I just finished my Snowflake China Cabinet.
The two specific blogs that inspired me to make this project are from Redanne and Nicole Wright. Anne on her blog "Redanne" made an Apothecary Cabinet using Eileen Hull's candy drawer dies for Halloween 2015 that is amazingly awesome. I just got the candy drawer dies on sale so I felt it was the right time to use them. Nicole Wright of Nicole Wright Designs made a shadow box ornament using Tim Holtz' Window and Window box die that is equally awesome. I have had that die for awhile, but haven't used it much. I started thinking that maybe I could make a china cabinet combining the two.
We actually had some snow here yesterday (which is it's own kind of magic for Upstate South Carolina) that had been predicted for at least a week. I was thinking about a project for a couple of online challenges and snow fits the theme for several of them.
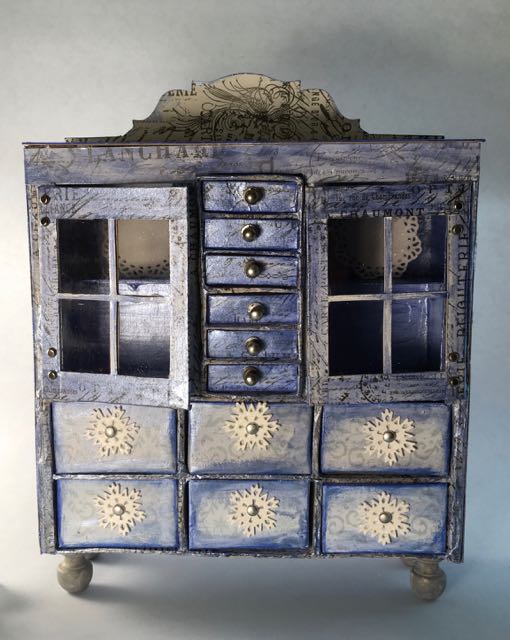
So here it is the Snowflake China Cabinet. I decided to use Tim Holtz Mini Snowflakes as the "china". I glued several pieces together, glittered them and stacked them inside the cabinet like your would store your good china. I made some bowls out of a Martha Stewart snowflake punch the same way.
My brother is a cabinet maker who would not have approved of the hodgepodge way I put the cabinet together. I basically built it section by section rather than by having a pre-conceived plan with perfectly fitting pieces just waiting to be glued together. I also neglected to take pictures as I went along because the plan was rather haphazard.
Candy Drawer base  First, I made the candy drawer base gluing 6 of them together and covering the seams between each drawer with Tim Holtz Sketchbook tissue tape. Then I made the middle drawer section for the top with the Sizzix movers and shapers large matchbox die. I made a box for them to fit in and glued them together. I also covered all the edges with the same tissue tape. The drawer fronts were covered with a blue scrapbook paper and edged with blueprint paint and a cornflower blue pearlescent paint. Each drawer has a glittered snowflake on it and adhered with a brad that was painted with the silver Ranger mixative for alcohol ink.
China Cabinet Doors
I made the doors on the cabinet by cutting out 4 windows and trimming the sides so that they would be straight. Then I glued 2 pieces together with a piece of acetate (leftover packaging from various dies) in the middle which was roughly the same size. The windows were also decorated with some tissue tape. My cabinet maker brother was actually impressed with my "glass" doors.
To install the doors, I adhered 2 sides to the cabinet (see how piecemeal it was constructed) and glued a cardstock flange to attached the doors to. I used 4 brads for each door. The flange moves with the door.
China Cabinet Shelf
Now with the sides on I could make a shelf for the china. I fold a piece of cardboard as a shelf support and glued it in the space between the sides and the middle drawers followed by gluing a shelf on.
Paint difficult spots before the back goes on
At this point I painted the inside of the visible section with gesso and then a light blue pearlescent paint - Martha Stewart cornflower blue. Cornflower blue is a favorite color of mine. I just love it.
Snowflake Stenciled Sides I stamped the sides with the Tim Holtz Papillon french script. I am learning, slowly, that the background needs to be in the background so I stamped it with a lighter ink - Ranger watering can archival ink. I wanted some snowflakes to show up on the sides so I used Ranger texture paste through the Tim Holtz snowflake layering stencil. The snowflakes don't really show up even though I painted them with glue and dusted them with glitter. Oh well, it's not a detail that is critical to the design. Like I said, I am slowly learning to keep the background in the background. It will take time.
This view shows the snowflakes very well, but without perfectly placed light, they don't show up well at all.
Cabinet Back and Top I cut the cabinet top out with the Sizzix on the edge Bracket die. It makes a lovely curve for the top of the cabinet. That piece also serves as the back of the piece. It was also stamped with the Papillon stamp. The part that is visible in the cabinet was lightly painted with the cornflower blue.

Glue it all together
All the makeshift pieces (sides, top, and the back) were glued on and I added some wooden feet that I found in my stash. To avoid exacerbating the seriously monochromatic color scheme that is going on, I painted them with distress hickory smoke paint.
My cabinet is a little wonky, a little distressed, but I am still very pleased with how it turned out. It's always fun doing something new and interesting.
Here are the challenges that I'd like to enter for this project:
Simon Says Stamp Monday Challenge Blog - Simon Says: Start Afresh - What is more appropriate than making something you've never made before using tools you've never used before and you have snow outside that makes everything fresh looking?
Simon Says Stamp Wednesday Challenge Blog - Simon Says: New Something - Again this project is perfect for new things - new dies, new stamps, new year, new techniques.
Creative Carte Blanche - Baby, It's Cold Outside - The snowflakes and the cool colors are appropriate for this challenge. I love the inspiration on their blog.
Stamps and Stencils - Swirls, Whirls and Flourishes - This blog is a mixed media blog which emphasizes stamping and stencils. I don't usually use stamps or stencils because I usually make little houses, but this time I used both techniques. I used a swirly stamp in several places and the bracket top I count as a flourish. So I think the Snowflake China cabinet fits.
Thank you for reading. I hope you are staying warm no matter what the weather. Take care.
Lucy

Vintagehandmade
Wow, what a breathtakingly beautiful make! Love the construction and the design! So inspirational and so fabulous! Thank you for joining us at Stamps and Stencils this month! Branka DT
Team Clark
Hi Lucy, I could have sworn I had already left you a comment on this amazing project! Hmmm... But I'm here again to say how much I love this! Thanks so much for sharing with us at Stamps & Stencils and biggest congrats on your SSS spotlight! Wow! That is an amazing honor! <3 Hugs, Autumn
Cheryl Grigsby
Lucy, this is A-MAZ-ING! I am dizzy with all your details, a feeling I love. Absolutely fantastic, I love that you've taken an entirely different take on Baby, It's Cold Outside. What a treat to view your art, thank you for sharing this on Creative Carte Blanche. (We love YOUR inspiration, too. <3)
Candy C
Lucy...this is absolutely precious! I LOVE making little miniature furniture out of pretty much scraps and you've done such an amazing job on this piece! I remember Anne's Halloween cabinet. You've really done her proud on this lovely little snowflake cabinet! Absolutely darling! I love all of the detail and what a cool, unique piece for our theme! Thanks for sharing your art with all of us at Creative Carte Blanche!
Paradise Lost
Wow! This is gorgeous, Lucy. The colours & stamping are superb.
Redanne
Apologies, I forgot to answer your question... no I don't get to CHA (sadly), my days of long haul flights are in the past! I hope you get to go one day though. Anne x
Redanne
Oh Lucy, I am speechless, firstly that I actually inspired you (since you are so incredibly talented!) and more importantly, that this beautiful creation was built by hand, it is stunning. I love that you think it is a bit wonky, it just gives it a more vintage feel. Really, this is totally fabulous!
I apologise for not visiting sooner but as you know we have been under the weather here - but you have cheered me up no end! Thanks too for the shout out!
Happy New Year Lucy, I look forward to seeing more of your wonderful creations this year! Anne xx
Lucy
Thank you all the compliments. I have had fun with this and will be making more cabinets. But no, it's not for doll house furniture. It's just an exploration of what you can do with cardboard.
jenn shurkus
wow!! this is an amazing project! you thought of every last detail 🙂 Thank you for playing along with us at simon says stamp wednesday challenge!!
Jo Ann Webb
This is beautiful! Of course, I love the color and the snowflakes! Is this the beginning of making doll house furniture?
Susan
Lucy, this snowflake cabinet is amazing! Love those cool colors and all the detail. I'm sure it took a while to put it together. Love the snowflakes as drawer pulls and on the sides of the cabinet. Very clever piece indeed! Thank you so much for joining us at Creative Carte Blanche!
Lynn Koeppen
So cool! Now you need to make a house and it can decorate the interior!
toni
Got to catch my breath! What a fantastic make! Such a wonderfully creative use of those dies and beautifully constructed. Very inspirational. Thankyou for sharing this beauty with us over at Stamps and Stencils. I hope Anne has seen this ! Toni xx
Catherine
Wow, Lucy! This is amazing. I love how you used those die to create something so out of the box on how they would typically be used. Pure genius! Thanks for joining us on the Simon Says Stamp Monday Challenge.
Cathie ♥