• Skip to primary navigation
  • Skip to main content
  • Skip to primary sidebar
  • Skip to footer
Paper Glitter Glue
  • Shop
  • Favorite Supplies
  • Tutorials
  • About
  • Contact Me
  • Free Library
menu icon
go to homepage
search icon
Homepage link
  • Shop
  • Favorite Supplies
  • Tutorials
  • About
  • Contact Me
  • Free Library
×
Home » Holiday » Easter » Easter Houses are FINISHED.

Easter Houses are FINISHED.

March 2, 2016 by Lucy Leave a Comment

Be sure to Pin to your Favorite Pinterest Board!

132 shares
  • Share

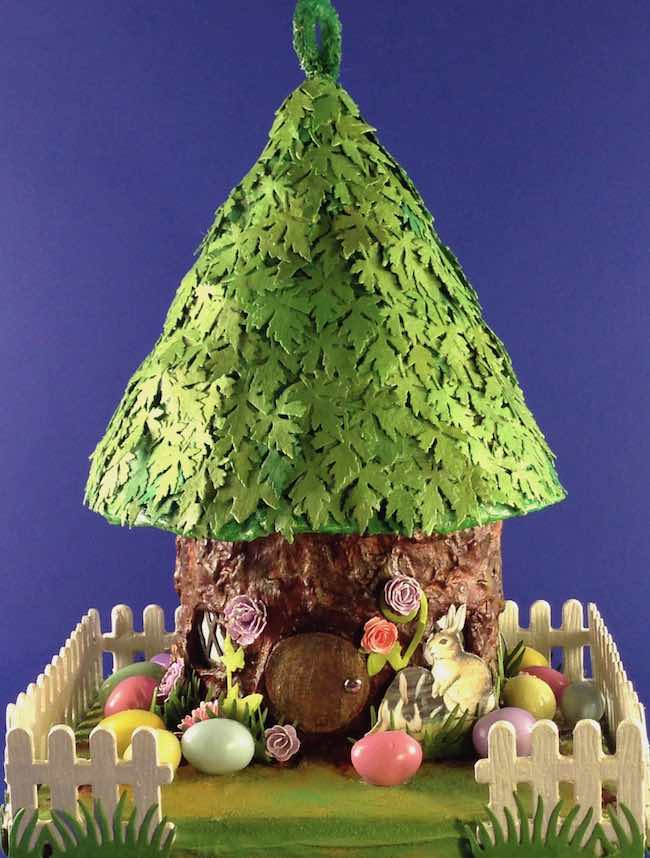
Finished these  Easter Houses with tree stump bases

Close up of Tree Stump Easter house

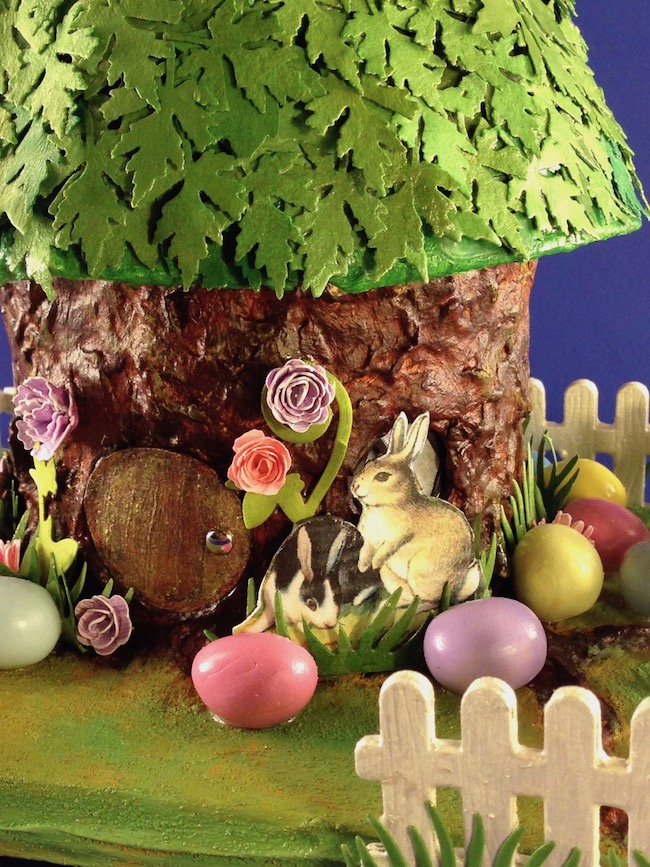
This is a close up of the Two Bunny Maple leaf Easter house. The other bunny is on the other side.

Easter Bunny Graphics

The 2 bunnies are from an Alpha Stamps digital download printed on regular paper then glued to cardstock and cut out. I bent them a little to curve around the base.

Grass and fence around the base of the Easter House

The grass is from a LaLa Land die and glued it around the base of the tree and fence. The fence is also a LaLa Land die. It is the easiest fence to die cut that I have found. I glued together 3 pieces of cardboard to make each section of the fence - that means there were a total of 50 pieces glued together to make the fences for the 4 little houses. I did not extend the fence all the way in the front because I wanted the bunnies and the eggs to be seen better.

Make Miniature Eggs for the Easter Houses

The eggs are Sculpey polymer clay eggs that I made and glued to the base. Just roll a ball of clay into a egg shape, then back according to the directions. Then I coated them with Sculpey glaze just to give them a little shine.

Now make flowers to decorate the base

The flowers are from a couple of dies - one from Impression Obsession and one from Tim Holtz' tattered florals. Make a lot of flowers to decorate Easter houses.

To make the card stock flowers sturdier, I coated them with Mod Podge. That's because I want these houses to last for years.

Here's a full view of the Two Bunny Easter House

Easter house with eggs and picket fence

Now the Brown Bunny Oak Leaf house below.

Below you see the bunny portrait within the house.


Bunny portraits in Easter house

Finally, here is the Drummer Bunny Oak Leaf house.

There is one more house done, but truthfully, it is drying in the oven. Sometimes to speed up the drying process, I turn on the oven for 5 minutes (ALWAYS with a timer) and then put the little house in there to dry after I turn off the oven. It is also an oak leaf house very similar to the ones above.

I always look at the houses for a few days before I deliver them. I may add a small section of grass to the front and maybe some flowers at the front corners where there is a little gap in the fence. Details, details. I think the kids will like their Easter houses no matter what - but a little extra embellishment can't hurt.

Thank you for stopping by.

« I WON!
Tim Tag March 2016 »

Be sure to Pin to your Favorite Pinterest Board!

132 shares
  • Share

Reader Interactions

Comments

    Leave a Reply Cancel reply

    Your email address will not be published. Required fields are marked *

  1. Lucy

    March 15, 2016 at 7:53 am

    Thank you for your kind comments.

    Reply
  2. Jo Ann Webb

    March 15, 2016 at 7:49 am

    I adore your Easter houses!!

    Reply
  3. Deb~Paxton Valley Folk Art

    March 02, 2016 at 11:14 pm

    Lucy, those are so adorable, what wonderful details! Love the Sculpey eggs and how the roofs can be removed, and did you decorate the inside as well? I think I see a little bunny 'portrait' in there! Thanks for visiting my blog, I'll answer your question here as you are 'no reply' and will also leave a reply on your comment at my blog in case you are looking there for an answer. For the frame I used 110 lb white cardstock, it goes through my printer fine (I have an Epson WorkForce 645 printer, it's several years old now). I then backed the frame with another piece of 65 lb black cardstock to give it even more substance. Between the two layers of card and the 140 lb. watercolour paper that the background was painted on, the picture is actually very sturdy. If the 110 lb. card won't go through your printer, you could layer up 3 pieces of 65 lb card and that should give lots of stability? Thanks so much for visiting me and for sharing these wonderful Easter houses! Deb xo

    Reply

Primary Sidebar

Lucy holding a small putz house

I'm Lucy - the paper architect behind the captivating tiny house designs at PaperGlitterGlue.com.

While I am often found covered in glue and cat hair and obsessing about the details of my projects, I love sharing my designs so anyone can craft seriously awesome paper crafts.

So look around and find something to MAKE.

You can read more about me here.

Want to make a beautiful Village Wreath?

You can do it step-by-step with my Alpine Village Wreath Workshop. Just let your creativity flow as create your own little village proudly displayed on a wreath. You'll create a heirloom that your family will treasure for years.

Wreath with alpine village houses and bottlebrush trees

And if you are a Halloween fan - you'll love my Halloween book! 13 Handcrafted Halloween Houses

This book contains 13 different Halloween designs with embellishments like crooked windows, fences, and shingles.

13 Handcrafted Halloween Houses book cover

What is a Putz House and How Do You Make One?

Halloween house putz house

Learn to make the best House Pop-Up Cards! with the Playful Pop-Up Houses book.

Cover for Playful Pop-Up Houses book

Footer

You are welcome to link to PaperGlitterGlue.com or use a single image with a brief description and a link back to any post. Do not republish any post. That's not allowed. But I do like it when you share my photos to Pinterest.

Amazon Associates Disclosure

Lucy Foxworth of PaperGlitterGlue.com is a participant in the Amazon Services LLC Associates Program, an affiliate advertising programs designed to provide a means for sites to earn advertising fees by advertising and linking to Amazon.com. So as an Amazon Associate I earn from qualifying purchases. Thank you.

Footer

↑ back to top

About

  • Privacy Policy
  • Disclaimer

Newsletter

  • Sign up with the form below for emails and updates.

Contact

  • Contact

As an Amazon Associate I earn from qualifying purchases.

Copyright © 2023 Paper Glitter Glue