I know it can be confusing to find files within a Password-protected library so I want to explain how to use the free library as clearly as possible. Here are the instructions on how to find any of the Paper Glitter Glue Paper Craft projects you want to make.
Steps to use the Paper Glitter Glue Library
- First, subscribe to my Paper Glitter Glue newsletter
- Second, get the password to the Paper Glitter Glue Library
- Click the link the main library page - About the Paper Glitter Glue Library page
- Click the CLICK HERE to get to the Password page
- Enter the password on the Password Page
- Now you are in the Paper Glitter Glue library - find the project you want to make
- Download the project in the format you need
- Unzip the files
- Share your projects when you make them
1. Subscribe to my Paper Glitter Glue library
First, subscribe to the Paper Glitter Glue newsletter to get the password to the library. Here's the form below if you haven't already subscribed. Type in your first name and your email address in the spaces provide.
2. Get the Password to the Paper Glitter Glue Library
When you subscribe, the password pops-up in a little box immediately after you subscribe.
In addition, at the bottom of all my emails, I include the password. So be sure to look for it at the bottom of each of my newsletter emails.
3. Click the link to the Main Library Page
To get to the main library page which is titled as "About the Library", click the library link. But where can you find the library link?
You can find the library link in several places:
- At the top of every single webpage, there is a library link to the main library page, the About the Library Page
- Within each blog post in the section "Download the pattern"
- In the newsletter email, I always include a library link
There is a Library link at the top of each page on the Paper Glitter Glue website
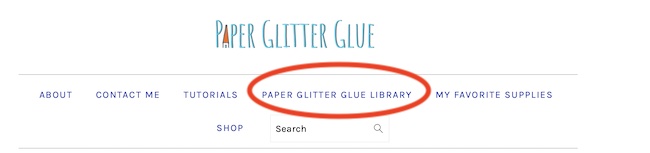
4. Click the CLICK HERE on the About the Paper Glitter Glue Library page to get to the Password page
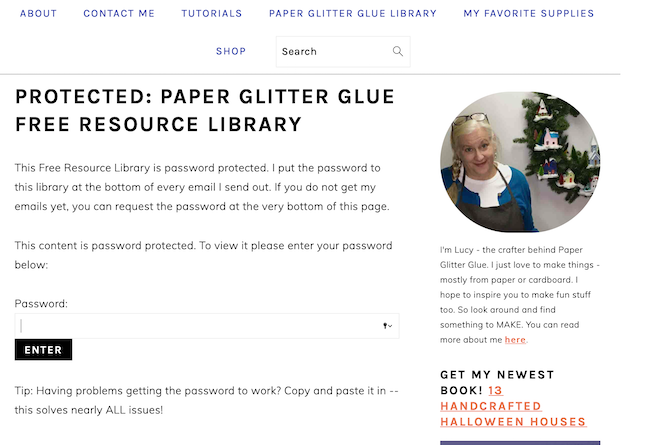
In the middle of the "About the Library Page" there is a big orange button that says "CLICK HERE". Click that link which takes you to the page where you enter the password. It looks like this photo.
P.S. Just remember, don't click the CLICK HERE on the photo below because it won't work. It's just a photo of the page.

5. Enter the password on the Password page
After you click the CLICK HERE button, you are taken to the Password page that looks like this. Remember that's just a photo below.
Enter the password that I've given you for the library and then click ENTER.
Remember that this is the password that I've given you. It's the key to getting into the library.
But if you don't have the password, simply subscribe to my newsletter and you will get the password right away.
And if you forgot the password, it's in EVERY SINGLE ONE of my emails. Just search your email box for paperglitterglue.com and you should find one of the emails.
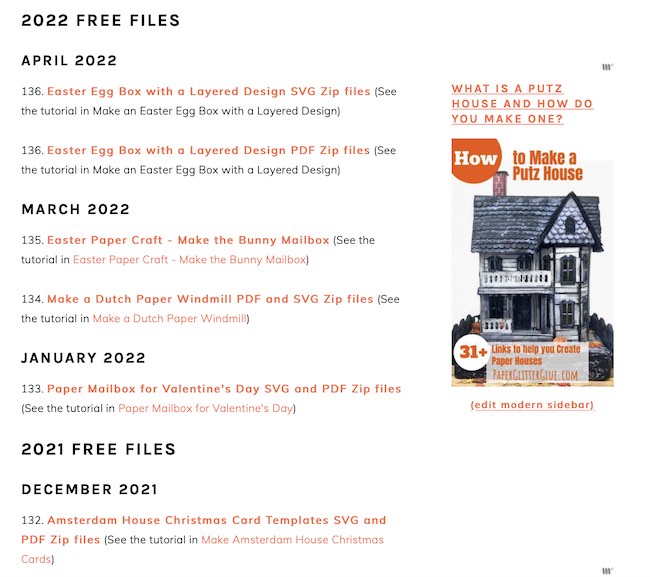
6. Now you are in the Paper Glitter Glue library - find the files you want
Once you are in the Paper Glitter Glue library, you will see all of my free files in chronological order. Each project is listed in the month and year when it was made.
They are also listed by number. So remember either the month and year for the project AND/OR the design number to find the file you want.
Here's how the library looks once you are in.

And there is one additional trick to help you find the file you want. Use the FIND function - CONTROL + F (for Windows) or COMMAND + F (Mac) to find the file if you forget the date or the design number. The find function works for ONE SPECIFIC WEBPAGE, not the entire site. It's a good thing to remember when you search any single webpage.
Note: The search bar at the top will NOT work to find the files when you are in the library.
The search bar at the top will not work because that searches the entire website, not just the specific page. So remember to use the FIND function (control + F or command + F on a Mac) to find a specific topic on a webpage.
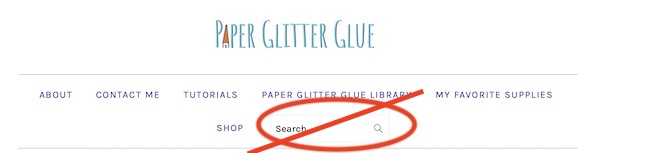
But the search bar does work if you are looking for something within the Paper Glitter Glue website ex. Halloween houses.
7. Download the project in the format you need
I make my files in two main zipped (zipped means compressed) formats:
- as Printable PDF (portable document format) files for printing
- as SVG (scalable vector graphics) cutting files
So if you cut your files by hand, you use the PDF files. If you cut your files using a cutting machine, then you need the SVG files.
Important - you can only open SVG files in a design program such as Cricut Design Space, Adobe Illustrator, Inkscape, Corel Draw, or Silhouette Design programs.
If you don't use the SVG files, just ignore them.
But if you do use SVG cut files, then remember to open them within a program that can read them.
8. Unzip your downloaded files
I know that this step can trip people up as well. If you are on a Windows-based machine here is how to unzip the file folders:
1. Go to the File Explorer. If you can't find it or haven't used it before, type in File Explorer on the taskbar search box. Then select it.
2. Open File Explorer and find the zipped folder.
3. If you want to open the entire folder, then right click Extract All and follow the instructions.
4. To unzip a single file or folder, double-click the zipped folder to open it. Then, drag or copy the item from the zipped folder to a new location.
After you have unzipped your folder, you will be able to use your files - that means you can print your PDF files or upload your SVG files to cutting machine program.
If you are on a Mac, the zipped files open up automatically. Some things are just easier on a Mac.
9. Finally, after you have made your project with my files, be sure to share them
I love to see what you make so if you make one of my projects, please share with me with my Facebook group or tag me on Instagram or email me at Lucy@paperglitterglue. It really makes my day.
Questions?
If you have any questions, please email me at [email protected].
Thank you for visiting.