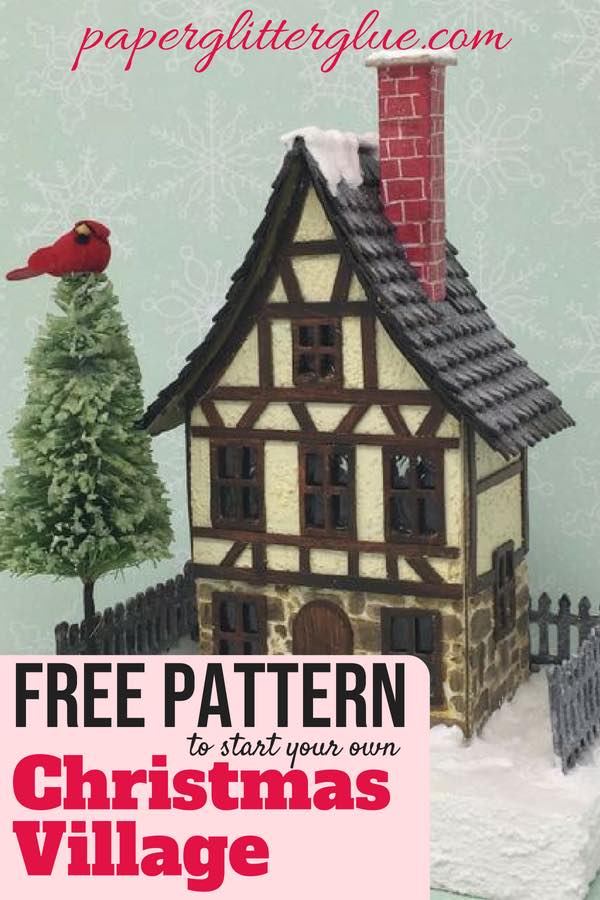
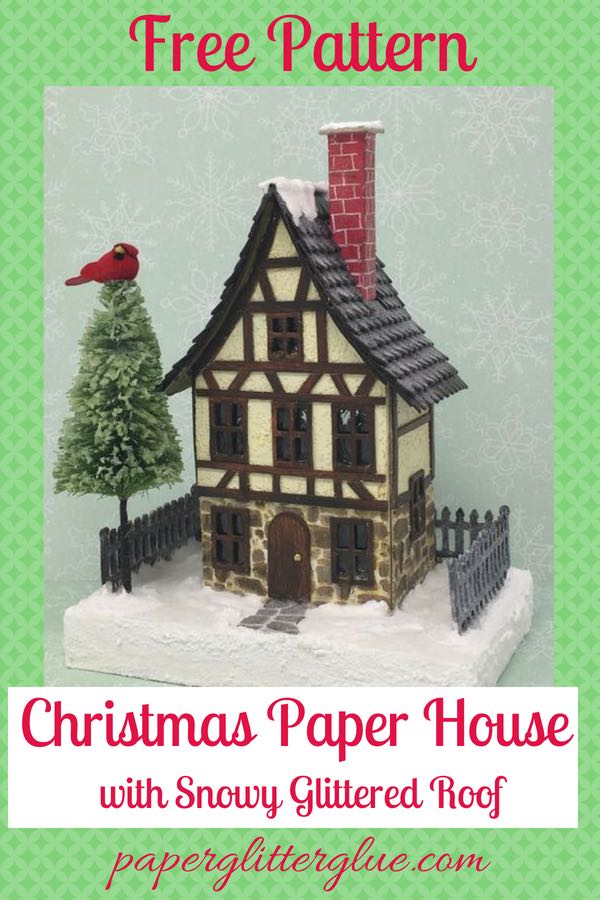
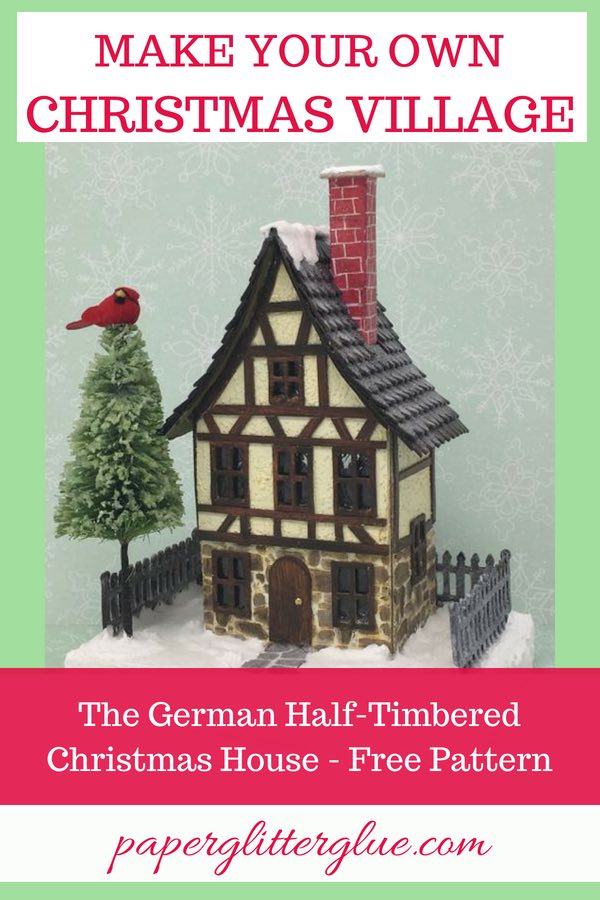
Make Your Own Christmas Village starting with this German Half-Timbered Paper House - the Christmas Village House
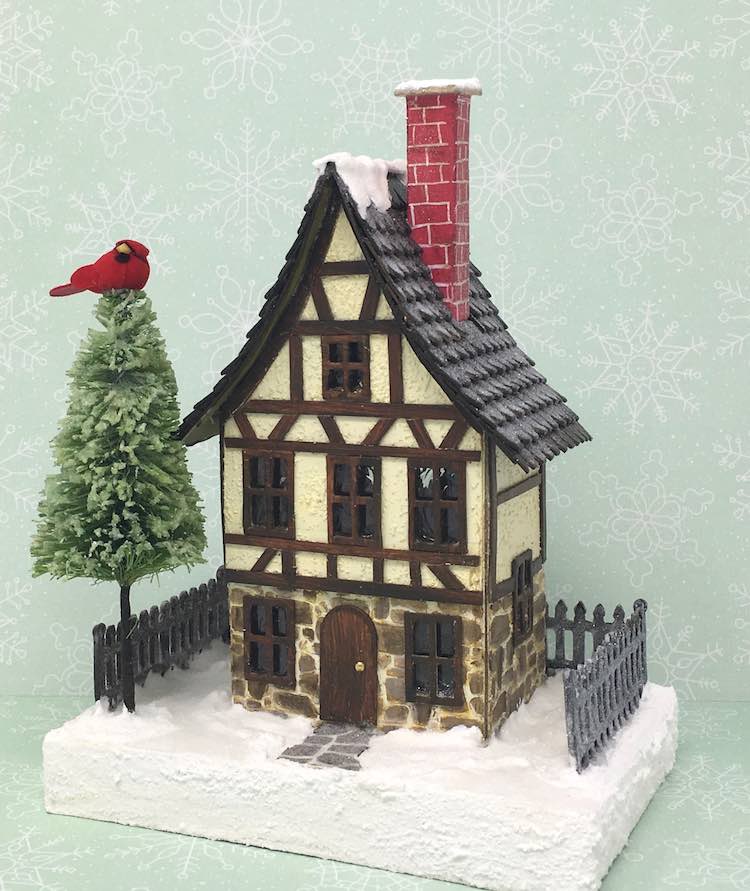
This cute little paper Christmas Village house is inspired by a beautiful architectural style from Germany called the Half-Timbered Houses. The German term to describe this construction style is "Fachwerk". While this construction method is found throughout the world including Tudor houses in England, Germany is probably most famous for its preservation of the half-timbered architectural style. In fact, there is a 3000 km tourist route called the German Timber-Frame Road (Deutsche Fachwerkstraße) which has numerous cities and towns with examples of these buildings. I look forward to visiting this area some day.
And why am I making a Christmas Village house at this time of year? I've been working with an exceptional student in the Pediatric Emergency Department who recently had a birthday. She was very complimentary about my little houses so I told her I would make her one. I asked if she would like a Christmas house or a Halloween House and she immediately answered, "A Christmas House." Her husband is working in Germany at this time so she asked for a German house. She liked my previous Tudor house which looks similar, so that's how a Christmas house inserted itself in the Halloween house season.
The pattern for this house is inspired by the Irish Cottage pattern, but with the added timber-framing and the stone work on the bottom of the house.
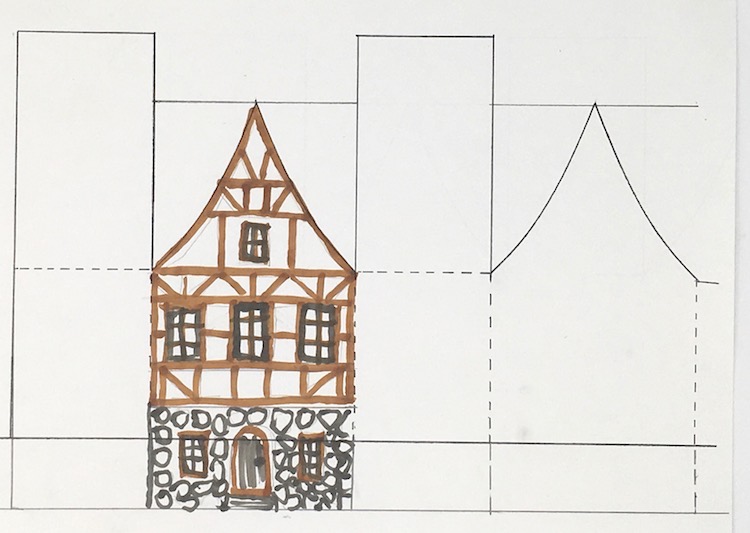
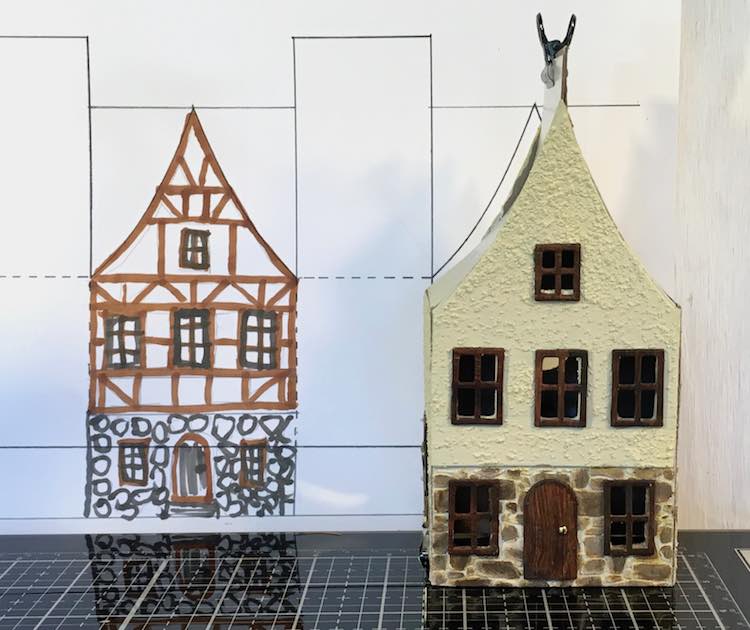
So I added one inch to give me enough room to decorate the house the way I planned. Here's the concept sketch for this German Half-Timbered House drawn over the Irish Cottage pattern.
So now there is a specific pattern for the Christmas Village house in both SVG and PDF formats. It even includes the wood trim for cutting out with an automatic cutting machine like a Cricut or Scan N' Cut or Silhouette.
Here are links to Information related to this tutorial:
- Irish Cottage House - St. Patrick's Day House
- Irish Stone Cottage - Paper House
- Tudor House which uses an almost the exact same pattern
- Stone Texture for your little house
- How to Cut Out Windows for Your Putz House
- How to Add Light to your little house - how to make the base for your house
This post contains some affiliate links for your convenience. Click here to read my full disclosure policy.
Materials to Make the Christmas Village House also called German Half-Timbered Paper House:
- Cardboard - free Christmas Village German Half-Timbered Paper House pattern
- Aleene’s Fast Grab Glue or similar PVA glue
- Gesso
- Paint colors of your choice
- Sand for texture if painting the house
- Texture paste or Grit paste for the stenciled stone surface on the lower level of the house
- Clear packaging for windows if desired
- Sunshine Yellow Alcohol Ink
- Glossy Accents
- Fence Die, if desired – Tim Holtz Village Bungalow
- Window Dies - Please note - these dies are no longer available. The updated pattern has windows included.
- Decorative elements such as bottle brush trees and glitter
Steps for Making Your Christmas Village Paper House - the German Half-Timbered Paper House - Design No. 5
Briefly, these are the steps in making this cardboard house:
- Copy the pattern for the German Half-Timbered House - Design No. 5 - onto cardboard, score the fold lines, cut out
- Cut out the window openings
- Or cut it out with your automatic cutting machine
- Prime and paint the house
- Follow instructions here to make the stenciled stone surface for the foundation
- Paint cardboard to look like wood for the trim
- Cut trim for windows, door and roof shakes or shingles
- Adhere windows and trim before you glue the house together
- Cut out roof, chimney and prime and paint
- Glue house together along tab in the back
- Glue roof to house
- Adhere the chimney to roof, then the wooden shake or shingles
- Make base, prime and paint
- Glue house to base and add embellishments
Easy when you take it one step at a time.
Download the pattern to make your German Half-Timbered House found in my resource library - Design No. 5
You can get the all my crafty news and the password for my resource library that has the pattern for this Christmas Village house and other free files by filling out the form below.
If cutting by hand, copy the pattern onto your cardboard, score and cut the pattern
If you are cut out your little houses by hand, the pattern itself is very simple – it is a basic gable house with a gently curved roofline. I generally make my patterns so they fit on an 8.5 x 11 piece of paper and cardboard which makes a nice-sized small house. You may shrink or enlarge your pattern to whatever size you want depending on your sources of paper and size of cardboard.
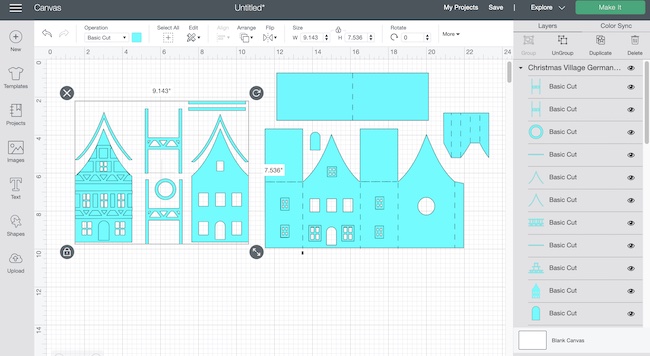
If you are using an automatic cutting machine like a Cricut, Silhouette or a Scan N'Cut then upload the pattern to your design software and be sure to specify which lines are cut line and which lines are score lines.
On the house itself, all the lines really are score lines. So be sure to mark them as score lines and attach to house itself in your design program. This photo shows the score lines on the main body of the house in Cricut's Design Space.
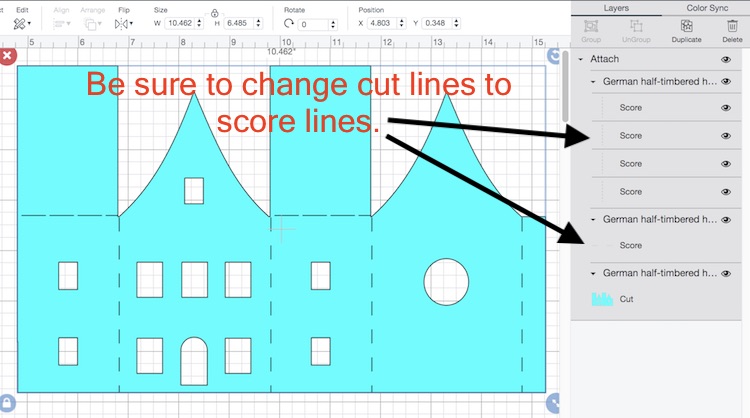
Here is the design no. 5 in the Paper Glitter Glue library.

Also, I grouped the trim and support pieces that you see on the left side of the photo. That way, with one click on the little eye icon in the Layers panel you can hide them when you are cutting out the main structure of the Christmas Village house itself. I do hope this helps you.
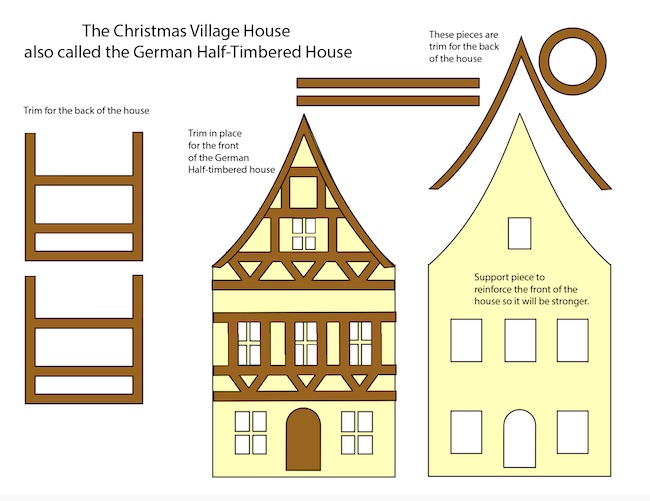
I did not draw the windows on the initial house pattern so you could decide exactly where you want the windows placed. The sketch pretty much shows where the windows should be for this design.
But on the updated version especially for those of you using cut files, there are window frames on the extra front piece and window frames.
I always prime my houses with gesso (gesso is a white paint primer which prepares your cardboard to hold onto paint better). For this German Half-Timbered house, I mixed the gesso with a little sand to give it more texture on the top part of the house.
You can follow the tutorial linked above to make the stone surface on the foundation of the little house. Here's the stencil taped in place which also masks off the areas you don't want stenciled. Each side is done separately. The texture paste dries pretty quickly.

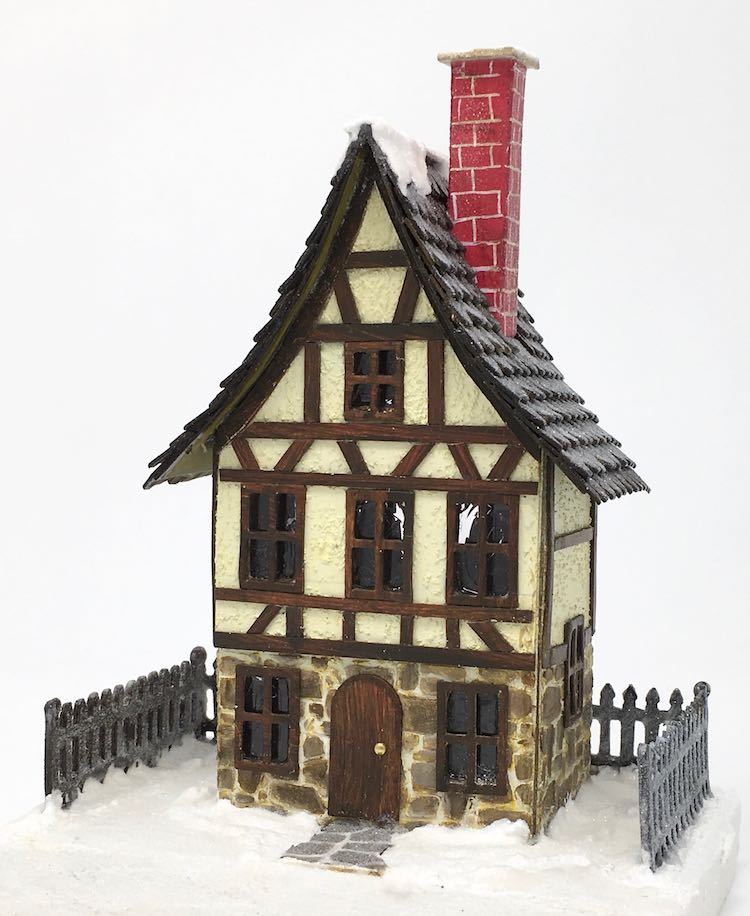
After stenciling the foundation stones, paint the entire house the background color - the color you want for the mortar between the stones and for the plastered part of the house between the wood timber trim. I used Antique Linen Distress paint with just a little extra Fossilized Amber mixed in.
Paint the stone foundation with layers of color to mimic the look of stone. The lighting in the photo below makes the siding look much lighter than it is, but you can see the texture and layers of paint on the stenciled stone.

To make the trim look like wood, I generally layer different shades of paint to simulate the graining in wood. First I use a yellow paint like Fossilized Amber or an ochre color, then a red or lighter brown - Fired Brick, in this case, followed by the darkest color - Ground Espresso or something like burnt umber. I paint an entire sheet of cardboard this way so I have plenty of material for the trim. I also used the same colors for the shakes on the roof.
Most of the trim consists of thin strips of painted cardboard cut with my guillotine cutter. That's the best way to make consistently thin strips if you don't have an automatic cutter like a Cricut, Silhouette, or Brother's Scan N Cut.. You don't need many strips - maybe 7 strips cut about ⅛ inch wide and 11 inches long. To make the arched trim in the front and back I traced the outline of the house and cut out a thin piece.
If you want your windows to look like they have glass in the panes, cut small sections of clear acetate packaging to function as windows. You can color the window glass with alcohol inks to give them a nice shade. I adhere the windows on the inside of the house with a thick transparent glue from Ranger Ink called Glossy Accents. Often I put a thick layer on the entire window so the windows look like wavy glass.
It is easier to adhere windows to the house before you glue the house together. It's not absolutely necessary, but I think it's easier if you do at this point.
When I remember, I try to paint the inside edge of windows the same color as the window frame.
In addition, it is MUCH easier to glue the trim on before you glue the house together. You can fit the trim exactly this way and apply more pressure on the glue. The trim on the arch was trimmed after gluing.
Here's how the trim looks in the back on the finished Christmas house. I didn't make it as elaborate on the backside.

The roof pattern is a little large on purpose. Cut it out and see how it fits, then you can trim the edges if you think they overhang too much. Oh, and before you glue it to the house, paint the underside of the overhang. It looks much better painted a matching color rather than raw cardboard.
The chimney piece is a little bit fiddly. Notice that the chimney has 5 sides one of which is the glue tab. You can cut that one side a little smaller than the other so it won't make that side stick out more than the other. I usually draw the mortar lines on the chimney with a white gel pen. You can draw them on before or after you glue the sides together. Mostly I draw the lines after it has been glued. I perch the little chimney on the end of one of my fingers and draw away. It's kind of fun - kind of like a chimney puppet.
The little tab on the right side of the pattern is the glue tab. Apply a thick layer of glue and let it get just a little tacky and then adhere the back and side together.
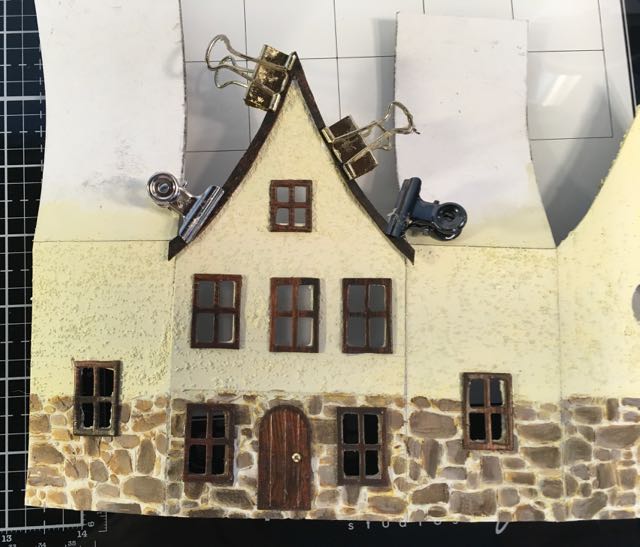
Binder clips are a great help in holding the glued sides together. You can use one of those brands of painter's tape that doesn't pull off your paint if you have already applied paint to the little house. For this particular house I just held the top of the glued side for a few minutes while the glue was drying.
Speaking of roof flaps - what is the purpose of those things anyway? They function as the under roof and give support to the front and the back of the house so it holds its shape better.
Curve the roof flaps gently to match the curve of the roof. Clip together and glue the tops together. The easiest way to glue these in place is to put a line of glue where they meet at the top. Apply the binder clip to hold them together. Let dry. When dry, cut off the excess cardboard if needed, then glue the edge of the roof flaps to the each gable. Now these roof flaps provide good support for the gables.
See the binder clip below. The updated pattern has shorter roof flaps that you probably won't have to trim.

Be sure the previous pieces you have glued are dry before you glue on the roof. If you use the Aleene's Fast Grab or Quick Dry glue you do not have to wait nearly as long because these glues are pretty thick. Score the middle of the roof piece and fold it at the scored line. Then gently curve each side to mimic the curve of the roofline. Draw a bead of glue on the gable edges and the base of the roof flaps. You don't want the glue smooshing out too much, especially if you have already painted your house. Just dab it with a paper towel or a Q-tip to remove the excess glue.
Center the roof over the house (equal overhangs on each side, front and back). Painter's tape might come in handy here, but normally I hold the roof in place until I am sure it has adhered. Keep watching to make sure you haven't made the roof slide forward or backward too much.

Next step is putting the chimney in place. The curve of the chimney matches the lower part of the house. But really you can slide it up or down or along either side until you like the way it fits. If there is a gap at the bottom of the chimney, you can cover it up with the shingles. I use lots of glue for the chimney because it takes a little while to get it to hold on a slant and again the shingles will cover up any glue blobs. You can cut the chimney so it's not so tall if you want. For this house I cut off about ½ inch.
Apply shingles to your roof. I wrote about applying the shakes to the roof of the St. Patrick's Day and the Tudor house if that is the type of roof you would like on your house. This German Half-Timbered House has shingles made from Tim Holtz Village rooftops die. But you could easily cut strips of cardboard to easily mimic these shingles.
I make my bases out of corrugated cardboard. I use a hot glue gun to glue the layers of corrugated cardboard together. Then I cover the cardboard with paper and paint.
Since this version is a Christmas house, the base is white with Snow-tex on top then glittered.
Apply a thick bead of glue to the base of your little house, center it over the base and glue it down. I apply a little pressure at first, but I don't have to hold it long.
When I first started making houses, this was the funnest part - decorating the house. Now I enjoy the whole process, but it is still exciting to see the whole project come together. Use whatever embellishments you have on hand to decorate your little house. And have fun in the process.
Here is the link to the bottle brush tree tutorial that I made for this project.

Let me know how your house-making project goes. If you need any additional help, feel free to leave a comment or email me at [email protected].
Choose a pin and pin to your favorite Christmas Pinterest Board so you can remember where you found the pattern for the German Half-Timbered House - the paper version!

Elias
Lindo trabalho! Parabéns!
Como posso conseguir o arquivo?
Lucy
Assine o boletim informativo Paper Glitter Glue.
Você receberá a senha imediatamente para ter acesso à biblioteca gratuita do Paper Glitter Glue.
English - Subscribe to the Paper Glitter Glue newsletter.
You will get the password right away so you can get access to the free Paper Glitter Glue library.
Dena L Donaldson
I am enjoying this so much. I had to take a trip for my husbands work and couldn't take my houses with me. So when I found your site I decided to do smaller versions and these are perfect. Thank you
Lucy
Thank you so much, Dena. That makes me really happy. I am so glad you like my little houses.
Lucy
Suzanne
Love your houses! Thanks for keeping me busy during these troubled times
Lucy
Thank you so much, Suzanne. It really is a good time to exercise our creative side, isn't it?
Lynn
Oh, I love this house! The chimney is great! The roof really fits the character of the house! I think you need a whole village of these houses set in the Alps with some skiers outside!
Howard Lamey
Lucy...this is yet another outstanding little house project!...possibly your best ever!...excellent photography, too!
Howard