Lessons Learned?
What are some of the lessons learned with the Spring Mansion, the putz prototype house?
Many things such as:
- How to make a tower to fit around a hipped roof
- How to draw a steeple pattern accurately with a compass
- How to make a second story porch or rather how NOT to make a second story porch
- How to cut small dowels to length
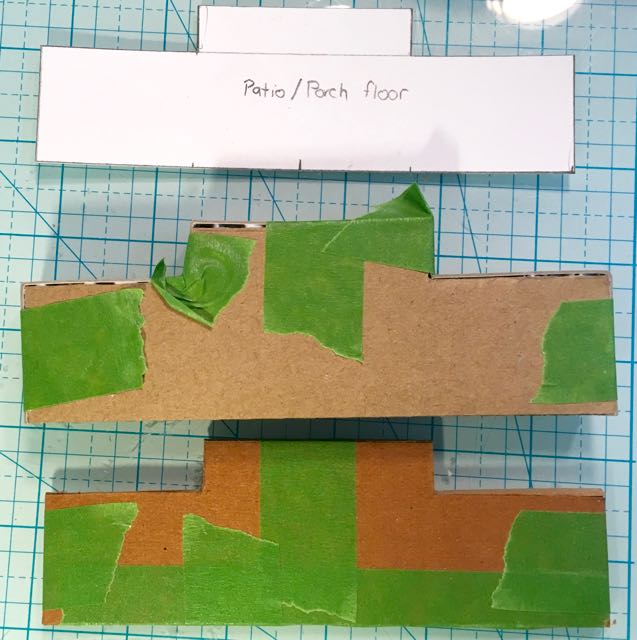
- How to make a solid porch floor that won't sink in
- How to make folded cardboard stairs
- How to make porch railings
- And most important, I learned do the hard things first.
DO THE HARD THINGS FIRST
Most of these lessons I learned are really are what not to do. I listed the most important last. If you have challenging details for a project do them FIRST when you are the freshest on your project, before you get really bogged down in some detail. I knew that the porches would be the most challenging part of the house for me so that is what I worked on first for the final real edition of the Wilkins House.
Wilkins House Porch Floor Pattern and Pieces
HOW TO MAKE A TOWER TO FIT A HIPPED ROOF
This took me awhile to figure out. I couldn't get the angle right because it wasn't what I thought it was. Finally I had to just measure against the roof to get the appropriate angle. That method always works. It's not based on geometry skills, but it works.
HOW TO MAKE A STEEPLE PATTERN
 |
| I am so happy about how nicely my steeples work out now. I'm not afraid to make them anymore. |
HOW TO MAKE A SECOND STORY PORCH
I made the second story porch on the Spring Mansion with just one thin layer of cardboard which was not sufficient. It looked flimsy and was wavy and did not support the visual weight of the porch railing. I glued an additional layer of cardboard which helped but didn't completely solve the problem. Next time on the real Wilkins Putz House? I've glued 2 pieces of heavy duty cardboard together for the second story porch floor. The heavy duty cardboard was the backing board from a watercolor paper pad - very substantial cardboard.
HOW TO CUT DOWELS TO LENGTH
Lesson number 4 was learning to cut small dowels to length. On my Halloween houses, the dowels can be wonky and it doesn't matter, but if you are trying to make a pretty house the dowels need to be the same length and the porch supported by the dowels needs to be level. That didn't happen on the Spring Mansion. I had been cutting the dowels with my garden clippers but that doesn't leave a smooth end. Now I cut them with a dremel tool and then sand the edge to make a nice flat end.
 |
| You can see the messy edge on the dowels. I just cut them to see how they would fit in the porch floor after I drilled holes. They fit nicely and will be very strong. I was going to push them through the top porch piece but I don't think that will be necessary. I think everything is going to be sturdy enough without that extra fiddly work. The final cut will be done with the dremel tool. |
HOW TO MAKE A SOLID PORCH FLOOR
Part of the problem with the dowels was related to lesson number 5 - how to make a solid porch floor. I made the porch floor from folded cardboard which means that it flexed so the height at one end of the porch was different from the other end. This time I made it with layers of corrugated cardboard covered with thinner cardboard. I drilled holes the size of the dowels to make sure they are well anchored on the floor.
 |
| Porch floor made of about 5 layers of corrugated cardboard. I added another thinner, smoother layer of cardboard on top. I used painter's tape to hold all the layers together while the glue dries. |
HOW TO MAKE FOLDED CARDBOARD STAIRS
 |
| Cardboard prototype for stairs on the Spring Mansion.
|
 |
| Stairs on the Spring Mansion - too wonky with seams visible on the front. |
HOW TO MAKE PORCH RAILINGS
Porch railings are not really hard; they just take time. For the Wilkins house I measured out ⅝ of an inch and glued the railings onto the balusters so that the entire piece was ⅝" high. Much, much nicer and it will be so much nicer to work with when I put the railings on the house.
 |
| Porch railings measured to ⅝ inch. They aren't perfect but they are close and will look so much better than the crooked railings on the Spring Mansion |
Those are major lessons that I can think of right now. There are probably other subtle things I learned that I'm not even aware of.
Thank you for stopping by my blog. I hope you have a happy creative day today.
Lucy
Laney, thank you. The skills required on this project are actually beyond my normal skill set. I hope everything won't look funny when I finish with it. Things are going together pretty well though. Thank you as always for reading and commenting on my blog.
Laney
What an interesting post! Each project adds to your arsenal of techniques and isn't it fun to figure all these things out and see your skills progress?! Loving following this project.
ßeulah ßee
I'm visiting today after you left a lovely comment for me on the Tim Holtz/Creativation blog hop (thank you). You, my dear, are the only one who noticed the blog title. But that should be no surprise as you are a master of details, case-in-point, your "lessons learned." You really have been on quite a journey with your constructions and I enjoyed stopping by to see your latest project. As a side note, I recently had to figure out a way to make an oval in a certain size. I found a you-tube video from a guy that makes commercial signage, followed his directions and, voila! It worked. Never stop learning is our shared motto...