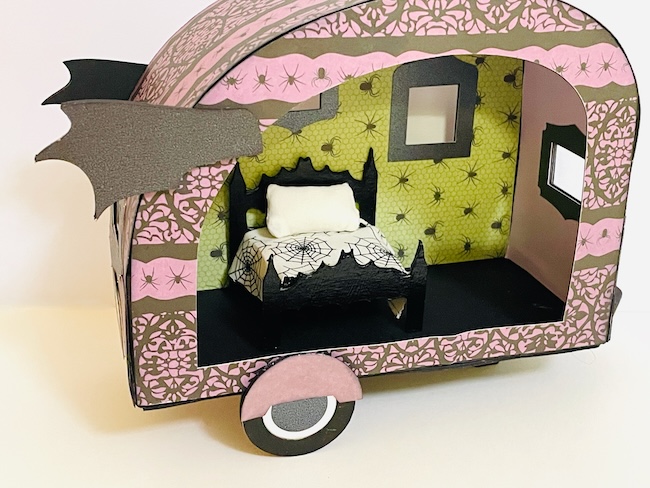
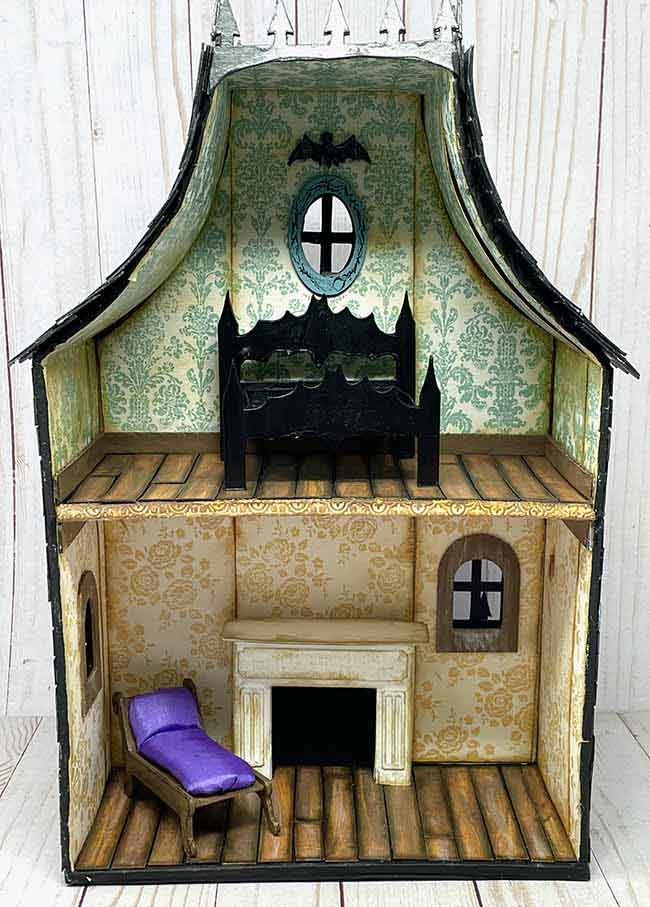
A Miniature Bat Wing Bed? Yes, I need it for my Halloween Decor. For example, my Halloween camper, the Boo-Mobile requires a bed so here is the Bat Wing bed. I've designed it in 2 sizes for you. One larger size for a bigger dollhouse and a smaller one to fit the camper.
This little Bat Wing Bed is extremely easy to make for Halloween. Kids will love it, too!
If you haven't already, subscribe to get my newsletter where I share my latest crafty news. You will get the password to the free Paper Glitter Glue library right away.
Sonya made these beds and had her Cricut cuties test them out.

MATERIALS TO MAKE THE BAT WING BED
- Free Design file no. 193 from the Paper Glitter Glue library
- Cardboard (my favorite) or cardstock - heavier cardstock like 110# cardstock works best.
- Paint if using cardboard
- Glue - Bearly Art Glue is my favorite for cardstock
- Aleene's Quick Dry Tacky Glue is my favorite for cardboard
- Binder clips to hold down the tiny tabs while the glue is drying
Here are the easy steps to make the Bat Wing Halloween Bed
Download the pattern for the Bat Wing Bed - Design No. 193 in the Paper Glitter Glue library
First, download the pattern from the free library. It is Design No. 193 in the library.
The pattern is available as an SVG zip file. The bed comes in two sizes - one to fit a small dollhouse or the Halloween camper and the other to fit larger dollhouses
If you need help unzipping the folder so you can see the files, see these instructions:
- Here's how to unzip a folder using an iPad or iPhone.
- To learn how to unzip a folder using a Windows computer, click here.
- To learn how to unzip a folder with an Android device, click here.
- To learn how to unzip a folder using a Mac, click here.
Cut out the pieces for the Halloween bed
For this project, I am using my Cricut Maker to cut out all the pieces for the Bat Wing bed. You can use either cardboard or cardstock. If you use cardstock, try to use a heavier weight of cardstock like 110# cardstock.
Here's how the pattern appears as it is first uploaded into Cricut Design Space.

Choose the size bed that you would like to make.
Be sure to select the pieces with score lines, change them to score, and attach the score lines to the piece it is grouped with.

Below are the main cardboard pieces for the bed.

Make the Headboard and the Footboard for the Bat Wing Bed
First, glue two or three layers of the headboard and footboard cutouts together. These pieces need to be strong to support the bed.
Make the "Mattress" for the Bed
Fold along all the score lines of the "mattress" box of the bed.
Glue the tabs together to make a shallow box as the Bat Wing Bed mattress. Binder clips are very helpful in holding the tabs in place.

Adhere the Mattress Box to the Headboard and Footboard
Next, apply glue to one side of the mattress to adhere it to the headboard. Line up the bottom of the mattress box with the bottom cross piece of the headboard
Line up the footboard so that the mattress is flat - unless you have reflux, then you can elevate the head of the mattress.
Fold the rectangular support strip in half and glue it underneath the mattress to prevent the mattress from splaying outward.
Make a tiny pillow and coverlet for your Bat Wing Bed
I sewed a tiny pillow and coverlet for the bed, but I don't think you need a pattern for that.

If you have any questions, I am always happy to help. Email me - [email protected].
Thank you for visiting.
Leave a Reply