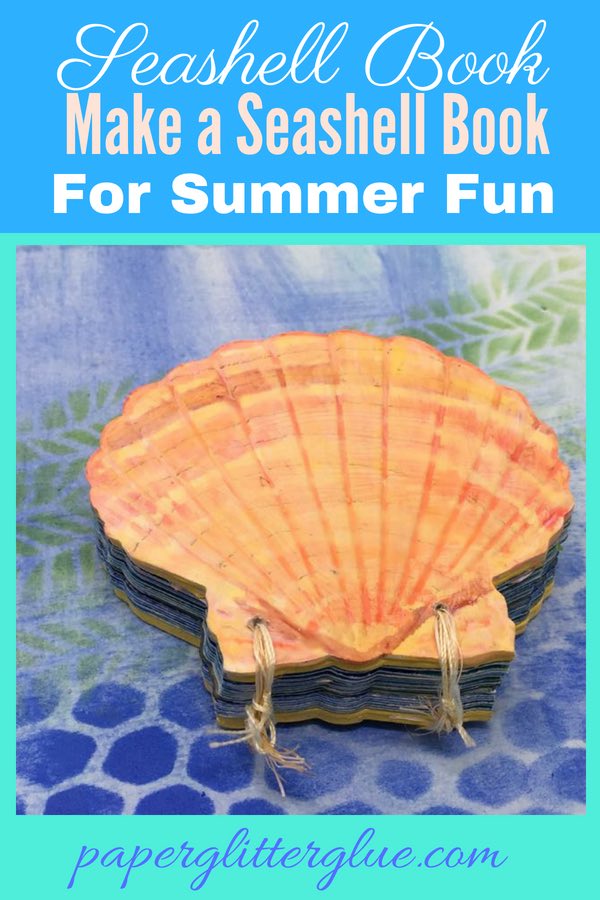
A popular pin on Pinterest inspired this idea to use the new Tim Holtz Seashell die as a Seashell Book. It's perfect for making a little book of seashells. It also fits in with two craft challenges this week which are based on a song. My song for this little book is "Beyond the Sea" a Jazz tune popularized by Bobby Darin in 1959.
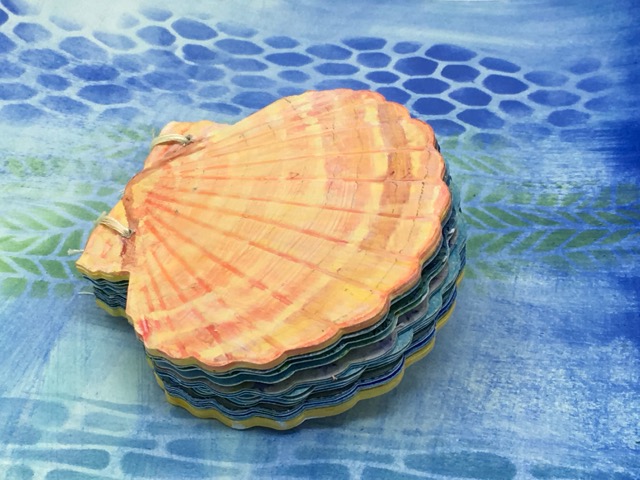
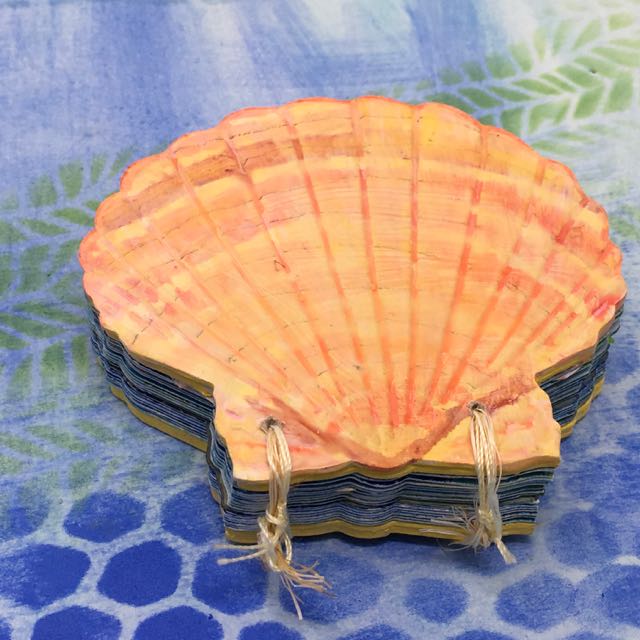
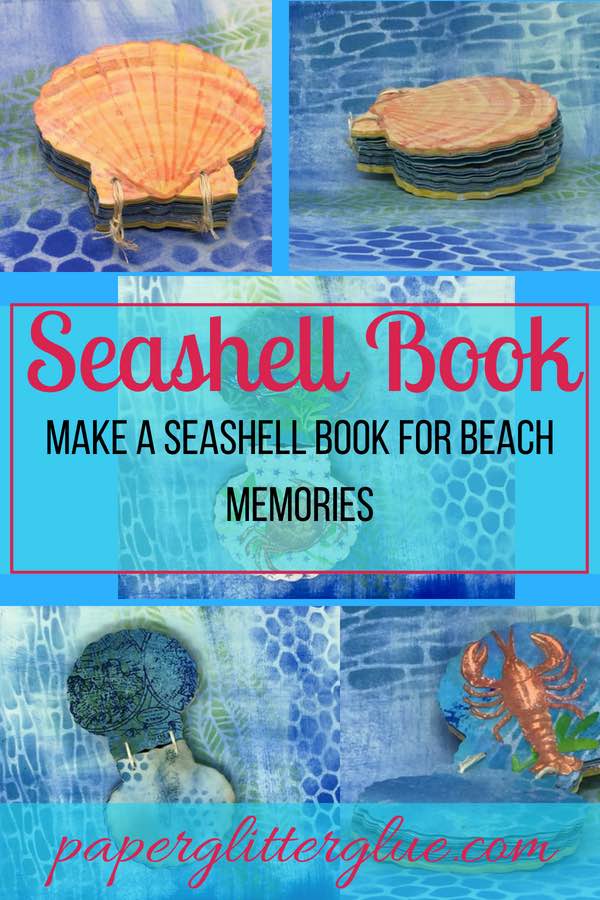
Seashell Book made from a Tim Holtz Seashell Die.
Compared to making my little paper or cardboard houses, this project is very quick. Here are the instructions on making a Seashell Book:
Materials:
- Seashell Die and texture fade
- Cardboard
- Paint, Distress Inks
- Heavy watercolor paper
- Stencils
- Sea Life stamps
- Mini-clamps
- Drill with a small bit
- Needle and Thread
Outline of Steps to make the Seashell Book
- Cut out cardboard in the shape of the seashell
- Emboss the shell shape on the top layer of the shell
- Glue cardboard layers for the seashell covers
- Paint the sea shell
- Apply color to watercolor paper
- Stencil watercolor paper
- Cut out pages of the seashell book
- Decorate pages with sea life stamps
- Assemble book, clamp together
- Drill holes for the binding
- Sew binding
Cut out cardboard in the shape of the seashell
Use the Seashell die to cut out 6 layers of lightweight cardboard for the front and back covers of the book.
Emboss the shell shape on the top layer of the shell
Emboss one layer to form the cover of the book. You can emboss one layer for the back cover as well, but I figured it's not going to show so I only embossed the top layer.
Three layers of cardboard adhered together form each cover of the Seashell book. It needs a little touch-up on the bottom cover.
Glue cardboard layers for the seashell covers
Glue 3 layers together to form sturdy front and back covers for your little book.
Paint the sea shell
Paint with primer. When dry, paint in the colors you choose. When it comes to botanical or zoological specimens, I take a literal approach. I usually do a quick search of the subject and try to mimic the colors in nature. For this particular shell, I learned some interesting facts. This shell has that squared off edges called wings or auricles which are found on scallop shells. These wings are enlarged on scallops because unlike most mollusks, scallops are free-living. They don't attach themselves to objects. They actually swim. Interesting to my mind, anyway. For the purposes of our little book, the wings on the shell are a perfect place to drill holes for the book binding.
The colors used on this shell are from watered down Worn Lipstick Distress Oxide ink with Fossilized Amber Distress Paint mixed with white gesso.
Painted cover of the Seashell Book.
Apply color to watercolor paper
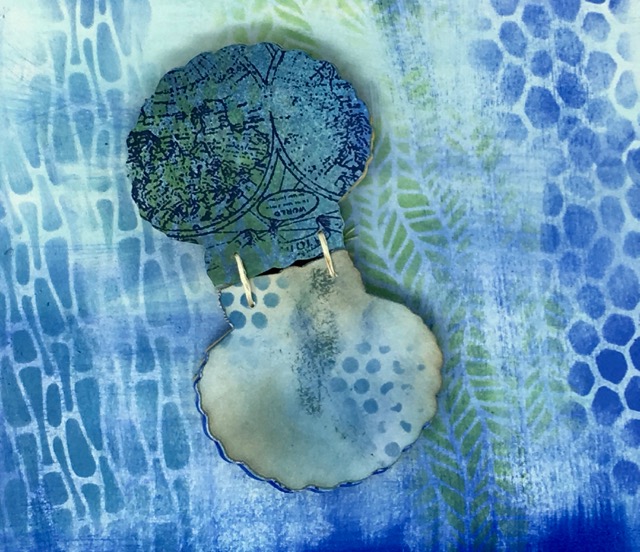
Color the pages of the Seashell book with various colors of inks and paints in sea colors - blues and greens and turquoise.
Stencil watercolor paper
Using stencils that mimic waves or sea kelp or netting or really any cool background design, stencil patterns on the watercolor paper for your book pages. I used Distress Oxides because I think these colors are so perfect for the sea.
Cut out pages of the seashell book
Decide how many pages you want in your little book. Cut out a few extra pages so you can experiment with designs and in case you mess up when you are decorating the pages.
Decorate your pages with sea life stamps
Stamp your different sea life stamps on plain paper or tissue paper, color with Distress inks and a water brush or paint. Plan how you want the book to open, what you want to be the top and bottom or left and right. Lay out your stamped pieces to test out the pages. I had to move some lobsters and crabs around so I wouldn't have 2 lobster pages facing each other. Cut out the shapes adhere to shell pages.

Various stamps and greenery form the undersea life on the Seashell book
Empty pages for the Seashell book to add photos later
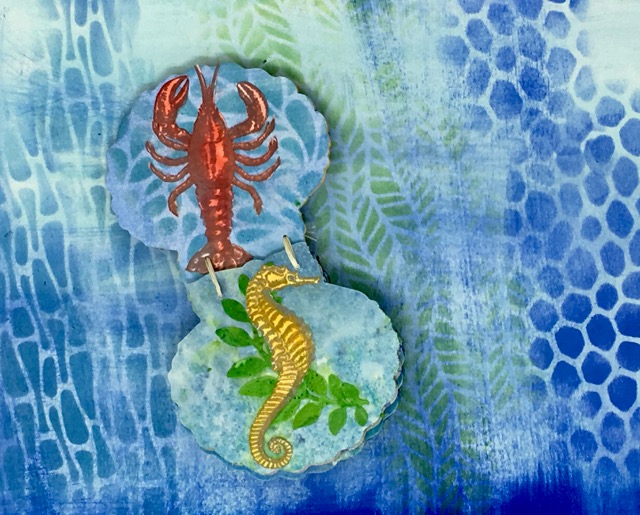
Lobster and Seahorse pages for the little Seashell Book
Assemble the book pages and covers together and clamp
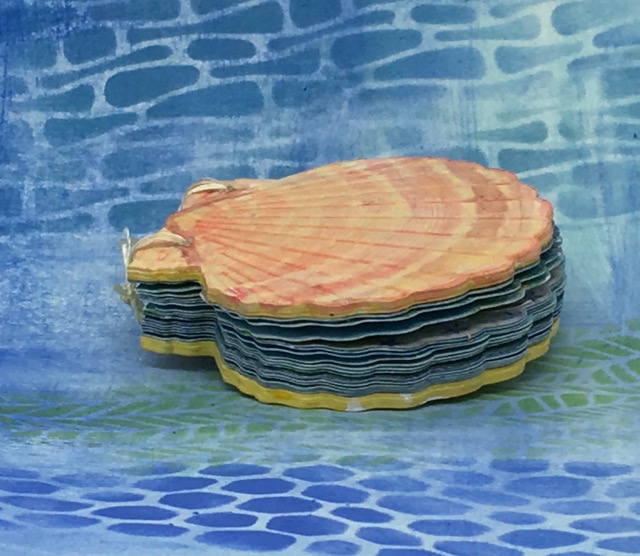
Put all the arranged pages together in order and add the front and back covers. Play around with the pages so that all the scallops line up together. This is one of the most appealing aspects of the little book - the nicely arranged scallops. Cut 2 extra pieces of cardboard in the scallop seashell shape. These pieces are sacrificial pieces. In other words, when you drill the holes for binding, these pieces are the ones you mark on and if the clamps make any marks, they make marks on your extra cardboard, not on the painted covers themselves.
Clamp the Seashell book together. I used some mini quick clamps from a home improvement store. I think this is an important step to maintain the alignment of the scalloped pages.

Demonstration of how the pages and covers are clamped together to drill for the book binding holes. The holes had already been drilled and the book bound together before I took this photo. I wanted to show you two things - how firmly the book is held together and show you the sacrificial pieces of cardboard to protect the real front and back book covers.
Drill Holes for the Binding
After clamping the book together I drilled a small hole all the way through the book with enough room for threading the binding through with a big needle.
Why a drill instead of punching holes in all the pages? With clamps, a drill and a small drill bit I could ensure that the pages stay lined up. Had I used a hole punch, the holes would have been larger which would allow more movement at the binding. Also only a few pages could be punched at a time making it more likely that measurement error would creep in and the pages wouldn't have lined up so nicely. So I recommend a drill, but you can make this little book punching a few pages at a time, but if you use a hole punch, punch the cover cardboard pieces individually first to line everything up accurately.
Bind the book together
You can read tutorial after tutorial on incredible techniques for binding handmade books together. My goal with the Seashell book is to make a quick project so I did not do any of the fancy binding. The simple method is to thread a needle with 2-3 lengths of thread and sew through the holes 2-3 times. Be sure to leave enough room for the book to open before you tie off the thread. Test it 1-2 times before you cut the thread. I just tied several square knots and left a little extra thread to make sure the knots hold well.
The little book opens and closes easily.
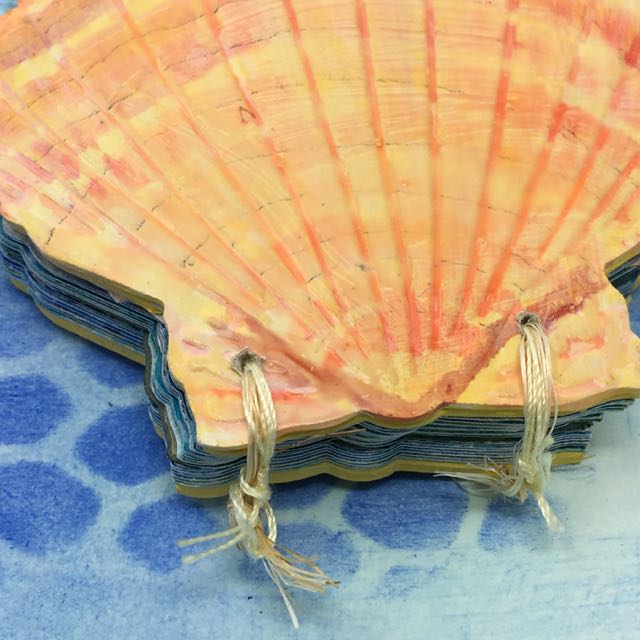
I used several strands of regular thread for the binding of the book. You could use yarn or sisal rope or thicker thread if you drill a thicker hole
It's always fun to finish a quick project like this. There are several online challenges that I would like to share my little book with.
First I would like to share it with the Frilly and Funkie Challenge "Surf's Up". Stop by their website and see the wonderful projects they have listed there.
Since the little book is designed to go along with the song "Beyond the Sea", I'd like to enter it in the A Vintage Journey Challenge for this month "Words and Music". Great design team projects here. Be sure to visit that page.
There is a really cool challenge called the Mini Album Makers Challenge which I have never entered before because I never have made a little album before. So I would like the enter this little book in their challenge. Some of my very favorite paper crafters are on this design team.
And finally, Simon Says Stamp Monday Challenge this week is "Inspired by a Song". So once again the Seashell Book "Beyond the Sea" fits in this challenge. Lots and lots of great designs here as well.
I hope you found something here that inspires your creative endeavors. Thank you for reading.
Autumn Clark
Well Lucy, you've been wowing all of my teams with this beauty! I truly am amazed by this brilliant idea and your gorgeous cover and page art. I just can't say enough how creative I think this is and how beautiful the result turned out! Thank you so much for sharing with us at Mini Album Makers for our May challenge and with Frilly and Funkie and A Vintage Journey too! Big hugs, Autumn
Gloria Stengel
This is so very clever!!! I love the art work on the inside. So pretty! Thanks for sharing with us at Mini Album Makers Challenge!
Juia Aston
What an awesome shell book! wonderful coloring of the covers - and beautiful inkings and stampings on all of your pages! Thanks for sharing with us at A Vintage Journey!
Jenny Marples
What a totally brilliant idea and so beautifully executed!!! So in love with this. Thank you for sharing with us at Frilly and Funkie xx
Emma
What an amazing project and such a fabulous and unique way to use this die! This is just so gorgeous and has so many lovely details which you could look at for hours ~ thank you so much for sharing and for playing along with us over on the Simon Says Stamp Monday Challenge Blog... x
Lyla Larimore
I absolutely LOVE your little book!!!!
And now I MUST HAVE that die!!!
Girl, if I had a vote for a WINNER....YOU'D get mine!!!
Fantastic work!!!
Lucy
Lyla, I commented on your blog about the incredible project you made recently with the sailboat on the cover. It is stupendous. So it means a lot to me that you like my little book. I do hope you will get the seashell die so you can continue making your incredible projects about the sea. Thank you for your lovely comment. Lucy
Sara Emily Barker
Lucy, this is a delightful way to use the shell die! I have never seen a more beautiful scallop shell! I haven't seen the pinterest inspiration, but I did have an idea that this would make a fabulous booklet, so I'm so pleased that you made it for our challenge at Frilly and Funkie! What a beautiful shell, and every page is perfectly done! I love your creative mind! Hugs!
Lucy
Sara, I just want you to know that your tutorial on your sealover's tag is what inspired me for coloring my seashell. It's a seriously wonderful tag. Thank you for stopping by.
Sara Emily Barker
Awww, that's so sweet! So happy to inspire! I am here to say big congratulations on being one of our Top Three at Frilly and Funkie---soooo well deserved! Hugs!
butterfly
What a sensational mini-album, Lucy - it's out of this world, as well as beyond the sea!! I love the covers - so naturalistic - and the pages inside are full of underwater treasures. The simple twine binding is the perfect finishing touch. Thank you so much for joining us on A Vintage Journey this month, and it's lovely to have you playing along at Mini Album Makers too.
Alison x
Lucy
Thank you, Alison. It is always a treat to hear from you. The mini-album was fun to make and I was very pleased that it actually worked out. I wasn't sure when I started. I hope to make many more and play along with both the Vintage Journey and the Mini Album makers challenges more often.
Anne R
Thank you too, for joining in with our Words and Music challenge at A Vintage Journey. x
Anne R
Lucy, I do love all of your projects but this one has captured my heart for sure. It is such a wonderful way to create a mini album and you have filled it with such beautiful creatures! I really enjoyed your tutorial too.
Thanks so much for joining in at Mini Album Makers challenge this month. Anne x