

• Skip to primary navigation
  • Skip to main content
  • Skip to primary sidebar
  • Skip to footer
Paper Glitter Glue
  • Shop
  • Favorite Supplies
  • Tutorials
  • About
  • Contact Me
  • Free Library
menu icon
go to homepage
search icon
Homepage link
  • Shop
  • Favorite Supplies
  • Tutorials
  • About
  • Contact Me
  • Free Library
×
Home » Craft Supplies » Sizzix » The Owl Cabinet

The Owl Cabinet

October 19, 2017 by Lucy Leave a Comment

Be sure to Pin to your Favorite Pinterest Board!

67 shares
  • Share
Here is my most recent project - The Owl Cabinet that I designed as a Pinworthy guest for this month's a Vintage Journey's Challenge - Crazy for Autumn Colour. I am honored to be chosen as a Pinworthy Guest Designer once again.

The tree is simply a cylinder of cardboard with the base slightly larger than the top covered with paper mache. 

Test fitting the owl and the light behind it.
The limbs are twisted pieces of brown packing paper. 
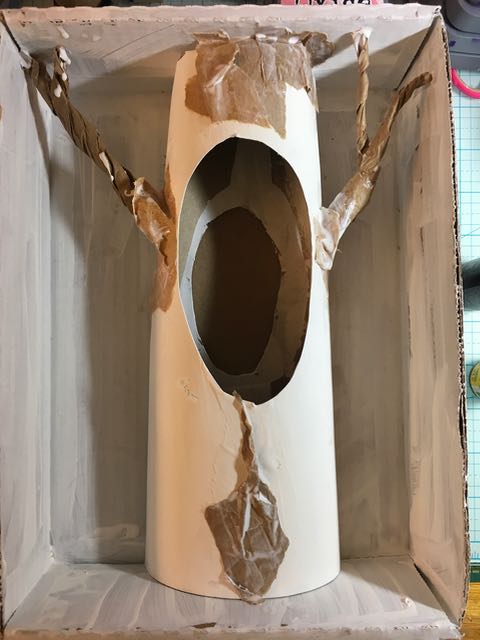
The tree itself is painted with gesso, then grey paint then Ground Espresso Distress paint. I tried to make the paper mache more "bark" like by using an old brush painting black striations. Then I went over it a little bit with my favorite yellow paint - Distress Fossilized Amber. 

The background consists of gesso, Tumbled Glass, Broken China and then a little Wilted Violet Distress Oxide sponged on in the corners to make the sky look a bit like evening is coming. I painted the sky near the ground with Fossilized Amber to lighten things there. 
I stained watercolor paper and cardstock with various colors of Distress Inks and Stains and then punched out the leaves with the Sizzix Oak Leaf Punch. 

The opening in the tree was sized to fit the owl - oversized really. It needs to be a tiny bit smaller. The owl is a Tim Holtz Ornate Owl Thinlits die which I cut out twice - once with brown inked watercolor paper, once in black and then an outline on clear acetate. I colored the acetate with various inks - yellow and then some gold and white fixative. I tried to make the owl's throat lighter because if you read about the Great Horned Owl one of its distinguishing features is the "neat white patch on the throat". I covered it with Glossy Accents which I should probably go over again to make that layer more even. There are a few birds from the Tim Holtz Scarecrow Thinly Die. They are circling far away because the Great Horned Owl is a ferocious predator. 
I cut a large hole in the back so the cabinet can sit in front of a candle and shine through the owl. 
The frame of the cabinet is just cardboard cut to outline the box. It's painted with black gesso then a generous layer of Crackle Texture Paste - my new favorite texture paste. The top of the cabinet is cut out with the Sizzix On the Edge Plaque and Postage Die. I love how it looks on the top of the project. 
That's about it. I love 3-D projects and paper mache and autumn colors and leaves. This was a very fun project as it incorporates so many of my favorite paper crafting elements.
Thank you for reading. Ya'll take care.
« Return of the Two Witches Sharing Recipes
Make Your Own Original Putz House - Part 1 »

Be sure to Pin to your Favorite Pinterest Board!

67 shares
  • Share

Reader Interactions

Comments

    Leave a Reply Cancel reply

    Your email address will not be published. Required fields are marked *

  1. Redanne

    October 26, 2017 at 10:23 am

    Wow Lucy, your creativity knows no bounds! Your tree is inspired and absolutely stunning... as Autumn has already said, you are truly a master of 3D. Such a pleasure to have you share your talent with us at A Vintage Journey once again! Hugs, Anne x

    Reply
  2. Team Clark

    October 20, 2017 at 5:48 pm

    Lucy, you are truly a master of 3D! The dimension, color and texture here are all incredible. Thanks so much for sharing with us at A Vintage Journey. Hugs, Autumn

    Reply
  3. butterfly

    October 20, 2017 at 12:28 pm

    What an inspired idea to light up the interior of the tree so that your owl glows with eerie wisdom! I love the crackled frame and the fabulous gnarled bark of the tree trunk. And the abundance of leaves is a joy - just right for shushling through! Thanks so much for joining us on A Vintage Journey this month.
    Alison x

    Reply
  4. Sara Barker

    October 20, 2017 at 12:28 pm

    Lucy, I truly enjoyed reading your post and seeing how your beautifully made project came together. I am a fan of 3D, and making things from old boxes and containers is so much fun, but time consuming! You have really worked some magic here, and I can appreciate your level of creativity and how much time this must have taken. Wow punching all those leaves! Love how you think! The outcome is FABULOUS and I love that you can light it up, too! Well done, you! Hugs!

    Reply

Primary Sidebar

Lucy holding a small putz house

I'm Lucy - the paper architect behind the captivating tiny house designs at PaperGlitterGlue.com.

While I am often found covered in glue and cat hair and obsessing about the details of my projects, I love sharing my designs so anyone can craft seriously awesome paper crafts.

So look around and find something to MAKE.

You can read more about me here.

Want to make a beautiful Village Wreath?

You can do it step-by-step with my Alpine Village Wreath Workshop. Just let your creativity flow as create your own little village proudly displayed on a wreath. You'll create a heirloom that your family will treasure for years.

Wreath with alpine village houses and bottlebrush trees

And if you are a Halloween fan - you'll love my Halloween book! 13 Handcrafted Halloween Houses

This book contains 13 different Halloween designs with embellishments like crooked windows, fences, and shingles.

13 Handcrafted Halloween Houses book cover

What is a Putz House and How Do You Make One?

Halloween house putz house

Learn to make the best House Pop-Up Cards! with the Playful Pop-Up Houses book.

Cover for Playful Pop-Up Houses book
Lucy holding a small putz house

I'm Lucy - the paper architect behind the captivating tiny house designs at PaperGlitterGlue.com.

While I am often found covered in glue and cat hair and obsessing about the details of my projects, I love sharing my designs so anyone can craft seriously awesome paper crafts.

So look around and find something to MAKE.

You can read more about me here.

Want to make a beautiful Village Wreath?

You can do it step-by-step with my Alpine Village Wreath Workshop. Just let your creativity flow as create your own little village proudly displayed on a wreath. You'll create a heirloom that your family will treasure for years.

Wreath with alpine village houses and bottlebrush trees

And if you are a Halloween fan - you'll love my Halloween book! 13 Handcrafted Halloween Houses

This book contains 13 different Halloween designs with embellishments like crooked windows, fences, and shingles.

13 Handcrafted Halloween Houses book cover

What is a Putz House and How Do You Make One?

Halloween house putz house

Learn to make the best House Pop-Up Cards! with the Playful Pop-Up Houses book.

Cover for Playful Pop-Up Houses book

Footer

You are welcome to link to PaperGlitterGlue.com or use a single image with a brief description and a link back to any post. Do not republish any post. That's not allowed. But I do like it when you share my photos to Pinterest.

Amazon Associates Disclosure

Lucy Foxworth of PaperGlitterGlue.com is a participant in the Amazon Services LLC Associates Program, an affiliate advertising programs designed to provide a means for sites to earn advertising fees by advertising and linking to Amazon.com. So as an Amazon Associate I earn from qualifying purchases. Thank you.

Footer

↑ back to top

About

  • Privacy Policy
  • Disclaimer

Newsletter

  • Sign up with the form below for emails and updates.

Contact

  • Contact

As an Amazon Associate I earn from qualifying purchases.

Copyright © 2023 Paper Glitter Glue