• Skip to primary navigation
  • Skip to main content
  • Skip to primary sidebar
  • Skip to footer
Paper Glitter Glue
  • Tutorials
  • My Favorite Supplies
  • Shop
  • About
  • Contact Me
  • Paper Glitter Glue Library
menu icon
go to homepage
search icon
Homepage link
  • Tutorials
  • My Favorite Supplies
  • Shop
  • About
  • Contact Me
  • Paper Glitter Glue Library
×

Home » Cardboard house » Make Your Own Original Putz House - Part 1

Make Your Own Original Putz House - Part 1

October 21, 2017 by Lucy 4 Comments

Be sure to Pin to your Favorite Pinterest Board!

737 shares
  • Share

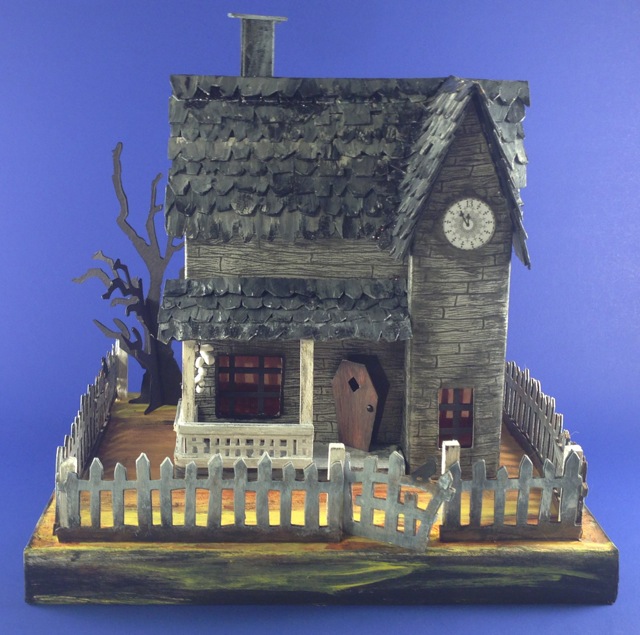
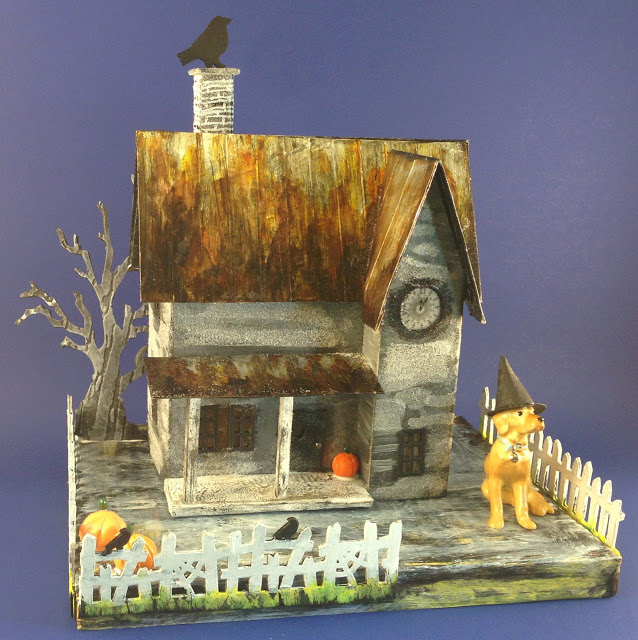
Katherine, a reader of my blog asked me about sharing the pattern for a house I made a couple of years ago. I made about 4-5 houses with this pattern.

Here are a few photos and links to the houses made with this pattern - Jack's house, Rusted Tin Roof House, Rusted Tin Roof House for Josie, and Jennifer's House.
Since I've been making houses for so long, I have actually learned a few tricks to make them much easier to make. The most important thing I learned from Howard Lamey on the Cardboard Christmas forums. If you pay attention to his patterns you will see little details that greatly simplify making cardboard houses.
Here is the first big tip - make the pattern easy to cut out.  Cutting cardboard with a craft knife can be tough - a simple pattern and straight cuts will make your crafting so much easier. Your hands will thank you.
Initial drawing of the pattern for Jack's House:
Template for Jack's House:
Template for the front gable extension for Jack's House:
You can see that there are all these little cuts that you have to make to make the tabs that I've found are not really necessary.
Now I would make this pattern like this - basically cutting out a rectangle.
This is the pattern I am drawing tonight. It's a relatively large house so there are no tabs on the sides because the back piece will be a rectangle with 2 tabs to provide a gluing surface.
Here is the pattern with score lines outlined in red. I made a copy so I can cut it out.
Now the house pieces have been cut out. See how simple that is!
Here is the back piece with the tabs on each side. It's made from another copy of the pattern.
And finally, here is the entire framework of the house temporarily taped together. This is a very similar shape to the houses above made with a simple gable pattern that is so much easier to cut out and actually more sturdy because the roof  and the gable ends are supported.

I make my houses out of cardboard to make them strong so they will last for many years, but there are a number of people who make their houses out of card stock like this. With paint and glitter and a firm base they are surprisingly sturdy.

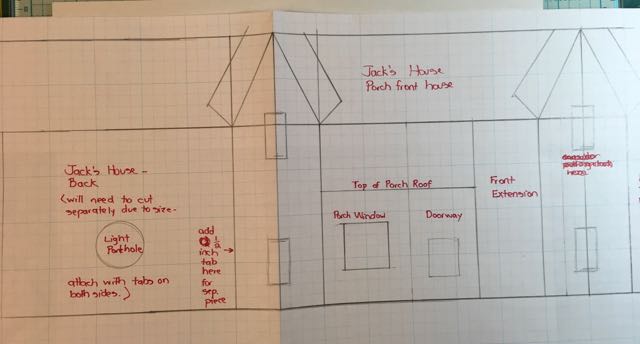
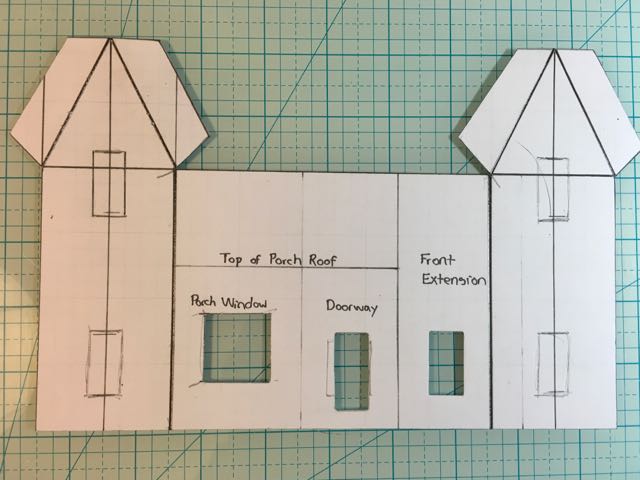
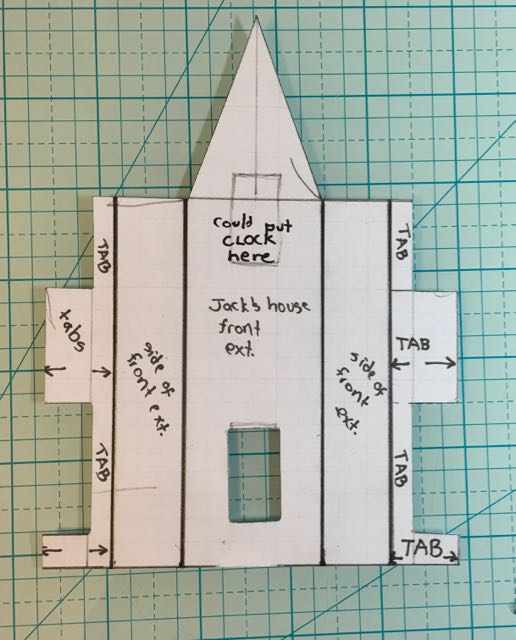
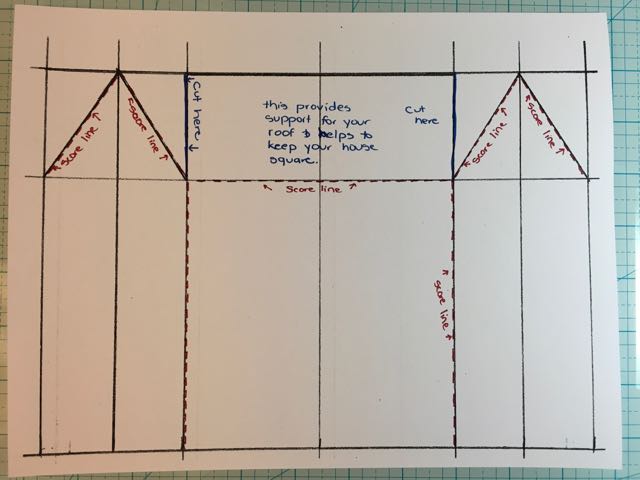
The front gable extension pattern can be greatly simplified as well.

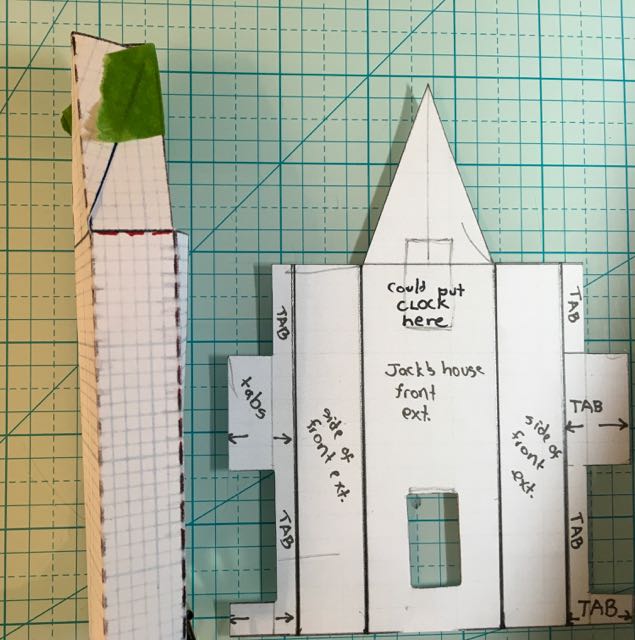
I've shown a side view of template taped together to show you that the extension gable is better supported this way. It is much easier to glue on a roof piece with these flaps in place. You may still have to cut the tab pieces a little bit depending on how much light you want to enter the extension.

I'll show you the transfer method to cardboard in the next post. I'll also make a pattern of this simple gable house with the dimensions as well.
« The Owl Cabinet
Make Your Own Original Putz House - Part 2 »

Be sure to Pin to your Favorite Pinterest Board!

737 shares
  • Share

Reader Interactions

Comments

  1. Katherine

    October 22, 2017 at 9:53 pm

    Wow! Thank you so very much 🙂 this was too kind of you 🙂 🙂 🙂

    Reply
  2. ßeulah ßee

    October 25, 2017 at 4:02 pm

    Have you ever tried constructing with foam core? You might fancy it and it is sturdy and easy to work with (the secret is a sharp knife blade). No need for tabs and it's a snap to glue. I used it to make tiny houses as Christmas ornaments and they were lightweight which didn't weigh down the tree branches.

    P.S. Love the owl in a box--brilliant!

    Reply
  3. Lucy

    October 31, 2017 at 2:29 am

    I haven't really constructed anything with foam core because I have so much trouble cutting it with nice straight edges - I guess I didn't know the sharp knife secret. I will have to try that after the Christmas season is over. Thank you.

    Reply
  4. Sheila

    February 02, 2022 at 5:46 am

    I LOVE your little houses!!! Thank you so much for sharing them~!
    I am Sheila in California and I would like to make one like your little brick one. If I may?
    Blessings in your work,
    Sheila

    Reply

Leave a Reply Cancel reply

Your email address will not be published. Required fields are marked *

Primary Sidebar

Lucy author of paperglitterglue blog

I'm Lucy - the crafter behind Paper Glitter Glue. I just love to make things - mostly from paper or cardboard. I hope to inspire you to make fun stuff too. So look around and find something to MAKE. You can read more about me here.

Get my Halloween book! 13 Handcrafted Halloween Houses

13 Handcrafted Halloween Houses book cover

What is a Putz House and How Do You Make One?

Halloween house putz house
Cover for Playful Pop-Up Houses book

Footer

You are welcome to link to PaperGlitterGlue.com or use a single image with a brief description and a link back to any post. Do not republish any post. That's not allowed. But I do like it when you share my photos to Pinterest.

Amazon Associates Disclosure

Lucy Foxworth of PaperGlitterGlue.com is a participant in the Amazon Services LLC Associates Program, an affiliate advertising programs designed to provide a means for sites to earn advertising fees by advertising and linking to Amazon.com. So as an Amazon Associate I earn from qualifying purchases. Thank you.

Footer

↑ back to top

About

  • Privacy Policy
  • Disclaimer

Newsletter

  • Sign Up! for emails and updates

Contact

  • Contact

As an Amazon Associate I earn from qualifying purchases.

Copyright © 2021 Paper Glitter Glue