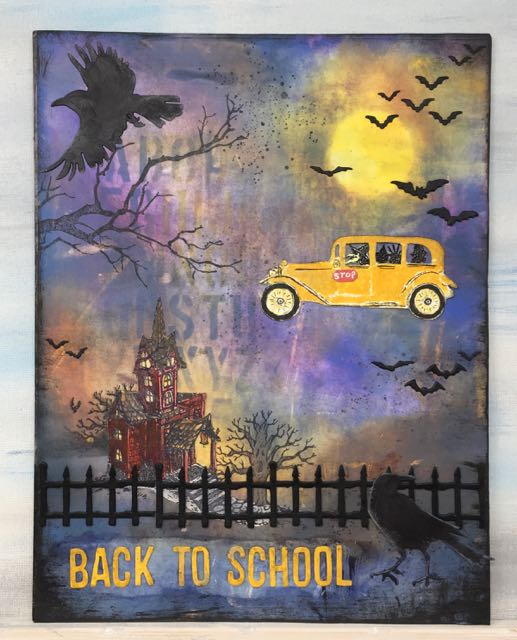
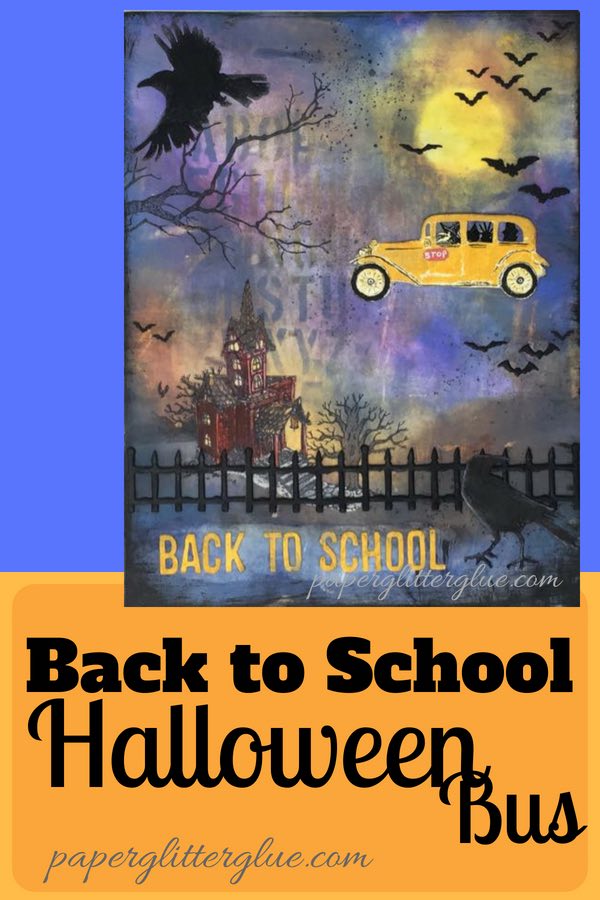
The Back to School Halloween Bus with the witch bus driver
The witch drives again - this time she drives the Back to School Halloween bus in a combined back to school and Halloween decoration. This DIY Halloween wall decor is made with Tim Holtz stamps and die cuts and distress inks. Want to see how to make this unique paper Halloween decoration?
This is the third in the series of the witch driving a vehicle at night. Here are links to the previous two Halloween projects:
The official title is "Lots of Traffic Out Tonight" because of all the crowded skies with things flying about, but the unofficial title is the Witch Bus Driver and the Back to School Halloween Bus.
Back to School Challenge
The Simon Says Stamps Monday Challenge provided the inspiration for the this seasonal paper Halloween DIY project since this week's challenge is "Back to School". I planned to make another witch driving a car with kids in the back seat called "Are We There Yet?", but when I saw this challenge I realized I could turn the vintage auto into a school bus. To me this is funny - a witch driving a school bus in the air.
Materials for the DIY Back to School Halloween Bus
To make your unique, cool Halloween wall decor you need the following supplies or similar variations:
- Cardboard
- Watercolor paper
- Glue - Aleene's Tacky Glue, Ranger Collage Medium
- Archival, Distress Inks and Distress Oxides
- Witch Stamp - Stampers Anonymous Haunted House CMS308
- House and Tree Stamps - Stampers Anonymous Haunted House CMS308
- Vintage Auto Stamp - Stampers Anonymous Vintage Auto CMS265
- Trick or Treat Kids in the bus - Stampers Anonymous Mini Halloween 3
- Branch Stamp - Stampers Anonymous Mr. Bones CMS345
- Embossing powder
- Distress Paints - Candied Apple, Black Soot
- Fence die - Sizzix Village Manor
- Bat dies - Sizzix Mixed Media Halloween and Haunted House Thinlits
- Bird dies - Sizzix Feather and Ravens Thinlits
- Letter dies - Sizzix Alphanumeric Thinlits Die Set
- Letter stencil - Tim Holtz Layering Stencil Crate THS089
To plan the location of the background elements, you need to know the size and shape of your main decorative elements.
Make the Back to School Halloween Bus
For me, the school bus driven by the funny witch and the little red school house dictate where everything else should go.
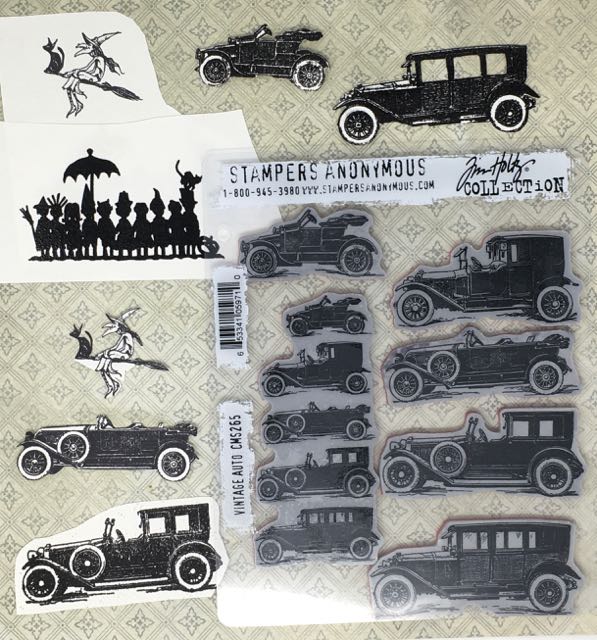
Stamped images of the Halloween elements for the Witch Bus Driver in "Lots of Traffic Out Tonight"
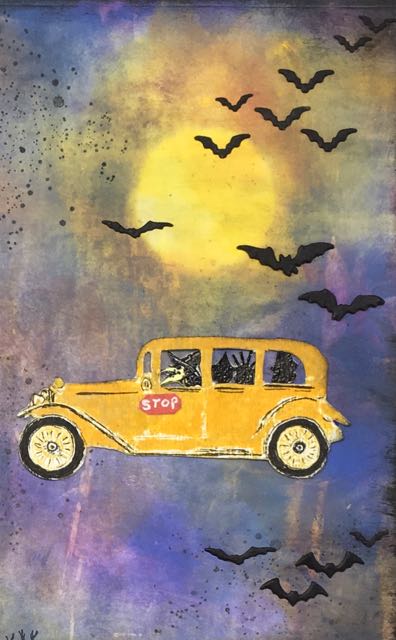
I used a vintage auto stamp for the school bus which was stamped in Fossilized Amber with a little Carved Pumpkin mixed in. A thin black marker was used to outline the details of the vehicle and color in the tires. Fussy cut the car out of the paper. Round off the roof edges to give the vintage auto a more school bus shape. Cut a small red octagon shape with STOP printed on it. I googled a bunch of school buses and this is a defining feature on buses these days.
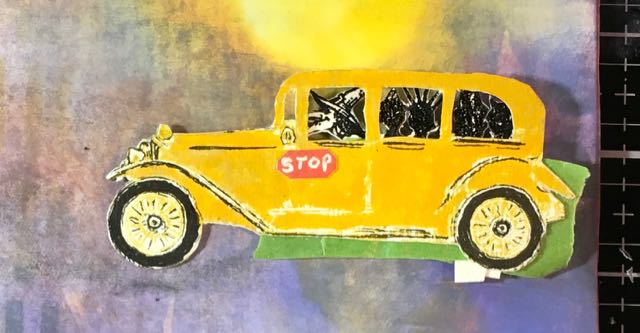
Working on the school bus with the witch school bus driver. The witch bus driver and trick or treater kids are temporarily taped in place
Stamp the witch with black ink and emboss with black detail embossing powder. I find it a little easier to fussy cut tiny pieces when I emboss the stamped image. Color her face using diluted Twisted Citron. Glue your witch in place as the driver of the school bus.
Now stamp the Trick or Treater kids. Cut out a few of the kids that fit in the windows of the school bus. Glue to the back side of the bus.
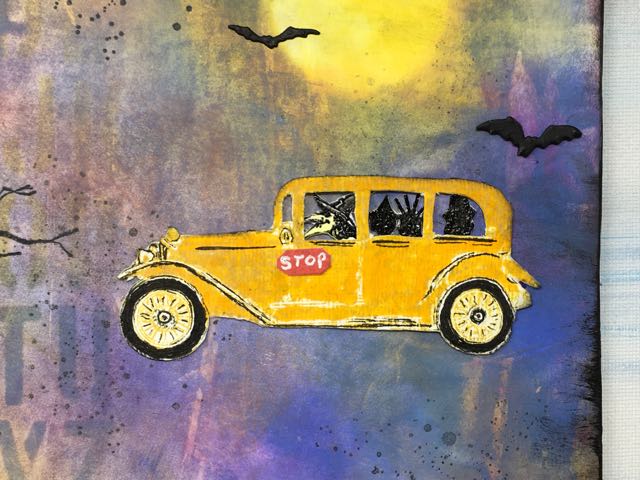
Close-up of the Witch Bus Driver driving the Back to School Halloween Bus
Make the Little Red School House
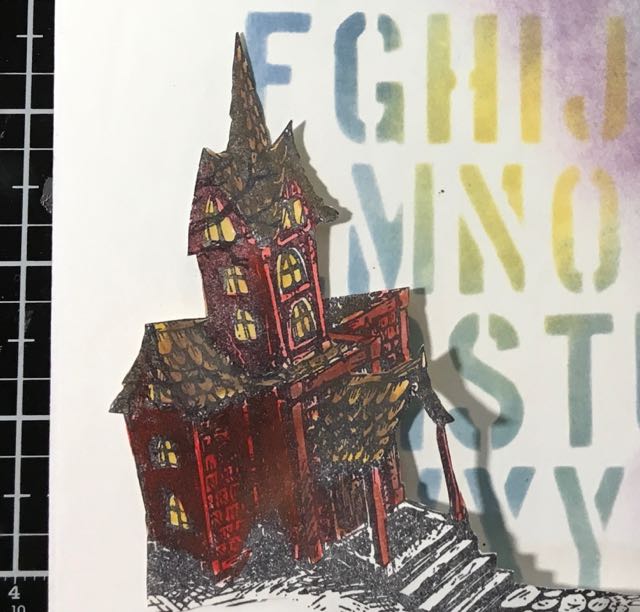
Little red schoolhouse stamped and cut out. I added a school bell later.
Stamp the Haunted House in black ink. To make the Haunted House look like a school house, I painted it red with Candied Apple Distress paint. I used a little Fossilized Amber painted on the windows and Ground Espresso for the roof. I colored a little school bell hanging on the porch.
Next, fussy cut the school house. I left out some details on the stamp so it would be easier to cut.
Now you have your major elements so you can decide how to ink the background.
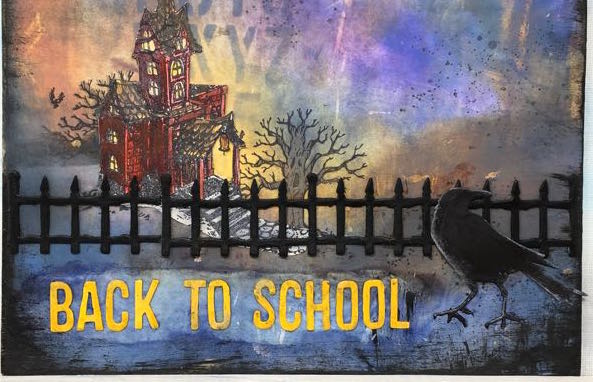
Closer view of the completed little red school house, the raven in the foreground, letters and the fence
Make the Moonlit Background
First, construct the base for this Halloween wallhanging - glue 2 layers of cardboard together to form a firm base for the watercolor paper and all the decorative elements. My base is 8.5 x 11 inches, but you can choose the size you like. If you are making a card, you don't need the cardboard.
Next, glue the watercolor paper to the cardboard. Use collage medium to get good adherence between the two.
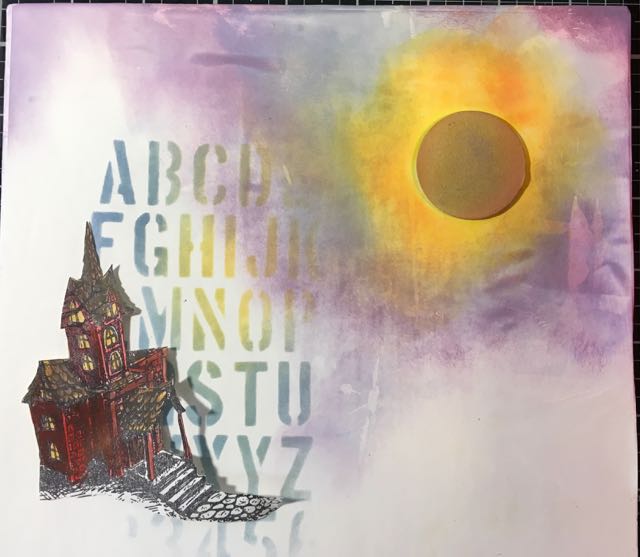
Masking the moon on the background of the Back to School Halloween bus driver
Mask the Moon
Make a mask for the moon. I cut out a circle 1.5 inches in diameter. A lot of people use "Post It" notes, but I used cardboard. Of course, you can make a smaller or larger moon to fit your own specific design.
Ink a circular area for the moon with yellow color. My favorite yellow for a spooky moon is Fossilized Amber Distress Oxide.
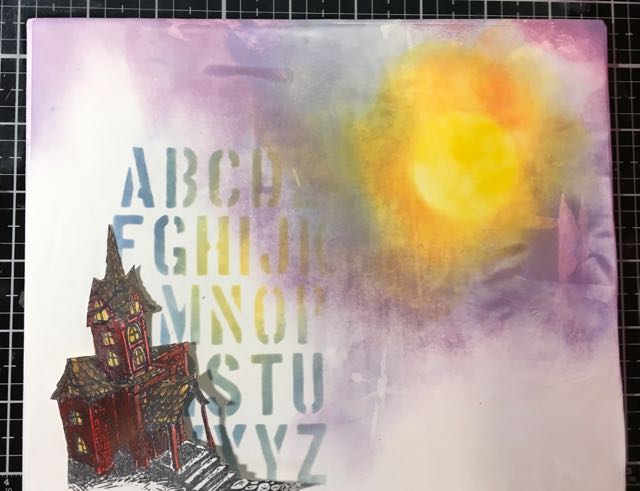
Inking the background moon with successively darker colors
Put a small piece of tape on the back of your circular mask (unless you are using a post it note, then you don't need the tape) then place it in the center of the yellow area.
Stencil the alphabet in the background, if desired. I added that to make the project more school-related.

Leave the background a little lighter behind the little red schoolhouse.
Ink the background with darker and darker inks
Gradually ink darker and darker night sky colors in an enlarging circle. I used the following Distress Oxides - Carved Pumpkin, Ripe Persimmon, Stormy Sky, Faded Jeans, Wilted Violet, Shaded Lilac, Dusty Concord, Blueprint Sketch, Ground Espresso, Walnut Stain. Then the edges were distressed with Black Soot Distress paint. But remember to leave a lighter area for school house to show up. Darken the lower part your paper to function as the ground.
Generally, I streak a little color across the moon like a thin, wispy cloud is crossing the face of the moon.
Stamp spooky elements for the background - the creepy little trees, the tree branch and the random speckles.
Cut out additional Halloween and Back to School elements
Place your school bus and the little red school house on your background to figure out the best placement. Determine where you need something else to make the design interesting. Glue them down.
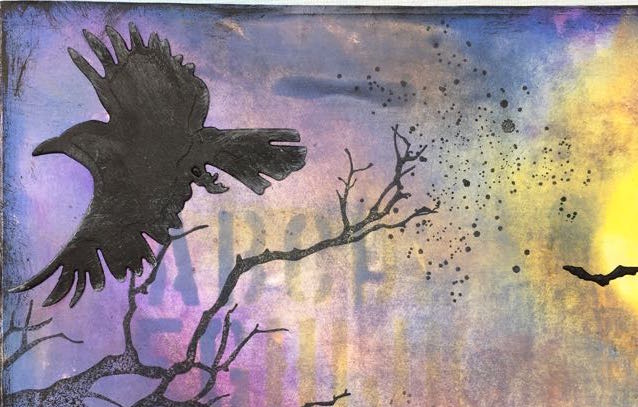
Close-up of the flying raven in the upper corner of the wall hanging
I planned to add bats because, of course, you must have bats flying about with a witch driving a vehicle at night. But I needed something else. These raven die cuts are perfect for embellishments on the edges. For some crazy reason, they are retired, but you could use a Raven stamp and then fussy cut it out. Or add more bats.
Arrange the additional decorative pieces on your back ground. Glue the back to school letters at the bottom of the piece using collage medium.
What else?
I planned to add some word bubbles with the following conversation:
Kids: "Are we there yet?"
Witch Bus Driver: "No."
Kids: "Do we have to go?"
Witch Bus Driver: "Yes."
But I glued the bats where the word bubbles would have fit so you will just have to imagine the conversation between the bus driver and the kids. I have struggled in the past trying to arrange the bats in a pleasing manner. This time I think I placed them better so that they give a sense of perspective.
The bats are placed to give the illusion of depth to the Halloween project
Edging
I almost always edge my pieces with a darker color usually Black Soot or perhaps my favorite brown shade, Ground Espresso. For a Halloween piece you cannot go wrong with Black Soot.
How to Use this Halloween Decor
This Halloween project can easily be framed since it is a standard size - 8.5 x 11 inches. You could make it smaller for a card. You can stand it up on a buffet or in a bookshelf. There are lots of possibilities for this cool Halloween wall decor.
Again, I am going to enter it in the Simon Says Stamp "Back to School" Monday challenge.
Have fun making stuff
Subscribe if you want to receive my crafty newsletter about every two weeks for crafting inspiration and tips. Also please follow me on Pinterest to keep up with more inspiring ideas. And pin this to your favorite Pinterest board to remember where you saw the "Lots of Traffic Out Tonight" combination Halloween and Back to School DIY project.

Beulah Bee
I think I see a comic book developing here--this is so much fun. Amazing tutorials, how wonderful of you to take the time to share the step-by-steps. Your composition/placement is perfect!!
Sara Emily Barker
Lucy, this is a fabulous series of artwork filled with tongue in cheek humor! I laugh out loud when I see that witch! I love what you've done to make this vehicle a bus and the haunted house into a little red school house. Your background is truly a work of art unto it's own, and your bat placement is perfect! I love that you provide your process, too! Now how did I miss the hearse one? Off to see that! Hugs!
Andrea Ockey Parr
Wow, wow, wow! What an amazing project! I am blown away by the creativity here. I think the whole concept of combining Halloween with school was so unique and you pulled it off beautifully! The details of just the bus alone are amazing-- the witch driver made me smile! I also liked how you structured the post to split it into different parts and techniques. I enjoyed the whole project and post so much and am so glad you took the time to share it with us for this week's Simon Says Stamp Monday Challenge!
Lucy
Andrea, Thank you so much. I am so glad you enjoyed it. I was a little worried about the combination of Halloween and back to school, but your comment is very encouraging. Not that I plan to do it again. Probably that is my last witch driving a vehicle - certainly until next year. I look forward to the next challenge. Thank you again.
Marty Fishman
I love this series of the witch driving in various situations - so creative and well done, Lucy!
Lucy
Marty, thank you for your kind comment. I do appreciate it. Lucy