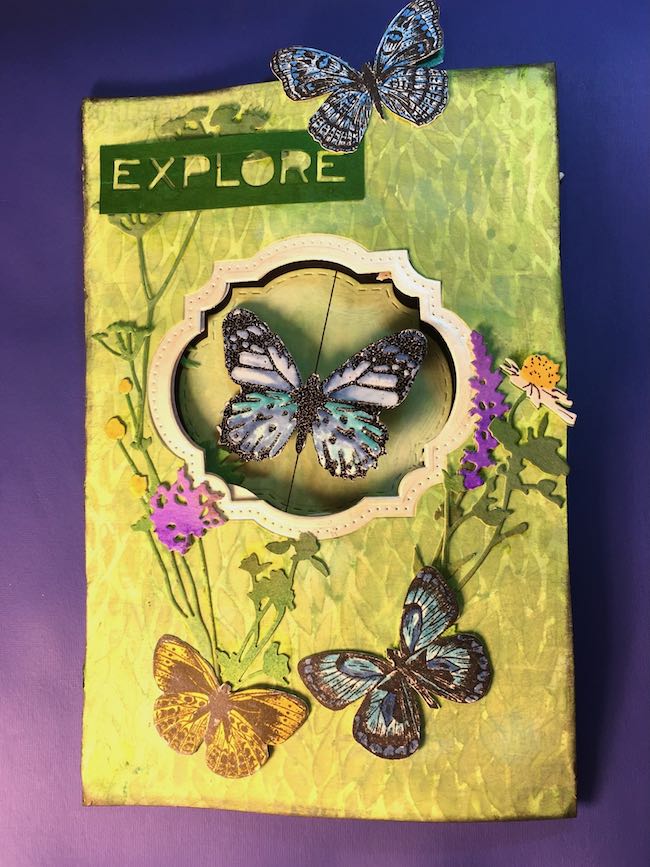
I started to write about all the things that I didn't do right on this card, then I thought to myself, "Wait a minute, let's turn this around and talk about what you learned making this card." Because I learned a lot.
Just as I did when I made the "Sands through an Hourglass" shaker card, I had to figure out a lot of things to make my butterfly spin, it actually made my head spin for awhile.
I must let you know that I got (borrowed) the idea for this card from Shelly Hickox' Halloween card which had Karen Burniston's Midnight the bat spinning in the middle.
First, you have to have some strong thread to support the butterfly. The best thread I had was some black buttonhole thread - it's pretty strong. Yes, it's black, but clear fishing line, for example, will stretch and doesn't work well. That was one of my first decisions.
Then you have to securely anchor the thread on the butterfly front and back. I used a strip of adhesive tape as well as glue to stick the butterflies together. Now the string is secure within the butterfly.
You have to have a butterfly that will spin within the opening of the card. I picked the smaller butterfly of Tim Holtz Butterfly Duo steel rule die.
I was going to color it with the Ranger crayons, but I thought if someone is going to wind up the card, the color might smear which led me to the decision to emboss the black edging on the butterfly and color the butterflies with my pens. I embossed it using the drop shadow technique from the December 2016 tag.
The pages of the card must be decorated. Since I intend to enter this in the Simon Says Stamp Monday Challenge which is "Layer it Up", I did several layers of stencils to give the background some dimension. There was a steep learning curve here. I love so many of these projects where you can clearly see layer after layer - a stencil layer, texture paste, colors merging beautifully with colors. I have not been able to do that though I have tried.
On this project, I first stenciled the Papillon stamp then used one of the new Tim Holtz leafy stencils that just came out. I did several layers with this stencil using a couple of greens and the final layer was the Distress Oxide Peeled paint. In the process of layering I kind of lost my Papillon stamp.
LESSON - Work on layers, keep playing with them until you can start to get some dimension in the backgrounds.
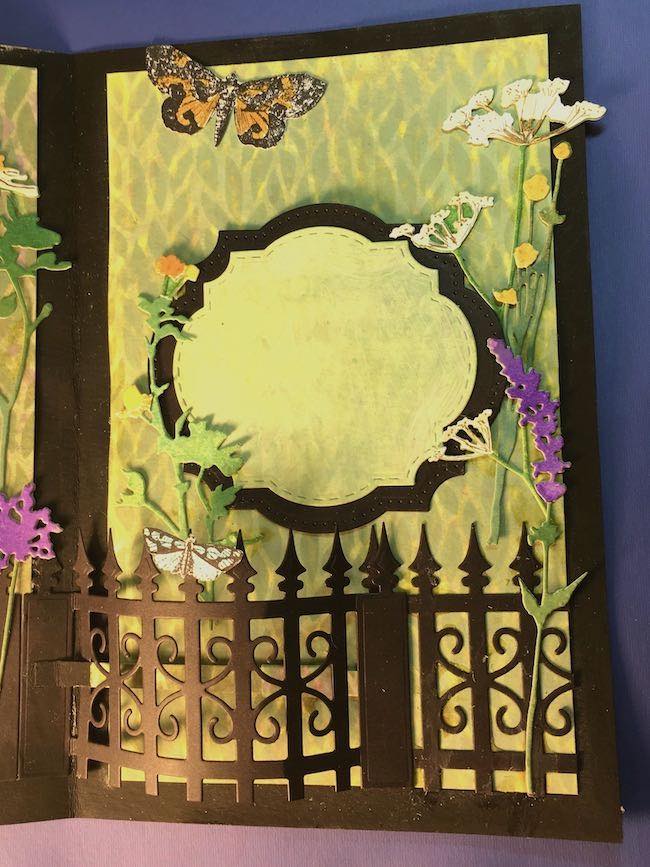
I planned to make a similar lining for the inside of the card, but for some reason I cut the paper in 2 pieces and made one side without making the other side at the same time. Then I found it difficult to make the insides match. I couldn't remember what I did on the first side I made.
LESSON - Make pages that need to match at the same time or make them as one page and then cut them when you are ready to glue them down.
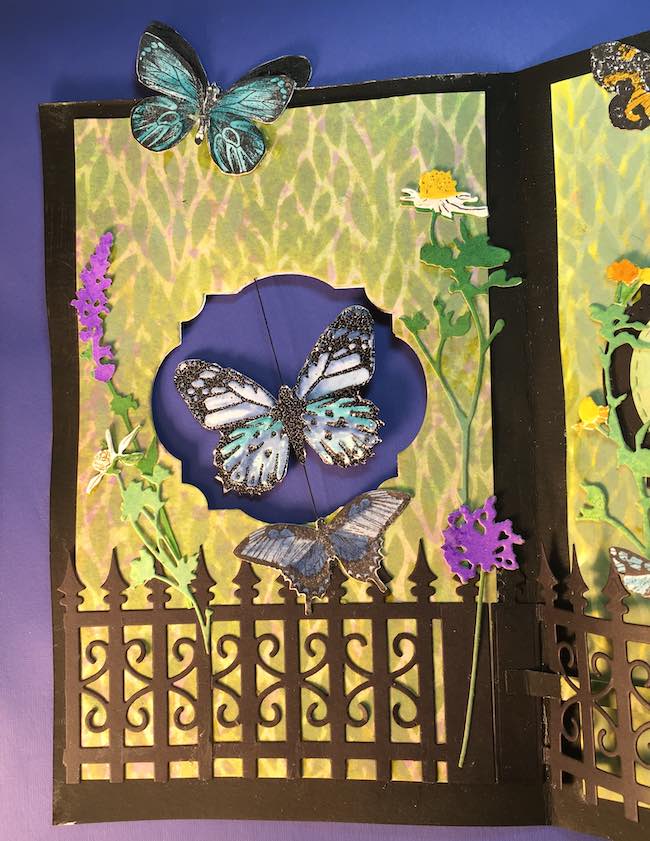
Next is the challenge of anchoring the thread in place. Do that when you glue down the inner panels. That way you don't have to thread a needle and work it through the card to glue the thread down.
LESSON - Think about the order of things when you are gluing.
ANOTHER GLUING LESSON - If you want your flower stems to go behind the fencing the card, it is important to glue them down BEFORE you glue the fence down. Seems like a simple concept but it was easily overlooked.
Those are the major lessons that I learned on this card.
I think the card is a little busy and my decorative elements are a haphazard in the spacing, but overall it's a fun card and at least the butterfly really spins and the fence pops up as it is supposed to. I haven't put a message inside yet, still thinking about that. I am planning to send it to my friend who is having breast reconstruction surgery next month.
I have a 4 second video showing the butterfly spinning that I'll upload when I can figure out how to do that.
Macarena
This is so cute. I love all the botanical details and the colors. Thank you for joining us at Simon Says Stamp Monday Challenge.
Redanne
I don't think it is busy at all, you can never have too many butterflies in my humble opinion!! I love the stencil you used in the background too. Marjie Kemper, if you don't already know her, creates amazing depth with her stencil layering (www.marjiekemper.com). Anne x
Team Clark
Lucy, this is so so cool! I totally love the entire design. I've been wanting to do a spinner and this is just the inspiration I needed. PS. When you upload your video to YouTube, to add it to your blog post click the little video icon beside the photo icon that you use to upload pics. Then enter the URL from your video. 🙂 Hope that helps! Hugs, Autumn