
Create a Dancing Leprechaun to bring the luck of the Irish to life. This festive project features a cute leprechaun made from cardstock with accordion-folded arms and legs that jiggle and sway with movement.
Inspired by vintage holiday wall hangings, this playful decoration is perfect for adding a touch of whimsy to your St. Patrick's Day. Follow my step-by-step instructions and use the free cut files to bring your own Dancing Leprechaun to life and spread the joy of the season!
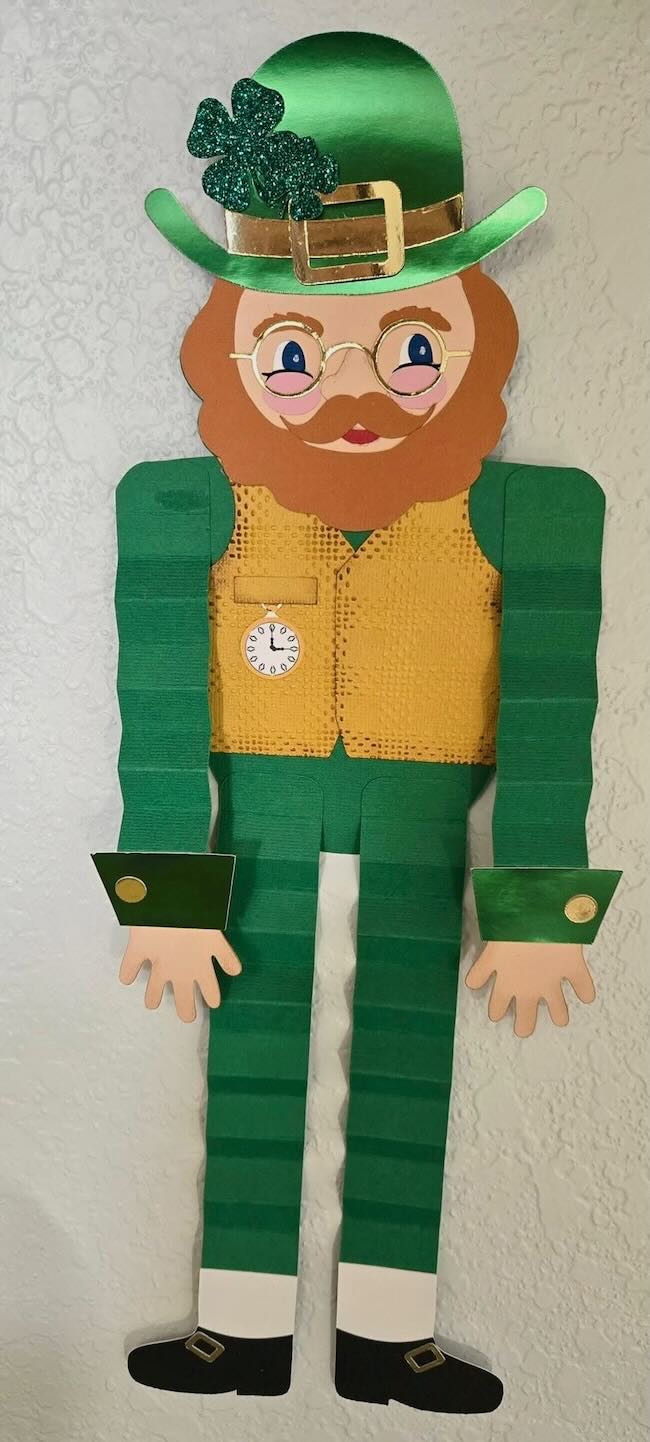
My friend Shirl made the leprechaun in the photo above. She added the pocket watch on the vest which is a great detail. Isn't it wonderful?
Be sure to subscribe to my newsletter to get the password to my free pattern for the Dancing Leprechaun. Just file out the form below and you will get the password right away.
Remember I will never send you any spam and you can unsubscribe at any time.
This post contains some affiliate links for your convenience. Click here to read my full disclosure policy.
What do you need to Make the Dancing Leprechaun?
Download the free pattern from the Paper Glitter Glue library - Design No. 187
Cardstock - Lightweight cardstock such as 65# cardstock works best
Glue - Bearly Art Glue
Ink to give dimension to the cheeks
A way to cut out your pattern - I used my Cricut Maker. It works with all the Cricut machines except the Cricut Joy

Steps to Make the Dancing Leprechaun
- Download the free pattern for the Dancing Leprechaun - Design No. 187
- Cut out all the pieces for the Leprechaun figure
- Apply the vest to the body of the leprechaun first
- Make the Leprechaun face first following the instructions to layer the face correctly
- Adhere the face and beard to the main body
- Accordion fold the arm and leg pieces
- Glue the trim to the hands and shoes
- Adhere the hands and the shoes to the accordion folded legs and arms
- Glue the arms to the body of the leprechaun
- Glue the legs to the body of the leprechaun
- Adhere the tab for hanging to the back of our leprechaun's head
- Hang your Dancing Leprechaun somewhere prominent, a door, for example so everyone can enjoy seeing him dance when the door is opened or closed
If you like the vest on your leprechaun, apply the vest to the body first
It's important to add the vest first because the face with the beard goes on top of the vest. If you just want to use the belt without the vest, you can do that later.
Align the top of the vest with sides of the body and the shoulders.
In the photo below you can see how the vest fits underneath the beard.

Next, let's make the Dancing Leprechaun Face
Making the Layered Leprechaun Face is just a little challenging. I've tried to simplify the layers of his face for you. In addition, I've included a blank face if you want to draw a face on your leprechaun - maybe to give him more personality.
1. Glue black oval background to white face oval so the pupil and eye lines are visible.

2. Center the skin tone face over the white piece lining up the lines below the eyes. Glue.

3. Ink the cheeks for contrast. Adhere the cheeks just below the eyes.
4. Glue the tiny eyes in the cut out eye section of the pink face.
5. Glue the orange eyebrows on his face.
6. Place the orange beard piece on the face- line it up with the edge of the green background piece. Make sure your face is lined up the way you want. I glued mine in a little crooked on my first prototype.
7. Adhere the nose in the center of his face.
8. Once the face is done, glue it to the green leprechaun body OVER the vest lining up the edges of the hair with the background piece
9. Choose which hat you like - the bowler hat or the top hat. Place the hat trim just above the brim of the hat. Apply glue.
10. Apply the hat of your choice.
Make the Arms
You can get an idea of what I mean by accordion folding from the photo above.
Fold along all the score lines for the arms and legs. Fold in an accordion fashion so leprechaun’s arms and legs can “dance” and jiggle.
The arm pieces are slightly curved at the top to mimic the outer curve of shoulders.
Adhere the hands to the back of the green trim. Add a gold buttons on the cuffs.

Glue the hands to the front of the accordion folded arms.
Pay attention to right and left (always a challenge for me).
These are kind of cartoony hands. What I consider the thumb is a little fatter and shorter than the pinky finger.
I put the thumb of the hands towards the body, but you can reverse it if you like. But do remember to make a left and right hand.
Make the legs
Just like you did for the arms, fold the legs to make the accordion fold so your leprechaun will dance.
The shoes are pretty simple. Glue the black shoe on top of the white sock, then glue the gold buckle on top.

Glue the shoes to the larger flat section at the bottom of the leg.

Complete Your Dancing Leprechaun

Adhere the arms to the green leprechaun body paying attention to the outer curve of the shoulders.
Next, glue the legs in place on the lower body. You can place th legs to either the front or the back of the leprechaun. Either way works.
Glue the hanging tab to the back of your leprechaun's head.
Be sure to hang the your dancing figure somewhere he can move
Displaying your dancing leprechaun on a door is perfect because he can dance whenever someone opens or closes the door.

And if you like this dancing figure, don't forget about the Mr. and Mrs. Santa Dancing figures for Christmas.

Questions?
Feel free to ask if you have any questions. Leave a comment or email me - [email protected].
I hope you can put your creativity to use today. Have a good day.
Lucy
P.S. Be sure to pin this to your favorite Pinterest board so you can remember where you found it.
Pam
I see instructions to put the leprechaun together but I don’t see a link to the Cricut cutting instructions. Help, please!
Lucy
Pam, I didn't include those instructions, but I can add them now.
Thank you for reminding me.
Lucy