• Skip to primary navigation
  • Skip to main content
  • Skip to primary sidebar
  • Skip to footer
Paper Glitter Glue
  • Shop
  • Favorite Supplies
  • Tutorials
  • About
  • Contact Me
  • Free Library
menu icon
go to homepage
search icon
Homepage link
  • Shop
  • Favorite Supplies
  • Tutorials
  • About
  • Contact Me
  • Free Library
×
Home » Cardboard house » Cardboard base » Gothic Halloween House - Part 3 in the continuing series on making a little cardboard house

Gothic Halloween House - Part 3 in the continuing series on making a little cardboard house

May 6, 2017 by Lucy Leave a Comment

Be sure to Pin to your Favorite Pinterest Board!

  • Share
Here is the house as it is about to be glued together. It is much easier to add the siding at this point, but it does leave a seam at the corners. That can be covered up by a corner board as it is on a real house or left the way it is. Usually I leave it black on my Halloween houses for the creepy factor. Since this house is pretty tall, when I glue it, I put a clip on the bottom making sure that the edges line up, but I can't do that on the top so I use the green 3M painter's tape to hold the sides firmly together. It removes easily but holds well enough to make sure there is a good seal. 

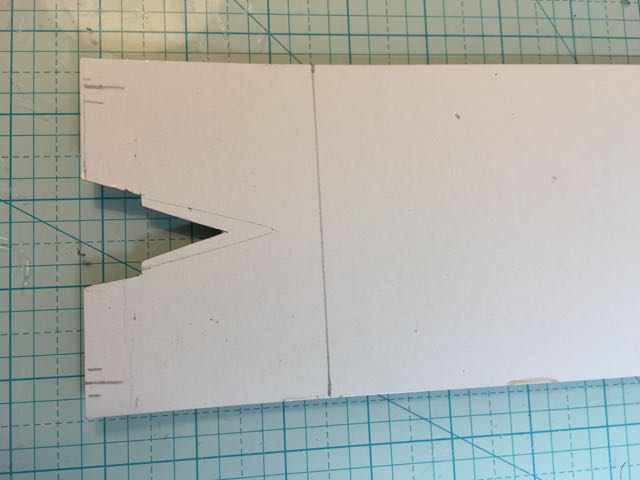
This is the roof with the cut out for the gable. I extended the cut out a little bit to let light into the tiny window on the gable, otherwise you could just make the angular cut at the bottom to let the roof overhang around the gable. You wouldn't need the V-shape above it for light. I also cut a V-shape out the roof support - the under roof - for the same reason.

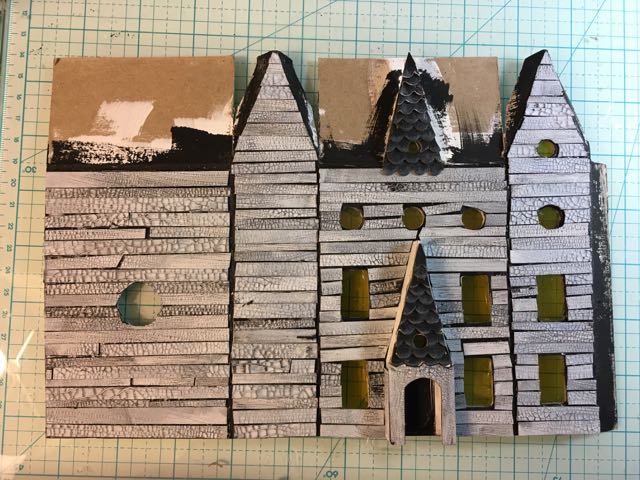
The photo below shows dry fitting the pieces to make sure the overhangs of the roof are the same on both sides (doesn't really usually happen) and that the chimney fits snugly next to the roof and to see how it looks on the base. I also used the Tim Holtz Village Manor windows on the larger windows. These are some of my very favorite windows, absolutely perfect for a Halloween house. The smaller ones are from a Papertrey Ink die, I think.

The other photo shows the chimney better. I usually use a white Sharpie to draw the lines of the mortar between the bricks, but I painted these because I thought I could make the lines smaller. That worked. I distressed it after painting with Ranger Black Soot paint because I didn't want it to stand out too much since it is such a tall chimney. When I painted the chimney I mixed it with sand to make a rougher texture.

This is the underside of the roof. I try to remember to paint the overhang edges so they aren't the color of cardboard when I glue it down. Sometimes I forget and then I have to paint after the roof is glued on which is difficult. Better to remember before. Sometimes I use a contrasting color like on the Stone House where I used ochre, but here I used the leftover sandy paint from the chimney.

The other photo shows the gable roof cutout. These are always a little difficult. When I first started making them I would try to recreate the angle on the front of the gable, but that is not the angle you have to match. It's the slant of the roof that you have to recreate. Maybe it's intuitive to you, but it wasn't for me at first.

I have to remember to paint the underside of both gable roofs as well. I'm also going to do something different here. Usually I glue the shingles on when the gable has already been glued to the roof and it is a pain, measuring each angled piece then gluing it on and hold it in place until the glue sets. I am going to glue the shingles on while the piece is flat. I think it will be easier and cleaner. Then I will apply the roof shingles after the gable is glued in place.

That's today's progress. The house itself is almost done. Decor comes after that.

Ya'll have a good day. Thank you for stopping by. Lucy

« Gothic Halloween House Progress
Progress on the Gothic Halloween House - Part 4 »

Be sure to Pin to your Favorite Pinterest Board!

  • Share

Reader Interactions

Comments

    Leave a Reply Cancel reply

    Your email address will not be published. Required fields are marked *

  1. Lucy

    May 12, 2017 at 2:47 am

    Also, I signed up for your blog with my email address. I live in Upstate SC so maybe (assuming I can find a gallery to display them) you could come down and see the collection.

    Reply
  2. Lucy

    May 12, 2017 at 2:45 am

    Laney,
    I have to get brave to go to a local art gallery to find one to display them for the month of October. I will give all my profits from the sale of the little houses to Habitat for Humanity of Greenville, but first I have to find an art gallery. I will take a photo with the whole village together before I sell them. That is always my favorite photo.

    Reply
  3. Laney

    May 12, 2017 at 2:37 am

    Thanks Lucy! I'll have to check at the craft store. Will these houses be on display somewhere when you are finished?

    Reply
  4. Lucy

    May 10, 2017 at 1:12 am

    I found the sand at one of the craft stores. It's just a bottle of very clean white sand - labeled "Sand". I've seen it called Floral sand as well. A little goes a long way. Sometimes the people on the Cardboard Christmas forum mix it with some finely ground mica to give some shine to the piece.

    Reply
  5. Laney

    May 10, 2017 at 1:01 am

    Yes those roof angles can be tricky! May I ask what type of sand you use for texture?

    Reply

Primary Sidebar

Lucy holding a small putz house

I'm Lucy - the paper architect behind the captivating tiny house designs at PaperGlitterGlue.com.

While I am often found covered in glue and cat hair and obsessing about the details of my projects, I love sharing my designs so anyone can craft seriously awesome paper crafts.

So look around and find something to MAKE.

You can read more about me here.

Want to make a beautiful Village Wreath?

You can do it step-by-step with my Alpine Village Wreath Workshop. Just let your creativity flow as create your own little village proudly displayed on a wreath. You'll create a heirloom that your family will treasure for years.

Wreath with alpine village houses and bottlebrush trees

And if you are a Halloween fan - you'll love my Halloween book! 13 Handcrafted Halloween Houses

This book contains 13 different Halloween designs with embellishments like crooked windows, fences, and shingles.

13 Handcrafted Halloween Houses book cover

What is a Putz House and How Do You Make One?

Halloween house putz house

Learn to make the best House Pop-Up Cards! with the Playful Pop-Up Houses book.

Cover for Playful Pop-Up Houses book

Footer

You are welcome to link to PaperGlitterGlue.com or use a single image with a brief description and a link back to any post. Do not republish any post. That's not allowed. But I do like it when you share my photos to Pinterest.

Amazon Associates Disclosure

Lucy Foxworth of PaperGlitterGlue.com is a participant in the Amazon Services LLC Associates Program, an affiliate advertising programs designed to provide a means for sites to earn advertising fees by advertising and linking to Amazon.com. So as an Amazon Associate I earn from qualifying purchases. Thank you.

Footer

↑ back to top

About

  • Privacy Policy
  • Disclaimer

Newsletter

  • Sign up with the form below for emails and updates.

Contact

  • Contact

As an Amazon Associate I earn from qualifying purchases.

Copyright © 2023 Paper Glitter Glue