This is the third house of the 2017 Haunted Holtzville series - a village of Halloween houses made from the Tim Holtz Village Dwelling dies. Named in honor of Tim Holtz, you know. This is one of my favorites. I haven't made a Village Manor since last year when the die came out and I forgot how much I love this house.
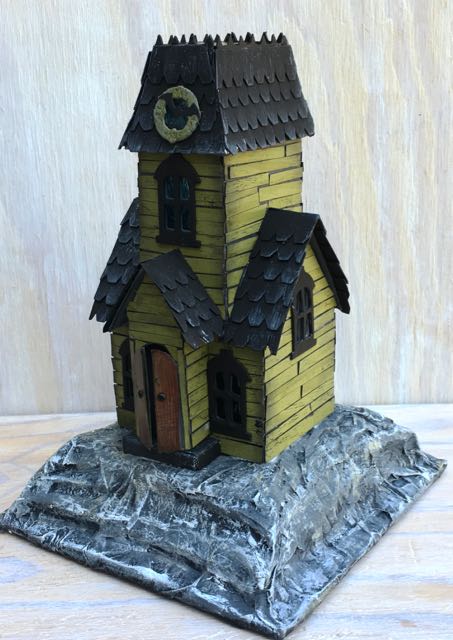
Side view of the Haunted Holtzville Village Manor #3, third in the series of Tim Holtz Village Manor Halloween Houses
Make each little haunted cardboard house different
I always try to make each house different so I decided to make green crackle siding with the paint color Peeled Paint from Tim Holtz and Ranger. I also experiment each time with the bases. It's a little steeper, but not as steep as the first Bat Wing House and I didn't really cut in steps. You have to scramble up the rock to get to the house. This house is called "Where is the Kitty?" because the kitty is hiding in the foyer behind the doors. I will have to get it set up at night to show you the kitty, but I couldn't get the light right today.
Further decor for the Haunted Holtzville Manor No. 3
Next, I plan on using the silhouette of the kids on Tim's new Halloween Shadows thinlets from Sizzix in front of the house looking for their kitty. I added the bat to the circle around upper roof window so it wouldn't look so much like a wreath.
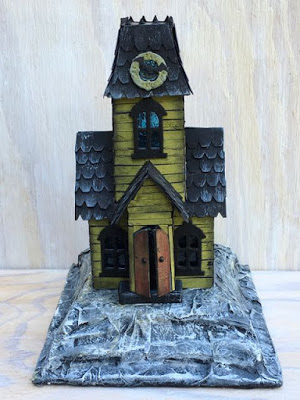
Front view of Haunted Holtzville #3 Village Manor Cardboard Putz house
Side view - I really try to put the top part of the house on straight but I never notice that stuff is crooked until I take the photos. The front stoop is off center, etc, etc. BUT that's why I make Halloween houses mostly - wonky is good.
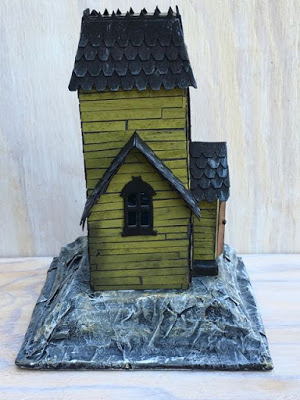
Side view of the Halloween house called Haunted Holtzville #3 made from the Tim Holtz Village Manor die by Sizzix
A little more wonkiness visible from the back. But it's ok because it's a Halloween house, right?

Back view of the Haunted Holtzville village manor - still a bit wonky, but in a slightly spooky way
Make window panes with recycled plastic tinted with alcohol ink
I love the blue tinted windows. I've said this before, but I cover both sides of the plastic windows (leftover packaging from various craft items) with glossy accents after they were tinted with blue alcohol ink. It makes the windows wavy and obscures the funky glue blobs and paint splotches inside the house. I also lined the house with metallic tape to reflect light better. Maybe I can take some photos later tonight to show you how nice the light looks and show you where the kitty is.
How to achieve a rocky look on your cardboard bases
I said to a friend of mine, "Can you tell I am getting better at painting the rock on the bases?" He looked at me like I was crazy. He's not exactly artistically inclined. Anyway, I think my rock bases are looking better.
I made this base with layers of corrugated cardboard like I usually do, but I varied the side of each cardboard layer to give that stepped effect. Then the corrugated cardboard was covered with crumpled packing paper. Next, prime the paper with the primer of your choice - either black or white. This base is covered with a black gesso. After that paint layer, add a contrasting color - I used blue for this one. And the last layer is white or a very light blue to make the crinkled edges of rock stand out better.
So even if my friend doesn't agree, I am getting better at painting to look like a rock surface.
To complete this house:
Maybe glue on some moss
Make more polymer pumpkins
Owl or Bat on top
Halloween Shadows Kids in front
May add a little more color to the rock base, tone down the white a little bit.
That's it for today. I have to work most of the night so I gotta go. Ya'll take care, please. Spread kindness and love and creativity.
Gwen
Please tell me your technique for painting the base! It's fabulous!
Lucy
Thank you, Gwen.
I think there are a couple of things that work to make the base look good. First, I crumple up paper to cover the cardboard. I like to re-use the brown packing paper for the base. It's strong and really wrinkles well. Next, I paint a base coat of primer usually white gesso primer, but sometimes I start off with black. Then I layer on colors. Sometimes they look good and sometimes they aren't so great. If I don't like the color, then I repaint it. But I think what really makes the base is the final highlight color - obviously for this base it was white. I think that is what makes it look like a rocky outcropping.
I hope that answers your question. Maybe I should do a tutorial on painting the bases?
Laney
Love this house - that color - perfect! And yes, you are a master at painting the rock bases. 😉
Matxalen
Me encanta esa casa...