
Today we make a little fringe feather tree using tissue paper fringe, but you can also make it out of a fuzzy yarn like eyelash yarn. This particular feather tree is made out of Tim Holtz orange and black paper fringe from Idea-ology. I love this stuff. This Halloween craft is a part of the 13 Days of Halloween. Because I promised you 13 houses, I will double up on Halloween paper houses for one of the next 3 days. I initially thought of this tree because I was going to hang the little houses from the branches, but I ended up making the Halloween houses for this series just a little too big so that wouldn't work. Still I like the idea enough to want to share it with you.
When I came up with the idea of using the paper fringe to make a feather tree, I wasn't sure it would work. But once I got the hang of it, it was really pretty easy. I generally followed the directions from Dennis Bauer who is widely considered the one of premier feather tree makers today.
No pattern to download today because today's post for the 13 Days of Halloween doesn't require a pattern. I do have a video that I have uploaded on YouTube so you can see the technique for wrapping the wire and then the fringe.
Here I would like to apologize for the inky fingers. I have been crafting a lot lately so my fingers are often stained. I just didn't notice it when I was doing the video or I would have stopped and scrubbed the ink off.
What do you need to make a Fringe Feather Tree?
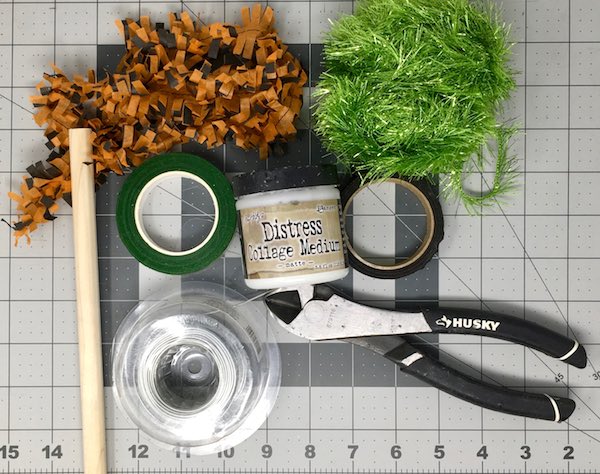
Supplies you need to make the Fringe Feather tree for your Halloween decorations
Supplies:
- Paper Fringe or Yarn - I used Tim Holtz Halloween Fringe by Idea-ology for this tree
- Wire - 16 gauge is recommended. The closest I could find was galvanized 17 gauge wire at the electrical section at the home improvement store
- Wirecutter
- Floral tape - to wrap the wire so the fringe or yarn or feathers won't slide on the wire
- Glue - I love Ranger's Collage Medium for this purpose
- Dowel - ½ inch diameter, 4 feet long
- Drill
- Finial
- Ruler
- Wooden block for stand or container for your feather tree
Directions for making the Fringe Feather Tree
-
Choose the height of your tree
Since I bought a 4 foot dowel, I thought that looked like a good height for a feather tree. Also I have a Martha Stewart feather tree that is 4 feet tall and it's a good height for a little tree like this. But you could make it taller or shorter depending on the location of your tree.
The ½ inch diameter dowel makes a very sturdy tree. If you want a branch sticking out of the top of your feather tree, then drill the hole now. I didn't do that because I knew I could not drill an accurately centered hole in the top of the ½ inch dowel. That's why I glued a finial to the top instead.
-
Choose how many tiers of branches and how far apart to space the branches.
I should have used even spacing, but I tried to increase the spacing between each tier. When I studied feather trees later on, it looks like most of them have even spacing between each tree of branches.
-
Make a stand for your tree
Drill a ½ inch hole in the wooden block for your stand. My brother helped me with this step. Make sure you drill this hole so it is straight up and down so you tree will not be crooked. My brother also added 2 little wood block extensions to make sure that the wooden stand wouldn't tip over. It is very sturdy.
I was going to cut two pieces of a 2x4 into 4 inch blocks glue them together and drill the ½ inch hole, but with the extensions on each side the one piece 2x4 was sturdy.
There are also many other ways to steady your little tree. You could place it in floral foam and then tape the floral foam within a sturdy container for displaying your tree. Sometimes people put them in a plaster base or in a miniature tree stand. One website suggested a metal container filled with landscape stones.
-
Cut the Wire Branches for your Fringe Feather Tree
Cut your wires for each tier of your tree. For my 4 foot tree I used the following sizes:
- 7 inches for the top tier - 4 pieces
- 8 inches for second tier - 4 pieces
- 10 inches for the third tier - 5 pieces
- 11 inches for the fourth tier -5 pieces
- 12 inches for the next tier - 7 pieces
- 14 inches fort the next tier - 7 pieces
- 15 inches for the final tier - 7 pieces
These sizes are not the finished sizes of the branches because the last 2 inches attach the tree to the dowel.
So the finished size for each branch is:
- 5 inches
- 6 inches
- 8 inches
- 9 inches
- 10 inches
- 12 inches
- 13 inches
Please note: I would have made 8-9 pieces for the final tier, but I was running out of Tim Holtz Fringe by this time and I wasn't sure I would have enough to make 2 more branches.
Also I did not add divisions to the branches for the same reason. My next tree will have more branches that are closer together.
-
Wrap the wire with floral tape
When I first starting making this tree I thought I could skip this step, but it really is necessary because the fringe or yarn will slide on the bare wire and won't adhere. So I wrapped each piece with floral tape. There's kind of a trick to using floral tape. You have to stretch it because somehow that enhances the stickiness. In the video I showed you how I wrap the wire. I start a little bit from one end. Holding the floral tape in one hand and rotating the wire with the other, I wrap to the end of the wire and then kind of fold it so I can change directions and wrap the entire wire. When you get a good rhythm going you can wrap the wire easily. It took me a little while to get to that stage.
One problem you may have is that sometimes the floral tape doesn't adhere too well and it will kind of unwrap in the center. If that happens, just patch that section by over-wrapping it with floral tape. You can see an example below.

Re-wrap the floral tape to cover the wire when it doesn't adhere well
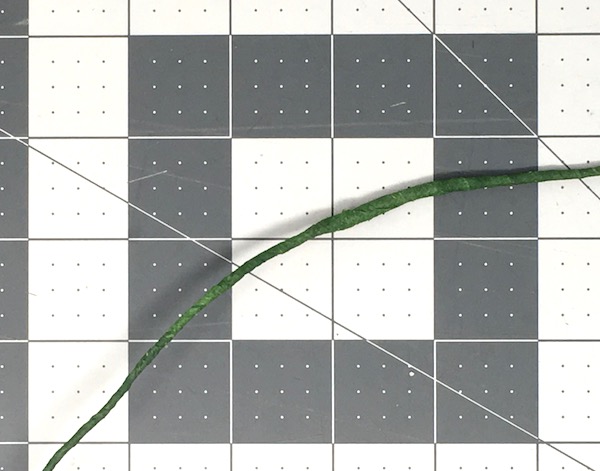
Just patch the section with more floral tape where the floral tape doesn't adhere well
And, of course, there is an easier way to get floral wrapped wire. You can actually purchase it at a craft store - it is called green stem wire found in the floral section. You get 12 pieces that are 18 inches long and they are relatively inexpensive. It comes in different gauges - they do have 16 gauge stem wire. That's the easier way to obtain the stems for your feather tree.
-
Now Wrap the wire with your Tim Holtz Idea-ology Halloween Fringe
You'll find the Idea-ology Fringe so much easier to wrap that the floral tape. I start it off the same way, just a little bit away from the edge, smear some collage medium on the floral wire, start wrapping to the end, change directions and finish wrapping the wire. Because I was running out of fringe , I didn't wrap all the way to end, I only wrapped the length of the branch that I knew would be visible. At the end I smear the collage medium to hold the end paper in place. This end is covered by floral tape when you wrap the branches to the dowel.
Make enough branches for your entire tree. I'm not sure how many packages of Idea-ology fringe I used, but I'm pretty sure it was 12-14 packages. You may want to take that into account when you plan the size of your tree.
-
Bend the branches so each branch in a tier is the same length
Each branch on a specific tier should be the same length. Bend them at 90 degrees so you can tape the excess wire to your dowel. So the first tier of branches is 5 inches long and the second tier is 6 inches long, etc. I bend them so I would make sure I made them the same length.
-
Wrap the base of the branches to your dowel
Starting at the top, wrap the excess part of the fringe-covered branches with floral tape to adhere it to the dowel. This is a little awkward. When you only have 4 short branches it's easy, but it gets more challenging as you get to the base of the tree. So when I have 6 branches I wrap 3 branches first to hold them in place, then I wrap the other 3 on the other side. Then I wrap the tape all the way down to the bottom of the wire.
Finish wrapping the rest of your dowel so that the dowel mimics bark. I used brown floral tape for the trunk and painted it black for this Halloween Fringe Feather tree.
-
Glue a finial to the top of your dowel

Here's the Fringe feather tree in progress showing the wooden stand. I added another tier after this photo was taken.

Or if you drilled a hole, insert a short branch to the top of your tree.
-
Place your fun little Fringe Feather Tree in its stand
Now insert your little tree into its own stand. And there you have it - your own DIY feather tree for Halloween or for the holiday of your choice.
I hope to decorate the tree with some Tim Holtz dies cuts. I think that is what it needs.
Tomorrow we get a new little house pattern - just a little more advanced than the previous one, but still easily doable. I also have been traveling lately in Washington DC and I did not realize how inspiring the architecture would be. I think I am going to make a miniature Halloween castle based on a section of the Smithsonian castle for one of the final houses in the 13 Days of Halloween series.
Ya'll take care.
Lucy

Learn to make your own little feather tree for any holiday using paper fringe or yarn
Suzanne
You are just adorable! I thoroughly enjoyed this video! I am going to look around for the fringe on the internet. .. wish me luck!
Lucy
Thank you, Suzanne. I think several places have restocked since I did the video. Have fun. Let me know if you need help.