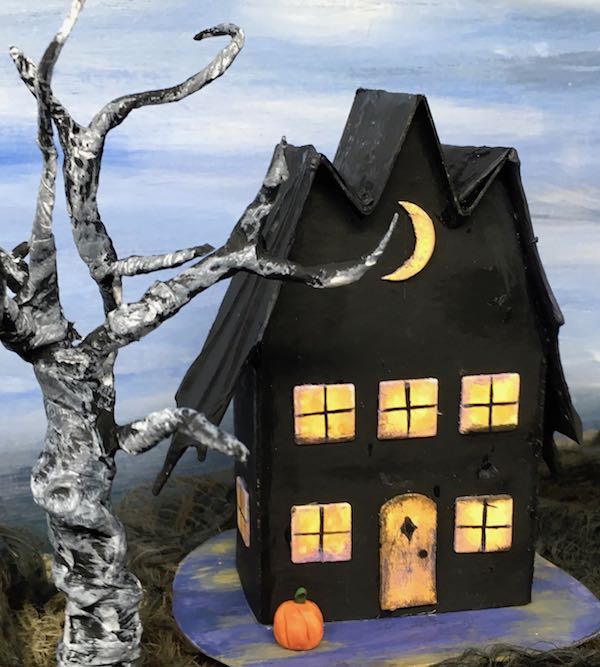
Front view Bat Wing Halloween Paper House No. 8
Now for today's little house - the Bat Wing house Halloween Paper House pattern no. 8. It's a unique little Halloween house that is a perfect addition to any Halloween village. I modified this pattern from the larger Bat Wing house that I posted a couple of weeks ago. Making this little house is comparable in difficulty to the Triple Gable Gothic house from yesterday.

Here you can see the texture on the bat wings themselves. Usually I paint them with matte collage medium to give just a little sheen to them.
Add this little house to your Halloween village with the free pattern in the Paper Glitter Glue library.
Let’s get started on the Bat Wing miniature Halloween house.
How to MAKE THE Miniature Bat Wing Halloween HOUSE?
DOWNLOAD THE FREE Bat Wing House PATTERN AT THE PAPER GLITTER GLUE LIBRARY
You can find all my free patterns in my Paper Glitter Glue Library. Please note that I list the patterns chronologically. That means you will find the newest 13 Days of Halloween paper house pattern first at the top of the library. I mostly list these houses by their number. Today's house is Halloween Paper House No. 8.
There is now an SVG pattern for this little house that you can download.
To get access to the library, simply subscribe to my newsletter with the form below and you will be sent the password immediately so you can download the pattern. Then click on the library link, click to enter the password protected area, type in the password and then the list of free patterns and tutorials will be available.
This post contains some affiliate links for your convenience. Click here to read my full disclosure policy.
MATERIALS
- Halloween House No. 8 Pattern PDF or SVG pattern - Design No. 21
- Tracing paper (if you are tracing to the cardboard)
- Cardboard (this house needs to be made of cardboard because of the steep gables and the bat wings)
- Baker's twine
- Tissue Paper
- Cutting Mat - there are the two different cutting mats I use. I like the Tim Holtz Glass Media Mat the most because I can clean glue and paint off of it easily. Here's the other mat that works very well for crafters.
- Metal-edged ruler
- Craft knife and/or scissors
- Aleene’s Tacky Glue or other white PVA glue
- Ranger Collage Medium
- I used Stampers Anonymous Craze stamp
- Ranger Pigment Ink Pad - Glacier White
- Paint – I use Tim Holtz Distress Paints because these paints work so well for Halloween projects. I used black gesso for the Bat Wing house.
- Colored pens, pencils if desired
- Paintbrushes – you need small brushes for details
- Various Halloween Embellishments
BRIEF OUTLINE OF DIRECTIONS
- Download and print pattern - Design No. 21
- Copy pattern to cardboard
- Score, then cut out pattern, and a small cardboard base
- Prime the house with the base color
- Stamp with the design of your choice or just paint it black
- Add windows and doors
- Fold and glue house together
- Make the bat wings
- Glue the center piece of the roof to the house
- Glue the bat wings to the house
- Paint cardboard base
- Glue to base
- Decorate your little house
ADDITIONAL LINKS:
13 Days of Halloween Paper House patterns:
- Halloween Paper House No. 1
- Halloween Paper House No. 2
- Halloween Paper House No. 3
- Halloween Paper House No. 4
- Halloween Paper House No. 5
- Halloween Paper House No. 6
- Halloween Paper House No. 7
- Halloween Paper House No. 8
- Halloween Paper House No. 9
- Halloween Paper House No. 10
- Halloween Paper House No. 11
- Halloween Paper House No. 12
- Halloween Paper House No. 13
See also the Twisted Tree Tutorial and the other Bat Wing Halloween House.
MAKE THE Bat Wing House – HALLOWEEN PAPER HOUSE NO. 8
-
FIRST DOWNLOAD AND PRINT PATTERN For the Bat Wing House
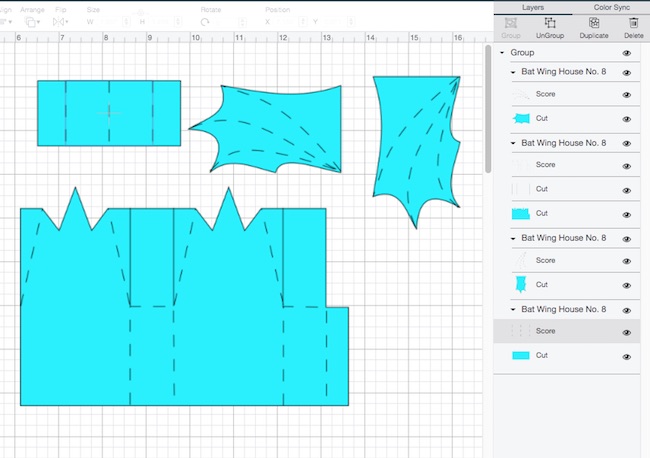
First download and print the PDF pattern. Or download the SVG pattern if you have an automatic cutting machine.
Here's how the pattern looks in Cricut's Design Space with the score lines marked and attached.
-
COPY PATTERN TO CARDBOARD
Use your favorite method copy the pattern to your cardboard.
-
SCORE, THEN CUT OUT PATTERN AND A SMALL CARDBOARD BASE
For these little houses, cut out a small piece cardboard a little bit larger than the house. This cardboard doesn't need to be anything fancy. In fact, I think irregular works better for this little Halloween neighborhood.
-
PRIME THE HOUSE WITH THE BASE COLOR
Obviously these bat wing houses need to be black.
-
STAMP WITH THE DESIGN OF YOUR CHOICE
Three of my previous Bat Wing houses had a spider web surface so I wanted to do something different for this house. To add texture and interest, one of the houses is stamped with the Stampers Anonymous with the Craze stamp. It's a great stamp.
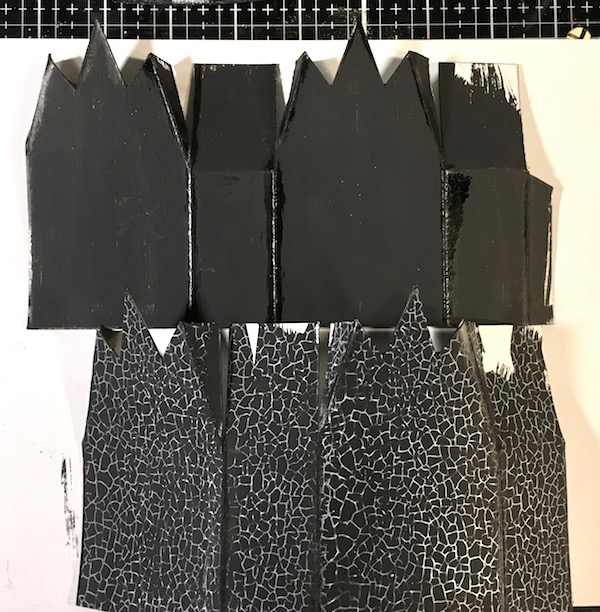
Painted and stamped bat wing house structure for Halloween Paper House No. 8
-
ADD WINDOWS AND DOORS
Before you add the windows and doors, remember the front piece is the one in the middle with side wall on either side of it. The glue tab always goes in the back.
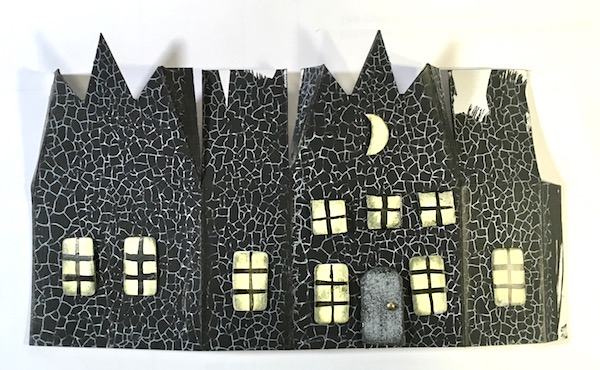
Planning window and door placement on the Craze stamped Bat Wing miniature house
Recently, I told you that I found the easiest way to make windows and doors for these houses. Basically, cut out little squares and rectangles for doors and windows. Then paint them a brighter color than the houses - mostly I used Squeezed Lemonade distress paint or Fossilized Amber. But if you mess up the painting you can just discard it. After some experimentation, I prefer cardboard over paper because it gives a little more dimension to the window or door.
Also it helps to glue the windows and doors on the house before you fold and glue the house together.
-
NEXT FOLD AND GLUE HOUSE TOGETHER
Now fold the house along the scored lines and glue the house together with the glue tab in the back. Let dry before you try to glue the roof on.
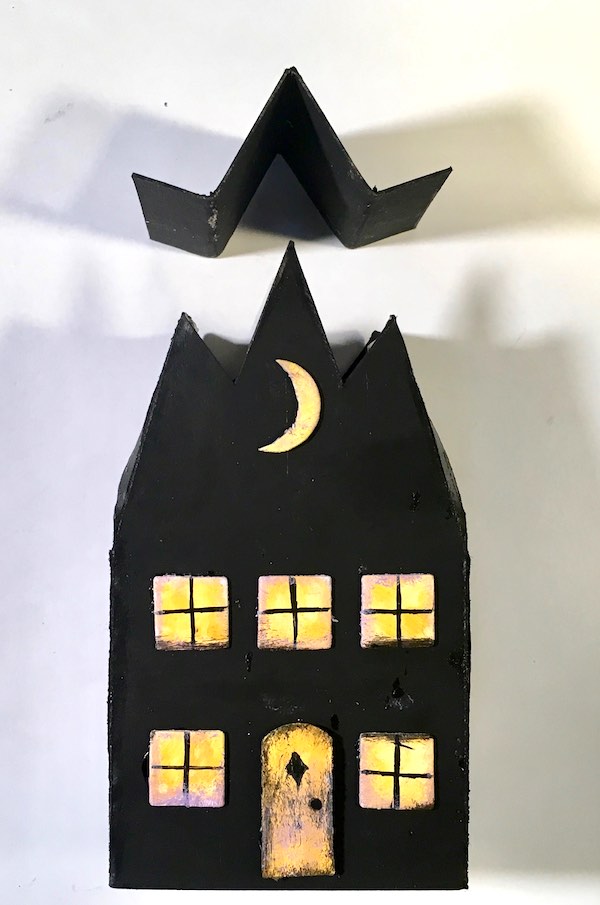
The house is glued together ready for the W-shaped roof piece to be adhered. Make the bat wings first so you can test fit them to the sides and roof.
-
Make the Bat Wings
Now to make the bat wings.

Make the bat wings for the Bat Wing Halloween Paper House No. 8. There are 2 sets of bat wings above because I made two Bat Wing houses.
Cut out the two wings from the pattern. The side with the point that juts out the most is the front of the wing.
-
Make the "Bone" structure on the wings
To make the bones on the bat wing, I cut string a little longer than the lines on the bat wing pattern and embed them in a thick layer of glue. For these wings, I used Baker's twine because it is the perfect size string.
-
COVER WINGS WITH TISSUE PAPER EASING IT AROUND THE CURVES AND STRING
Cover the wings with a layer of tissue paper.
I leave extra tissue paper at the top of each wing to fold over the gable so it will adhere better.
Fortunately, the tissue paper makes a nice subtle wrinkly effect that works for the a bat’s wing. Adhere the tissue paper with a collage medium or a thin glue like Mod Podge so you can ease the tissue paper around the form. If it tears just make a little patch of tissue paper and adhere that.
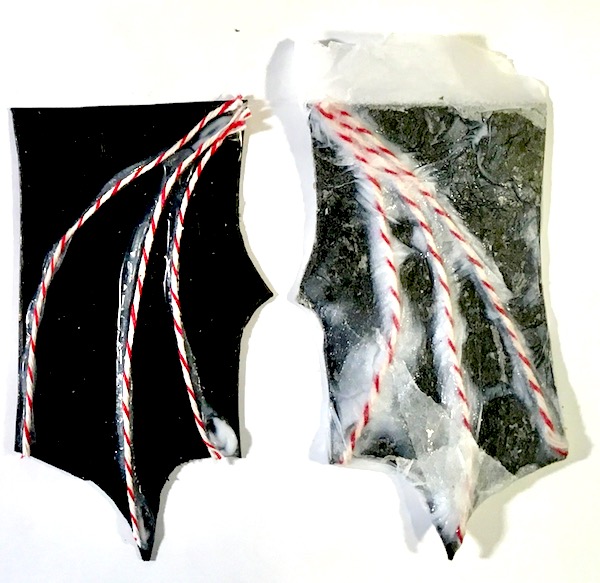
Close-up of the tissue paper bat wing. Really it doesn't matter that it is messy because the paint is going to cover it up.
Above the house you can see the W-shaped piece for the roof. It’s the same width as the top of the bat wings.
-
PAINT BAT WINGS Black TO MATCH THE ROOF
Because black gesso covers things so well, that’s the paint I used here. Be sure to paint all of the tissue paper black because the top flap will be visible on the roof.
-
THE CHALLENGING STEP: GLUE THE ROOF TO THE HOUSE
The hardest step on the Bat Wing Halloween house is gluing the 3 pieces of the roof.
Glue the W-shaped center roof on
First glue the center W-shaped roof piece in the middle. Just like on the previous Triple Gable Gothic Halloween House, apply a thick bead of glue to the middle tallest gable. Then apply the folded roof piece in place. Try to center it over the gables so that there is an equal overhang on the front and back. The tip of the middle gable is pretty flexible. Sometimes I have to push it in place with a pencil or stylus.

Hold the roof in place to let it dry. This is critical because the next 2 sections are dependent upon this one being secured.
Glue the Bat Wings on
After the middle W-shaped piece has been glued on, glue on the 2 bat wing roof pieces. Again try to center them on the roof with equal distance of overhang on the front and back. It doesn’t always work. Mine are frequently uneven, but it probably bothers me more than anyone else. I use lots of glue.
Generally after I squeeze the glue on, I smear it with my finger so it makes a smoother layer which will hold better than the lumpy layer you see below.

The middle W-shaped piece is glued in place now it's time for the bat wing to be glued on.
Glue on the other wing and you are done with making the Bat Wing House structure. Sometimes I paint the wings with a matte collage medium to give some shine to the wings because that is how I imagine bat wings look.
-
PAINT CARDBOARD BASE
Now that you have the roof in place, your little Halloween house is basically done. Pick a contrasting color for the base and paint it. One of my favorite details is distressing the base.
-
GLUE TO BASE
To glue the house to the base, apply a thick bead of glue onto the bottom of the house and apply to the cardboard base. Let dry.
-
DECORATE YOUR LITTLE HOUSE
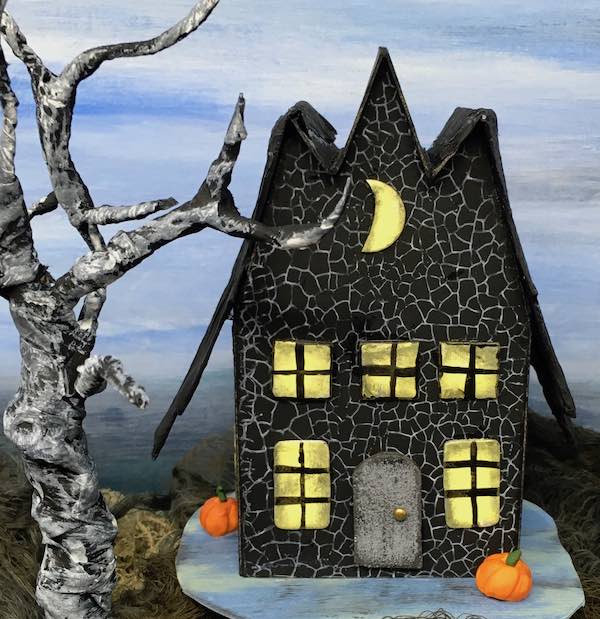
Front view of the Bat Wing Halloween Paper House stamped with Stampers Anonymous Craze stamp
Finally you get to decorate the little Bat Wing house. Just like the other houses, I am keeping them simple with the same little polymer pumpkins. And once again, I suggest you use more imagination than I have. This is one of my favorite designs. Tomorrow I am probably going to post the fringe feather tree plans so you have time to gather supplies and make it before Halloween.
And once again I am going to add this miniature Halloween house to the Simon Says Stamp Monday Challenge "Halloween/Spooky". Lots of great designs there. Be sure to stop by and see them all.
Be sure to check back tomorrow for the "Fringe" Feather tree. This craft is pretty different for me, but I'm pretty sure you will like it. Take care of yourselves.
Lucy

The Bat Wing House is Halloween Paper House No. 8 in the 13 Days of Halloween series.




Zoey
Oh my, these are beyond AMAZING!!!! i am in love!! Thank you for sharing with us your step by step progress!!! I love these houses very much!
Thank you for playing along with us over Simon Says Stamp Monday Challenge! We all hope to see you again pretty soon! xx Zoey