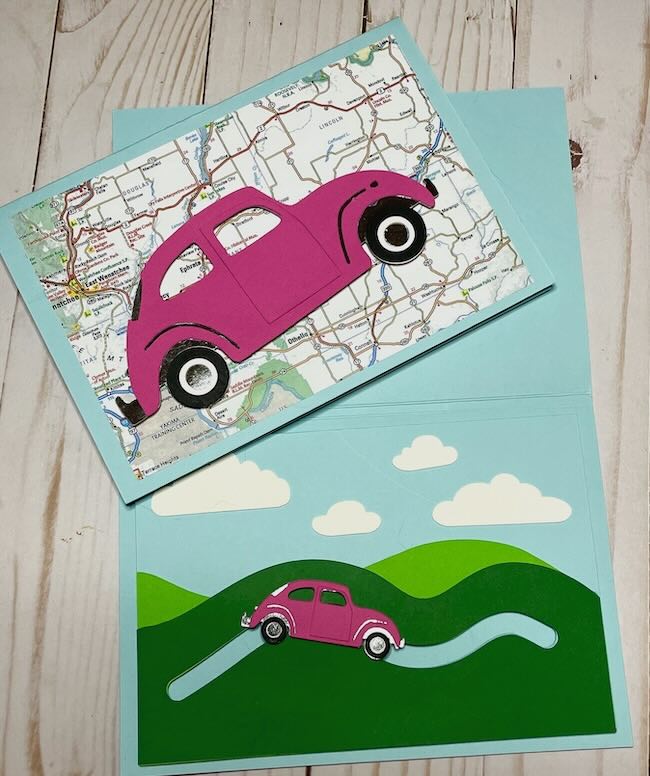
Since it is summertime while I am writing this, I thought it would be fun to make a travel-themed slider card with an adorable little beetle car zooming along. The Beetle Slider card is design no. 214 in the Paper Glitter Glue library.
If you do not already have the password for the library, just subscribe with the form below so you will get the password right away and can get this adorable paper craft pattern.
This post contains some affiliate links for your convenience. Click here to read my full disclosure policy.
Materials to Make the Beetle Slider Card - Design No. 214
- I used my Cricut Maker 3 as my cutting machine to make this slider card
- Cricut Light Grip Mat or Standard Grip Mat
- Scoring Tool or Scoring Wheel (I prefer the scoring tool on my Cricut)
- Fine Point Blade f
- Bearly Art Glue works well for card making
- Cardstock- various colors
- Foil Cardstock for metallic pieces on the car
- Lightweight Cardboard for slider mechanism
- 6 mm Foam Adhesive Dots
- Double-sided Adhesive Craft Foam Tape
Outline of Steps to Make the Beetle Slider Card - Design No. 214 in the free Paper Glitter Glue library

- Download the Beetle Slider Card - Design No. 214 in the free Paper Glitter Glue library.
- Choose which card you want to make - the card with the slider mechanism on the front or the large beetle on the front. If you choose the one with the slider mechanism inside, you need the card which has 2 score lines in the center to give the slider room to move.
- Glue the roadway of the slider card together - glue the front set of hills to the background set of hills. Make sure they are exactly lined up so the Beetle mechanism can move freely.
- Glue to the background piece in blue for the sky. Again line it up exactly for the slider mechanism to work properly.
- Decorate with clouds if desired.
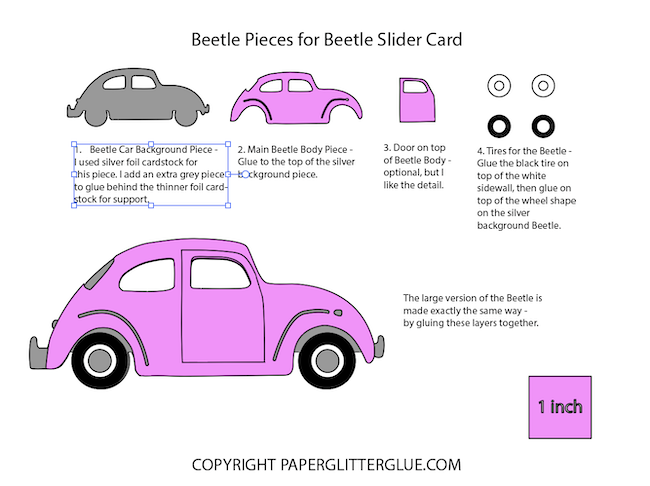
- To start construction on the beetle car, glue the foil silver background to the front of the beetle car. I also cut out an extra grey background car in thicker cardstock to provide extra support for the foil cardstock since it is a bit flimsy.
- Make the wheels glue the white circle background to the black front piece of the car to make the white wall tires. Glue the tires to the foil circular area of the beetle. That completes the wheels with the hubcaps.
- Glue the door to the beetle. It adds dimension, but not totally necessary.
- Cut out 3 circles for the slider mechanism, Use cardboard (or perhaps thicker cardstock) for the slider mechanism. Glue two layers of cardboard together for the bottom of the slider.
- Glue the single piece of cardboard to the back side of the beetle body.
- Adhere the 6mm glue dot to that circular piece on the beetle.
- Flip your hill background piece over and place the beetle car so that the foam dot is in the center of the roadway cut out. Next, adhere the double layer cardboard to the foam dot on the beetle.
- Next, attach foam tape to the back of the background piece. You are making room for the slider to move. Make sure you do not put the foam tape too close to the edge of the slider path.
- Attach to the card.
- Send to one of your favorite people!
Beetle Slider Card Files
The card patterns are available in a zipped file format. The file folder includes SVG files for use with a cutting machine and PDF files for printing. The PDF files also show you how to put everything together.
If you need help learning how to unzip your files, see these instructions:
- Here's how to unzip a folder using an iPad or iPhone.
- To learn how to unzip a folder using a Windows computer, click here.
- To learn how to unzip a folder with an Android device, click here.
- To learn how to unzip a folder using a Mac, click here.
If you have any problems making the Travel Adventure Slider Cards, please email me at [email protected]
Karen Sturdivant
I can't retrieve anything from the free library. It gives me a 403 forbidden response.
Lucy
I am working on the problem. Please email me so I can send you the file now. [email protected]
Lucy