Yesterday's post finished with the cutout cardboard front and sides. I did not take a photo of the back piece when I cut it out, but I do have a photo of the template for the back. I added ½ wide flaps on each side that allowed me to glue the back to the front/side piece.
 |
| Back piece without the side flaps for gluing to the main body of the house |


I didn't take too many pictures after this because the house was basically done except for embellishments like the roof and the porch.
The porch consists of a fold piece of cardboard glued to the front of the house about halfway (hence the line on the pattern). I put this roof down just a little bit too low. It detracts from the details on the porch. The edge of the porch is supported by 2 pieces of balsa wood I buy at my local craft store and cut to size. The porch base is a piece of wood I salvaged from my brother's shop, but you can buy similar stuff at the craft store as well. I distress the wood with white gesso then black soot distress paint.

Brief overview of finishing items:
Martha Stewart Iron Gate Edge Punch - I used this punch to make the metal railing on the widow's walk. Even though it is retired you can find it online. It is a wonderful, versatile punch - perfect for making all sorts of fences and embellishments for little cardboard houses.
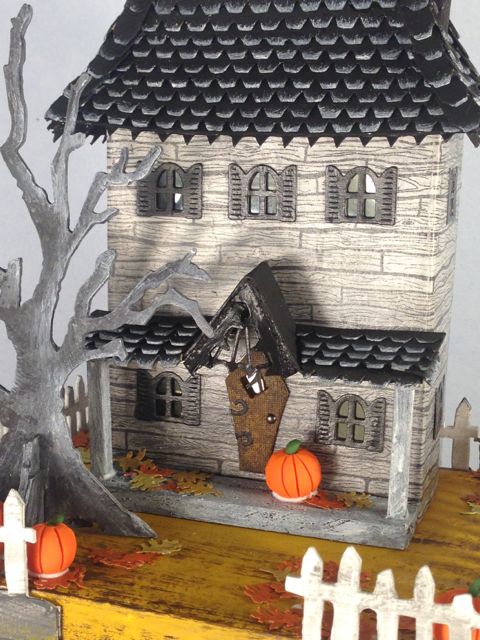
Tim Holtz Village Rooftops - used to make the tiles on the roof. I edged each row with white paint to make the tiles more visible. I also tried to stagger the roof tiles as I like the pattern it forms. I also used 2 tile pairs folded in the middle to edge the curves on the sides of the roof. The toothlike projections on the edge of the roof are the offcuts of the tiled cutouts. Just a little scary touch.
Papertrey Inn Tiny Town Basics Die - for the shuttered window cutouts. It was so nice to cut these windows out 4 at a time. I really like this set of dies.
Tim Holtz Branch Tree is now retired, I think. What a shame. It is such a great addition to any Halloween House. I punched out 2 extra trunks and cut slots in the tree and the trunk to make the tree stand up. It is not glued down. I also shaded it with Black soot distress paint on one side and picket fence on the other side of the tree - spooky.
The coffin door is cut out by hand. My favorite way to make cardboard look like wood is to paint it with ochre then burnt sienna and burnt umber. The hinges are just some black offcuts of cardstock. The doorknob is a tiny brad. I punch a hole with my smallest hole punch and then insert the brad and glue it down.
The pumpkins are from sculpey and are so easy. I just make a little orange ball from the softened clay. Put it the refrigerator to get the clay firm again, then use a cutting tool to make the indentations on the pumpkin and insert a little green stem. When the house is all done, then I coat the pumpkins with sculpey glaze to give them a little shine. The photo above was done before that though.
Tim Holtz On the Edge Fence - this is a great fence die. I use it a lot for my Halloween houses. It is simply painted with white gesso then distressed Black Soot and Ground Espresso distress paints. Sometimes I put the fence all around the edge of the cardboard base. That is the easiest way to glue on a fence. Sometimes I attach them to posts on top of the base. I'll show you that on my next house.
Since I had to fly (on a plane) with this little house, I didn't glue the bat in place until I made it to my destination. I used a bunch of hot glue in the chimney to attach the bat's wire to the house. The bat is from EK success. Please ignore the tipped over witch on the widow's walk roof. I didn't glue her down so she can be moved about wherever desired.

I think that's enough detail for now. This is a little bit complicated house to make. If you are new to making cardboard houses, I would go to the Cardboard Christmas forum or Howard Lamey's Little Glitterhouses and make one of Howard's simpler houses. When you put his patterns together you learn little details that make the houses stronger and more long lasting. After all, if you go through all this trouble you really want the little house to bring joy to someone for a long time, right?
Lucy
Yes, that is mostly how I do it. I glue several layers of corrugated cardboard together. This cardboard often pops open on the edges so I always wrap it with something. At first I used copy paper, now I score a piece of regular (meaning non-corrugated) cardboard the size of the base and make flaps to go around the irregular corrugated edges and glue that down. It seems to make the flattest, most stable base, but you do have visible seams at the corners. Since I usually glue a fence around the edge it doesn't really matter. I'll try to make a post that shows how I do it.
Laney
Hello again Lucy! What a great house! I enjoyed reading the tutorial. How did you make the base the house sits on? Did you use Howard's method? Are there other methods you use? Thanks!