• Skip to primary navigation
  • Skip to main content
  • Skip to primary sidebar
  • Skip to footer
Paper Glitter Glue
  • Shop
  • Favorite Supplies
  • Tutorials
  • About
  • Contact Me
  • Free Library
menu icon
go to homepage
search icon
Homepage link
  • Shop
  • Favorite Supplies
  • Tutorials
  • About
  • Contact Me
  • Free Library
×
Home » Fundraiser » Wilkins House » How to Draw Patterns for a Steeple for Your Little House

How to Draw Patterns for a Steeple for Your Little House

January 7, 2018 by Lucy 7 Comments

Be sure to Pin to your Favorite Pinterest Board!

20 shares
  • Share

Tutorial - How to Draw a Pattern for a Steeple

How to draw steeples 3D paper houses

The Circle and Chord Method

I've  been struggling with drawing patterns for steeples ever since I started making little houses. I basically made them by drawing a triangle the size I want and then tracing 3 copies to make the pattern. I knew I had to figure out a way using geometry and finally, I did. I can't believe it is this easy. Once you see the process you'll see that you can make a steeple with many sides easily.

This post contains some affiliate links for your convenience. Click here to read my full disclosure policy.

But first you need a specific tool - a compass. Here's a good compass you can buy online. It's draws a better circle than the compass below, but it is a little more expensive. I finally upgraded to the improved Staedtler compass.

Steeple pattern how to DIY
The compass - our special tool for drawing a steeple pattern

Directions:

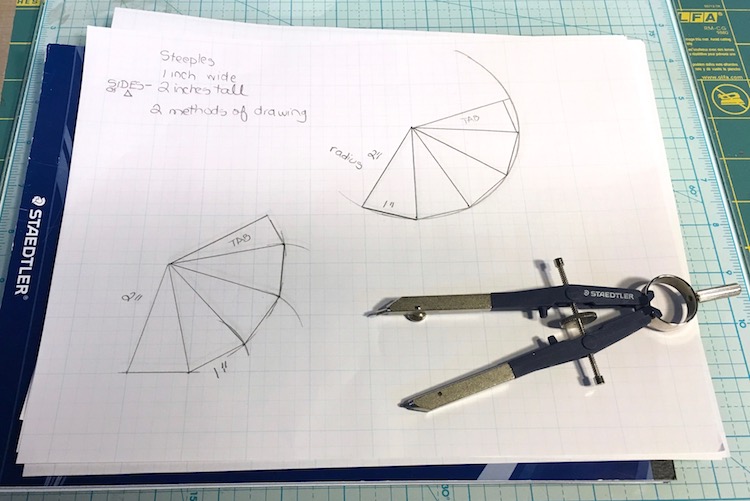
1. Determine the size of your triangle for the steeple. For the purposes of this tutorial, the width will be 1 inch and each side of the triangle will be 2 inches. That's not the height of the triangle because each 2 inch side is slanted. The height of the triangle is just a smidge under 2 inches (I confess, I didn't measure it.)

2. Set your compass to 2 inches.

3. Draw a circle on the graph paper with a radius of 2 inches. I knew I didn't need an entire circle because of the size of my steeple so I only drew a portion of the circle. You can barely see the little hole that the compass made in the center of the circle and how the circle intersects 2 inches when the lines are perpendicular.

Circle for Steeple pattern how to tutorial
Draw a circle with a 2 inch radius.
4. Mark a point on the circle as the starting point for your pattern. Now set the compass for one inch because that is the width we want for the steeple. Put the compass on your starting point and mark one inch intervals - as many as you need for the size of your steeple. Here we need 4 sides so I made a total of 5 marks (to include an extra side as a tab for gluing).
Circle for steeple pattern DIY tutorial
Mark one inch segments on the circle you've drawn.
5. Draw a line connecting the starting point with the one inch marks. You are drawing a chord on the circle - I had to look up the technical name for this because I didn't remember it from geometry.
Chords marking base of steeple triangle tutorial
Circle marked with one inch chords which will form the base of your triangles.
6. Now use your ruler to draw a line from the center point to each end of the chord on the circle. These lines form the sides of your steeple pattern. And there you have your steeple pattern. You can make a 6 sided pattern just as easy.
Steeple sides marked on your pattern steeple tutorial
7. Here is the finished pattern and the sample steeple.
Steeple pattern DIY pre-scored and cut out
Cut out the Steeple pattern. Try to remember to score it  before you cut it out. It is so much easier if you do this.
Steeple pattern DIY cut out and taped
The steeple pattern cut out and taped together. I am so happy I know how to do  this now.

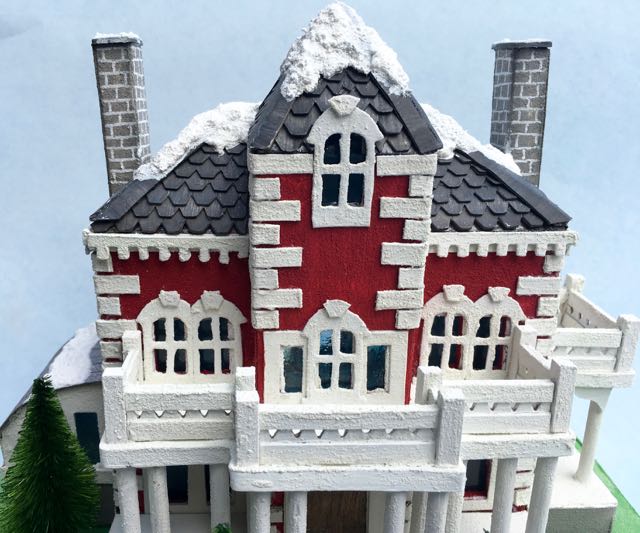
What do you think? Will this help you when you make steeple for little houses or little churches? I certainly hope so. It has already made my life a little easier in making the top to the tower on the Wilkins House prototype. Here's the steeple roof on the Wilkins House.

Wilkins house steeple roof over the front tower

Now I'm going steeple crazy. It's going to be so much fun.

And here is the steeple on the Snowy Church.

Snowy Church paper church for 12 Houses for Christmas

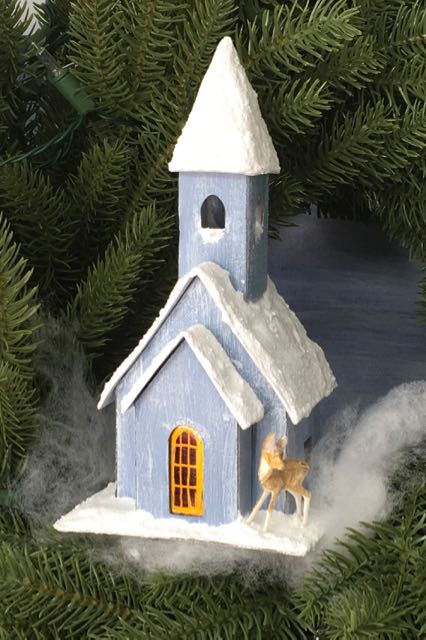
The glittered deer is always looking about and ready to run.

If you want to know how to make more Paper Houses and Paper crafts, you can join the Glitter and Putz House Facebook group or my private Paper Houses and Paper Crafts hosted by PaperGlitterGlue. Both of them are easy places to share your projects and ask questions.

Ya'll take care.

Lucy


« Putz Plan Progress
Frosted Butterflies Out of Season »

Be sure to Pin to your Favorite Pinterest Board!

20 shares
  • Share

Reader Interactions

Comments

    Leave a Reply Cancel reply

    Your email address will not be published. Required fields are marked *

  1. mike gilroy

    December 21, 2024 at 10:08 pm

    How do you cut this out of wood

    Reply
  2. Lucy

    January 07, 2018 at 11:36 pm

    Thank you for reading Laney. I am glad you think it will be helpful. I always enjoy seeing your projects.

    Reply
  3. Lucy

    January 07, 2018 at 11:36 pm

    Thank you, Sara. Your architect husband would laugh at this low tech solution, but it works. My brother told me yesterday that my creative work is analog as opposed to digital in this day and age.

    Reply
  4. Lucy

    January 07, 2018 at 11:34 pm

    You could put tabs at the bottom, but I don't usually do that because often the steeple hangs over the edge of the tower and you can sort of wedge it over the top of the tower. On the Wilkins House the steeple actually sits on a flat base so there is a decent amount of gluing surface. But you can always choose to do tabs to provide a larger area for glue. I hadn't thought of that idea. Good question.

    Reply
  5. Susan

    January 07, 2018 at 10:43 pm

    Should there be tabs left at the bottom of the sides to use to attach the steeple to the roof top?

    Reply
  6. Laney

    January 07, 2018 at 10:43 pm

    Thanks Lucy - this is great and will be so helpful!

    Reply
  7. Sara Barker

    January 07, 2018 at 1:42 pm

    Great tutorial, Lucy! Thank you for sharing it with us! Can't wait to see your finished steeples this year! Happy New Year!

    Reply

Primary Sidebar

Lucy holding a small putz house

I'm Lucy - the paper architect behind the captivating tiny house designs at PaperGlitterGlue.com.

While I am often found covered in glue and cat hair and obsessing about the details of my projects, I love sharing my designs so anyone can craft seriously awesome paper crafts.

So look around and find something to MAKE.

You can read more about me here.

Want to make a beautiful Village Wreath?

You can do it step-by-step with my Alpine Village Wreath Workshop. Just let your creativity flow as create your own little village proudly displayed on a wreath. You'll create a heirloom that your family will treasure for years.

Wreath with alpine village houses and bottlebrush trees

And if you are a Halloween fan - you'll love my Halloween book! 13 Handcrafted Halloween Houses

This book contains 13 different Halloween designs with embellishments like crooked windows, fences, and shingles.

13 Handcrafted Halloween Houses book cover

What is a Putz House and How Do You Make One?

Halloween house putz house

Learn to make the best House Pop-Up Cards! with the Playful Pop-Up Houses book.

Cover for Playful Pop-Up Houses book

Footer

You are welcome to link to PaperGlitterGlue.com or use a single image with a brief description and a link back to any post. Do not republish any post. That's not allowed. But I do like it when you share my photos to Pinterest.

Amazon Associates Disclosure

Lucy Foxworth of PaperGlitterGlue.com is a participant in the Amazon Services LLC Associates Program, an affiliate advertising programs designed to provide a means for sites to earn advertising fees by advertising and linking to Amazon.com. So as an Amazon Associate I earn from qualifying purchases. Thank you.

Footer

↑ back to top

About

  • Privacy Policy
  • Disclaimer

Newsletter

  • Sign up with the form below for emails and updates.

Contact

  • Contact

As an Amazon Associate I earn from qualifying purchases.

Copyright © 2023 Paper Glitter Glue