Create a stunning Merry Christmas banner with your Cricut! My tutorial guides you step-by-step to easily cut out these decorative letters and layer on background panels for added flair. Perfect for mantels, walls, or party backdrops, this banner adds a festive touch to your holiday decor that you can put together in just a few minutes outside of cutting time, of course.
This is day no. 2 for the Paper Glitter Glue 12 days of Christmas event. Yesterday we made the Winterberry Holiday Cottage. Tomorrow will be another fun craft.
To get the free pattern for the Merry Christmas banner, simply go to the Paper Glitter Glue library page, click the big click here button which takes you to the password page, type in the password, then you are in the library.
But if you don't have the password, simply subscribe to my newsletter with the form below and you will get the password right away.
This post contains some affiliate links for your convenience. Click here to read my full disclosure policy.
What do you need to make this banner?
I used cardstock, but you can use cardboard or even fabric or felt. Here's my supply list:
- Cardstock - it doesn't matter much which weight of cardstock that you use - 65-110# will all work well
- Cardboard - 22 pt cardboard is my current favorite
- Glue - Bearly Art Glue
- Yarn or Ribbon
- Cutting Machine - I used my Cricut Maker, but you could use other cutting machines. The letters are small enough to cut out on a Cricut Joy even.
- Paint if you are making your letters from cardboard
Steps to Make the Merry Christmas Banner
- Download the pattern from the Paper Glitter Glue library - Design No. 171
- Cut out the pattern pieces
- If using the background panels, glue the 2 layers together, then glue the letters to the background panels.
- Thread ribbon, string, or yarn through the holes of the panels or letters.
- Hang your Easy Merry Christmas Banner where you and your family can enjoy it!
Really it is that easy. The only thing that takes time is cutting out all the letters and background panels. You can literally put it together in 10-15 minutes.
Here is the short YouTube video showing all the steps for making the banner.
I've included several pattern variations in the file. To help prevent confusion, I'll explain a little more about them here.
This is a photo of all the SVG files included in Design No. 171

This is file "Merry Christmas Banner 4 inch paperglitterglue.com SVG.svg". (the 4 inch version that is NOT stacked meaning that the letters are not stacked on top of each other so that they fit on a 12 inch mat).

And this is the stacked version file "Merry Christmas Banner 4 inch stacked paperglitterglue SVG.svg". I've started including this version in my files because sometimes there is a Cricut Design Space update reduces everything to fit on a 12 x 12 inch square. So to get around that, I've stacked all the pieces of the file on top of each other. It's not my favorite way to use a file so if other versions work, I ignore this version.
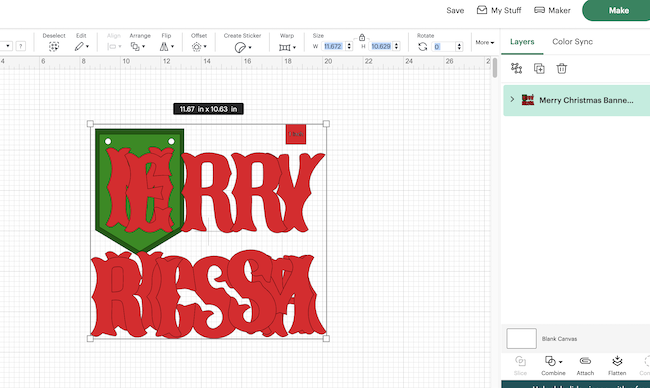
And here is the version of the Merry Christmas letters with holes in Cricut Design Space. This is the way it uploaded in Design Space.

Finally, you can see my banner using the 4 inch letters with holes. You can see Allie Cat's paws in the upper right hand corner. She was surprisingly good and did not chew on the ribbon.

Lucy
Leave a Reply