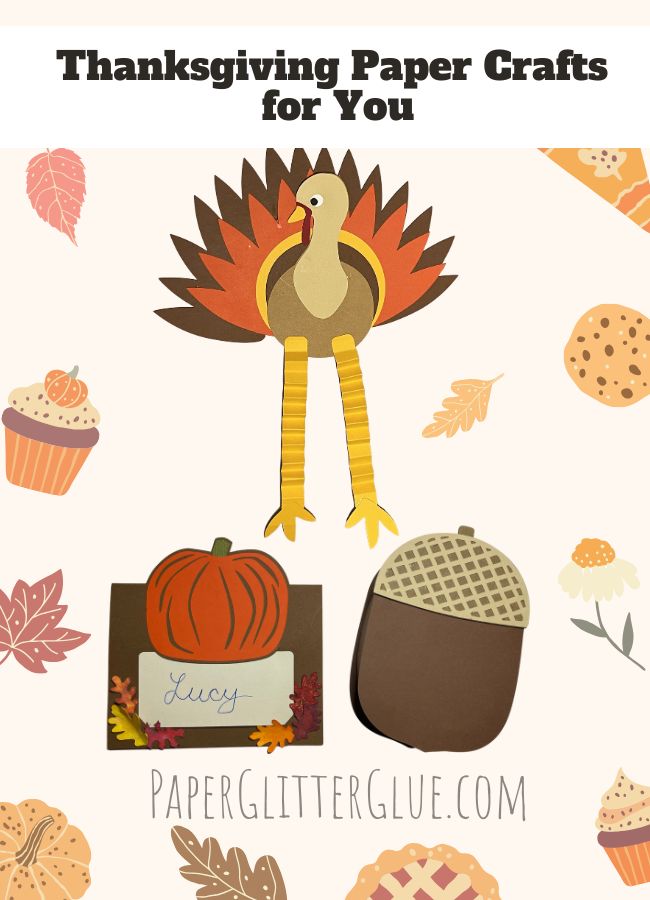
Thanksgiving is the perfect time to get creative and add a handmade touch to your holiday decor. In this collection of Thanksgiving paper crafts, you’ll find fun and easy projects like the Wobbly Gobbler Dancing Turkey, Pumpkin place cards, and Acorn table decorations — all made from cardstock. These simple crafts are perfect for dressing up your Thanksgiving table or keeping the kids entertained while dinner’s cooking!
Subscribe for my paper crafting newsletter to keep up with all the news.
This post contains some affiliate links for your convenience. Click here to read my full disclosure policy.
What Do You Need for these Thanksgiving Paper Crafts?
- Cardstock
- Watercolor paper - I like to use this when painting or staining my projects
- Glue, this is my preferred glue
- A way to cut out your projects - this is what I use
- Paint - optional
- Spray stains - works great for Autumn leaves
- Paper rolls for napkin rings
- Optional fall embellishments
Directions for Making Easy Thanksgiving Paper Crafts
- Download the projects for the free Paper Glitter Glue library:
The Wobbly Gobbler - a Dancing Turkey
Thanksgiving Pumpkin Place Card
Easy Acorn Gift Box - Cut out the pattern piece
- Assemble the layers of cardstock or watercolor paper according to the directions for each craft below
- When finished, decorate with your adorable crafts
The Wobbly Gobbler- a Dancing Turkey
Let's start with the fun paper craft I call the Wobbly Gobbler. It's a Dancing Turkey figure. I've done a number of other dancing figures, but none for Thanksgiving. So here we go. Here's the LIVE YouTube video where I made the Dancing Turkey.
1. Download the pattern for the Wobbly Gobbler - Design No. 201 in the Paper Glitter Glue library
If you have the library password, simply go to the library and select Design No. 201. It's a zipped file (compressed) containing both the SVG file and a printable file showing all the pieces of the Wobbly Gobbler.
If you don't have the library password, subscribe to my newsletter and you will get the password right away.
2. Cut out the pieces for the Dancing Turkey
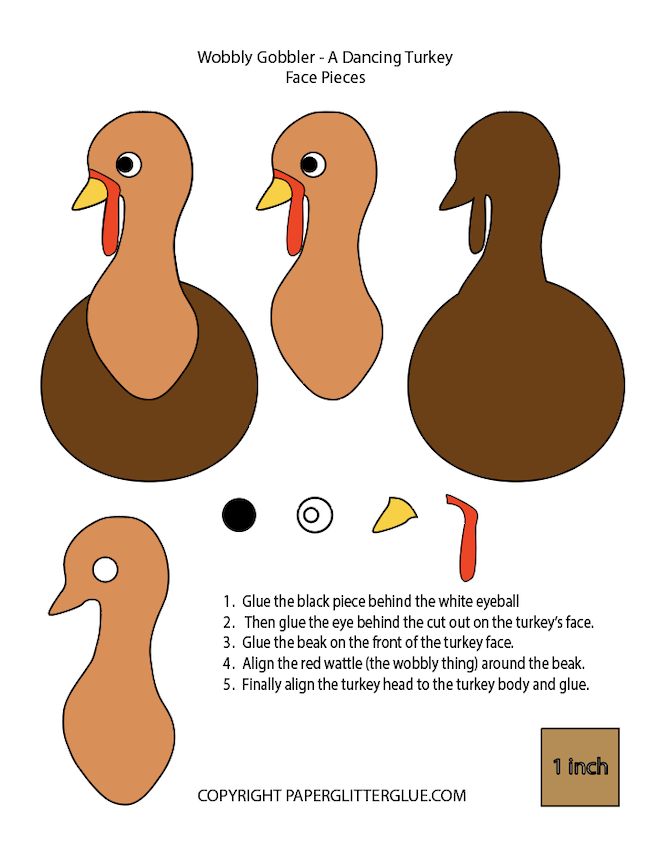
Below are the pieces shown the face and head of the turkey.
These are the two background wings for the turkey.

These are the colors behind the body of the turkey and legs for the dancing Turley.

3. Assemble the pieces of Dancing Turkey
First, assemble the head of the turkey. Glue the black piece of the eye behind the white eye piece.
Next, glue the completed eye behind the cut out on the turkey's head.

Glue the beak in place.

Be sure to line up the edge of the beak with the beak on the turkey body.

Next glue the turkey head on the turkey body.

Line up the head piece on the turkey body.

Glue on the red turkey wattle and the two colorful semi-circular sections behind the turkey body.

To complete the dancing turkey body, glue the layers of feathers together that go behind the turkey body.

Align the turkey body on the feathers and glue together. I try to make sure the head of the turkey is above the yellow part of the feathers.

Finally fold the turkey legs to make the dancing part of the turkey. Glue the feet to the legs and then adhere to the body of the turkey. Also glue the hanger to the back of the turkey.
4. Now hang up your adorable Wobbly Gobbler Dancing Turkey
Kids will love having this hanging on their door so that it wobbles when they open and close the door.
Make Thanksgiving Pumpkin Place Card
Next is the Thanksgiving Pumpkin Place card - a truly simple Thanksgiving craft. All you need is 4-5 colors of cardstock and some glue. And the pattern of course. You'll find it in the Paper Glitter Glue library as Design No. 202.

The video above shows you how to make the Thanksgiving place card.
Easy Acorn Gift Box
The Easy Acorn Gift Box is truly a very simple craft. Here's the video where I show you how to make it. The written directions are below.
1. Download the pattern for the Easy Acorn Box - Design No. 203
You'll find the Easy Acorn Box as Design No. 203 in the Paper Glitter Glue library. If you don't have the password to the free library, then subscribe to my newsletter with the form below and and you will get the password right away.
The pattern is available as an SVG cut file. I use a Cricut to cut out most of my projects.
2. Cut out all the pieces
For this project I made it using different weights of paper to make sure that would work. I cut out the design in both lightweight cardstock (65#) and heavy watercolor paper (140#). Both cut beautifully and were easy to assemble.
Here's how the grouped design looks when first uploaded to Cricut Design Space.

The only score lines that you have to identify are on the side strip pieces. The score lines are grouped with the piece they are to be cut out with.
Simply select the lines in the layers panel (my score lines are drawn in red so the color box will show them as red), then go to the operations menu scroll down to select score. Finally, select the entire side strip pieces and attach the score lines to the piece they below. The attach button is at the bottom of the layers panel on the right side of your screen.
Just a quick note here, I usually cut a couple of extra layers of the acorn cap base piece - the piece with out the cutouts - so the cap has more dimension and sticks out a bit better.
3. Layer the Acorn cap
If you cut out extra layers of the background piece of the cap, glue those layers together. Then apply the lighter colored top piece to the acorn cap background piece. Line it up so it matches the edges.
4. Make the Acorn box
This is actually easier than it appears. To make the box, you make upper and lower sections where the lower portion of the box fits inside of the slightly larger upper section. You can see the size difference in the photo below.

First, glue the side strips together. Fold along the score lines around the tabs. Then overlap one longer side piece with a shorter side piece and glue together. Make 2 side pieces for the top and bottom of the acorn gift box.
Next, let's make the slightly larger upper section first. Gently curve your side piece so it will go around the template to adhere it to. Apply glue to all the little tabs on the side strip that you have glued together.
Next take the oval template for the top piece (that's the piece on the left in the photo above) and slide the side piece which has the glue on the tabs under the template. Start on one side and gently continue all the way around the template. Hold it along the edge as you slide the side strip tabs under the template. It's easier than it sounds. You can set this step on the video.
Glue the ends of the side pieces together. You may need to trip a little bit off. That's what I do.
Next, center the box part on top of the acorn shape. Then glue the template with the side strips to the larger acorn shaped piece. Please note that the more rounded part of the box shape goes to the rounded top of the acorn cut out. Make sure you adhere it well. I rub my finger around the edge to make sure that all the little tabs are well-adhered to the top of the acorn top.
Do the same with the bottom piece. Again make sure that the rounded part of the inner box lines up with the rounded top of the acorn.
5. Glue the layered Acorn cap to the top piece Acorn Gift Box
Simply line up the top edges of the layered acorn cap with the top curve of the top section of the Acorn Gift Box. If you want to add a cap to the bottom piece you can do that as well, but I don't think it is necessary and might be confusion.
And finally, fill with treats, add someone's name to the front, and share with people you care about.
Happy Thanksgiving Crafting!
If you have any questions, just let me know. [email protected].
Leave a Reply