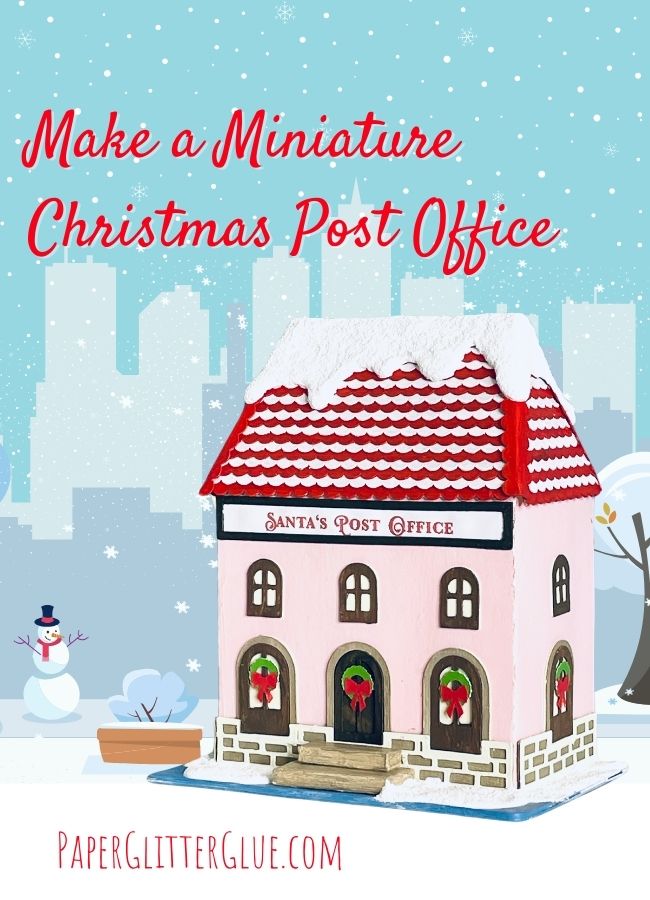
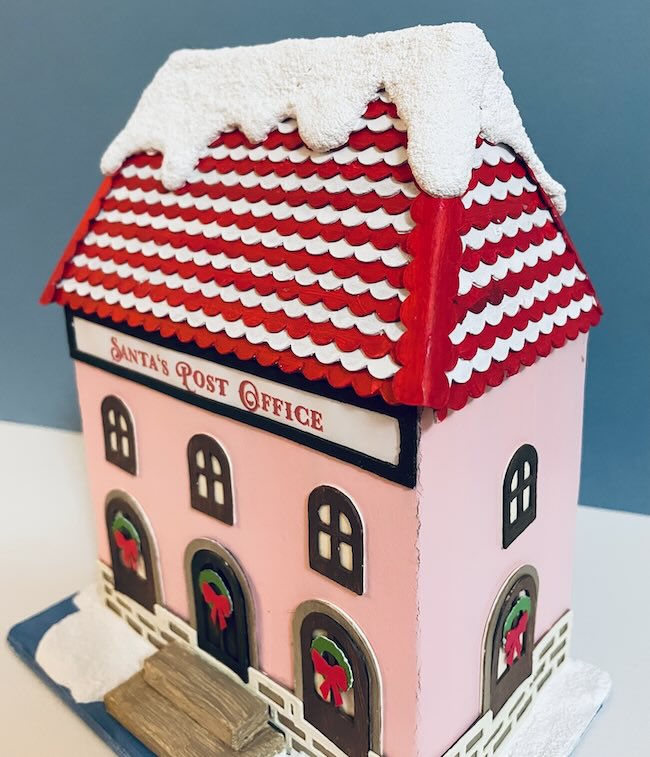
Today is Day No. 9 of my 12 Days of Christmas Papercraft event- Santa's Post Office. This pattern makes a festive Christmas post office with a space for tiny letters and packages in the page. I have to be honest here, making this structure is a little fiddly particularly getting the shelves in the back, but worth it to have those cubbyholes.
This post contains some affiliate links for your convenience. Click here to read my full disclosure policy.
So what do you need to make Santa's Post Office?
- Cardstock - Heavier #110 cardstock is the best cardstock for this structure
- Cardboard is my preferred medium for making this building, but you will have to paint the cardboard
- Paints if using cardboard
- Glue - this is my favorite for cardstock
- Quick Dry Tacky Glue - I use this glue when I am gluing cardboard
- Snow-Tex - this is my current snow texture
- Aleene's True Snow - this is a smoother type of craft snow
- Glitter - this is my favorite brand
- Cutting machine - I use my Cricut Maker, but other cutting machines work as well
- Standard Grip cutting mat
- Scoring stylus
Instructions for Making the Santa's Post Office
Step 1 - Prepare the pieces for Your Tiny Post Office
- Download the pattern - Design No. 179 in the Paper Glitter Glue library
- Cut out all the pieces for the Post Office
- Fold along all the score lines
- Paint your pieces if using cardboard for the structure
Step 2 - Decorate and Assemble body of the Post Office
- Decorate the house
- Assemble the basic structure
- Insert the shelves and dividers
- Finish gluing the back piece completely in place
Don't you just love this roof?
Step 3 - Make the Roof
- Apply shingles to the over-roof
- Trim shingles
- Glue the over-roof to the structure
Step 4 - Make a Base for Santa's Post Office and Decorate
- Make the base
- Glue the post office to the base
- Fold the along the score lines for stairs, glue to make a small box
- Adhere the stairs in front of the door
- Apply snow and glitter, if desired
- Make tiny letters and packages for the back
- Share with someone you love
Let's go over how to make the Post Office in more detail.
Here's the video where I show you how to make Santa's Post Office.
Step 1 - Preparing the Pieces to Make the Post Office
First, Download the Free Pattern - Design No. 174
Santa's Post Office pattern, Design No. 179, is available in the Paper Glitter Glue library. You can download it as an SVG cut file for cutting machines like the Cricut. Or you can use the PDF files.
If you don’t already have access to the library, all you have to do is subscribe to my newsletter to receive the password right away.
Next, cut out all the pieces
And really, there are a lot of pieces. When you use your cutting machine, you must identify the score lines and designate them as score lines, then attach them to the appropriate piece. I showed you all the score lines in Cricut Design Space in the video. But here they are as well.
This photo shows you the main pieces with score lines - the main front section of the post office, the back piece, the over-roof, the top and bottom shelves and the cubbyhole dividers.

There are 7 much smaller pieces that need to have score lines designated and attached. Those are the flashing strips that go on the roof and the two stairs. I don't want you to overlook those pieces.

Fold along all the score lines
It is important to fold along all the score lines before you go further. The fold lines help you line up the other pieces. And if you paint your cardboard, it's hard to see the score lines after painting.
If using cardboard, paint the pieces now
I prefer using cardboard for my houses and I like to paint so that's always an option for me. But don't worry, the house works using cardstock.
Step 2 - Decorate and Assemble body of the Post Office
Decorate Your Structure Now
For me, it is much easier to decorate my little houses when they are flat. It's not impossible to decorate when the house later, but it is easier to do it now.
Assemble the Basic Structure
First, glue the roof tabs to the angled front roof on the main post office piece. Let those dry before you move on.
Next, glue the side tabs on the back piece to the sides of the main post office structure. Do not glue the top part of the back piece to the roof section yet. It helps to have that free when you place the shelves within the post office.
To make the top shelf and dividers, fold all the tabs so they stand up. Then fold them at the midline and glue back to back.

This piece is ready for glue in the middle. All the glue tabs are oriented properly.

Now the top shelf is ready to be glued in place.
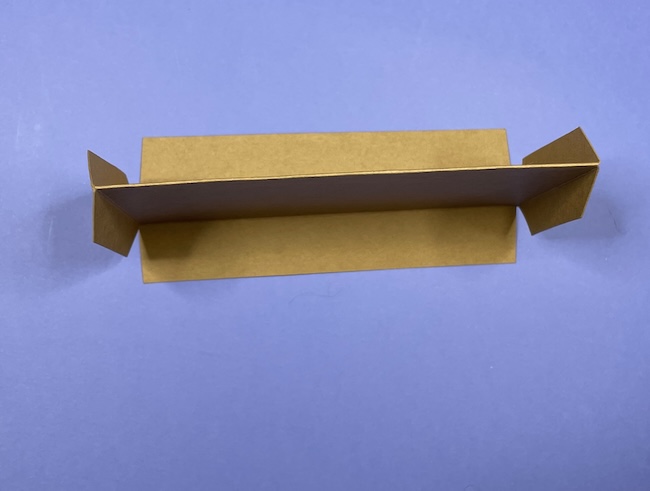
The bottom shelf is made a little differently with a folded tab in the middle. The two little extensions go in the front to adhere to the back piece.

Insert the shelves and dividers
Note: Inserting the shelves is the fiddly part.
First, insert the bottom shelf. It's pretty easy to slide that shelf into the space at the bottom of the post office. You can see how it fits there.

Next, we need the top shelf to be installed. To install it correctly, make sure that the wider back tab is at the top. That tab functions as a guide for placing the shelf at the correct height. The top of the back tab lines up with the score line on front where the roof pitch begins.
To insert the top shelf, fold back the top half of the back piece along its score line allowing you to place the top shelf easier.
Apply glue to the tabs on the top shelf and angle it in place. This is THE fiddly step. It's easiest to see in the video.
Once the top shelf is in place, you can easily slide in the two vertical dividers.
Whew! Done with the hard stuff.
Now finish gluing the back piece to the front roof
To finish the basic structure, apply glue to the tabs on the back piece including the tab on the top. Adhere to the front roof.
Step 3 - Make the Roof
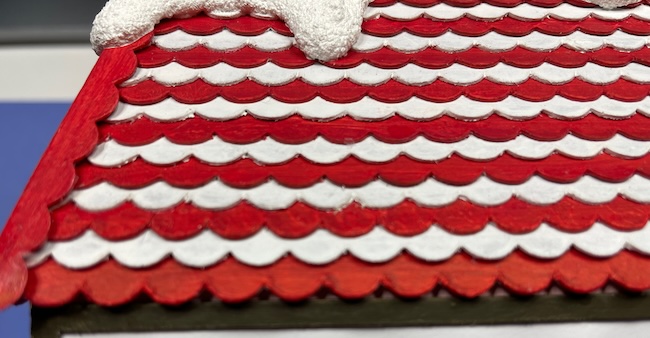
Apply shingles to the over-roof
Next, apply shingles to the over-roof. This simplifies adding shingles tremendously. Alternate the shingles so it makes a nice staggered pattern. Don't worry about trimming each shingle at this step.
Trim Shingles
Once all the shingles are securely glued in place, trim the sides of the shingles.
Glue the over-roof to the post office structure
Now you can apply glue to the top of roof and adhere the over-roof.
Step 4 - Make a base for Santa's Post Office and Decorate
Make a base
Simply glue 3-4 pieces of cardboard together to make the secure post office base. The base is in the pattern. Then paint the base or cover with cardstock.
Glue the post office to the base
Next, apply a good amount of glue to the bottom of the post office and firmly adhere to the base.
Fold the along the score lines for stairs, glue to make a small box
To make the stairs, fold along all the little score lines of the tiny boxes for stairs.
Adhere the stairs below the front door
Simply glue the larger stair box in place first, then the smaller box. Fortunately, these are very simple stairs to make.
If desired, apply snow and glitter
For some people, glitter is never an option. But I like a little tiny bit of glitter every once in a while. And I ALWAYS like snow on my winter houses.
Make tiny envelopes and packages for your post office
In the file, there are 3 envelope patterns. The largest pattern is big enough for a gift card.

Now share with someone you love!
I know you've got someone in mind who will love the tiny post office.
Also, be sure to pin this to your Favorite Pinterest Board so you won't forget where you found the pattern.

rsn
this is so cool! I will say I'm struggling to put it together, esp the shelf. some more pictures during the process would be very helpful. I'm still not sure how to use the shelf with the extra tabs among other things haha!
Lucy
Thank you for reminding me to add more photos. I was making a new project each day and I didn't write out detailed tutorials, but I did do a live video. Here's the link to the video.
Frances Elaine LaVine
This will be the second shelved house that I will make. The first was the book store, I love it. I wish you would show the finished back as well as the front. Great fun thank you.
Lucy
I will add a photo of the back when I get home. I am visiting my sister right now. But thank you for reminding me. I do need to show both sides.
Lucy