
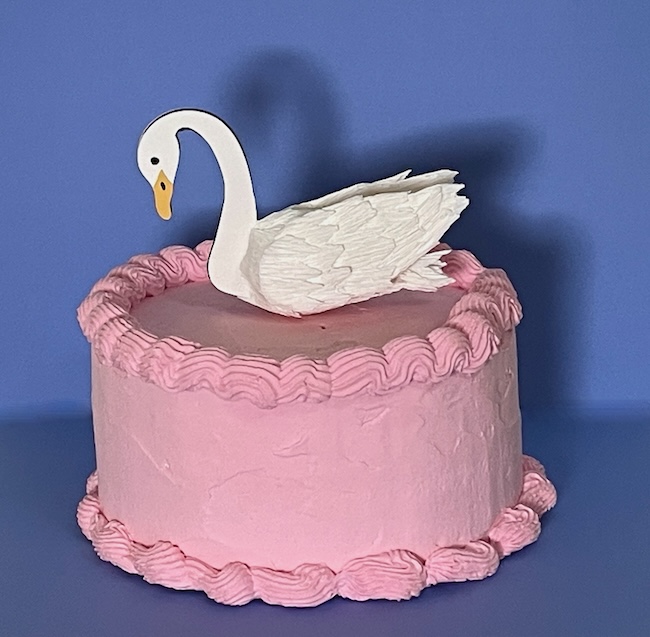
I was inspired to make a swan cake topper after I finished making the flamingo and stork cake toppers. Well, really several people requested it and I had such fun making those two cake topper, I was eager to add the swan version. This elegant swan makes a beautiful cake topper for a wedding cake or any celebration that calls for a touch of grace and charm.
This is design no. 209 in the free Paper Glitter Glue library. When you subscribe to my newsletter, you’ll receive the library password in every email. If you’re not subscribed yet, simply sign up using the form below and you’ll get instant access to the password—along with all my latest crafty projects and ideas.
This post contains some affiliate links for your convenience. Click here to read my full disclosure policy.
Supplies to make the Swan Cake Topper - Design No. 209
Quick and Easy Version
- Cardstock or Watercolor paper - white for the body of the swan, black to background, and yellow for the swan's beak
- Glue - Bearly Art Glue
- Toothpicks
- Cutting machine - I used my Cricut Maker
- Design No. 209 from the Paper Glitter Glue library
3D Version
- Cardstock or Watercolor paper - white for the body of the swan, black to background, and yellow for the swan's beak
- Glue - Bearly Art Glue for small pieces, Aleene's Turbo Tacky Glue to adhere crepe paper to the styrofoam ball
- Styrofoam ball - I used a 1.5 inch ball for the largest size for the swan
- Craft knife to cut the styrofoam ball
- Toothpicks
- Crepe paper
- Scissors to cut crepe paper
- Cutting machine
- Design No. 209 from the Paper Glitter Glue library

Steps to Make the Swan Cake Topper
Quick and Easy Version
- Download the pattern for the Swan Cake Topper
- Cut out the pattern pieces for the swan
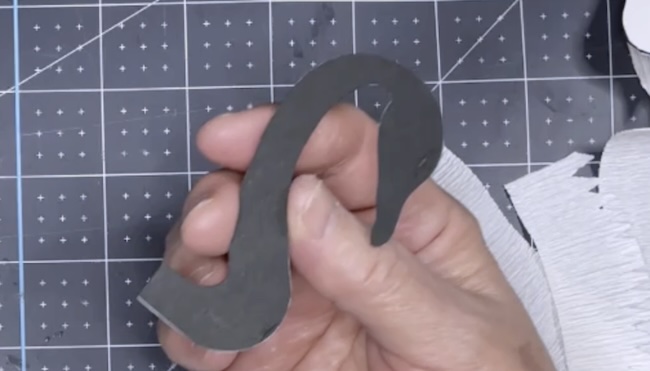
- Glue the black neck piece behind one of outside swan pieces
- Glue the beak in place to each side of the swan pieces
- Adhere the black wing piece between the two outer wing pieces
- Apply a thick layer of glue to adhere the toothpick between the two swan pieces.
- Glue the wings on each side of the swan

Steps to make the 3D Swan Cake Topper
- Download the pattern for the Swan Cake Topper
- Cut out the pattern pieces for the swan
- Glue the black neck piece behind one of outside swan neck and head pieces
- Adhere the two outer pieces together
- Glue on the swan's beak
- Cut a slot in the styrofoam ball to insert the swan neck piece
- Apply glue to the slot to hold the swan neck in place
- Cut crepe paper strips to mimic feathers
- Make the swan tail with crepe paper flaring out the bottom to fit on the styrofoam ball
- Adhere the tail to the back of the swan using pins to keep it in place
- Cover the wings with crepe paper feathers starting at the narrow end of the wing
- Gently curve the wings to fit the rounded swan body
- Start wrapping crepe paper around the body of the swan, starting with the tail end of the swan
- Adhere the wings to the swan
- Insert toothpick to complete the cake topper

Let's go into more detail on making these Swan Cake Toppers. Starting with the quick and easy version.
Download Pattern - Design No. 209 from the Paper Glitter Glue library
I've tried to make this as easy as possible for you by including 3 different sizes in the SVG pattern along with PDF options as well. In my video, I made the largest version which is about 5 inches wide and 3.5 inches tall.
If you don't have the password to my library, simply subscribe to my crafty newsletter and you will get the password to the library right away.
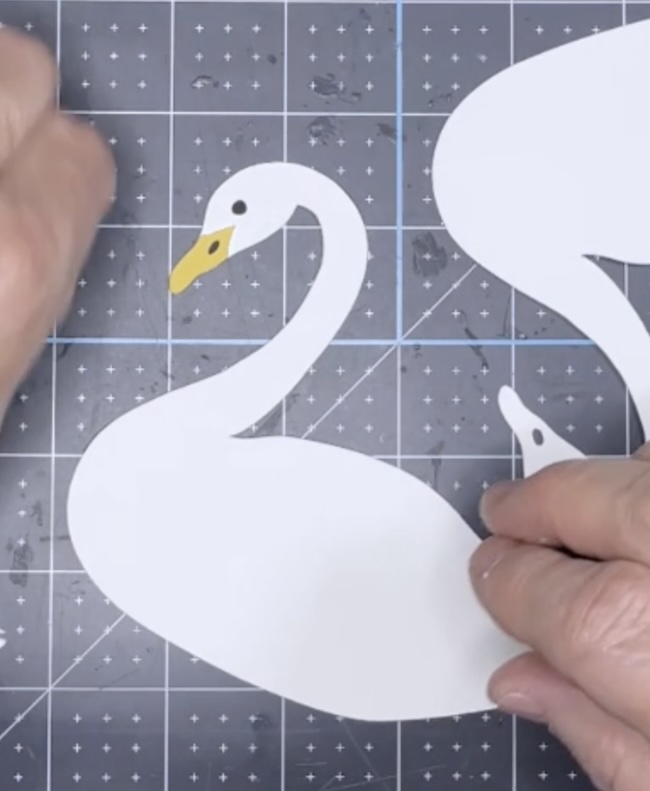
Cut out the swan pattern pieces

This is a pretty simple pattern in that there are no score lines so setting up the SVG file with your cutting machine is pretty straightforward.
In terms of material choices, I prefer heavier cardstock like 110# cardstock or 140# watercolor paper (300gsm). But you can use a lighter weight cardstock, though I recommend that you cut out two extra layers to glue together so your swan is sturdier. I like sturdy.
Glue the Black Neck Piece behind the Outer Swan
The black piece gives the eyes and the nose dimension. It also strengthens the neck. Glue it behind one of the outer swan pieces.

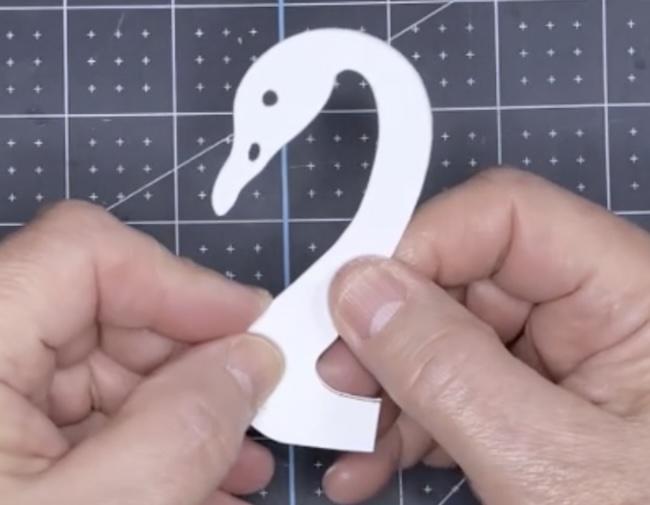
Glue the beak in place to each side of the swan pieces
Adhere the black wing piece between the two outer wing pieces

Apply a thick layer of glue to adhere the toothpick between the two swan pieces
After you have made the wings and added the beak to both sides of the swan, it's time to glue the swan together. First apply a thick bead of glue to the toothpick to hold it in place.

Then adhere the other side to the swan. Be sure to apply some pressure to adhere both sides well.

Finally, glue the wings on each side of the swan

Now for the 3D variation for the Swan Cake Topper
Download and cut out the pattern just as you would for the quick and easy version.
Glue the black neck piece behind one of outside swan neck and head pieces
Adhere the two outer pieces together
Now you've made a sandwich of two outer layers for the swan with a black layer in the middle.
Glue on the swan's beak on each side of the swan's head

Cut a slot in the styrofoam ball to insert the swan neck piece
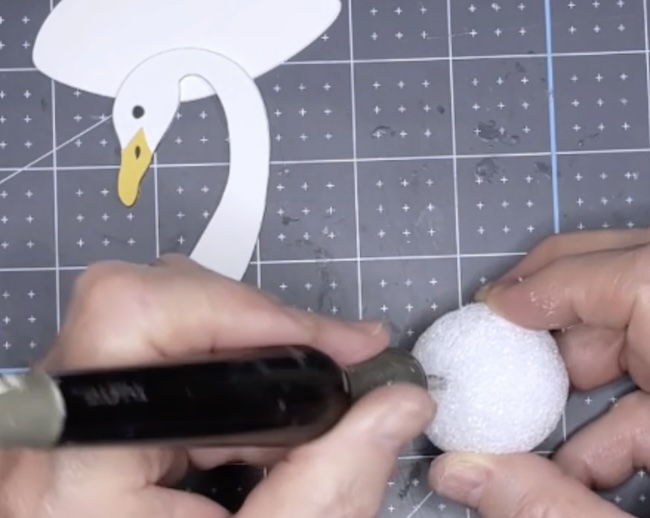
Apply glue to the slot to hold the swan neck in place

Cut crepe paper strips to mimic feathers

You can make the strips about 1 to 1.5 tall so you can vary the feathers. I use the smaller strips on the wings.
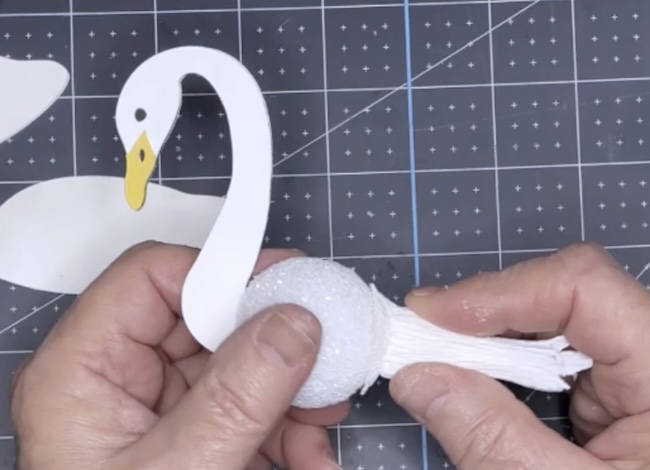
Make the swan tail with crepe paper flaring out the bottom to fit on the styrofoam ball
This is the most fiddly step in making the 3D Swan cake topper.

See how I've flared one end of the tail so it will fit better on the round styrofoam ball? It really does help it adhere to the body of the swan.
Adhere the tail to the back of the swan using pins to keep it in place
Use pins to help hold the tail in place while the glue dries.

Cover the wings with crepe paper feathers starting at the narrow end of the wing
While you let the glue dry on the tail, cover the wings with crepe paper feathers. Start at the narrow part of the wing so the feathers overlap nicely.

Gently curve the wings to fit the rounded swan body
Since the wings have to adhere to a rounded surface, I gently bend the front of the wing to mimic the curve of the swan's body.
Start wrapping crepe paper around the body of the swan, starting with the tail end of the swan
When the tail is well-adhered to the swan body, remove the pins so you can add feathers to the body.

Continue to wrap crepe paper around the foam ball going all the way to the neck. Don't leave the styrofoam ball exposed.

Adhere the wings to the swan

Insert toothpick to complete the cake topper
To finish the cake topper insert a toothpick in the bottom of the swan. Apply glue on the toothpick so it will stay in place. Be sure that you don't push the toothpick all the way through the swan.

If you want to protect your swan from getting icing on the bottom, cut a small circle of parchment paper or waxed paper where the swan would touch the cake.
Questions?
If you have any questions, please ask in the comments or email me - [email protected]. I am always happy to help.
Join me in my private Papercraft Facebook group. That's a good place to ask questions as well.
Leave a Reply