
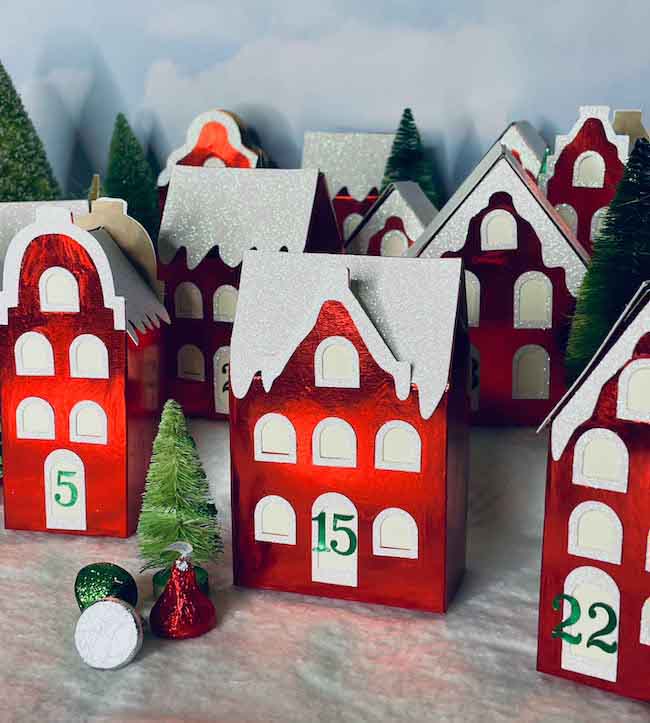
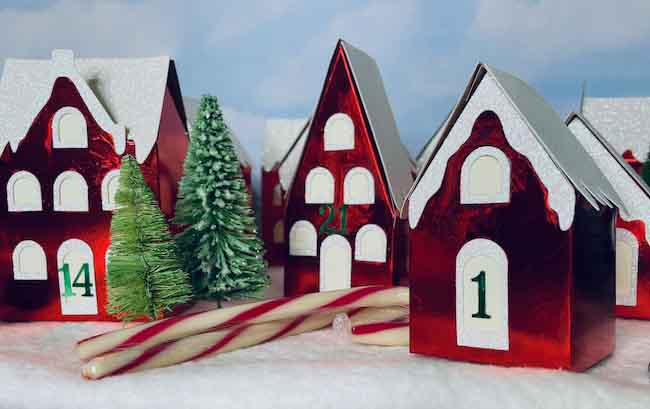
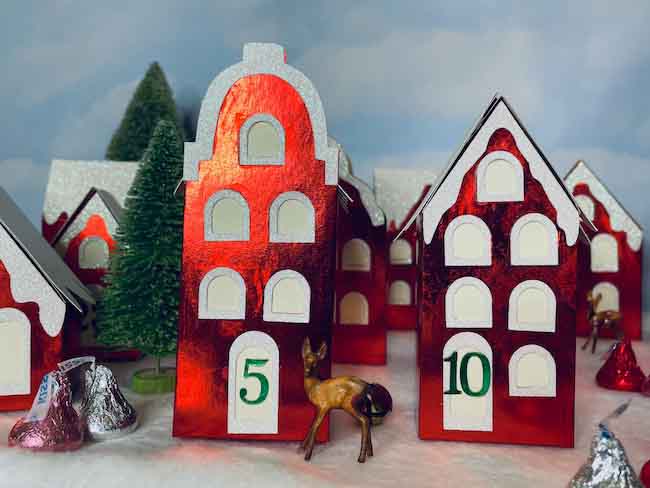
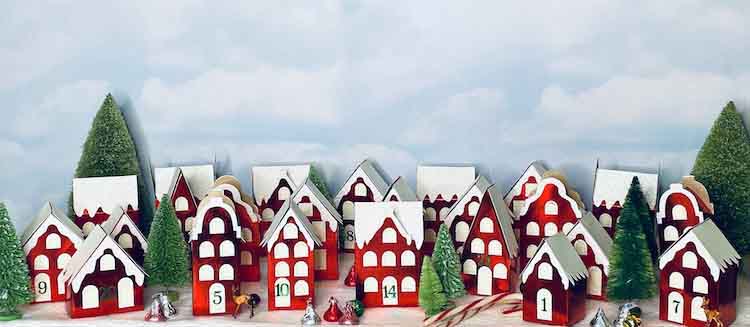
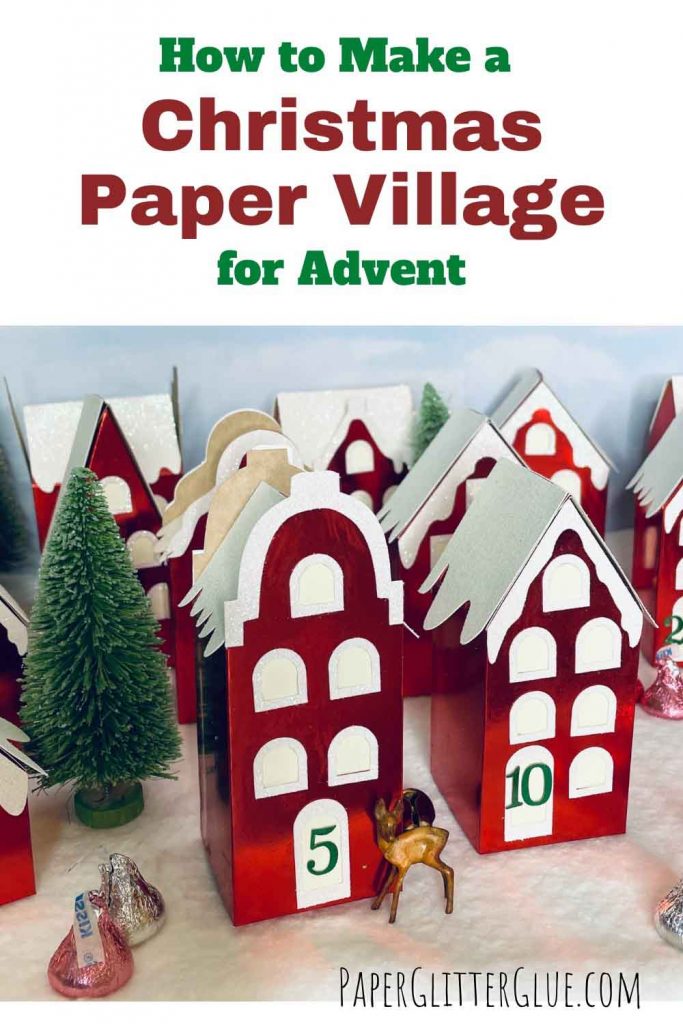
Here's how to make the cutest Christmas Paper Village for Advent. These paper house designs make an easy countdown to Christmas. Fill them with fun treats or candies or little gifts. In addition, each little paper house has tabs so you can fold them together and easily store them for the next Christmas season.
I've always wanted to make an advent village. Here's the history of how Advent calendars became what we think of now. Probably most famous paper Advent calendars were designed in 1946 by Richard Sellmer. His first one, "Die kleine Stadt", has delightful little houses and can still be ordered today.
Here is a great article about this year's Advent calendars you can buy. They are really incredible. I love this one with these jams and jellies.
But do remember that you can always make your own Advent calendar with these adorable little houses and then fill them with your own treats.
Just subscribe to my Paper Glitter Glue newsletter so you can download these free files - Design No. 129.
So what's better than a Christmas Paper Advent Village made with foil cardstock and holds Christmas treats, then folds up for easy storage?
And here is the video showing how to construct the first house in the series of paper village houses for Advent.
Let's get started making the paper houses for our Christmas village.
This post contains some affiliate links for your convenience. Click here to read my full disclosure policy.
Table of Contents
Materials to make the Christmas Paper Village for Advent
- Foil cardstock - colors of your choice. Use one 8.5" x 11" sheet per house.
- Glitter cardstock - You can cut out trim for about 3 houses with one 8.5" x 11" sheet of cardstock
- Cream cardstock - You can get about 3-4 background house pieces with one 8.5" x 11" sheet or you could use vellum
- Glue - such as Art Glitter Glue (which doesn't have glitter in it) or Bearly Art Precision craft glue
- Cotton batting for snowy landscape
- A way to cut out the pattern - I use my Cricut Maker to cut out the houses
Instructions to make the Christmas Paper Village for Advent
- Download the Christmas Paper Village house patterns - Design No. 129
- Cut out the houses, the snowy trim, and the window backgrounds
- Fold along the score lines
- Glue on the cream-colored background to the back of foil house
- Next, glue the snowy trim to the front of the house
- Apply glue along the side glue tab
- Assemble the paper house
- Apply numbers to the Advent houses
- Make the Christmas tree boxes
- Arrange your Christmas houses into a delightful village
For more details on making this delightful set of Christmas paper houses, read below.
Get the Free Pattern for the Christmas Paper Village Houses for Advent - Design No. 129
To get the free pattern, just go to the Paper Glitter Glue library. Then click the link in the middle of the page to go to the password page and type in the password. Please note that there are 2 different sets of SVG files for this project. I've updated the files to include window panes. Choose the updated folder if that is the file you want.
What?? You don't have the password? Well, that is easy. Just subscribe to my Paper Glitter Glue newsletter with the form below and you will get the password right away. Don't worry I will never share your address or send you any spam. You can unsubscribe at any time.
1. Download the Christmas Paper Village house patterns - Design No. 129 in the Free Paper Glitter Glue library
Once you are in the library, you will find the files numbered as Design No. 129 in the November 2021 section of the library. They are available in 2 formats: SVG cut files for cutting machines like a Cricut or a Silhouette and as PDF printable files if you are cutting the houses out by hand.
Also, I updated the files to include window panes. Use the updated files if you like the window pane version better (I like them much better).
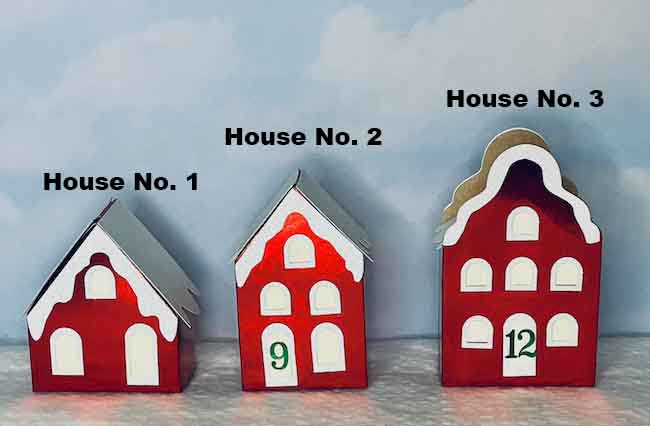
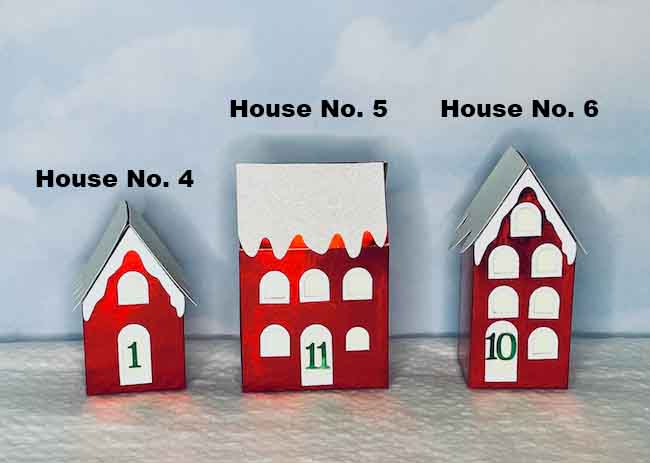
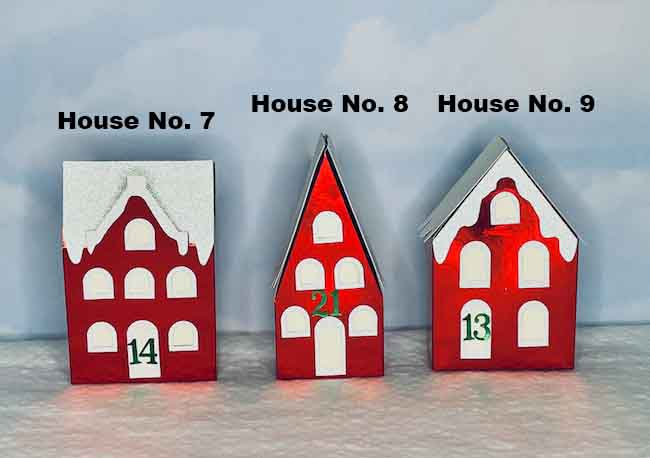
Please note that there are 14 different house files and one Christmas tree box that you can make for 15 designs in all.
In addition, all the files are compressed or zipped. You must unzip them to use the files. It's easy on a Mac, all you do it click on the folder and it will unzip. Here are the instructions on how to unzip (also called extract) on a Windows-based machine.
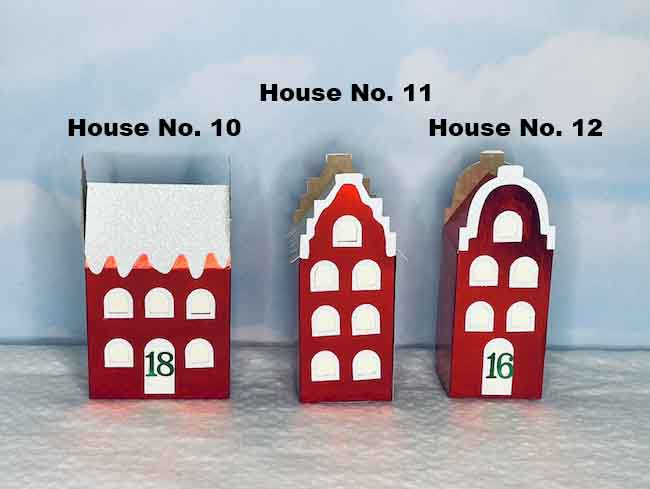
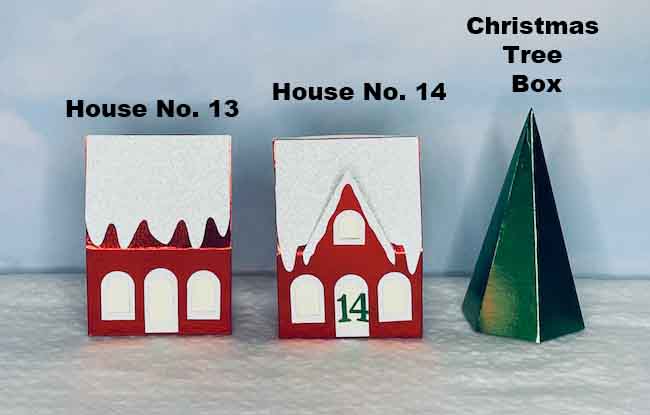
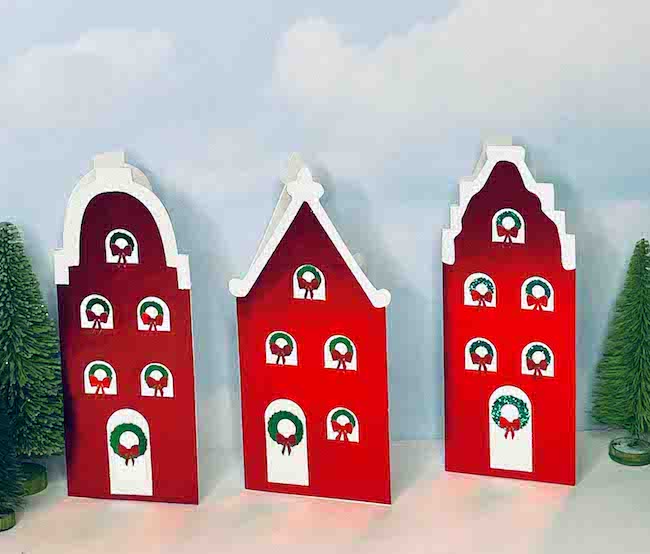
Examples of the Different Christmas Village House Patterns
2. Cut out the houses, the snowy trim, and the window background
So the next thing to do is decide how many and what houses you want to make. If you want to make an Advent paper village, I recommend 24 or 25 houses. Look at the designs and choose your favorites to duplicate. Or just choose 2-3 or your favorite designs.
Cutting by Hand
If you cut your designs by hand, I would choose easier designs like Design No. 1, No. 4, No. 13, and No. 14. You can always modify the number and design of the windows to make them easier to cut by hand.
Here are the instructions for cutting out the houses using Cricut's Design Space.
First, to cut with a cutting machine like the Cricut, upload the file to Cricut Design Space
This video shows includes the details to make the Advent Christmas house boxes using Cricut's Design Space.
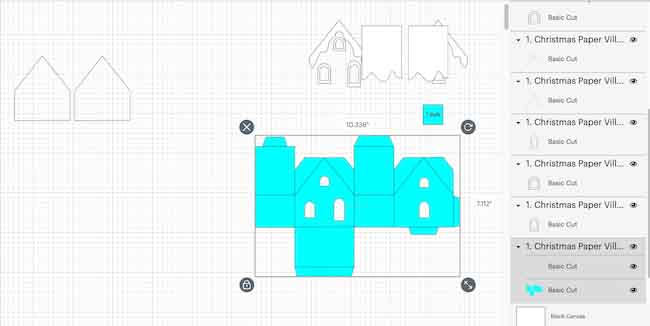
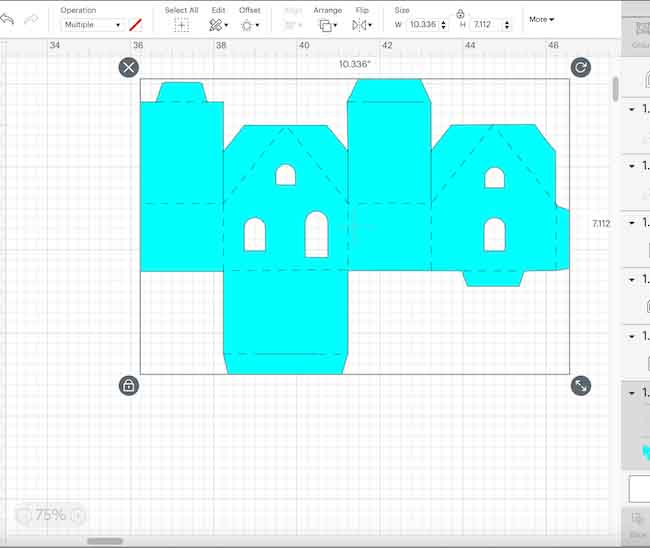
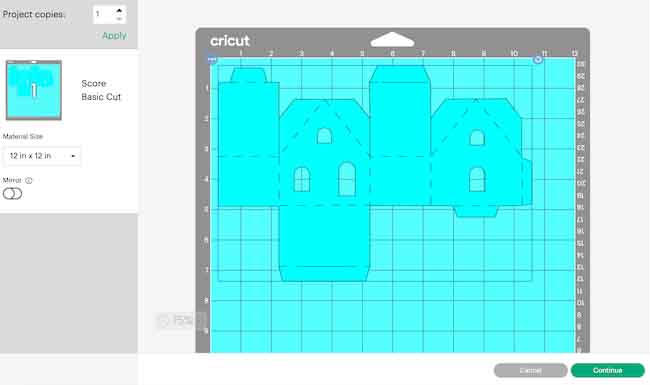
In order to see all the elements, I click the view button in the bottom left hand corner to reduce the view to 50% before I ungrouped the cut files for house no. 1.
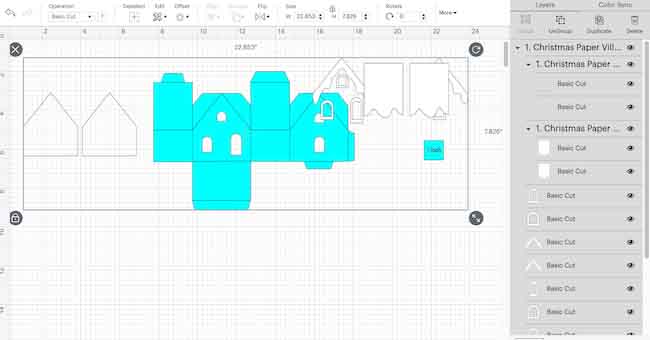
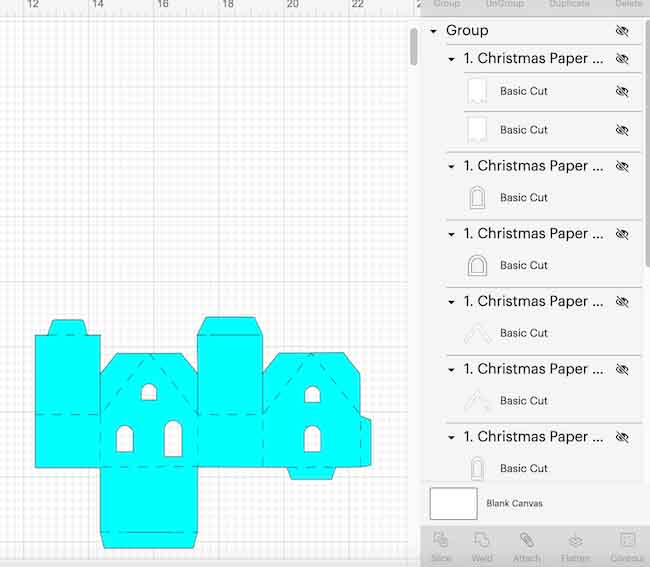
Ungroup the files to separate the parts of the house
Now you can see the separate elements for making the house - the one inch square to make sure the scale is correct (which you can delete if the file is uploaded correctly), the house itself, the snowy trim and the background pieces.
Select the house piece
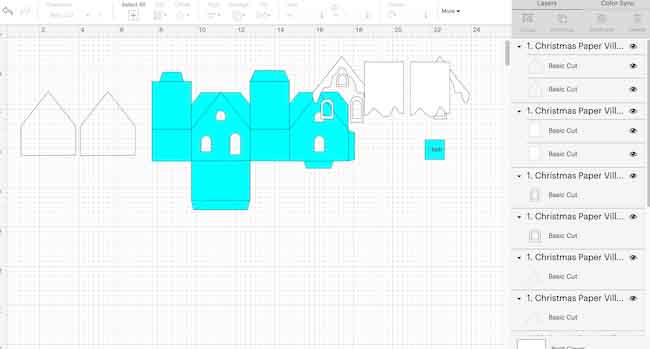
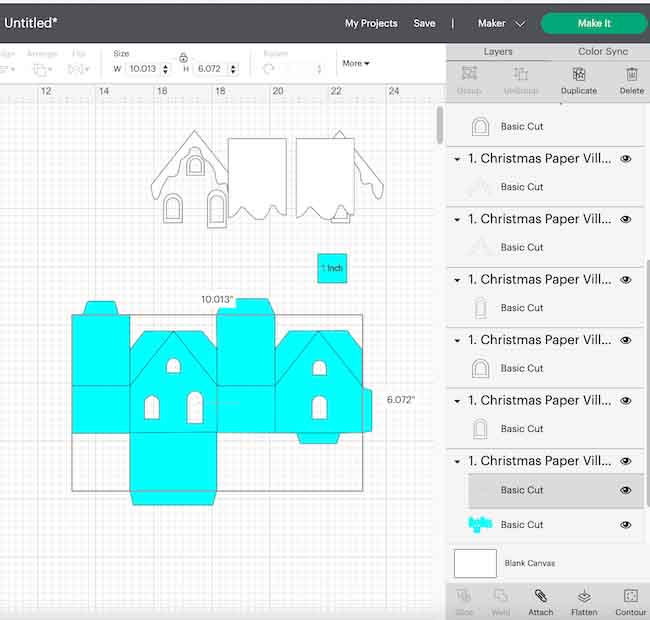
For your convenience, the score lines and the house itself are grouped together.
Choose these grouped lines
First select these grouped lines in order to turn them into score lines.
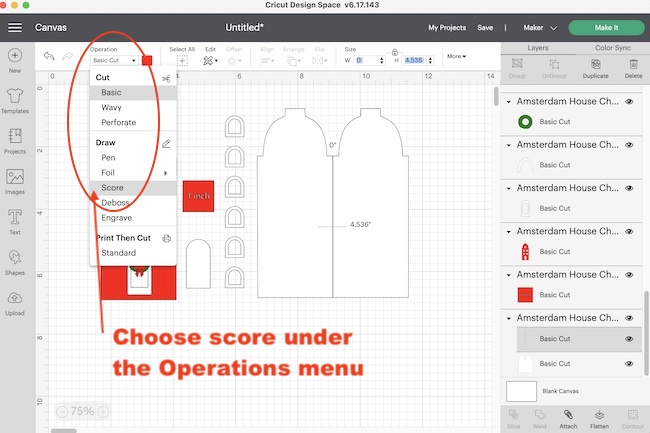
Go to the operations menu and choose score
On the left upper corner of Cricut Design Space, choose score from the operations menu. This photo is from a different project.
When the grouped lines are scored, they become dotted lines
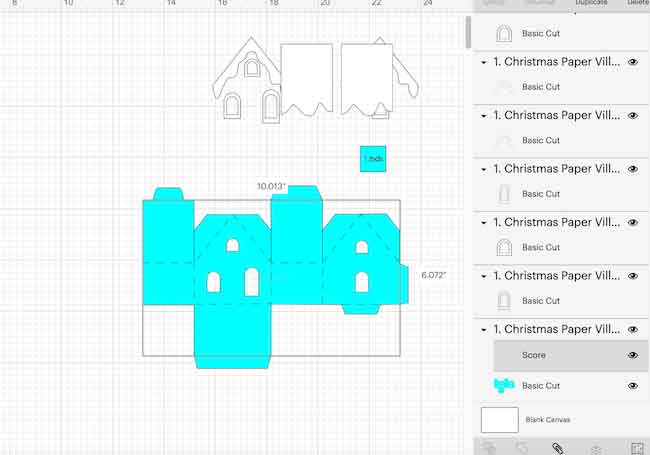
Score lines converted to score
Next, attach the score lines to the house piece
Your cutting machine needs to know what piece the score lines go to. In order to do that, you must attach the score lines to house piece. The attach button is in the lower right hand corner of the Design Space under the layers panel.
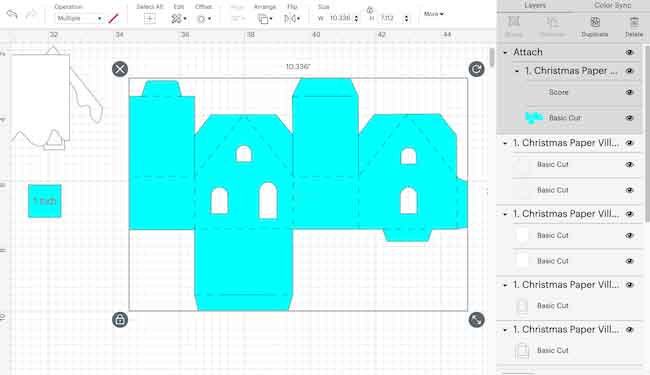
Under the layers panel, see the 3 different colors of objects
If you want to see what the colors are for each of the objects, check under the layers panel on the upper right hand side of Cricut Design Space. You may wonder why I generally choose this blue-green shade for my house patterns. I do that because this color shows the score lines pretty well.
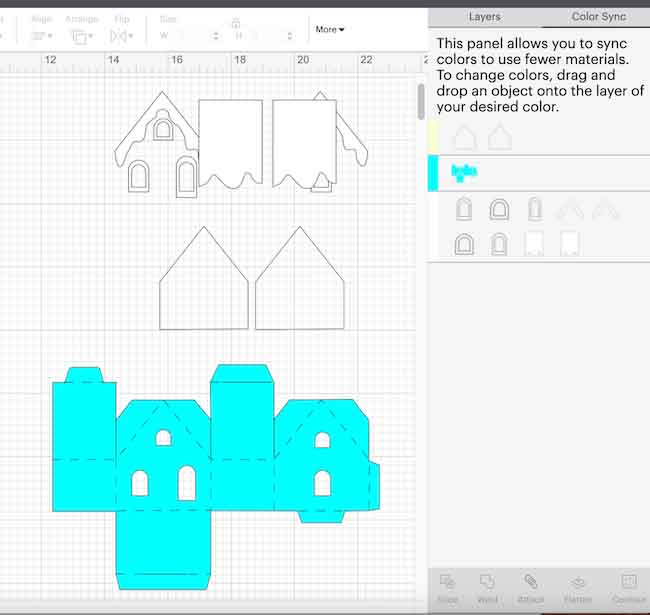
Click the eye symbol to hide the pieces you don't want to cut right away
See the eye symbol with a slash through it on the far right side of the photo? If you click that symbol, it hides or unhides that piece of the pattern which makes it easier to cut just what you want.
Click "Make it" when the house piece is in position for cutting on your mat
Choose your material type to start cutting out your house
For the foil cardstock, I used the "Cardstock (for intricate cuts)" option which worked beautifully.
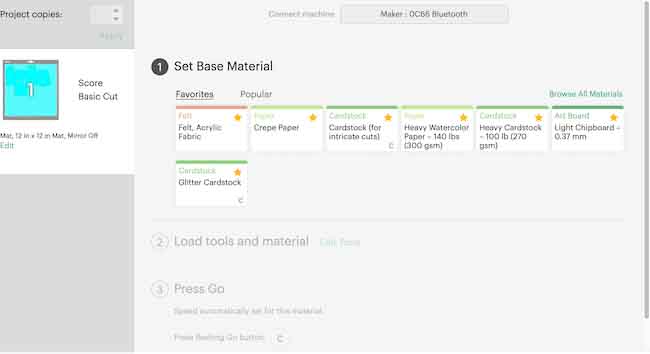
To cut the glitter paper for snowy trim, I used the Glitter cardstock option which also worked very well.
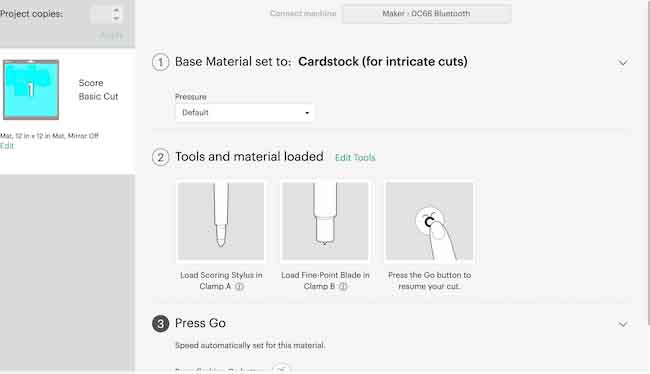
Choose your scoring tool
Generally, I choose the scoring tool for my projects because I find it is easier to use than switching out the scoring wheel. So under Edit Tools in the middle of the page, click that and choose the scoring tool as shown below.
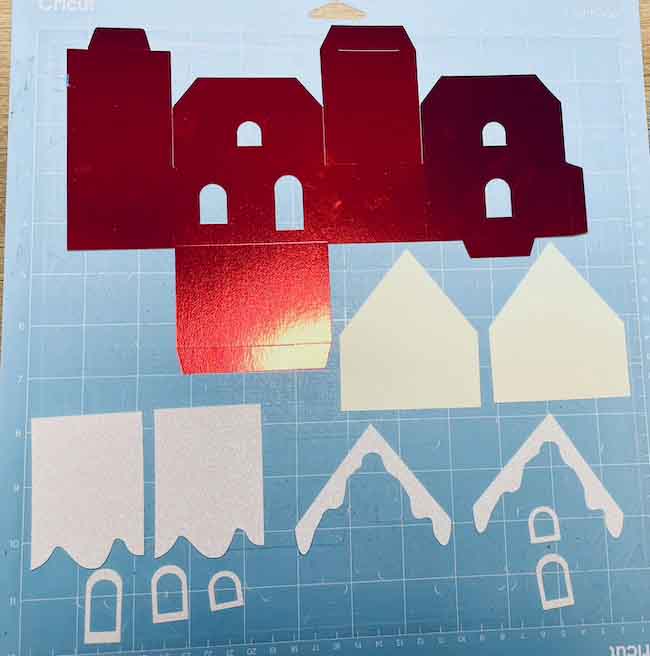
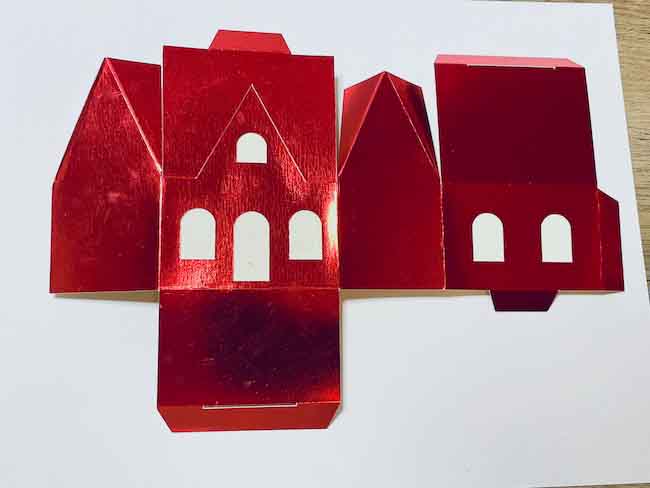
After you cut out the house, cut out the snowy trim and the window background.
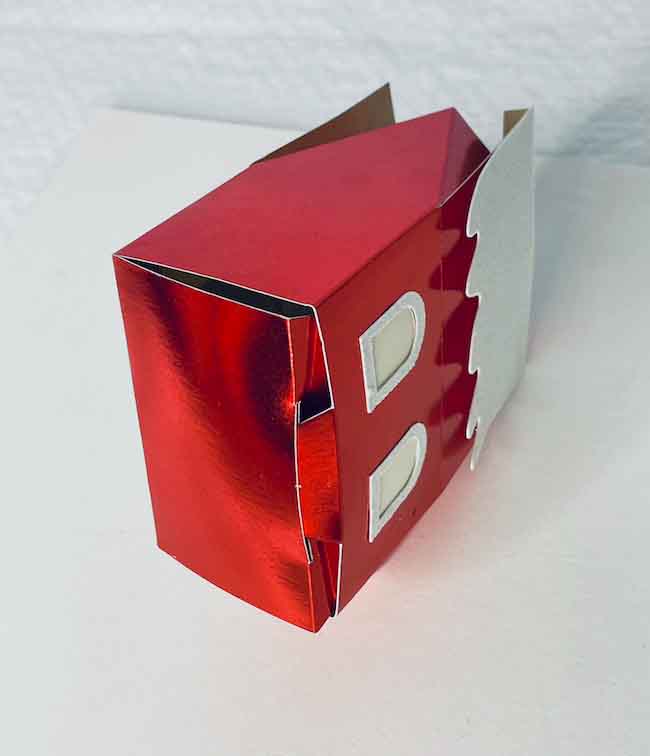
Here's how all the pieces look for the Christmas Paper Village House No. 1.
3. Fold along the Score lines
Before you start decorating the houses, fold along all the score lines. When you can clearly see where the score lines are, it simplifies construction of the house.
To do this, use a ruler or a straight edge. Place the ruler along the score line and fold towards yourself. The lines fold easier on the surface that you scored. After you have done that, you can fold them back that way they should go on the house.
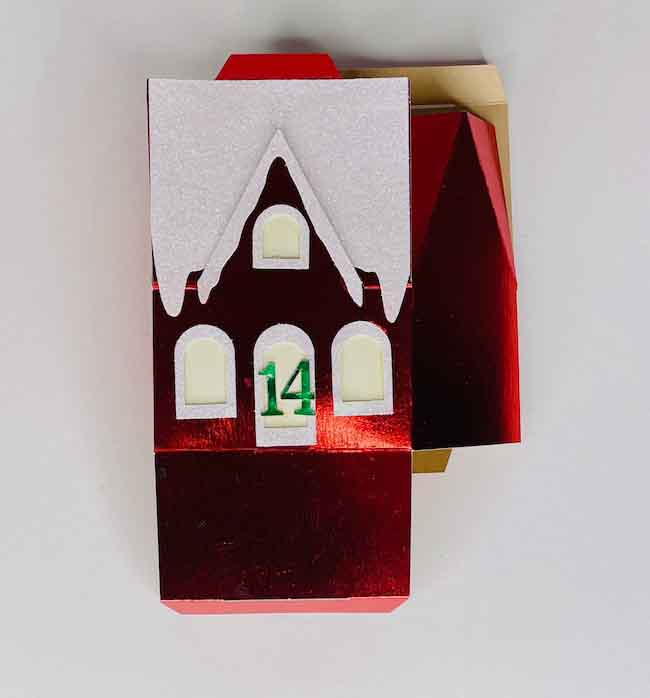
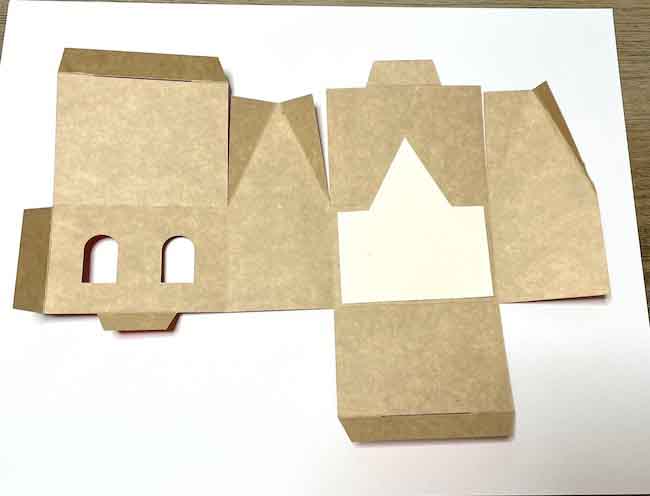
See the score lines on Christmas Paper Village House No. 14 below.
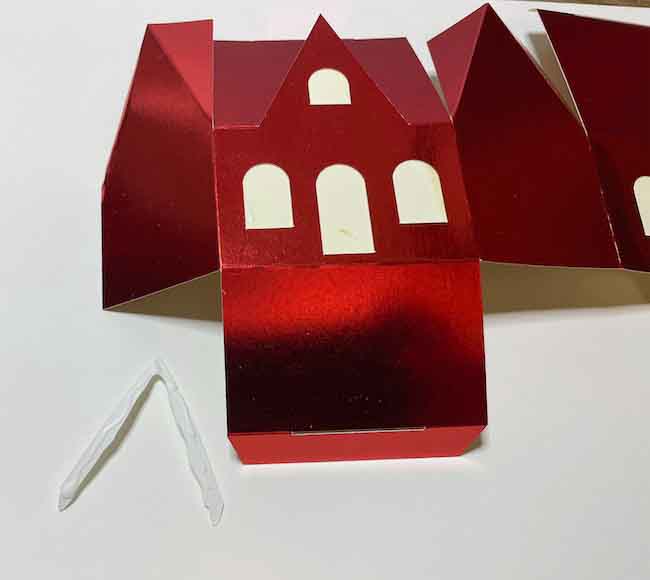
4. Glue the cream-colored cardstock to the back of the house piece
With the window cut out, glue a piece of cardstock to the back of the windows to hold whatever treats you put in the little house gift box.
Simply, apply a thin line of glue around the edge of the cream-colored cardstock (or whatever color you choose). Then apply those pieces to the front and back of the little house.
If you want to add LED lights to your little houses instead of treats, then I suggest you use cream-colored copy paper for the light to shine through.
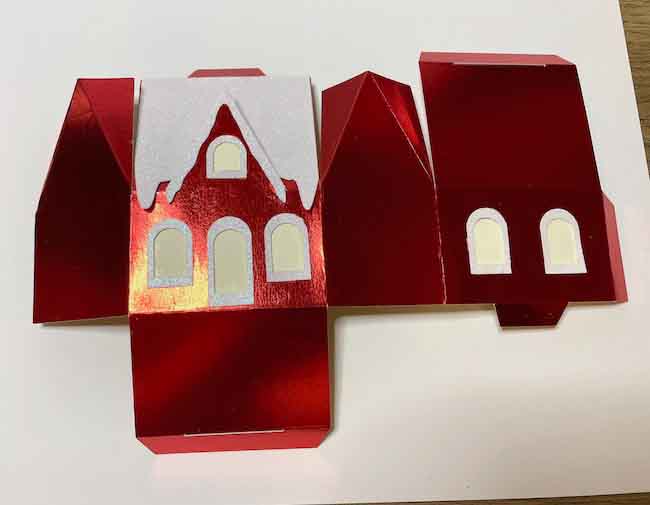
5. Next, glue the snowy trim on the foil house
Using a small amount of glue on the back of the snowy trim, glue it to the front of the house.
And the photo below shows the snowy trim on the front of Christmas Village house no. 14.
6. Apply glue along the side glue tab to assemble the house
To assemble the Christmas advent house, apply glue to the glue tab on the side. Then glue to the opposite side of the house.
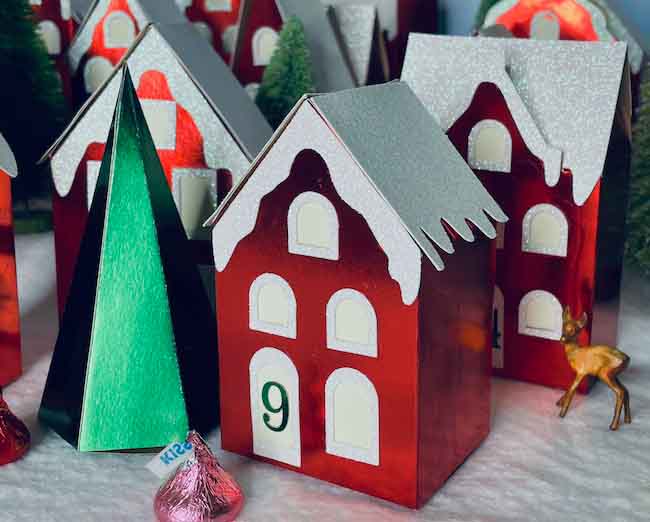
7. Apply Advent numbers to the house
For my village, I cut out numbers in green foil and glued them to the front of the house. But another good option is to glue colorful circles to the roofs.

8. Assemble the Christmas Paper Village House
To assemble the little Christmas Advent house, first insert the bottom tab in the slit on the larger flap. The house goes together so much better when you assemble the bottom flap first.
After inserting tabs in the bottom, then insert the tab in the slit on the roof flap.

9. Now make the Christmas Tree Boxes
If you want to add Christmas tree boxes to your Christmas paper village, they are easily constructed.
Just like making the houses, fold along the score lines using a ruler to help fold along the lines. Then glue along the side glue tab.
After assembly of the tree, insert the bottom tab into the slit on the hexagon flap.
10. Arrange your Christmas Paper Village
Often people use polyester quilt batting for snow. That's basically what is advertised as snow cover for villages. The problem with using polyester for the snow is that is tends to collect hair and other debris easily from electrostatic charge. And since I have cats, cat hair is highly attracted to this material.
I found white cotton quilt batting which is flatter than most of the polyester batting, but that makes it easier to place the houses. And fewer cat hairs get stuck in the batting which is a win for me.
The Holiday Showcase - Great Crafts to get a head start on the Holidays
I designed this project for a special event - The Holiday Showcase where 14 bloggers share wonderful projects for the Holidays. I've written a post so you can check out all these projects.

Have fun making the Christmas Paper Village for Advent!
If you have any questions, please feel free to email me at [email protected].
P.S. You can also make some of these designs as holiday cards.
And I'd love to see your creations, you can share them with me on my Facebook group, Paper Houses and Paper Crafts Hosted by Paper Glitter Glue.
Annie
Your advent village looks fun
Lucy
Thank you, Annie.
Lucy
Susan
Thanks, Lucy fo sharing freely all of your hard work! You also explain how to put it together very clearly. Happy Advent and Merry Christmas!
Lucy
Thank you so much, Susan.
And I especially appreciate that you think my directions are clear because I do try.
Lucy
Stephanie Sheridan
Lucy, These are so cute. Got to make them for my husband. No kids but spoil him.
Lucy
That is a very nice thing to do - spoiling your husband.
Lucy
Yvonne
i truly love the little houses, so beautiful.
Lucy
Thank you so much. I am so glad you like the little houses.
GG
So cute! Thank you so much for sharing all your wonderful ideas and patterns for little houses 🙂
Lucy
I am so glad you like the little village. And I hope you enjoy making it.
Lucy
YVONNE
YOU AMAZE ME WITH ALL THE THINGS YOU DO. I LOVE THEM