Table of Contents
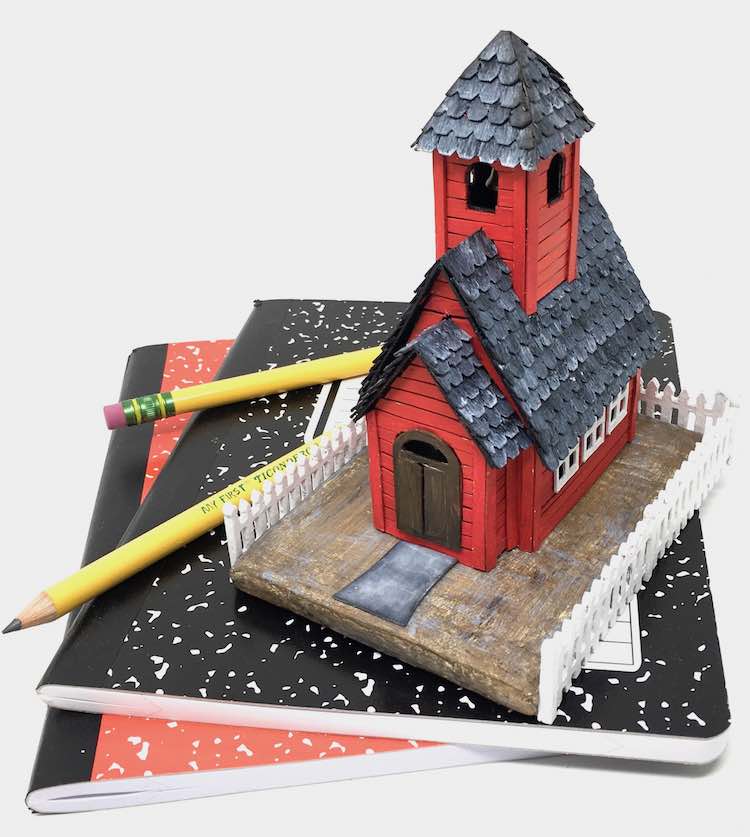
Make this fun Little Red Schoolhouse - a delightful paper house for a Back to School gift for a teacher or a child
It's August as I write this. The Little Red Schoolhouse is a fun way to celebrate the back to school season. Make this little paper school house with the free pattern template from the Paper Glitter Glue library and the tutorial below.

It's a great crafty gift to start off the new school year as well. You can make it for a Teacher's Gift, for a child just starting school or just plain cute room decor.
At the very end of the post, there is a quick cardstock variation that you can make in less than an hour. That would be a good craft for making a paper schoolhouse with kids. They can color in the siding and the shingles or even draw a bell to hang in the bell tower.
I also added a tutorial on making a Crayon Fence if you like that one for your Schoolhouse.
There is also a video showing you all the steps to make this paper school house.
First let's start with the materials to make the miniature school.

This post contains some affiliate links for your convenience. Click here to read my full disclosure policy.
Material to Make the Little Red Schoolhouse Paper House
- Cardboard
- Pattern to make Paper Schoolhouse from the PaperGlitterGlue Library
- Method to cut the pattern out - Xacto craft knife or an automatic cutting machine (this is what I use)
- Glue - I use Aleene's Fast Grab for the structure of the house
- Gesso primer
- Acrylic paints:
- Ranger Distress Paint colors - Candied Apple, Hickory Smoke, Picket Fence, Black Soot, Walnut Stain
- Corrugated cardboard for base
- Brown packing paper to cover the base
- Tim Holtz Sizzix Village Cottage for the picket fence around the school, I think this die is retired so I added an SVG pattern for the fence
Summary of Steps to Make this Cute Little School House
- Download the pattern from the Paper Glitter Glue Library - Design No. 58
- Cut out the pattern
- Score, fold, and assemble the pieces of the miniature Schoolhouse
- Glue the front portico on the little school house
- Glue on the front portico roof, then the main roof
- Next glue the bell tower and steeple on the schoolhouse roof
- Prime and paint
- Apply siding
- Glue on the shingles
- Make the base and the fence
- Paint the cardboard base for the miniature schoolhouse
- Glue the house to the base
- Glue the fence around the cardboard base
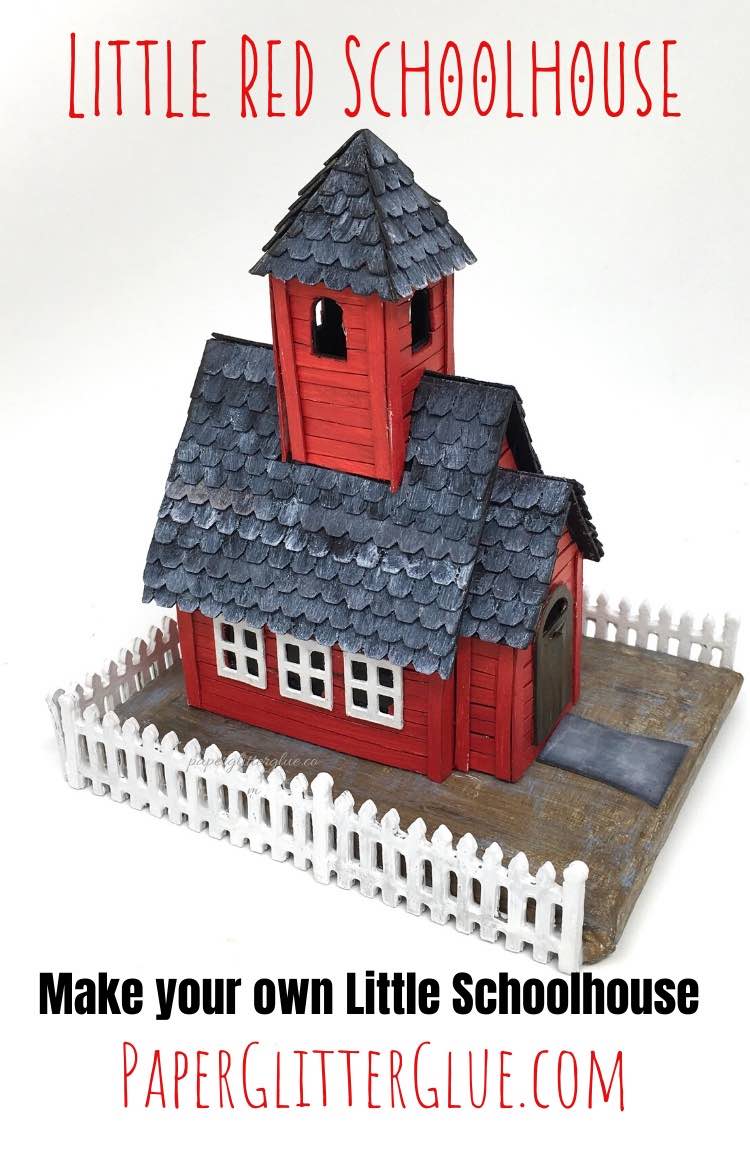
Make the Little Red Paper Schoolhouse - get the free pattern
Get my free PDF and SVG files for this paper craft at the Paper Glitter Glue Library in the August 2019 section. Just subscribe to my newsletter so you get notified whenever I have a new pattern or craft project for you. You will immediately get the password to the library where all my free patterns and tutorials are located. The patterns and templates are listed chronologically with the most recent pattern first.
Subscribe below to get access to all my free patterns
Download the pattern to your computer. You'll find basic measurements and brief instructions on the PDF pattern. I think it helps to look at the PDF pattern if you are using the SVG files because it is easier to tell what is a score line and what is a cut line.
The pattern is a modified version of the Snowy Church that I made for the 12 Houses of Christmas last year.
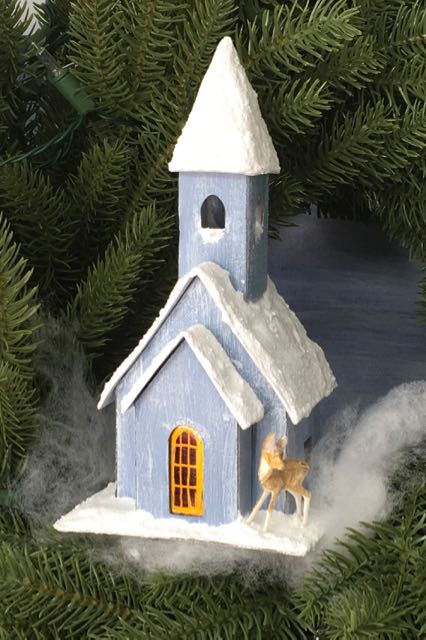
For the schoolhouse, the difference is the body of the paper building is elongated for a classroom and the bell tower and steeple are shorter to look more "school-like".
Now cut out the pattern for the little school
Transfer the pattern to your cardboard if you are cutting out the pattern by hand and cut out. I have simplified the pattern as much as I can to make it easier to cut. Score the cardboard at the dotted lines.

Skip the part below if you aren't using an automatic cutting machine.
If you are using an automatic cutting machine like a Cricut or a Silhouette, here is how the design looks in Cricut's Design Space. You can see the score lines and cut lines below.
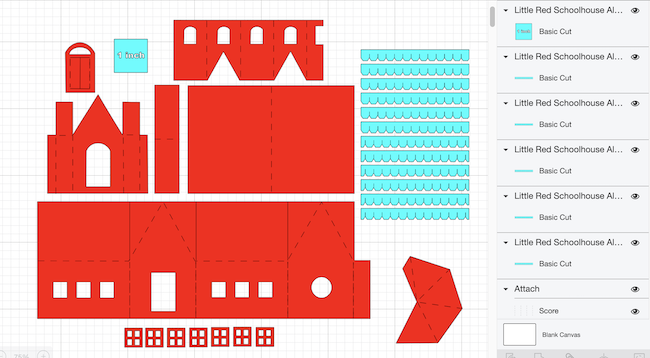
In Cricut Design Space, the score lines are already designated and attached.
So once you have cut out all the pieces, this is what you should have:
- Main body of the little schoolhouse
- Front portico piece
- Roof for front portico
- Roof for main schoolhouse
- Bell tower cutout with 4 windows
- Steeple
- 7 windows (you only need 6, but I included an extra one in case you lose one like I do)
- Door with arched top window
Now score, fold, and assemble the all the cardboard pieces of the miniature Schoolhouse
Because the Cricut Explore Air 2 doesn't really score very well, I go over the score lines again with a ruler and the back of an Xacto knife.
Here's the video showing how the miniature paper school house goes together.
First glue the main body of the schoolhouse together. Then glue the roof flaps behind the gable on the front portico part of the house. That prevents the gable from moving when you glue the portico to the paper house. And when you do that try to make the walls of the portico at 90 degrees.

Next assemble the steeple and the bell tower. Again check to make sure that they have 90 degree angles at the corners. Let the glue dry.
After the main body of the house is glued together and secure, glue the front portico on the school
When you glue it on, center it on the front of the schoolhouse. Also once again try to glue so that the angles of the portico walls are at 90 degrees.
Next comes the roof of the front portico because it is easier to glue on before you glue the main roof on.
Finally to complete the main body of your miniature schoolhouse, glue the main roof piece on.
Next glue the bell tower and steeple on the schoolhouse roof
Once the main body of the house is completed, glue the bell tower and the steeple to the schoolhouse roof.
Important - Don't glue the steeple on yet if you want to add a bell. Follow the instructions in Rhonda's tutorial "Setting bells in Putz Church Bell Towers". It is an excellent tutorial. I couldn't figure out how to make the bell hang properly until I read her tutorial. Glue the steeple on after you have the bell in place.
Prime and paint

You always have options on when to prime and paint your little house. Sometimes, in the video, for example, I prime and paint before I assemble the house. Many people who make little putz houses prime and paint after the house is assembled. You can do it either way. Since I added siding to the house. I primed the first house with black gesso to give depth after the siding application. For the house in the video, I painted it with a gray color because the black paint is just a little too dark.
To make the red siding, I cut out an extra little house and painted it with the perfect Candied Apple Red Distress Paint. That way I could just cut strips to exactly match the shape of the house.
Apply the Red Siding to the Schoolhouse
First, cut the red painted cardboard house pattern into 4 pieces for each side. Then cut the strips. Apply glue and then apply the strips to each side. Work on one side at a time. I'll be honest, this part is time-consuming, but adds such wonderful detail to your schoolhouse.

One simpler way to add siding is to paint the house red and draw the siding on the red paint. That works and is much faster and still gives you nice detail on your little red schoolhouse.
Glue on the Shingles to Your Little Red Schoolhouse
Next you can add the shingles to the roof of the little red schoolhouse. The SVG pattern includes 12 strips of shingles. I think I used about 24 for the main roof and the steeple roof. So duplicate the shingles when you cut them out.
The set of shingles is designed to fit the roof of the schoolhouse. Alternate the strips of shingles which end with a full shingle with those that have a half shingle. That gives you a cool design on the roof top.

Make the Cardboard Base and the Fence for Your Miniature School Putz House
For this house, I made the base just like I did for the Miniature Plaster House. Just hot glue 3 layers of corrugated cardboard together with a cut out for an LED tea light, then cover with newspaper or leftover brown packing paper and paint.

To make the fence, I cut out multiple fence sections using the Tim Holtz Village Cottage Die and glued several layers together to make it very strong. After all, the little house is going to a family with a 2 year old. You know how destructive they can be. I want it to survive her childhood. My hope is that it will a cherished momento for her.
Now paint the cardboard base the color of your choice
I always have trouble with this step because I am not good with colors. So I painted the base kind of a grey color. Maybe green would have been better. What do you think? Let me know what color you choose for the base of your red schoolhouse.
Glue the little house to the base
Once the paint is dry on the cardboard base, glue the house on it. I just run a thick bead of glue on the bottom of the house and smush it into the base. I do hold it for a minute so the glue will adhere well.
Finally, glue on the fence to the cardboard base to finish your paper schoolhouse

And the last step is to glue the fence to the base. You can glue it on top of the base or around the edge. I debated which one would be better. I decided to put it around the edge of the cardboard base because it seems more secure and doesn't obscure the little house. Either way works well.

Then I made a little walkway to glue in front of the door. It's just a painted piece of cardboard. You could make other embellishments - trees, toys, playground equipment, but I chose to keep it simple. For one thing, miniature items tend to get pulled off by kids. So I just kept it the schoolhouse as is.
If you want to make a Crayon Fence, here is the link to the Crayon Fence tutorial. It's Design No. 145 in the Paper Glitter Glue library.
Quick Card Stock Paper House Version of the Little Red Schoolhouse
Here is the quick version of the Little Red Schoolhouse. I don't usually make my houses out of paper - it's almost always cardboard. But this worked REALLY well and was so quick. I got it done in well under an hour. It might be fun to draw in the details like the siding and shingles or even a bell for the tower.

So that is how you make the Little Red Schoolhouse. I hope you enjoy this pattern and make one for the student or teacher in your life as a great back to school paper craft.
Do you have any questions? If so, you can ask me in my Facebook Group "Paper Houses and Paper Crafts hosted by Paper Glitter Glue" or email me at [email protected]. I love to help.
Nora made a wonderful version of the Little Red Schoolhouse. I love the ABCs on the front.

Here is one of the Little Red Schoolhouses made by one of my readers in the Facebook group. She decorated it for winter. It's great, isn't it? I think she did a masterful job with the snow.

Lucy
P.S. And be sure to save this tutorial your favorite Pinterest board so you can remember where you found the how to make the Little School House.


Cindy M
I love, love, love your little houses! I don't build them, I sure wish I could, I absolutely do not have the space to make them. I really enjoy seeing all the creations when you have your contests. Such imagination and talented hands!! Bravo to you for sharing so many of your templates, too. That is a real gift for people like me - on a very limited income - to be able to have some free files to work with. You are a blessing.
Marie
it is beautiful, thank you very much !!
❤️🤗
Lucy
Marie, thank you for your kind comment. I am so glad you like it.
Lucy
Kate Murphy
THANK YOU SO MUCH for the little red schoolhouse and doing it in card stock too!!! I do not always (if at all) time to do cardboard so I am usually limited to cardstock and this one is perfect! I have been looking for a template just like this style of schoolhouse! I am so excited to make this!!!
Lucy
I am so glad you like it. I am making a kit of the little red schoolhouse for my coworkers at Peds Clinic where I work. It is really easy to make in the cardstock form. I am kind of surprised. Thank you so much for letting me know you like the pattern.
Ann Martin
What a cute project - thanks for posting it!
Lucy
Thank you so much, Ann. I thought it would be fun as a back to school craft.