Learn to make a miniature Barn in the Make a Barn Challenge. The fun thing about making this particular barn is that you get to use different techniques for making crackle siding and a rusted roof.

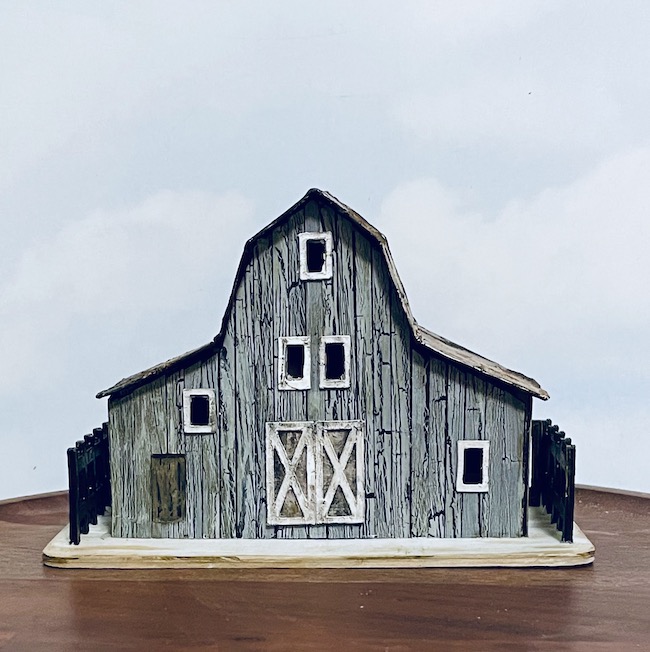
I've made several miniature barns in the past - the Tiny Barn and the Barn made from a recycled box. Since then I've collected photos of barns for inspiration to make another miniature barn. Finally I settled on this pattern which I call the Old Gray Barn for this Barn challenge. I hope you will join me in making a barn.
Table of Contents
Free Barn Patterns:
- Tiny Paper Barn - Quick and Easy Holiday Craft
- Recycled Box to Make a Miniature Barn for Kids
- Barn with Stables from Jackie at A Cottage in the Forest
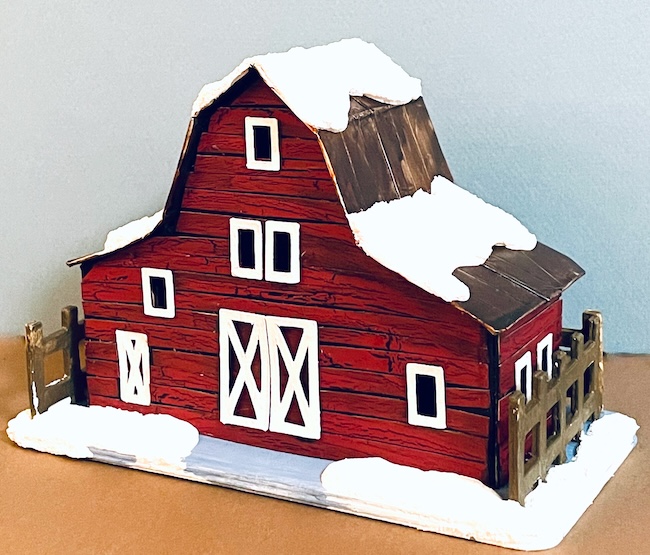
Below is my winter version of the barn in red with snow on the roof.
This post contains some affiliate links for your convenience. Click here to read my full disclosure policy.
Make a Barn Challenge Materials
- Old Gray Barn pattern from the Paper Glitter Glue library - Design No. 146
- Cardboard - this is the kind I use or Card stock - #110 works best
- Bearly Art Glue or Aleene's Quick Dry Tacky Glue
- Elmer's Glue All to make crackle-painted surface
- If using cardboard, acrylic paints like these:
Gesso primer
Hickory Smoke Distress Paint
Black Soot Distress Paint
Lost Shadow Distress Paint
Frayed Burlap Distress Paint
Ground Espresso Distress Paint - Aluminum Duct tape for a metallic roof
- Alcohol inks for a rusted roof on the barn:
Ranger Earthtone Alcohol inks - Grit paste for additional "rust" on the roof
- A way to cut out the pattern - I used my Cricut Maker, but you could also use a Cricut Explore Air or a Silhouette machine or you could cut it by hand fairly easily
Steps to make the Old Gray Barn
- Download the Old Gray Barn pattern from the Paper Glitter Glue library - Design No. 146 in the June 2023 section of the library
- Cut out the pattern for the Old Gray Barn
- Fold along score lines
- Glue the front and back pieces together along one side tab
- Prime and paint the barn pieces if using cardboard
Make crackle-painted surface if desired
Cut the crackle-paint cardboard into strips for barn siding - If using cardboard, apply siding to barn pieces
- Glue on windows and doors
- Assemble the barn structure
- Apply metallic tape to roof piece for a rusted roof on your barn
- Age the metallic tape with alcohol inks to mimic rust
- Glue the roof on the barn
- Make a base and adhere your barn to the base

Now let's go over the steps in more specific detail.
These barns are from one of my crafting buddies, Kay. She makes a great barn display. Here Old Gray Barn version is red though.

1. Download the pattern from the Paper Glitter Glue Library
If you are new to my website, here is how to get the Old Gray Barn pattern Design No. 146. Subscribe to my Paper Glitter Glue newsletter which is where I share craft information and crafty inspiration. The form is right below. You will get the password to my library right away after you subscribe. Please be assured that I will never send you any spam.
After that go to the Paper Glitter Glue library click the orange button which says CLICK HERE to get to the password page, add the password. Now you have access to all of my paper craft files in the library.
Please note that all of my free files are numbered and listed in chronological order. So pay attention to the month and year for the file you are looking for. This little barn is located in the June 2023 section of the library as Design No. 146.
The pattern for this paper craft is available in 2 formats - a printable PDF format and as an SVG file to use with automatic cutting machines.
If you have any trouble downloading or using the file, please email me - [email protected]. I am always happy to help.
2. Cut out the pattern for the Old Gray Barn
If you use a Cricut or other cutting machine to cut out your patterns, you need to be aware of score lines. Having your machine cut and score your cardboard or card stock just makes creating so easy. I used to have this thought that I was cheating to use a machine for cutting, but I've gotten over that.
Upload to Cricut Design Space
To help you, here is how the pattern looks as uploaded to Cricut Design Space.

Ungroup the Design and Delete the 1 inch square
First ungroup the design. I always include a one inch square for scale on my patterns. Once you know that the pattern is uploaded at the correct size, delete the one inch square.
Select the pieces with score lines
The three pieces with score lines are the front and back pieces and the roof piece.
Each of these pieces is grouped with its score lines. Select the set of score lines. When I draw a pattern, I draw the score lines in red so you can instantly know that this is a score line because the color box under the Operations menu is red.

Select score under the operations menu and then attach
Go to the operations drop down menu and choose score. The lines then turn to dashed lines.

Next attach the score lines to main piece of the barn. That way your Cricut machine knows these score lines belong to this piece.

The nice thing is that by rotating the design 90 degrees and flipping it, you can cut out both the front and back pieces of the barn on one 8.5" x 11" piece of cardboard or card stock. I attached them together in Design Space so I don't have rearranged them on the cutting mat.

Now cut out all your pieces
For my 30 pt cardboard I use the Light cardboard setting. For card stock, I use Cardstock (for intricate cuts). Usually I run it through twice to make sure the machine cuts all the way through.
3. Fold along the score lines
When I use cardboard for my houses or barns, I fold along the score lines first because they can be harder to see after painting.
4. Glue the front and back pieces together along one side tab
5. Prime and paint the barn if using cardboard
Because I covered my barn with crackle-painted siding, I primed the barn with black gesso to provide a shadow between strips of siding. See how the pieces are already folded.

Then I made a sheet of crackle paint in a gray shade. You'd be surprised at how easy it is to make crackle paint for siding.
Here's my video on making crackle paint:
Look at this sheet of crackle-paint siding. Use your paper trimmer to cut each strip ¼ inch wide.

These strips are very effective for making a vintage barn.

6. If using cardboard, apply the siding to the barn structure
Glue strips to the barn structure and trim to size.

7. Glue on the windows and the doors
Next, glue on the windows and the doors. There are two doors - one large on in the middle and a smaller side door. I find them much easier to glue in place before I assemble the entire house.
To make the doors, glue a cardboard piece on the back side of the barn to support the doors with the X-shaped pattern on them. Those go on the front of the barn.
8. Assemble the barn structure
To complete the barn structure, first glue the side tab together. Once that is dry, glue the roof tabs to the roof flaps. I used painter's tape to hold down the flaps while the glue dried.

9. Apply metallic tape to roof piece for a rusted roof on your barn

10. Age the metallic tape with alcohol inks to mimic rust
Make a rusted roof for your old barn by distressing or aging the metallic tape with alcohol inks and some grit paste. The photo below shows the metallic tape BEFORE using alcohol inks to age it.

The photo below shows the distressed roof aged with alcohol inks and grit paste.

For more information and details, see this tutorial - How to make a rusted roof for your houses.
11. Glue the roof on the barn
Once the roof tabs are glued down to the roof flaps and you have your metal roof distressed, it's time to glue the roof on.

I tend to use a lot of glue. You don't really need this much.

Often I use painter's tape to hold the roof in place while the glue dries.

12. Make a base and glue your barn to the base
To make a strong base, I glued 4 layers of cardboard together. Then apply a thick bead of glue to the base of the barn and adhere to the base.

Make the fence by gluing 2-3 layers together and gluing to the base. The base is probably smaller than he
Questions?
If you have any questions just email me - [email protected]. Be sure to share on Pinterest. Or tag me if you make the Old Gray Barn.
And that's how you make the Old Gray Barn.
Thank you for reading.
Lucy
Leave a Reply