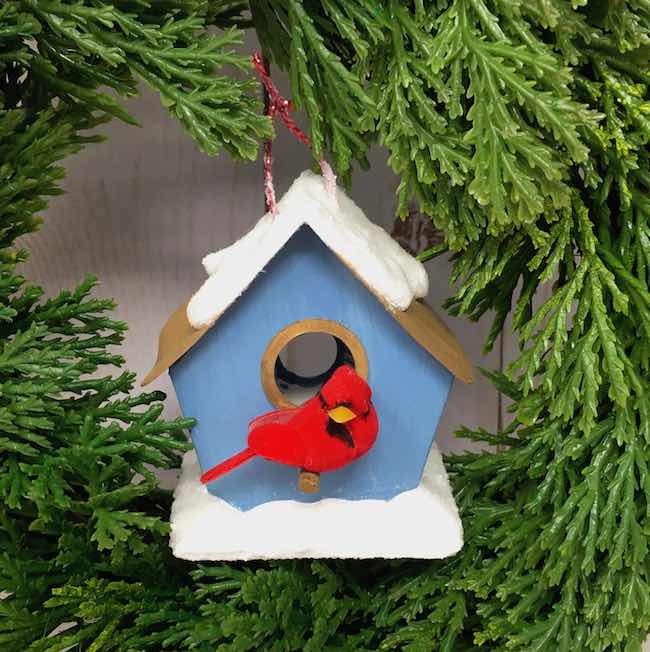
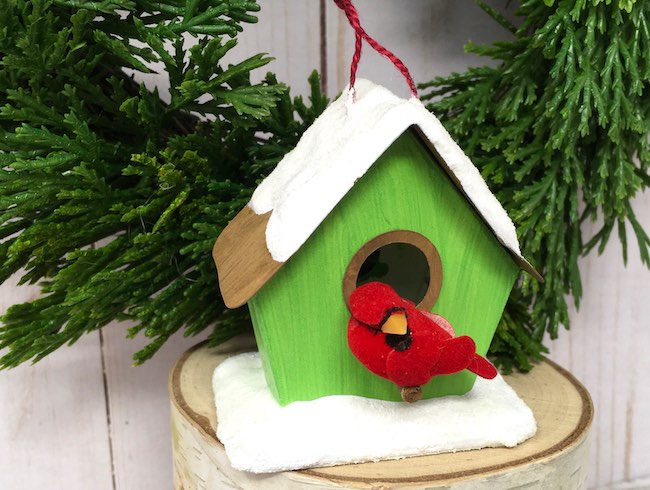
Here's how to make a cute little paper birdhouse ornament for the holidays. It's a quick and easy craft that everyone will enjoy both making and seeing on the tree or hanging from a window. It would be fun as mobile or a decor in a child's bedroom.
Now let's make this adorable miniature paper birdhouse.
This post contains some affiliate links for your convenience. Click here to read my full disclosure policy.
Materials to make a Tiny Paper Birdhouse - Design No. 110
- Card stock or cardboard
- Tacky glue
- Hot glue (optional)
- Paint
- Uniball Signo white gel pen
- ⅛ inch dowel
- Embroidery thread and needle
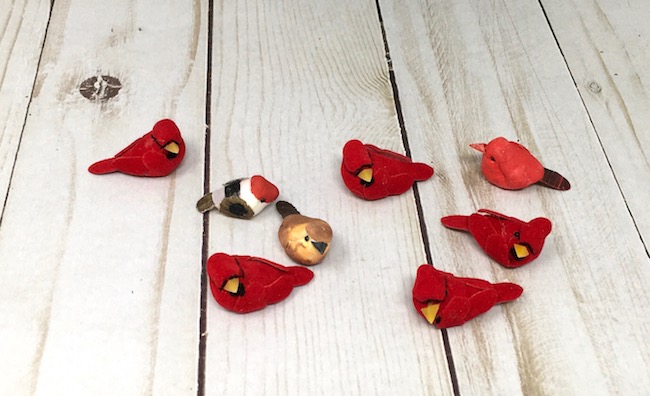
- Miniature birds
- Tiny Cardinals
- Tiny Cardinals male and female
- Snow - I used Snowtex, but Aleene's Glitter Snow is much more affordable
- Mod Podge and glitter
- Pattern for Tiny Paper Birdhouse - Design No. 110
- A way to cut out your pattern - I used my Cricut Maker, but other cutting machine work too. And you can easily cut it out by hand.
Instructions to make the Miniature Paper Birdhouse
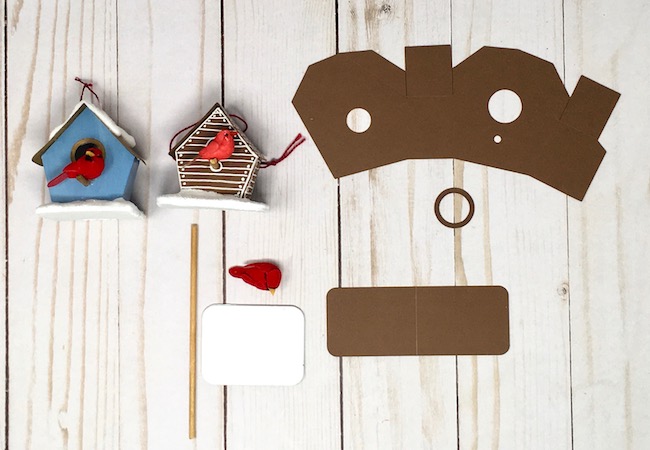
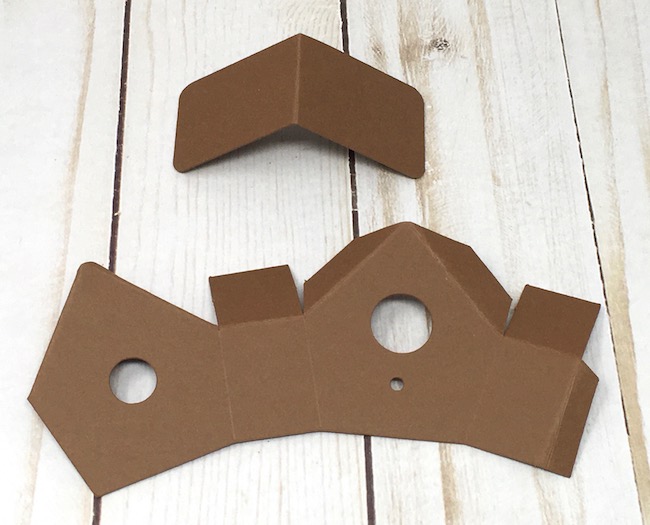
- Cut out the pattern - Design No. 110
- Paint or decorate if needed
- Assemble the birdhouse
- Insert dowel for the bird perch
- Make a hanger
- Make a base
- Add snow
- Glue on bird
First, get the pattern - Design No. 110 - and cut it out
To get the pattern, just go to the library, put in the password, and download the tiny paper birdhouse pattern from the December 2020 section of the library.
If you don't have the password, just subscribe to my Paper Glitter Glue newsletter with the form below and you will get the password immediately.
Subscribe NOW!

Subscribe to get my free newsletter by email. Also get access to all the fun patterns and tutorials in the Paper Glitter Glue library with the secret password. I will send you a newsletter every one to two weeks.
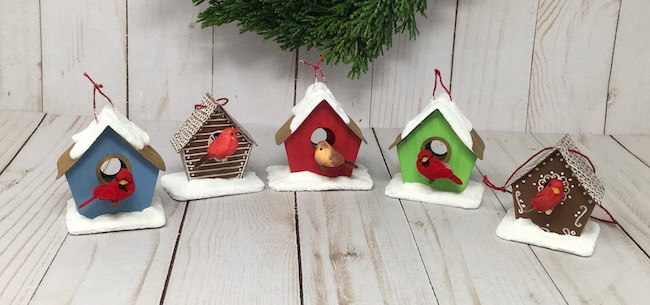
There are two different types of files - a printable PDF file and scalable vector graphics (SVG) files that work on cutting machine. Also there are two sizes of the birdhouse - tiny and small. The tiny size (my favorite) is about 2 inches across the front, 1 inch deep, and 2.5 inches high. You can see a small house on the left and the tiny house on the right.

Here is how the tiny birdhouse looks in Cricut's Design Space. If you are using a Cricut, Cricut does not allow us to designate the scorelines, you you have to select them, go to the operations menu and change them to score, then attach.
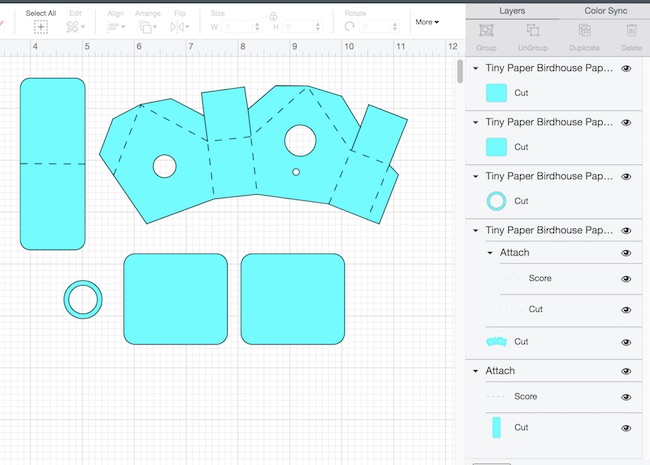
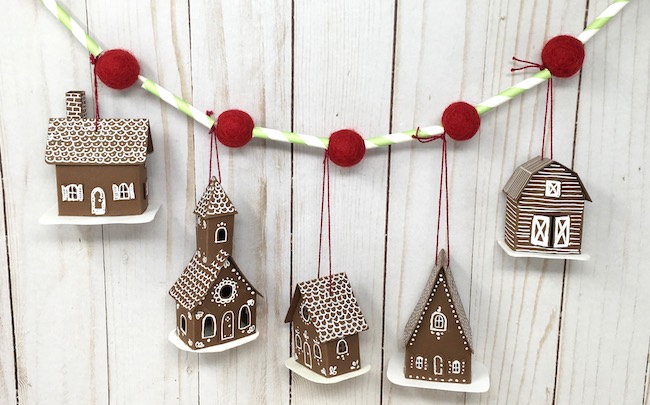
Also, just a bit about choosing materials. For all of the tiny birdhouses I made, I used 65# or 110# card stock, but cardboard certainly works as well. And I painted 3 card stock versions as well, but you can use colored card stock if you want. If you decorate the birdhouse to look like gingerbread, use a white gel pen (the best is the Uniball Signo in my opinion) to draw designs on brown card stock.
Please note - the two rectangular pieces show above are for making a base for the miniature birdhous
Paint or decorate if needed
After you cut the pattern out, decorate. Use colored card stock if you like. I just like painting my little houses so I used an acrylic paint on 3 of the little houses.
Assemble the paper birdhouse
Here's a video showing how to assemble the tiny paper birdhouse.
First, fold along the score lines before assembly.
Next apply glue to the side glue tab shown on the right in the photo above. Then glue the house structure together.
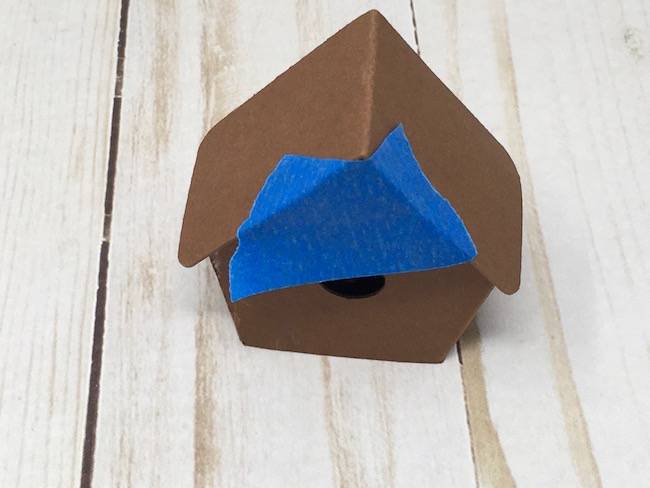
After than push the roof flaps inward and glue the roof tabs to the roof flaps. On the photo below you can see the side seam where the house is glued together as well as how the roof tabs are glued on top of the roof flaps.
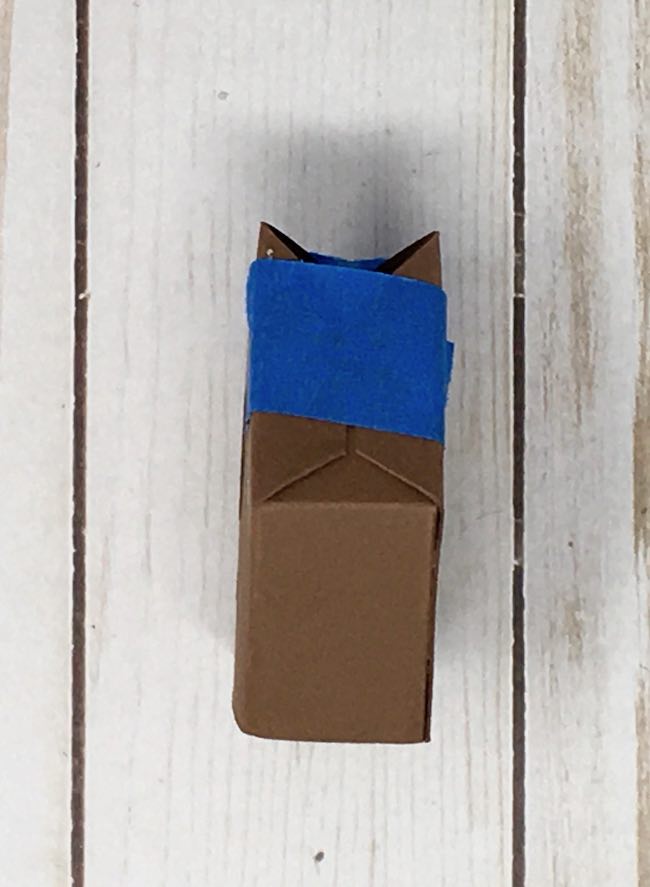
Often I use painter's tape to help hold the structure together while the glue dries.
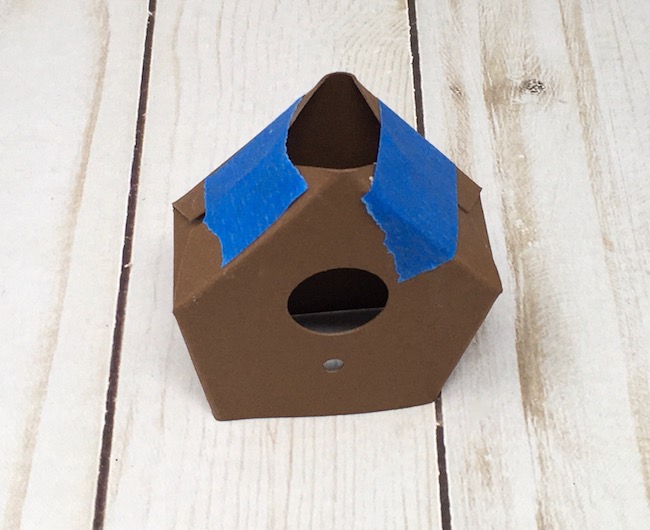
Next, glue the roof in place. Again, painter's tape helps hold the roof on while the glue dries.
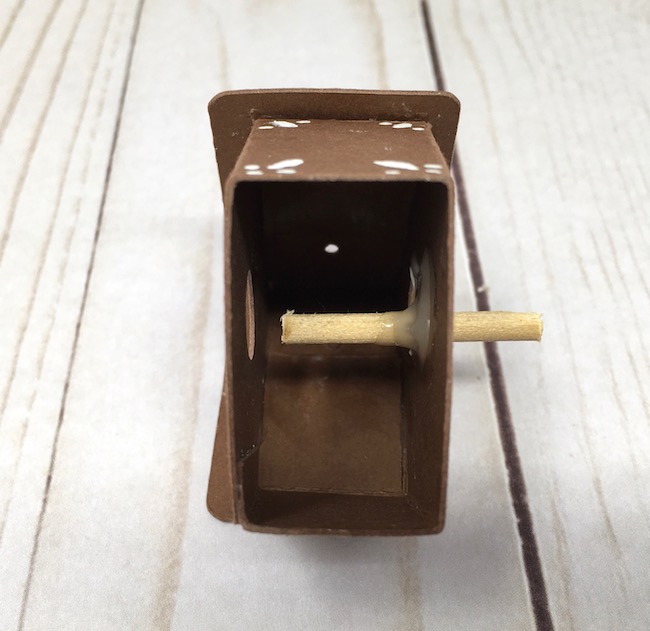
Insert dowel for bird perch
Next cut about a 1 inch section of the ⅛" dowel for the bird perch. This thickness is easy to cut. I use my garden clippers. Insert the dowel in the small hole on the front of the birdhouse and glue in place. Hot glue is the fastest, but I also used Fast Grab Tacky glue for some of the perches and just left it alone for a while to dry.
Make a hanger for the birdhouse
Poke a hole in the roof about ¼ inch down. With a large embroidery needle and thread, poke it through the hole and make a hanger.
It's easier to do this before you add snow because the snow gets all smushed down if you wait to add the hanger.
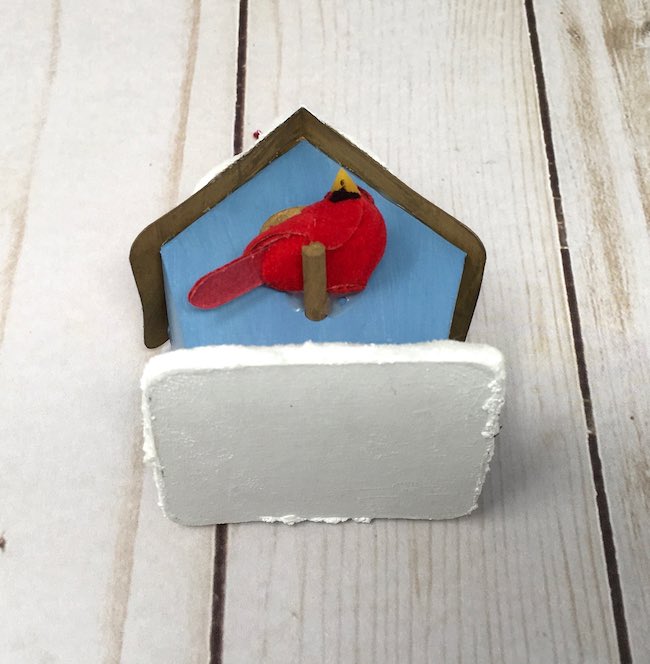
Make a base
For these tiny birdhouses, I simply glued two pieces of cardboard together. Both of these pieces are in the pattern.
I painted them white to match the snow.
Glue the house to the base with a thick bead of glue along the bottom of the birdhouse.
Add snow for a wintry birdhouse
After the house construction is done you can add snow if you want. I didn't add snow to the roof of the gingerbread-type birdhouses because I like the design on the top. But I did add snow to the base. And finally, paint with Mod Podge and add glitter if you want your little birdhouse to sparkle.
Of course, you can decorate it for other seasons with tiny flowers, mushrooms, moss, pinecones, etc. Just use your imagination.
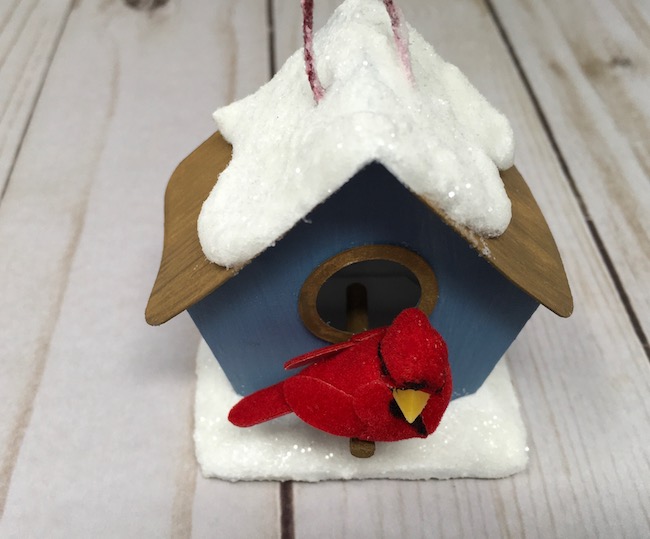
Glue on the miniature bird
Once the house has been completed, glue the miniature bird onto the perch. Hot glue works faster, but I used my Fast Grab Tacky Glue.
Sometimes it is hard to find tiny birds (around one inch in length), so I included a bird pattern in the cut files. You don't have to use them though. When you order tiny birds online, you may find them under the name mushroom birds (I have no idea why). Generally, I order them from Factory Direct Crafts, but they can be found in hobby stores and on Amazon as well.
And that's it. That's how you make these adorable ornaments. This is another in the quick and easy series of holiday crafts for this season. Here's a list of my other tiny houses that you might like to make:
I hope you have fun making them. Remember, if you have any questions, please email me at [email protected].
Lucy
Morgan
Thank you so much, Lucy, for this simple and so cute pattern for tiny birdhouses! I made three using heavy cardstock-ish cardboard from a cracker box, and X-acto knife and Mod Podge. I used a Q-tip painted brown for the perch (cut off each end). No difficulties with the pattern or instructions. SO CUTE! They will be gifts to my parents, who love bird watching. I am so happy to have discovered your website, and am now officially obsessed with tiny houses. Thank you for sharing your knowledge and skills and creativity with the world!
Merry Christmas!
Lucy
Thank you, Morgan. I am so glad you like the tiny paper birdhouse. I like using cardboard more than cardstock because the birdhouse will last so much longer.
Lucy
Stephanie Sheridan
Get out of town. They are so cute. Now to get my cutter to work. Then i can cut out alot. I love birds. Have had several over the years. They become my babies. I just love animals.
Lucy
I am so glad you like the birdhouses. I hope you can get your cutter to work. These little birdhouses are really easy to make so you can make a lot.
Lucy
Janet
Hi Lucy,
Thank you so much for the bird house patterns. They are adorable. Aside from my regular Christmas tree, I have a 3-foot tree that I only put bird ornaments on. Your little bird houses will sure complement my tree! Your instructions are always so thorough. Thank you for all you do for crafters like me!
Merry Christmas/Happy Holidays,
Janet
Lucy
Janet,
I am so glad you like the little birdhouses and that they work with the theme of your tree.
Thank you.
Lucy
Julia
Thanks Lucy, I love your tndy houses. I haven’t had a chance to make them but I hope to after the holidays.
Julia
Robin Williams
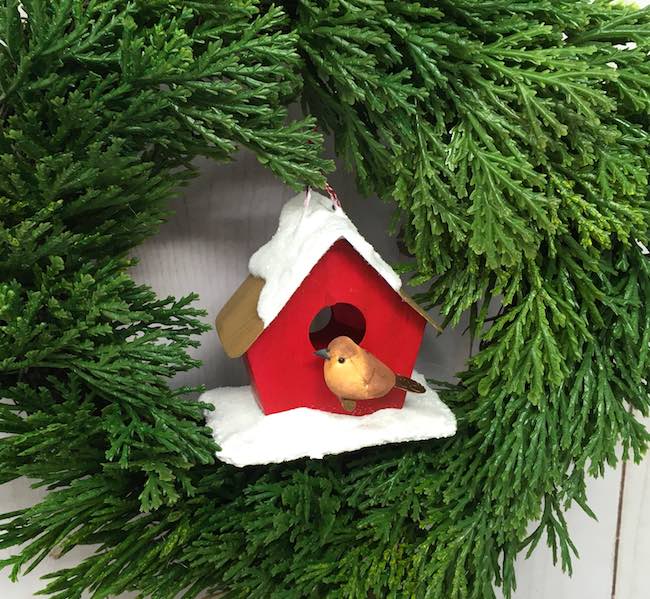
Hi, Lucy!
Your tiny birdhouse looks adorable in that green wreath! I love the birdhouse pattern and can't wait until I finish housework today and make my own tiny birdhouse!
One of my sisters asked for a birdhouse ornament for Christmas so she's going to get one from me, using your patterns!
Thanks very much for sharing your amazing creativity!
Take care and stay safe, Robin
Lucy
I am so glad that the timing for making the birdhouse works out with your sister's gift. That's very cool.
Thank you so much.
Lucy