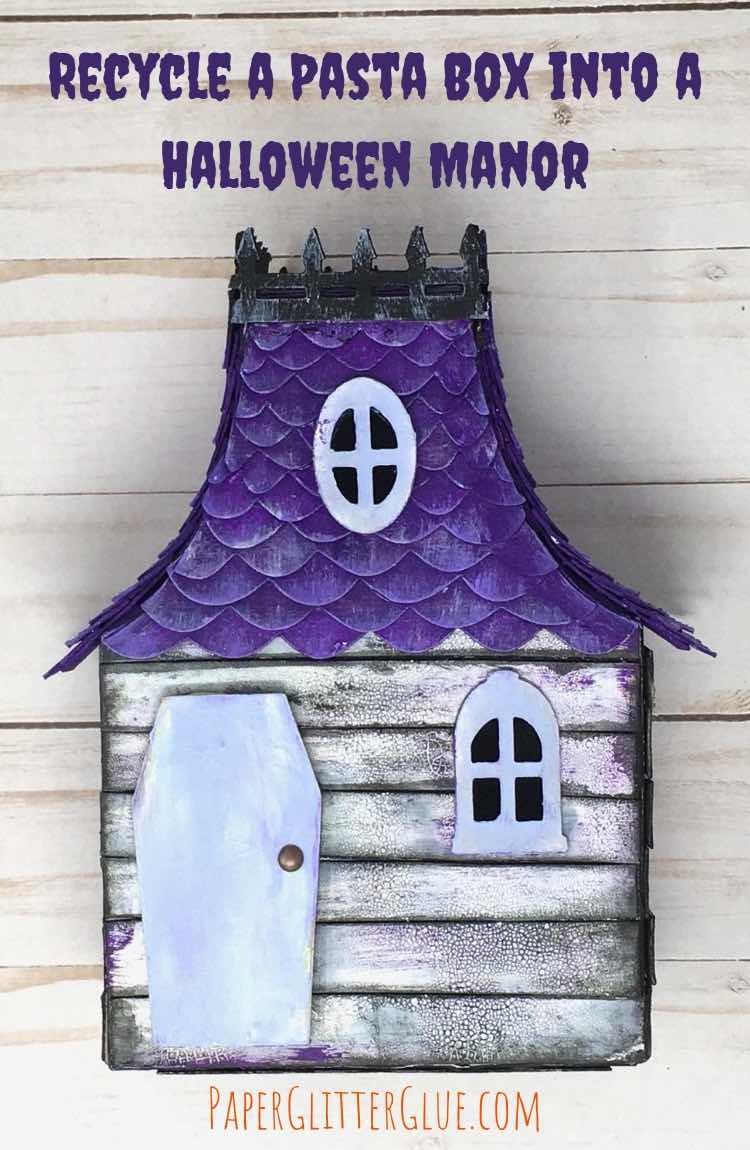
Learn how to make the Recycled Halloween Manor from a pasta box! It's great project to make with kids. They will love the their own mini Haunted House.

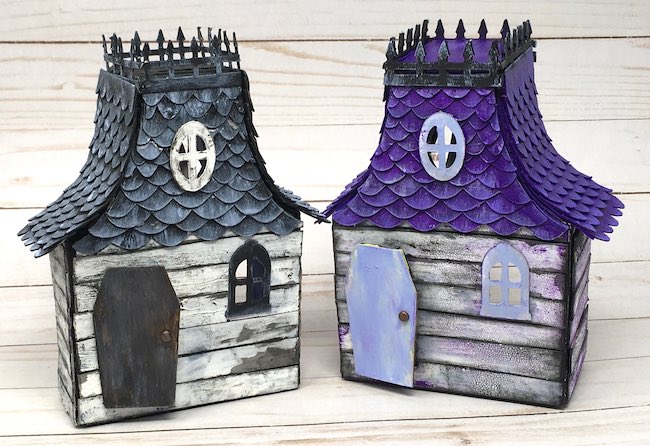
Earlier in the year, I finally decided do something about all the pasta boxes I saved for some imagined future craft project. The boxes evolved into barns and dollhouses for crafting with kids. Well, what's next? A Halloween version of the upcycled pasta boxes, of course - the Recycled Halloween Manor.
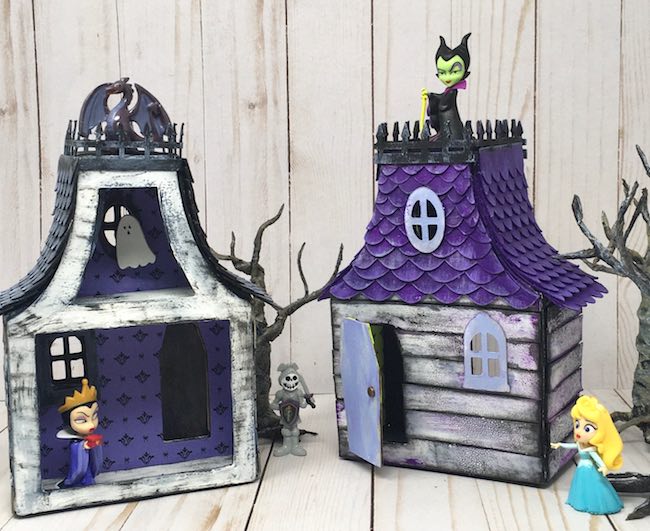
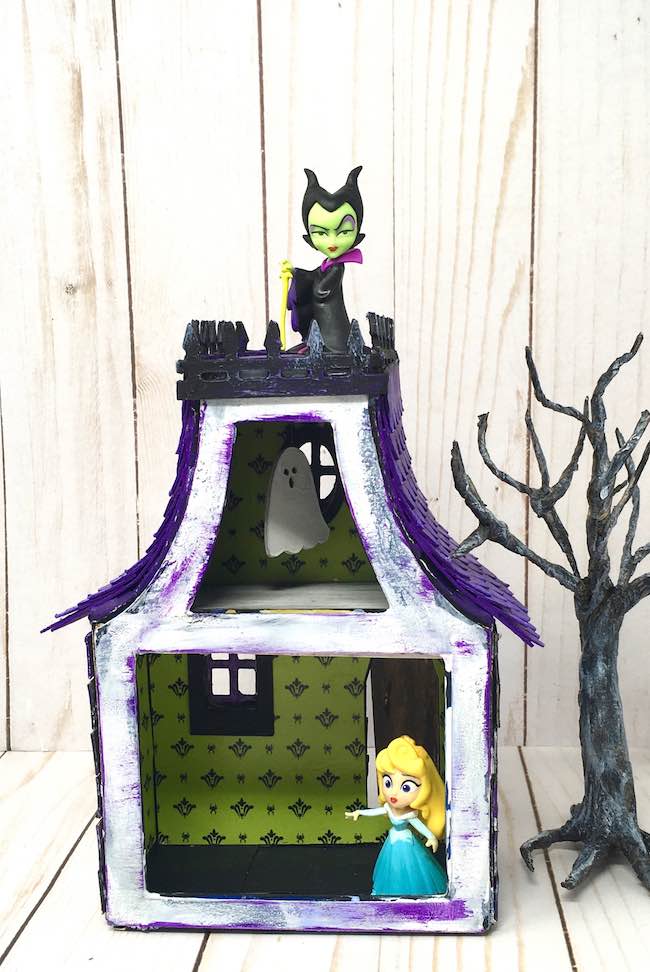
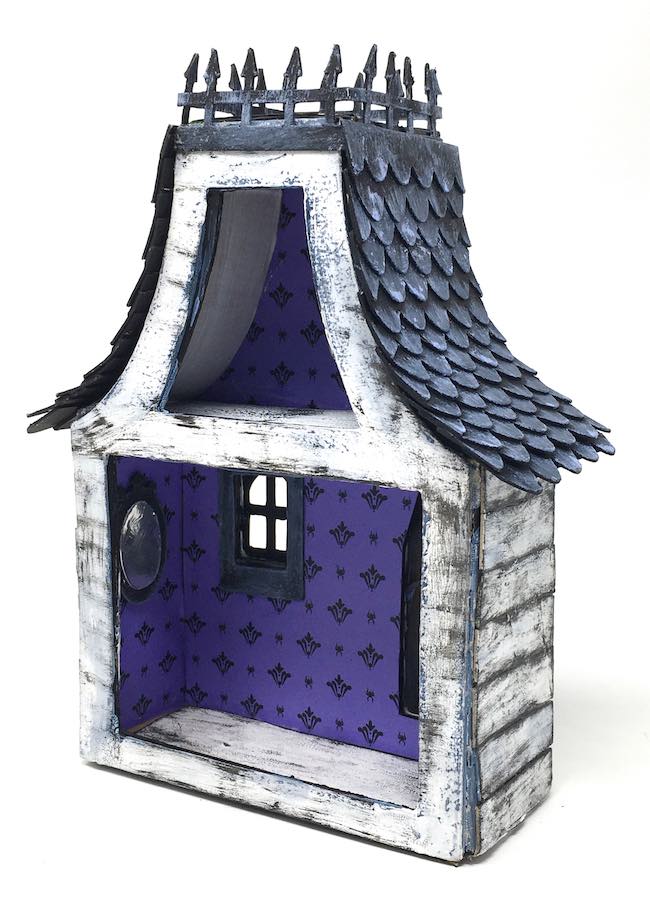
When the idea for the Recycled Halloween Manor came to me, I couldn't wait to make it because I envisioned such fun details - like a swinging ghost in the attic, funky shingles on the roof, a coffin-shaped door, and a framed mirror downstairs. This upcycled craft is more detailed and time-consuming to make than the barn or the dollhouse, but so worth it to my way of thinking. It's perfect for your Halloween decor and play!
Let's get started.
Here's how to make the just slightly spooky Recycled Halloween Manor
This post contains some affiliate links for your convenience. That means if you make a purchase after clicking an affiliate link, I will earn a small commission but it won’t cost you a penny more. Click here to read my full disclosure policy.

Materials for the Recycled Halloween House based on a Pasta Box
- Pasta Box
- Cardboard
- Card stock or copy paper or scrapbook paper
- Glue - this is my favorite
- Mod Podge
- Gesso primer
- Paint
- Craft knife
- Crackle medium
- Aluminum duct tape or aluminum foil for mirror
- I used a Cricut for the cardboard pattern
- Printer to print the wallpaper
- Halloween embellishments

Instructions to Make the Halloween House
Copy and Cut out the the Pattern
- Copy the pattern for the Halloween house - Design No. 92
- Cut out the cardboard templates
- If you don't have a recycled box, you can use the additional structural pattern for the house
Make Interior Wallpaper and Decorations
- Print the wallpaper - choose the bat or spider wallpaper
- Cut out the wallpaper shape for the inside of the Halloween house
- Cut out window frames and frame for the mirror
- Make the little ghost in the attic
Make the Exterior Details for the Recycled Halloween Manor
- Prepare the shingles
- Paint the windows and door
- Make the crackle paint siding or use the printed siding
Make the main structure of the Halloween Manor on the Pasta box
- Trace the outline on the opened pasta box
- Cut out the shape of the house
- Glue the house-shaped cardboard templates to pasta box
- Make the loft piece
- Prime and paint the cardboard house
Decorate the house exterior
- Adhere the siding to the house
- Glue the decorative shingles to the front
- Glue the windows to the exterior
Decorate the manor interior
- Glue the wallpaper to inside back of the house
- Add the spooky interior details like the ghost, window frames, and mirror
Glue the house together and glue on roof
- Adhere the attic floor (the loft piece) in place, if desired
- Glue the side tab to make the house structure
- Next glue the 2 roof pieces in place
- Add shingles and roof railing
- Hang the little swinging ghost in the attic
- Finally, glue on the coffin-shaped door
Below are more detailed instructions for you on how to make the little Halloween House.
Here's a Live YouTube video that show how to make the pattern out of a recycled box
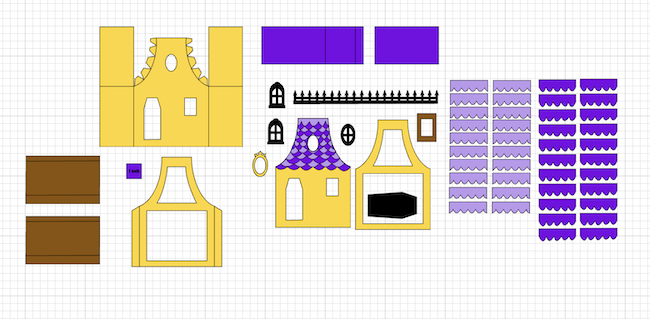
Copy and Cut out the Halloween Manor Pattern
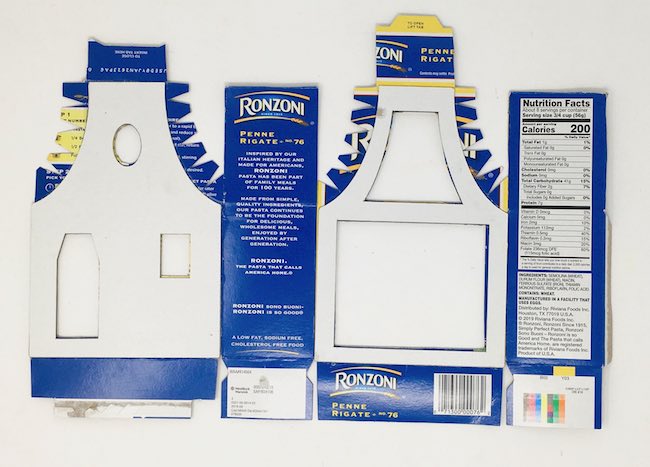
I bought about 5 different varieties of pastas to compare box sizes. Most had almost identical dimensions across the front. Some pasta boxes hold 16 ounces and some hold 12 ounces of pasta. The 12 ounce boxes are narrower in depth. The Halloween manor with the purple wallpaper above is one example. The only change you have to make on this pattern is cut the side wallpaper and siding so that it fits. The shingles and the roof piece still work just as well.
You can get the pattern for the miniature house from the Paper Glitter Glue library where I keep all my free patterns. If you already have the password, just type in the password. The patterns are listed chronologically with the most recent pattern first. This pattern is design no. 92.
In case you don't have a pasta box, there is a pattern included to make the structure of the Halloween Manor.
If you don't have the password to the library, just subscribe to my Paper Glitter Glue newsletter with the form below and you will get the password immediately. I'll send a newsletter every one to two weeks. No spam, just a crafting newsletter.
The pattern is available in 3 formats - PDF for printing, SVG cut files for cutting machines like the Cricut or Silhouette, and DXF cut files for cutting plotters.
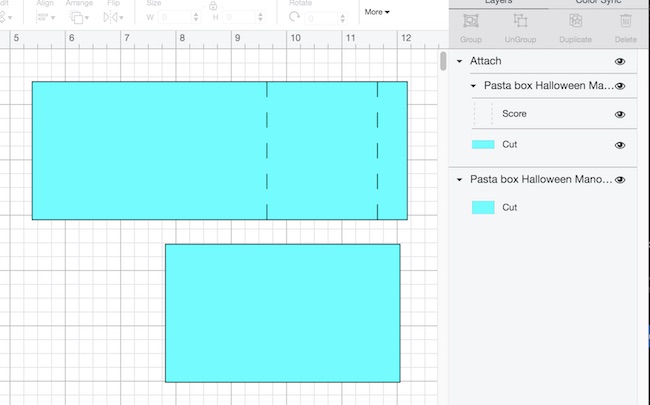
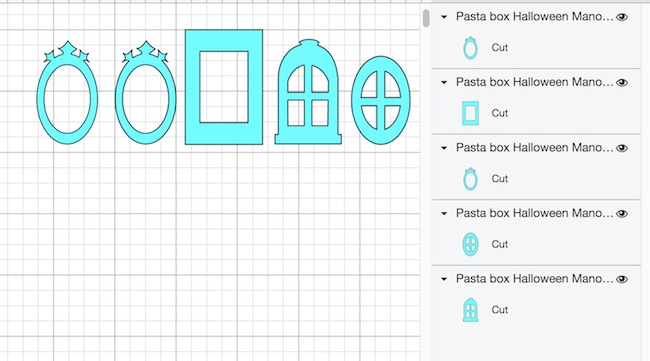
Here's how the pattern looks in Cricut Design Space
This is an easy pattern to cut out by hand, but even easier to cut out with an electronic cutting machine like a Cricut or a Silhouette. I use my Cricut Explore Air or my Cricut Maker when I make my little houses.
Below are all the parts for the Recycled Box Halloween Manor show in Cricut Design Space.
If you don't have a good size pasta box or recycled box, you can make the basic structure using these pieces of the pattern/

Here are the front and back Halloween Manor pieces in Cricut's Design Space. Use these two pieces to cover your pasta box.

Note: These are the pieces that have score lines. You must select the score lines and change them to score in the operations menu on Cricut Design Space and attach them to the piece they belong to.
First, the longer roof piece has score lines.
If you want an attic floor, cut out the floor piece below. Be sure to change the score lines so you can fold the flaps to glue to the sides of house. This piece is sized for a pasta box that is 2.5 inches wide. You may have to adjust it based on the size of your particular recycled box.

Finally, if you are using the structural pieces, be sure to select the score lines and convert them to score under the Operations menu. Then attach. Always remember to attach the score lines to the piece it is grouped with.

Make the interior wallpaper and decorations
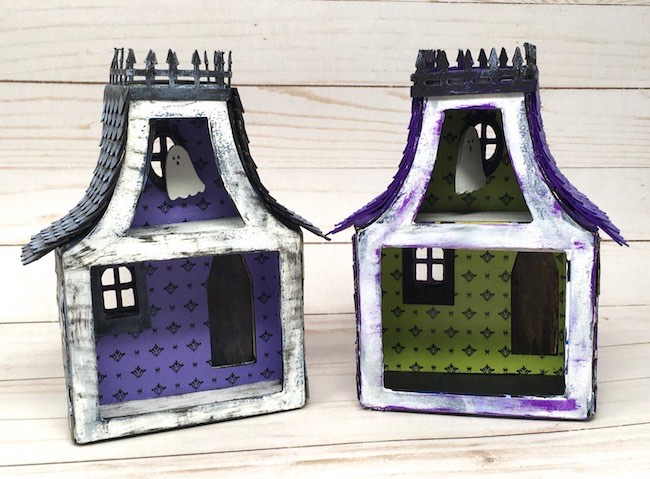
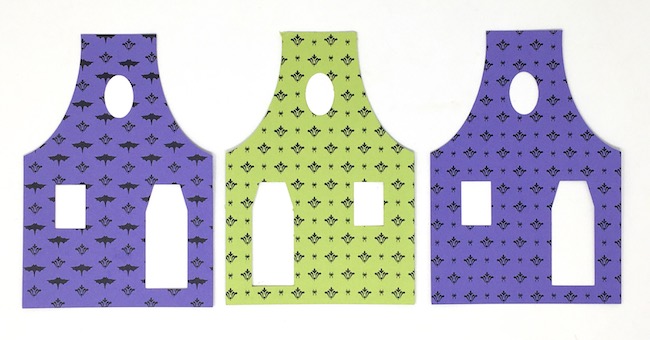
You have a choice of Halloween wallpaper included with this project. I designed two wallpaper variations - one with bats and one with spiders. In addition, you have the option of printing the wallpaper with a purple background or you can print the black and white version on paper or card stock with the background color of your choice.
But of course, if you have other decorative paper that would make good wallpaper, feel free to use that.
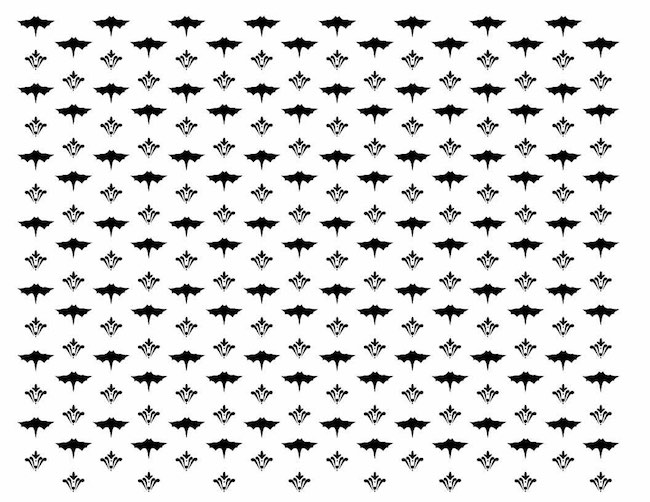
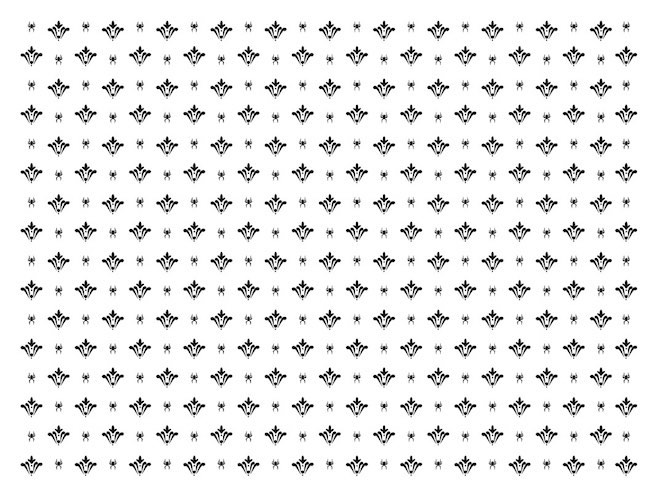
The wallpaper pattern is easy to cut by hand, but even easier with a cutting machine like a Cricut
Next, cut out the wallpaper in the shape of the inside of the house. You can cut the pattern by hand or with a Cricut. For me, the easiest way is to print out the wallpaper and then cut the shape with my Cricut. That way I know the shape matches the cardboard templates.
Remember to mirror or flip the image when you cut so the wallpaper will fit the inside of your house.
Cut out the window frames
Also, cut out the the frames to decorate the exterior and interior. I cut one square frame for the downstairs window and 2 oval frames - one of the attic window and one for the mirror on the wall.
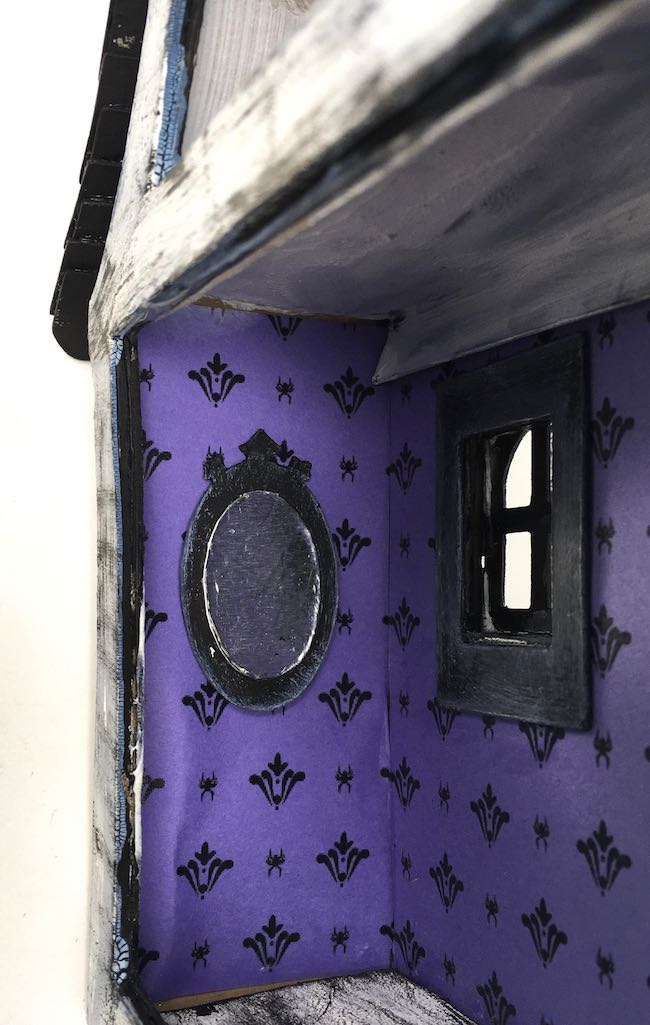
Make a mirror for your Halloween Manor
To make the mirror, save the interior cutout from one of the oval frames, apply aluminum tape or aluminum foil or metallic craft paper. Next, cut a piece of card stock slightly larger than the oval center. Then glue the covered center inside the frame. Sometimes you have to trim the mirror inside piece a little bit to make it smaller so it will fit better.
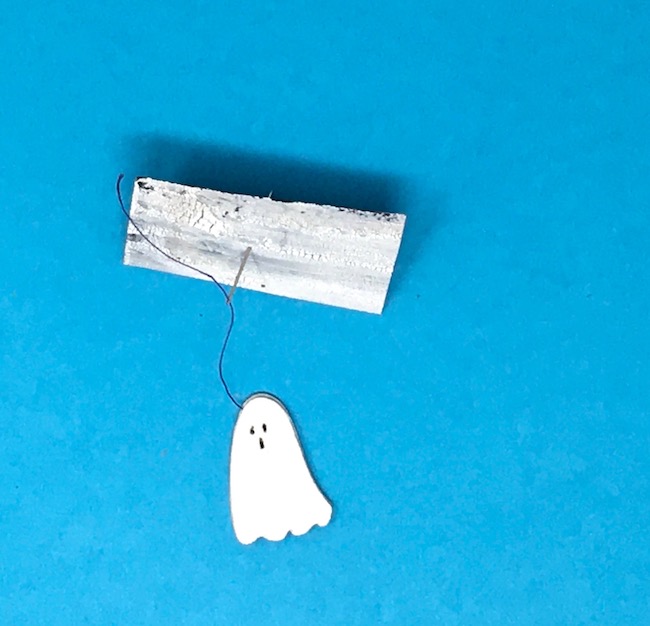
How about a Tiny Ghost for the Attic
You can get the ghost pattern from the previous Halloween post on this blog.
To make the ghost, cut out 2 ghosts from cardboard or card stock. Paint the pieces, if needed. Apply glue to the matching sides of the ghost so you can sandwich thread between them. The thread needs to be several inches long so you can play around with the placement for hanging in the attic. Glue the thread in the middle when you glue the two sides of the ghost together. Wait to hang the ghost as one of the last details when the roof and the attic floor are in place.
Make the Exterior Details for the Recycled Halloween Manor
For the spooky shingles on the Manor, I designed fish scale shingles to fit the front of the house. These shingles are sized so it is easy to line them on the front of the house (see below in the section on gluing the shingles in place). You can paint the shingles the color of your choice or you could use colored card stock.
The rooftop shingles are simpler and easy to stagger.
Next, make the house siding
Next, make the siding. You can print the siding in the file if you like, but my preference is to use crackle medium or crackle paint to make really dilapidated-looking siding. Here's my post on how to make crackle siding for miniature houses.
First, cut out a piece of cardboard in the shape of the house and sides. Then paint a base coat color - black gesso for me - followed by crackle medium or a glue like Elmer's Glue-All. After that dries, apply the top coat. I picked white for both sample houses.

Cut into ½ inch strips to apply the Halloween house. You can apply before or after the house structure is completed.
Draw the Main Structure of the Halloween Manor on the Pasta Box
Open the pasta box so it lays flat. Be sure to preserve the glue tab that holds the box together. If it gets torn, just glue a strip of cardboard onto side to function as a glue tab.
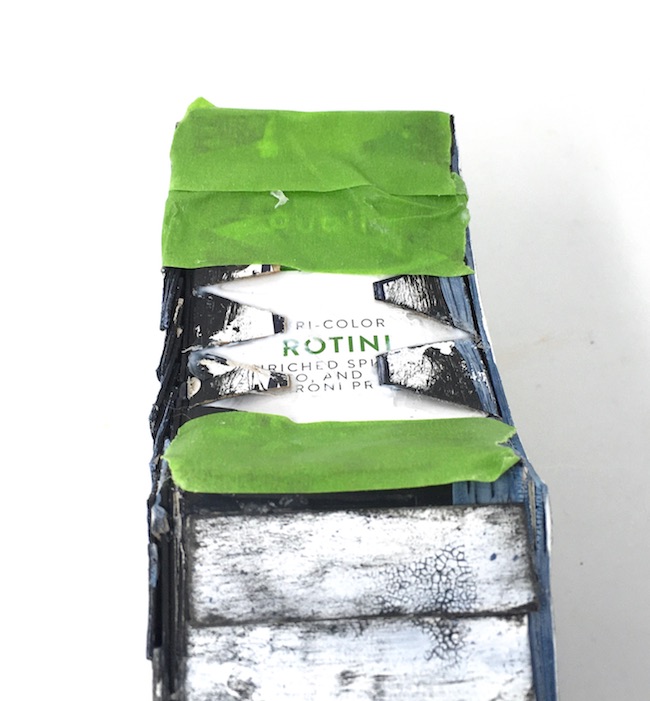
Trace the house outline on the opened pasta box as shown below. Most pasta boxes have a window on the front. When tracing the design, use that side for the open side of the house, not the side with the window and the door.
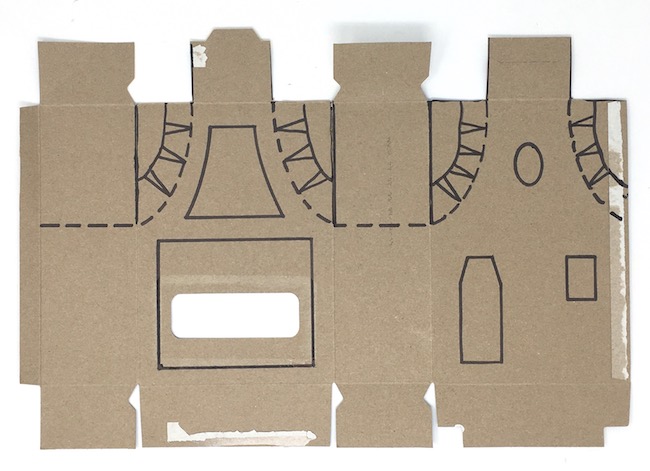
Here's how the box looks after the cutting the shape out for the front and back.
Please note: Be sure to leave some extra cardboard to make the roof tabs. I did not include them in the pattern.
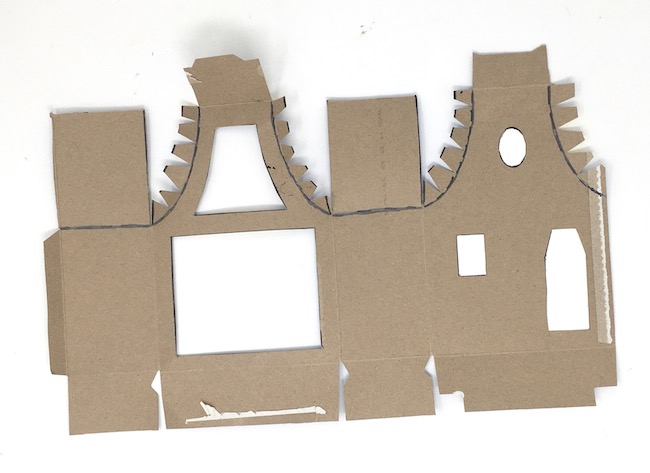
Since pasta box cardboard can be kind of flimsy, I alway glue the templates on the outside of the house to reinforce the structure.
The attic loft is optional
You don't need to make an attic loft for the Halloween house, but it's a great additional detail for the Halloween Manor. Prime and paint the loft floor piece.
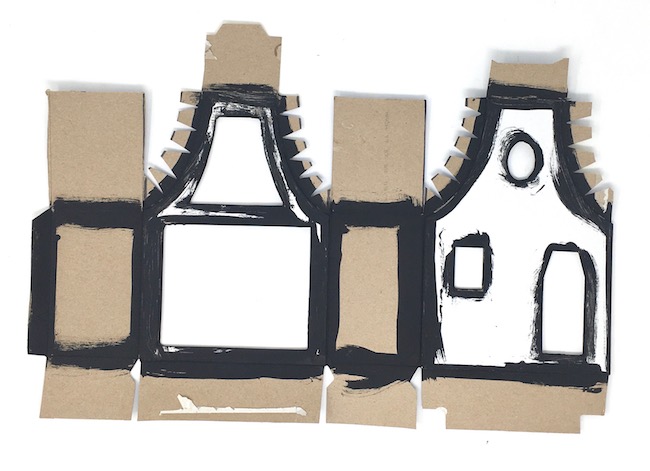
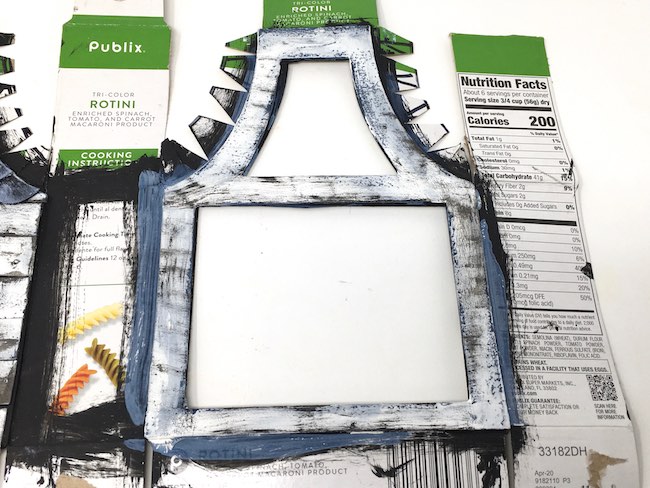
Prime the cardboard structure of the house
Next prime the cardboard house. I prime the inside as well so raw cardboard won't show on the edges. For Halloween houses, I suggest using black gesso to prime the house because it functions as a shadow on the edges.
Decorate the House Exterior
Generally I decorate the outside of my houses before I decorate the interior or glue it together. That way if I smear paint on the wrong place I can fix it before I work on the inside of the house.
Cut the strips of siding about ½ inch wide and glue to the house. Do this before you glue the front shingles.
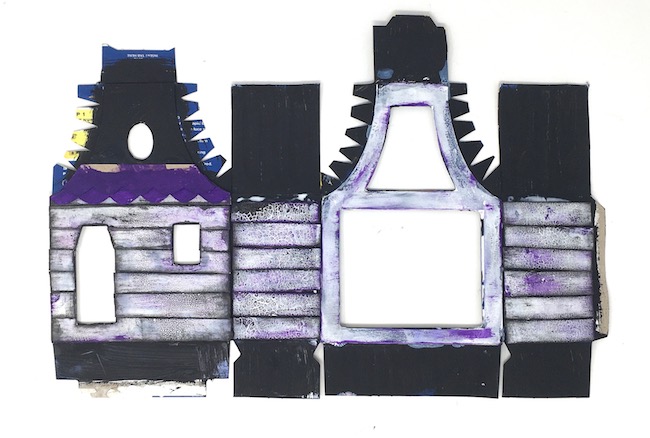
There's not much to decorate on the back exterior of the house. You can just distress the back with some contrasting paint. For one house I used black paint and for the other house I used a vivid purple paint - Wilted Violet from Tim Holtz.
Note: The front shingle pattern has all the shingles cut to size for you
The front shingles fit together so you don't have to trim to size. There is one tricky piece which you can see on the photo below. After the shingle with the narrow lower bridge near the middle of the photo below, the next set of shingles is actually two separate shingles. So keep that in mind when you are installing them on your little house. One way to make this easy is to line up the shingles as show below. Then you can easily place them in order.

Here's how the shingles look installed on the little house. When I add some distressing in a lighter color the individual shingles show up better.

After the siding and shingles are on, glue on the exterior windows
Now, glue the windows to the exterior. I recommend holding off on the door because of the hinge. You don't want to tear it while you are constructing the house. I save that detail for last.
Decorate the Manor Interior

Once the exterior is completed, work on the interior. Use Mod Podge or white glue to adhere the wallpaper to the inside of the house. Just to reiterate, I decorate the exterior first so if I get paint in the wrong place, it won't mess up the interior features.
Follow that with the window frames and mirror. You can also make some spooky pictures to go on the wall or add some creepy curtains. Wait to hang the ghost until the attic details are completed - meaning the roof and the attic floor are in place .
Glue the house together and glue on roof
If you want an attic floor, glue the loft piece in place. For simplicity, I just painted it white and distressed it a bit with black paint.
Glue the house together along the tab that originally held it together. Next, glue the angled roof tabs to the flaps. I used painter's tape to hold the roof flaps in place while the glue dried.

Next glue the roof tabs down to the pasta box side flap as shown in the photo below. The roof tabs may seem unnecessary, but they provide support for the roof pieces.
One piece is larger and forms the uppermost roof of the Manor. Apply that piece first. Then apply the shorter side.


Next, add the railing to the roof
Just a few more details and your little Halloween Manor is done. Next add the railing to the roof. Center over it front of the house. Gently bend it around the corners on the roof. Glue the railing to the top. The cardboard railing is a little longer than what is needed so just trim off the extra cardboard.
Please note: I've made the railing thicker in the pattern template so it will be stronger and less likely to bend than in the photo below.
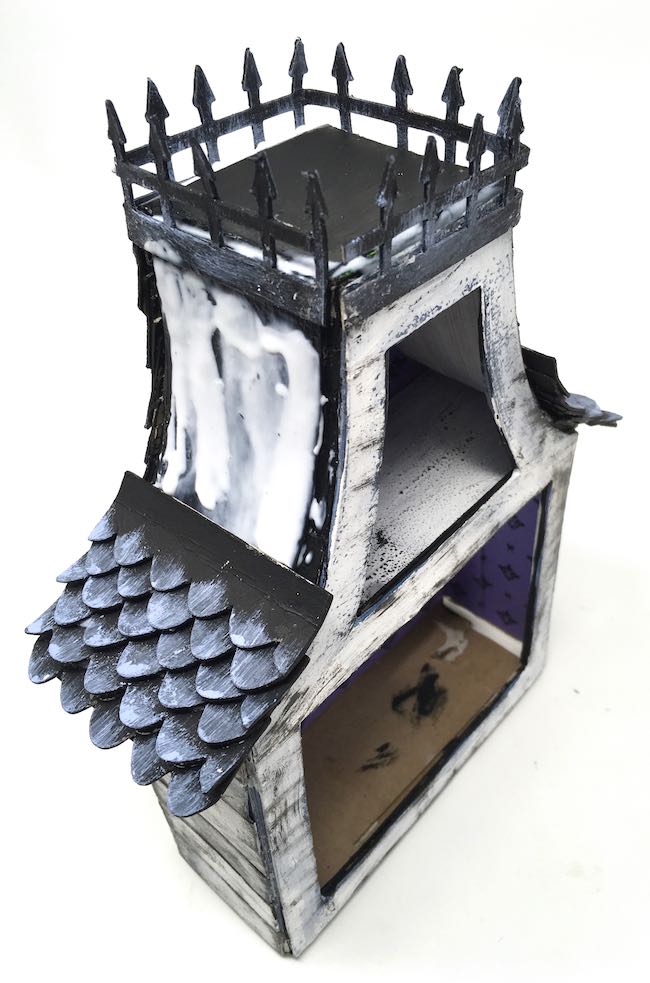
After the railing is in place, glue the shingles to the roof starting at the bottom of the roof.
The shingles are designed so that you can alternate them easily and they will fit together well.

Make the little ghost for the attic
Next suspend the little ghost in the attic. Using the excess thread on the cardboard ghost, thread a needle so you can push it through a piece of cardboard or even card stock. I left the string about one inch long and glued and taped the thread to the cardboard piece. Glue the cardboard piece to the roof of the house.

Make the Coffin-shaped door
To make the little door add a card stock hinge. I did not include this in the pattern because you can make it so easily with a strip of scrap card stock. Glue the hinge to the door.
Just place the door on the front of the house so that the door is situated properly. Apply glue to the hinge and adhere to the front of the Halloween manor. Since the coffin door has angled sides, it opens on a slight angle.
And that's it for the pasta box Halloween Manor. I hope you have enjoyed making it with your recycled box. I've got lots more crafts in store for you. Just check back in a few days.
Lucy
P.S. If you want to remember where you found this cool Halloween paper craft, just pin it to your favorite Pinterest board.
Leave a Reply