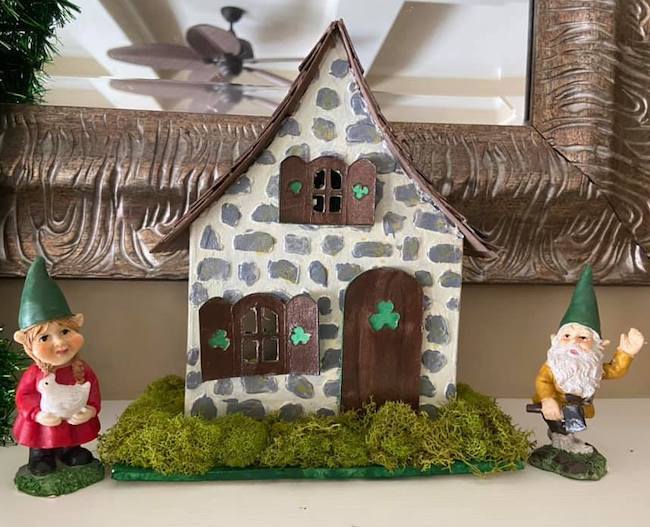
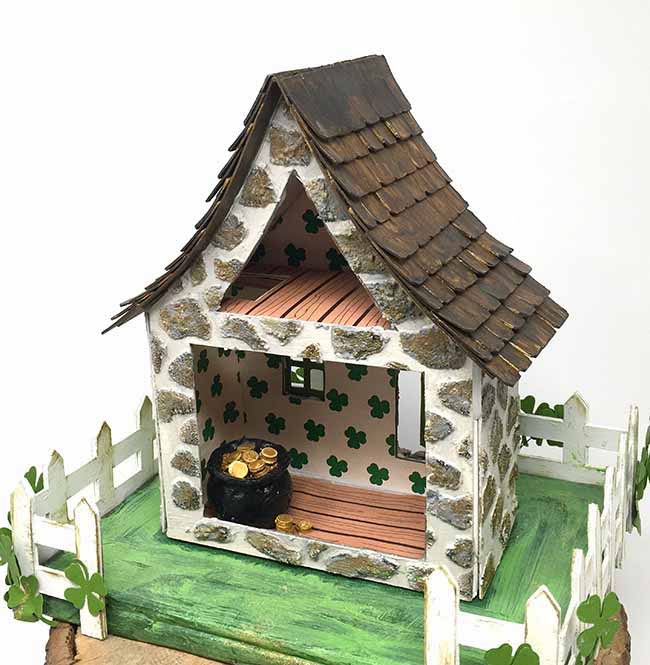
Want to make something perfect for St. Patrick's Day? How about a DIY Leprechaun House with lots of personality and Irish details? I love this little cardboard house specifically made for tiny leprechauns. For this house I used a recycled box as the basic structure of the house, but if you don't have a good box for the base, there is a house pattern in the free files in the library.
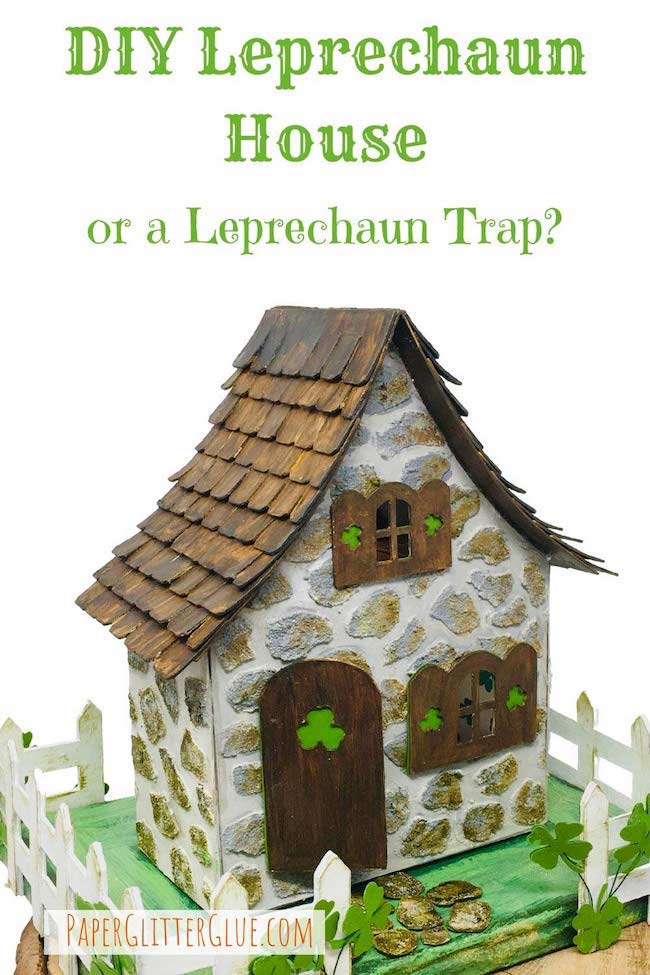
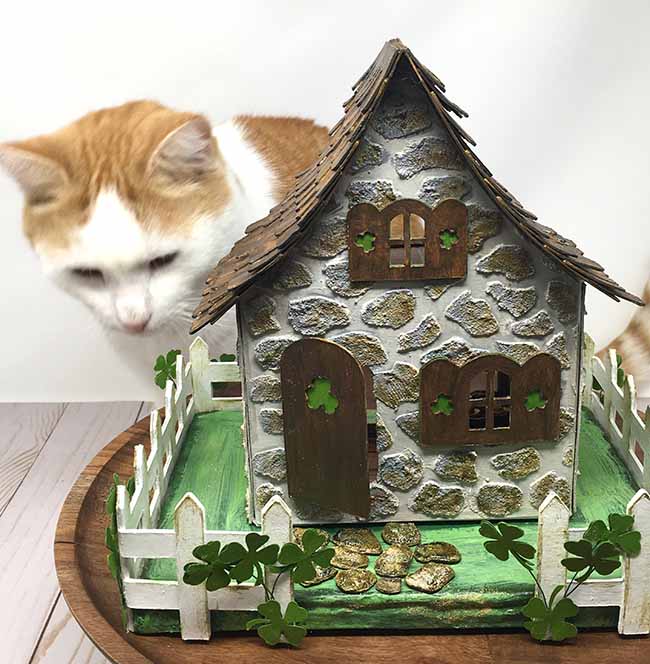
Could it be a Leprechaun trap? Well, it certainly could be a trap with a little imagination. Or if you have Bill the cat lurking about.
And here is how you make the miniature Leprechaun house.
This post contains some affiliate links for your convenience. Click here to read my full disclosure policy.
What do you need to Make the Leprechaun House:
- Free Pattern for the Leprechaun House - Design No. 112 - in the library
- Cardboard - this is my favorite when I purchase online
- Recycled box - I used a pasta box 8" x 2.5" like this to give you an idea
- Glue - Aleene's Original Tacky Glue worked well for this project
- Hot glue
- Scrapbook paper or shamrock wallpaper to line the house inside
- Stencil material - I used some Yupo paper I had on hand, but you can use stencil acetate or even cardboard as a temporary stencil
- Ranger Grit Paste
- Shamrock or Clover Punch or die cut
- 26 Gauge Wire for Shamrock stems
- Paper to cover the cardboard base - I used leftover packing paper
- Paint colors of your choice. These are the ones I've used:
- Picket Fence Distress Paint
- Ground Espresso Distress Paint - one of my very favorite shades of paint
- Brushed Corduroy Distress Paint
- Rustic Wilderness Distress Paint
- Mowed Lawn Distress Paint
- Walnut Stain Distress Paint
- Gathered Twigs Distress Paint
- Fossilized Amber Distress Paint
- Black Soot Distress Paint
- Pumice Stone Distress Paint
- Hickory Smoke Distress Paint
- Gold Paint
- Mod Podge
- Gold Glitter
- Pot of Gold - I made mine with Sculpey clay
- A way to cut out your pattern - I used my Cricut
Directions to make the Leprechaun House
- Download and cut out the free pattern for the Leprechaun House - Design No. 112
- Stencil the stones surface on the front house piece
- Prime and paint the house pieces - stone surface and wood shingles
- Print and cut out the shamrock paper or use scrapbook paper for the wallpaper
- Use the floor board paper if desired for the first floor and attic floor; cut out
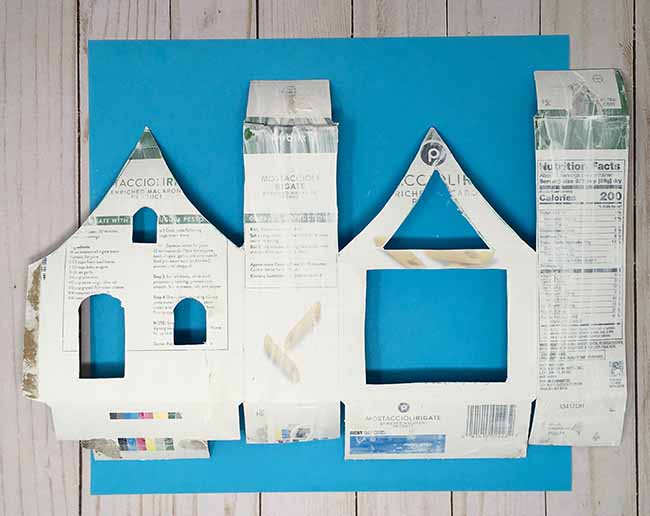
- Open up the recycled box preserving the tab on the side, then trace the pattern on the recycled box and cut out
- Decorate the house inside and out
- Assemble the house
- Make the cardboard base
- Prepare the fence and fence decor, glue around the base
- Make the pot of gold then glue inside the Leprechaun House
To read about the details for making the Leprechaun House, continue reading.
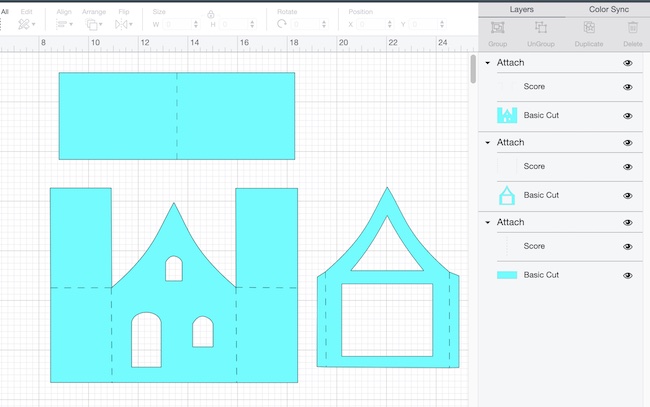
First download and cut out the pattern
To get the free pattern from the Paper Glitter Glue library, just go here and type in the password to get access to the files in the library. If you don't have the password, just subscribe to the Paper Glitter Glue newsletter and you will get the password right away. But just know that I will never send spam. I usually send out an email every one to two weeks.
The pattern is design no. 112 in the February 2021 section of the library.
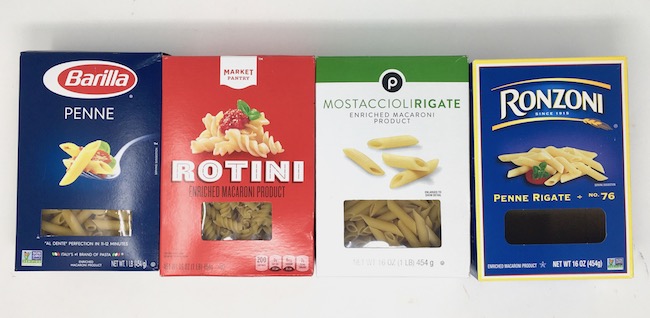
Here is how the pattern for the little Leprechaun house looks in Cricut's Design Space. The pattern is designed to go with a recycled pasta box which is 5 inches wide across the front and 2.5 inches deep. The height doesn't really matter.
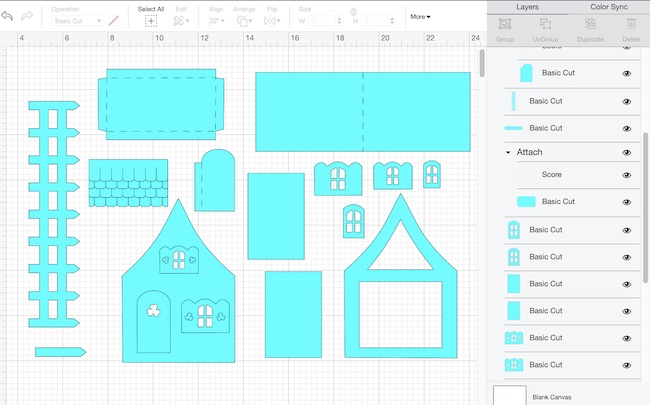
In addition, there is a separate pattern with enough shingles to fit on one sheet of 8.5 x 11 inch piece of cardboard.
Please note: The pattern is designed to go with a recycled pasta box which is 5 inches wide across the front and 2.5 inches deep. The height doesn't really matter. If you don't have a good-sized recycled box, then there is a pattern in the folder labeled "Leprechaun base house pattern" that you can use instead.
But I prefer using the recycled pasta box as the base for the little Irish Cottage. All of the examples below work for this project.
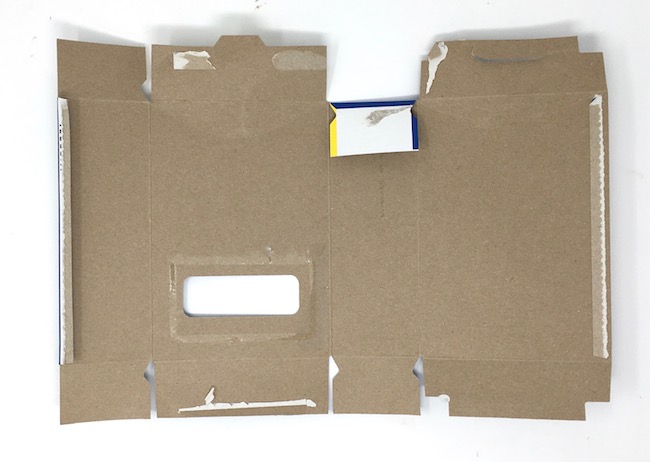
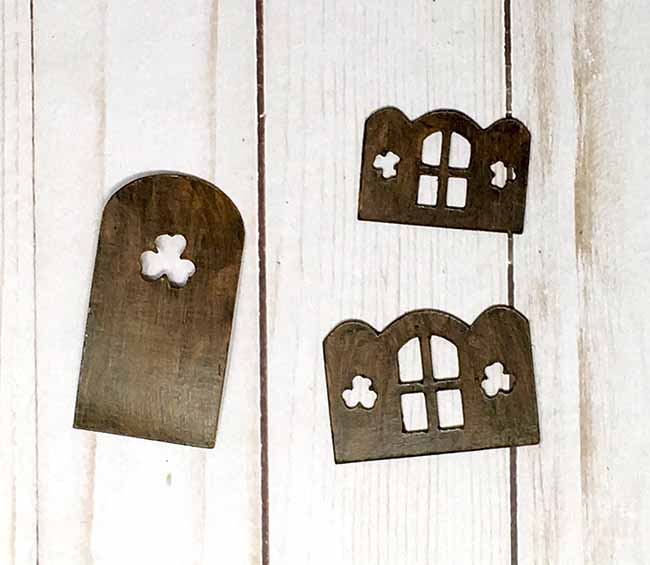
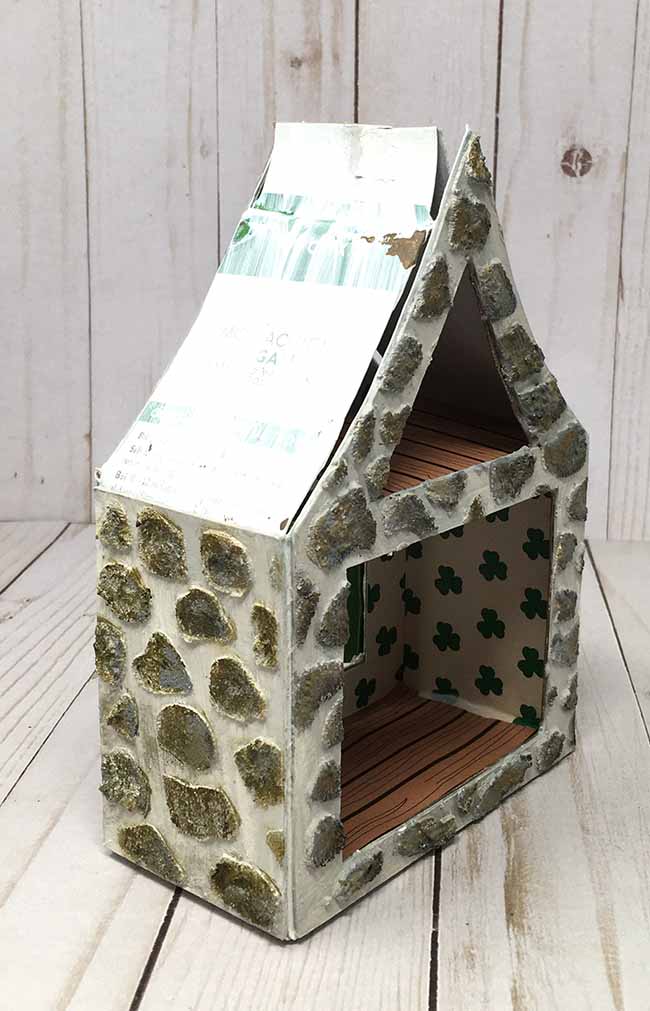
Here's how the opened box looks with the glue tab on the left side. Use the side with the cut out for the back of the house.
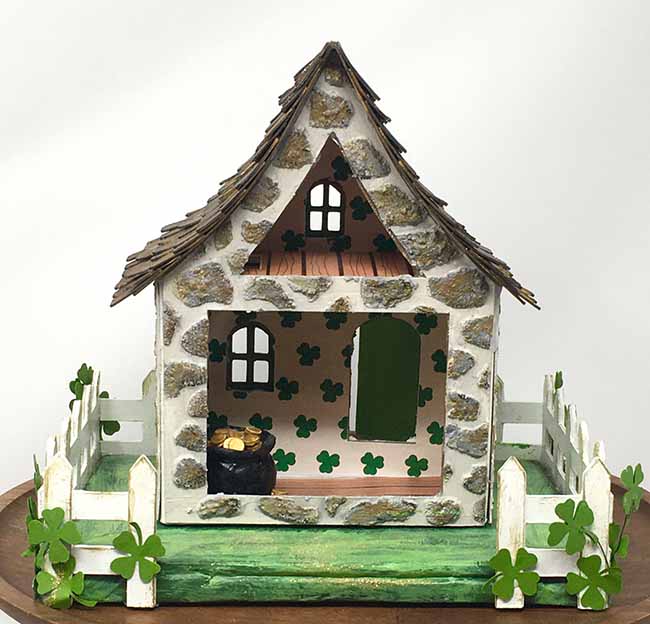
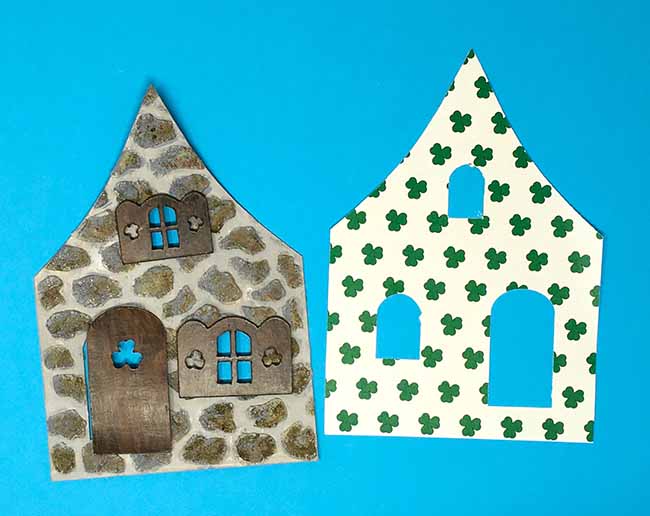
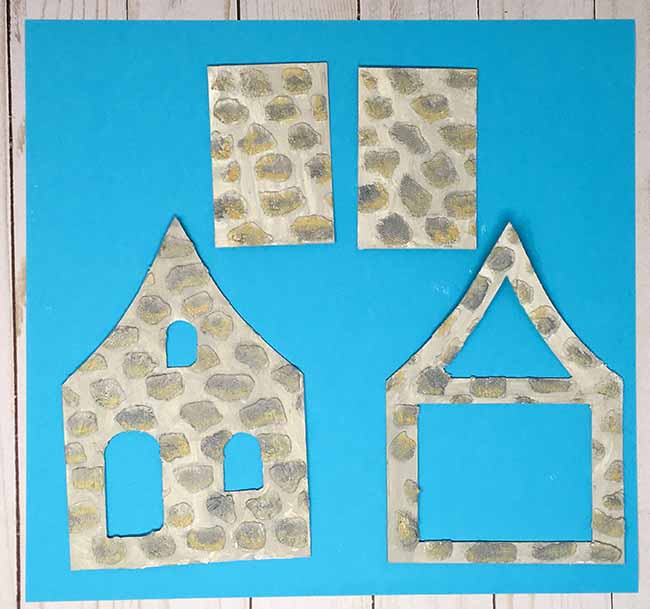
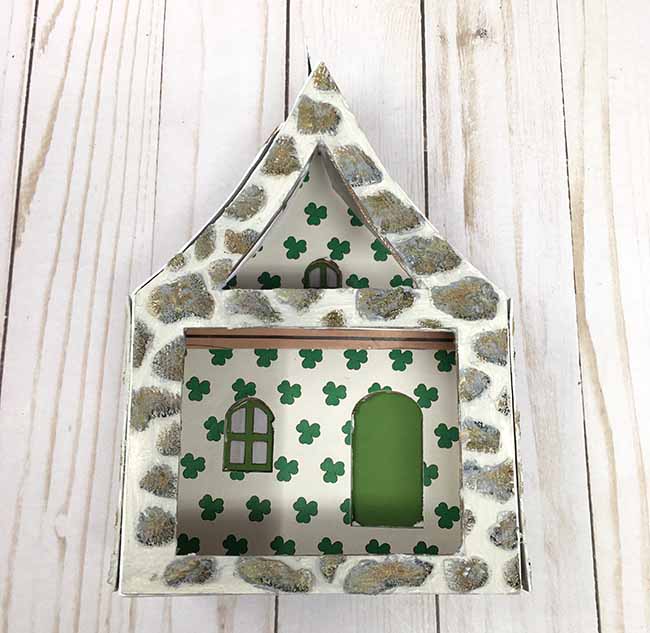
Below you see the main front pieces of the Leprechaun House - the stone decorated front piece and the shamrock wallpaper for inside. Note the the inside is the reverse of the outside. Remember that when you are cutting it out.
Look at this great version that Kristi, one my of my readers, made!! She did a great job on the stones. To see how to do that, read the next step.
Stencil the stones on the house
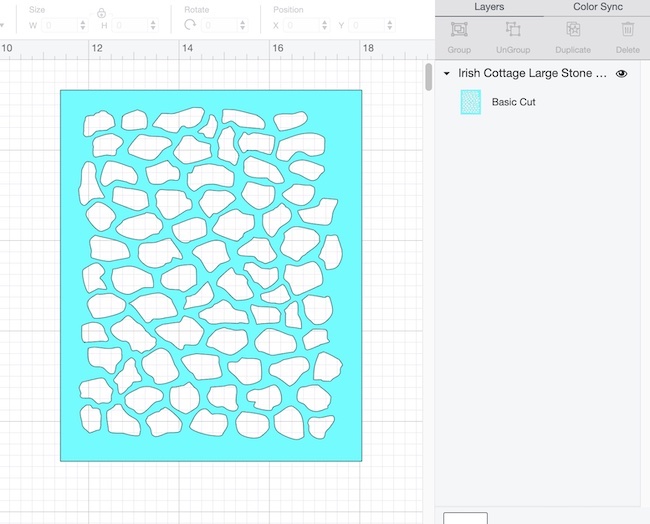
The stone stencil is larger than I normally do to fit the proportions of this particular house.
After you cut out the stencil, tape it to the cardboard pieces.
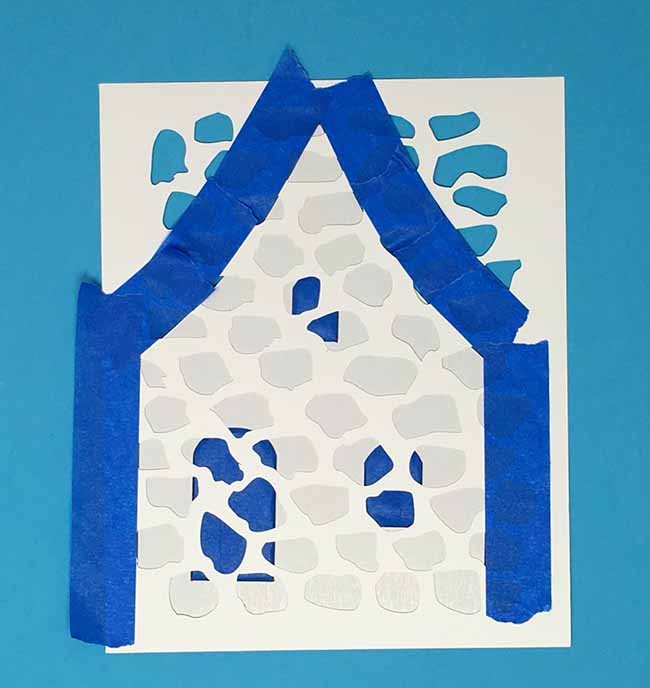
Next, spread a thin layer of Grit paste on the stencil. Remember that you don't have to use a thick layer. In fact, it works better if you keep the layer thin.
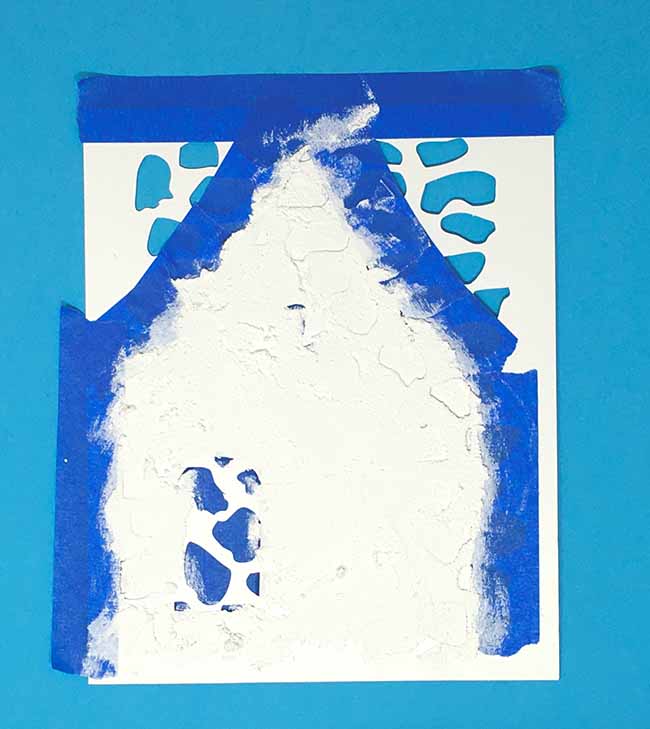
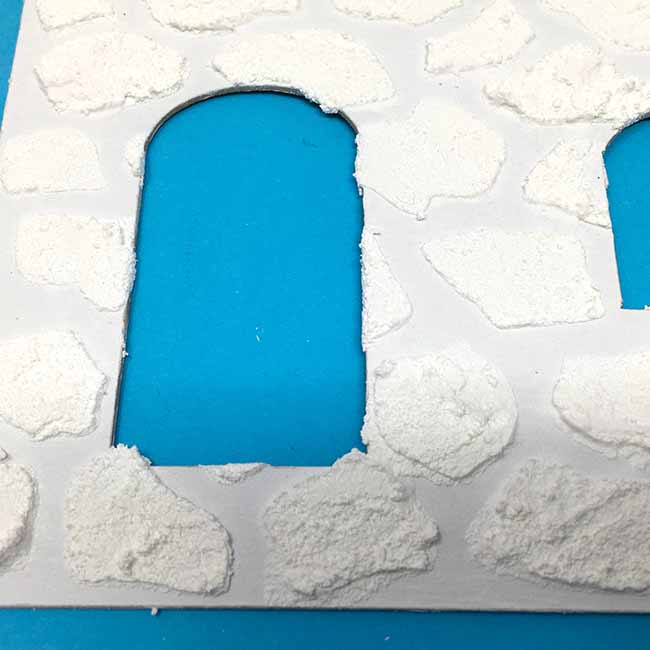
This view shows how the stone looks after removal of the stencil.
Prime and paint the house pieces - stone surface and wood shingles
Oh boy! One of my very favorite things to do is textured surfaces on my paper crafts.
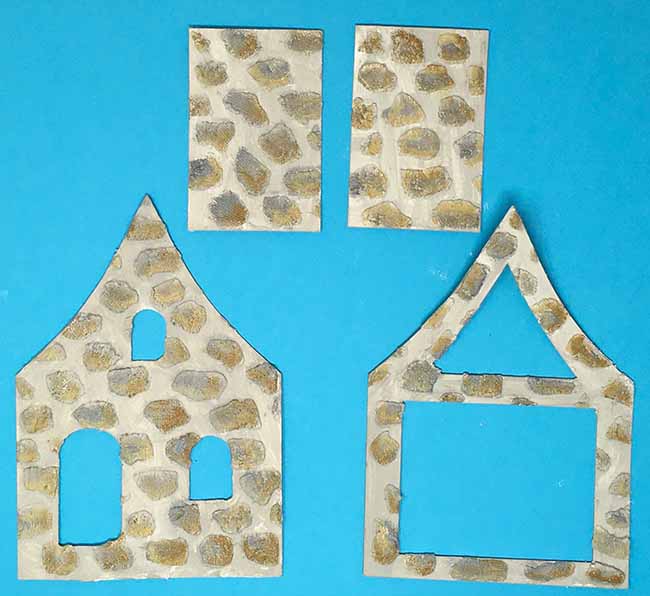
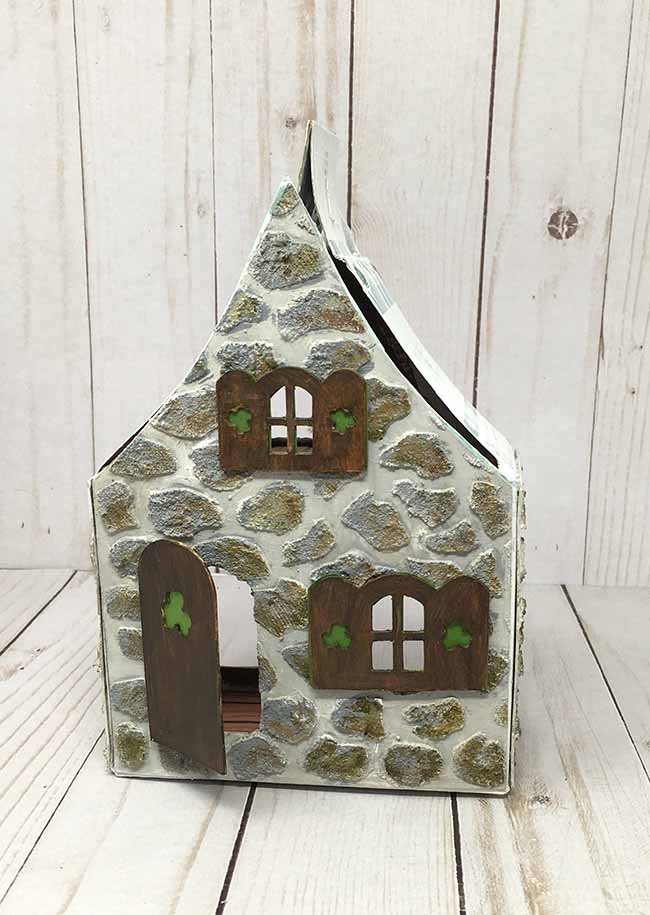
Stone Surface for the Miniature Leprechaun House
Since the little cottage needs a stone surface in my mind, I happily revisited this technique. You may remember my first version of the stone texture on an Irish cottage from a couple of years ago. I used exactly the same technique from the Stone Texture Tutorial.
Briefly, here are the steps I used to make the stone surface.
First, paint the background mortar color. I chose a light grey called pumice stone.
Then gradually layer on color. I started with lighter colors, then moved to darker colors. Hickory Stone distress paint provides the second layer of color. Then I moved to colors with more brown in them.
For a detailed discussion on making the stone surface, go to the Stone Texture Tutorial.
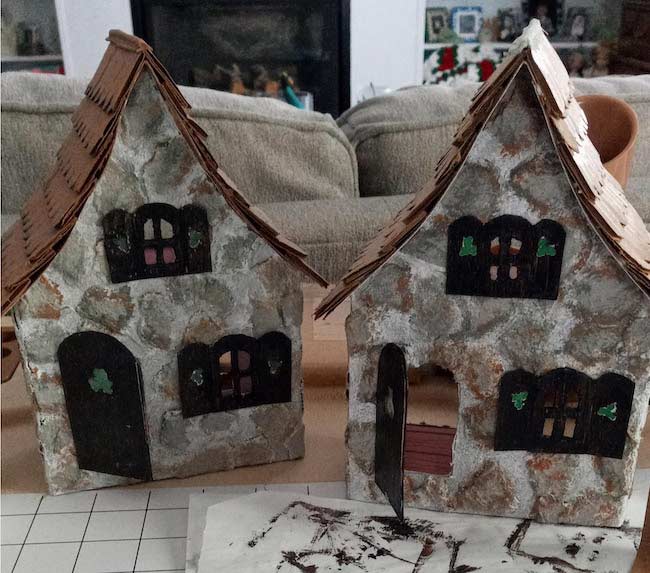
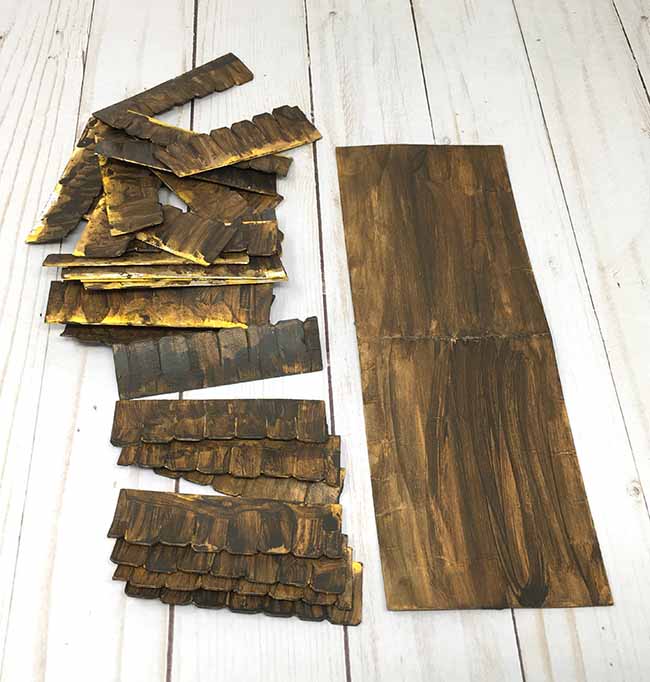
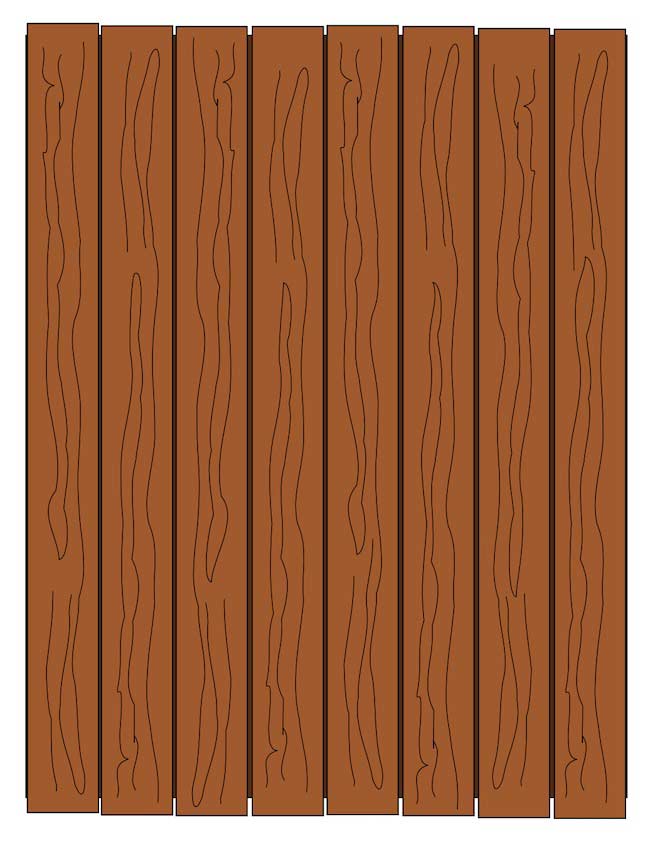
Paint shingles to look like wood
Next, paint the shingles. Just like layers of color make the stone, use layers of color to mimic wood on the shingles. Similar to the stone, I start with lighter colors and move to darker colors - Fossilized Amber to Gathered Twigs to Ground Espresso.
I used 22 rows of shingles to complete the roof.
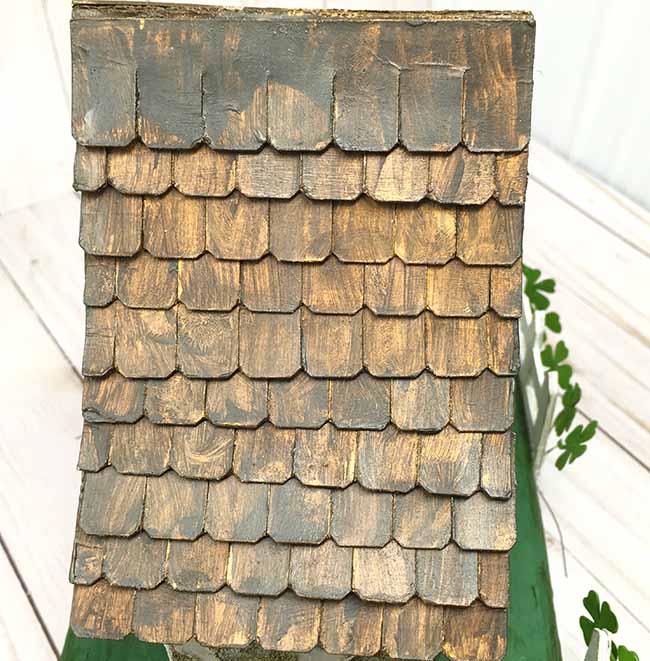
Two things about the making the shingles and the roof - first gently curve the roof piece to fit the roof curve on the house and glue the shingles to the roof before you glue the roof to the house. See the finished roof below.
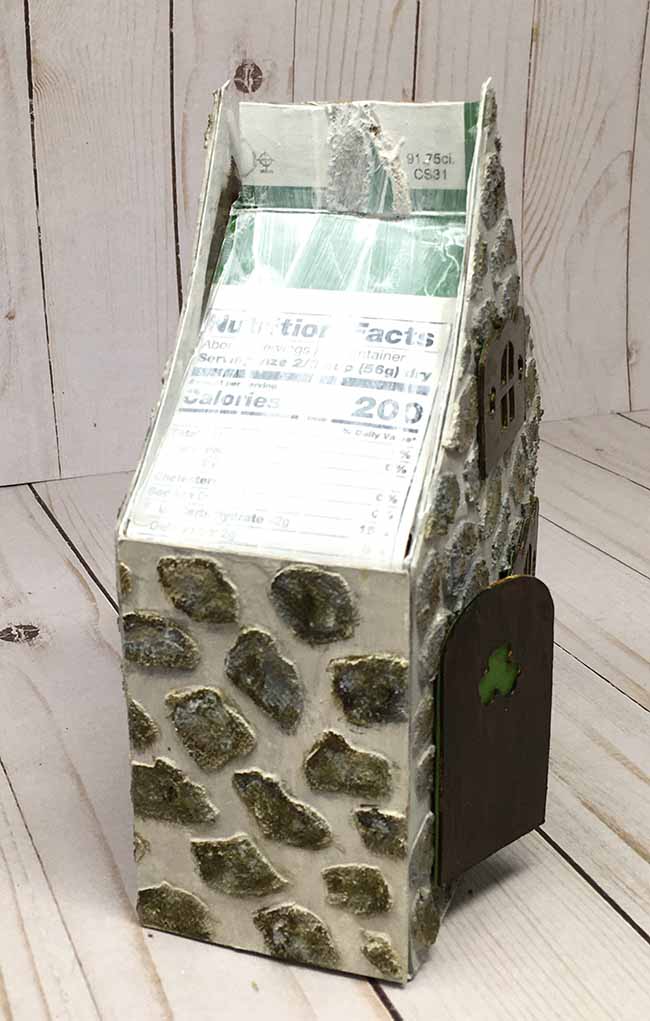
Use the same effect for the windows on the outside.
Print and cut out the shamrock paper or use scrapbook paper for the wallpaper
There is a PDF version of shamrock wallpaper with no background in the files. If you want a different color, just print on colored paper or card stock.
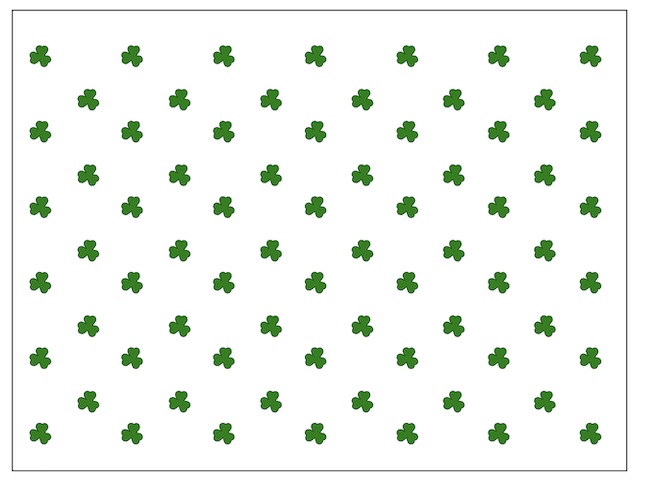
After you print out the wallpaper, cut out the house shape from the wallpaper. IMPORTANT - be sure to flip the pattern horizontally when you cut out the house for the inside.
Also, cut out the side pieces from the wallpaper as well.
Next, cut out floor pieces twice using the attic piece as the pattern.
Open up the recycled box preserving the tab on the side, then trace the pattern on the recycled box and cut out
To prepare your recycled box, open up the top and bottom flaps which we'll use for support of the floor and the roof. And then open up the side flap. Try not to tear the side flap.
Next, trace the pattern onto the cardboard box.
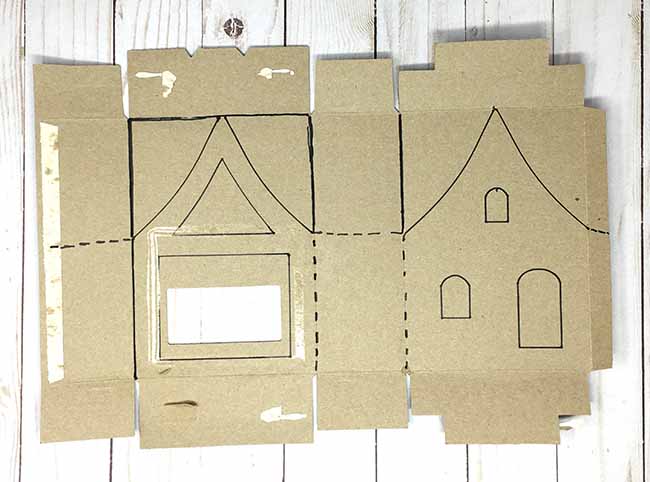
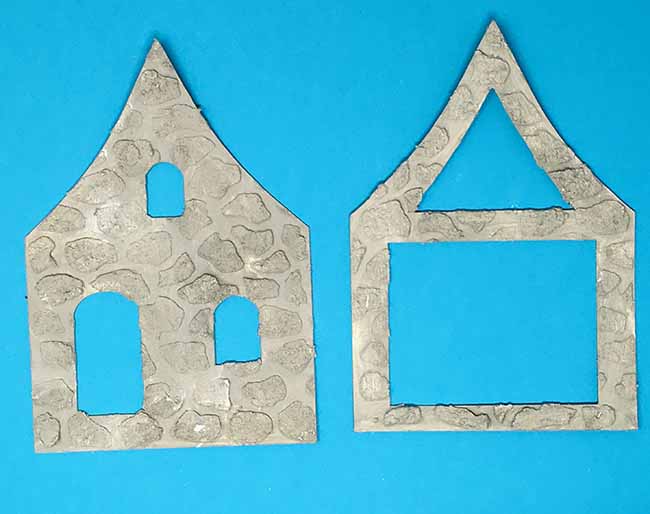
Cut out and prime both sides of the cardboard.
Decorate the house inside and out
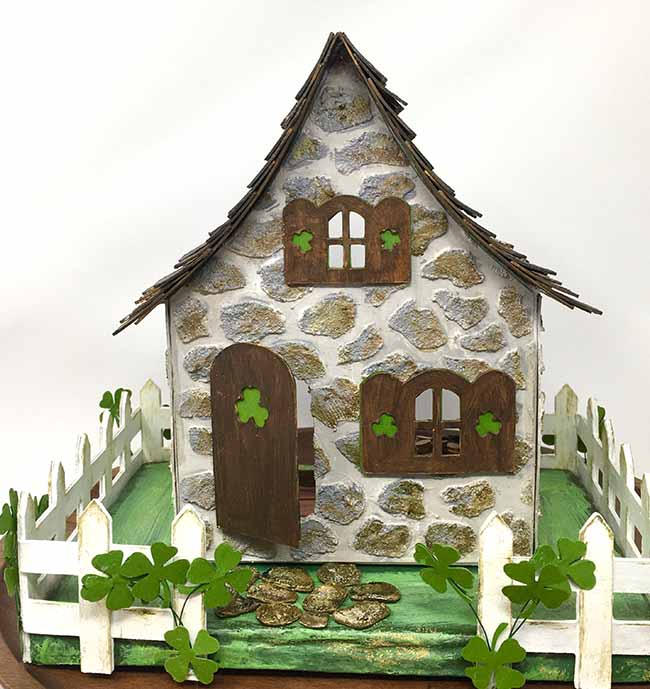
This part is pretty easy because all you have to do is glue the decorated pieces to the inside and outside of the house. Use tacky glue to glue the stone surface to the outside. Also glue the shutters in place. I cut the solid shutters in green as backing for the wood shutters. The green also looks good from the inside.
Wait until the house is assembled before gluing the floor in place.
Mod Podge works well to glue the wallpaper in place.
Assemble the Leprechaun House
If you want to have an attic floor, now is the time to add it. Glue one flap to the front inside of the little house at the level of the cross piece on the back of the house. I hope that makes sense.
Then apply glue to all the flaps on the attic piece and the side flap.
Now, fold the house together. Glue the bottom of the box back together. Let dry.
The next thing to do is assemble support for the roof. Here is where you glue the roof flaps together. What are roof flaps? They are the flaps on the side that support front and back gables. If you don't have roof flaps, it's hard to keep the gables ends in line.
You'll see that the flaps are taller than the roof. That's ok. Glue them together, then trim to size/
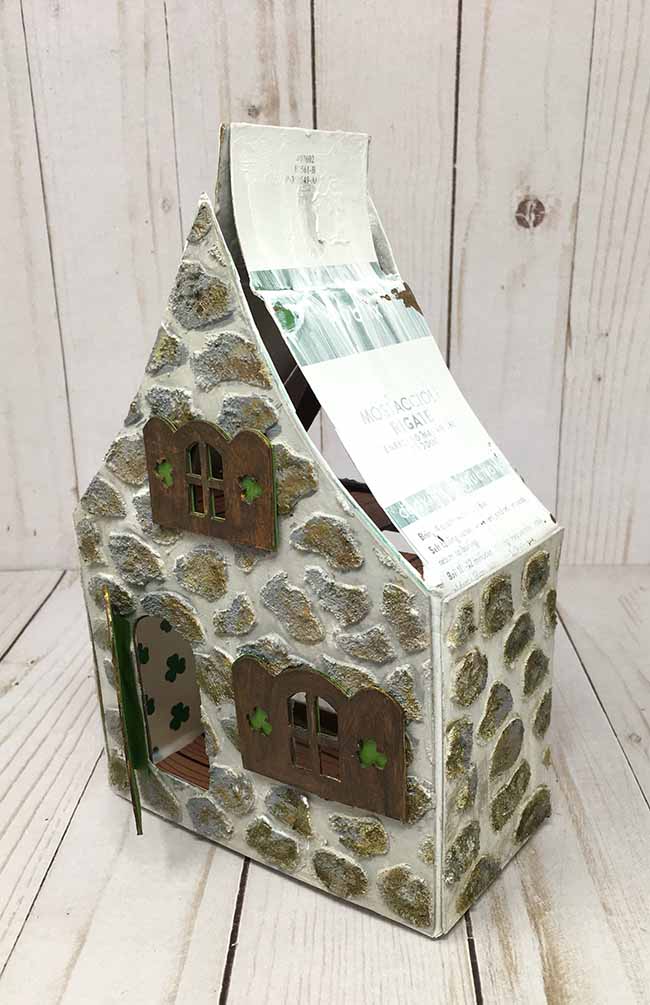
Here's a photo showing the trimmed roof flaps.
Apply a thick bead of glue to hold the roof flaps just behind the gables. Painter's tape helps here to hold the flaps in place.
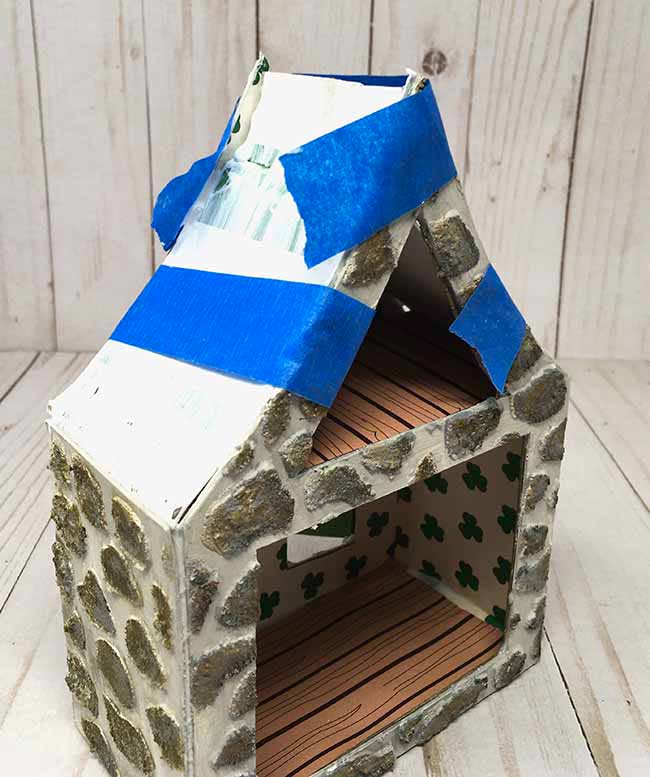
It may be a little difficult to see, but the dried glue holds gables properly.
And the final structural part of the house is to glue the roof in place. Before you glue the roof to the house, be sure to gently curve the roof to fit the curve of the house. Do a test fit first before you apply glue to the gable edges of the roof.
After placing the roof on the house, gently hold it so roof adheres to curved shape.
That completes the assembly of the house.
Make a cardboard base for your house
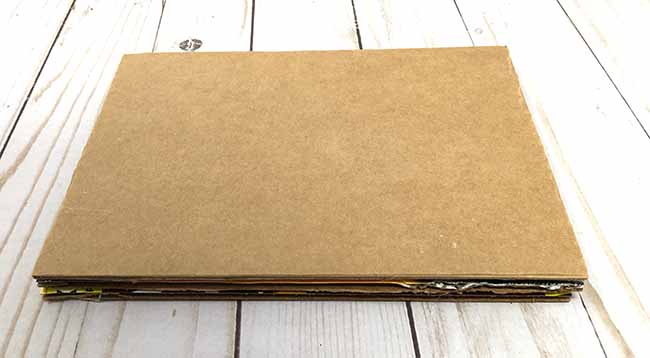
This is a simple step. Simply glue 3-4 layers of corrugated cardboard together with hot glue. My base is 8 inches across the front and 6 inches deep.
Then cover the cardboard base with paper. Generally, I use crumpled packing paper adhered with Mod Podge to cover my base.
Paint the color of your choice.
Make the fence
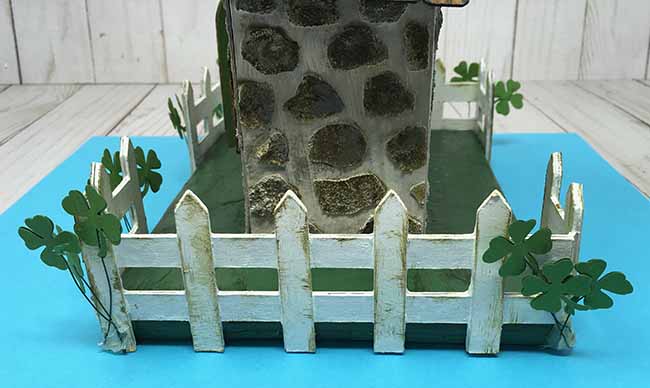
I love the fence as the framing element for the little cottage. One important thing to me is to make my little houses sturdy. That means that when I make a fence I don't want it to get crunched easily. In order to do that, I glue two layers of fencing together and score them where they fold around the base.
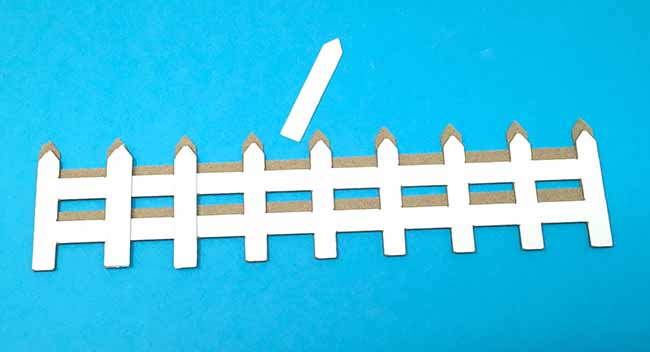
In addition, to get give more dimension to the fence, glue extra pickets on the surface. The photo below shows how those extra pickets add depth to the fencing.
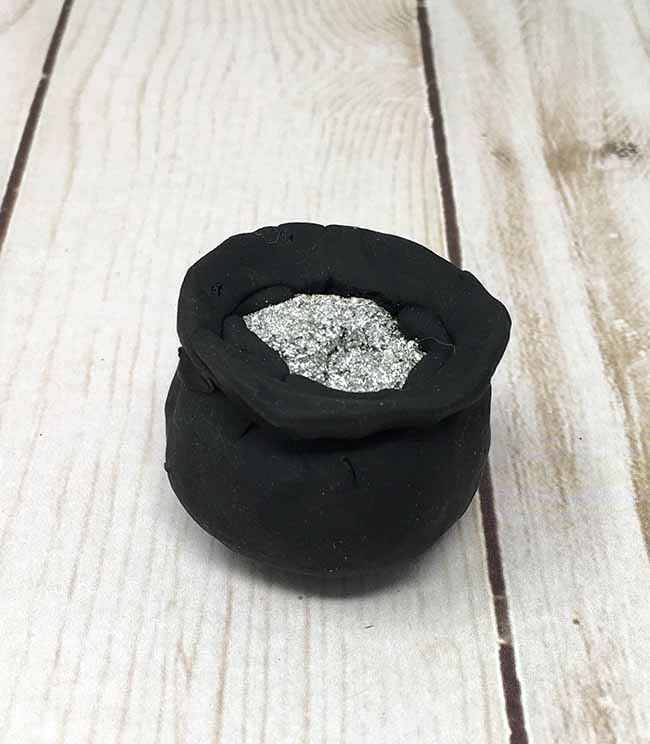
What final details does a Leprechaun House need? A pot of gold and clovers, of course.
Finally, make a little pot of gold. Simply cover a ball of aluminum foil with black Sculpey clay. Then coat the top of the aluminum foil with glue and dump gold glitter on top.
Make gold coins by punching some circles out of cardboard and paint them gold. You can even make stacks of gold coins by gluing them together.
To give a even more dimension to the fencing, glue 2 card stock clovers together with a stem of 26 gauge floral wire. Trim the stems and hot glue to the outside of the fence. Cover up the hot glue with an additional clover.
You can dust some gold glitter around as well.
And that's it - that's how you make your Leprechaun house or even a Leprechaun trap. I hope you have fun.
I am entering this project in the Frilly and Funkie "Mostly Neutral" challenge. The Leprechaun house fits because almost all the colors are neutral - the exception is the green base and a few little touches of gold.
I am also entering this week's Simon Says Stamp Wednesday Challenge using your favorite technique which is of course, the stone texture. I just love to mimicl stone in my paper craft projects.
If you have any questions, email me at [email protected].
Lucy
P.S. Here is Bill waiting on a leprechaun to appear.

Myrna Smith
Thznk you for sharing your Leprechan house. I got most of it cut out.
I want to finish it for my daughter (teaches grade 3) and her class.
Lucy
I would love to see it when you are done. If you like, you can send it to me by email - [email protected] or in the Paper Glitter Glue Facebook group.
stampersuzz
Sweet little retreat for Mr. Leprechaun! Thanks for sharing with us at The Funkie Junkie Boutique!
Lucy
Thank you. I am so glad you like it. I love your shop!!
Lucy
Sara Emily Barker
Lucy, I am tickled pink that you made this little Leprechaun house and shared it with us at The Funkie Junkie Boutique Blog! It's perfect for our Mostly Neutral challenge with that lifelike stone wall and shingled roof. So wonderful!
Lucy
I am so happy that the design fit the challenge because I was already working on it before I found your challenge. I am so glad you think it is perfect.
Thank you so much.
Lucy
Emily
This is awesome!! I especially like the last photo with Bill the cat showing how little and cute the house is. Thank you for sharing!
Lucy
Bill is such a cool cat, but he does jump in the light box when I try to take photos. He does help for perspective though, doesn't he?
Thank you, Emily.
Bobbi
Lucy,
This house is fabulous for St. Patrick’s Day! Thanks so much for sharing your creativity and how-to with us. Looking forward to your next post.
mary bender
Oh My This is wonderful, Your instructions are so precise. I never before thought of making a stencil , Now I know how , thank you so much
Lucy
Thank you, Mary. Yes, we can make stencils specific for a project. I needed larger stones so that's why I had to make a proportionate stencil for this little house.
Lucy
Lee
Oh, Wow! This is adorable! Thank you, for taking the time to provide in-depth instructions. This is great for a newbie like me.
Lucy
Lee,
I am happy that you like the in-depth instructions. I always wonder if it is worth the time to write all that down, but I am so glad that it helps you. This is an easy house to build.
Thank you.
Lucy
Shirl Watts
Awesome, love the house!
Lucy
That makes me happy. I am so glad you like it, Shirl.
katherine leggett
this house is so cute thank you for sharing it
Lucy
Katherine,
It means a lot when people like my little houses. Thank you to taking the time to let me know.
Lucy
Jeanne Kahle-Potts
I love this. There aren’t enough crafts for St. Patrick’s day. Thanks.
Lucy
I agree. We do need more St.Patrick's Day crafts.
Thank you so much.