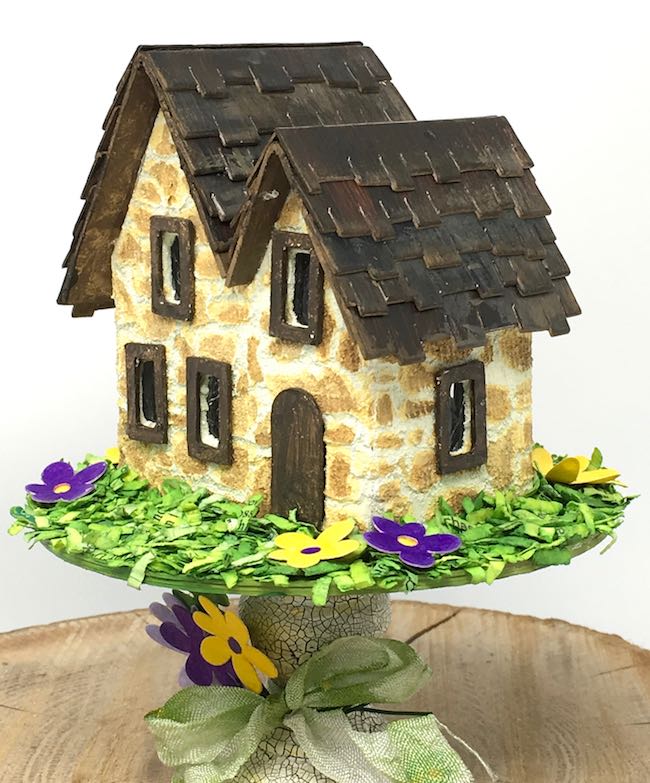
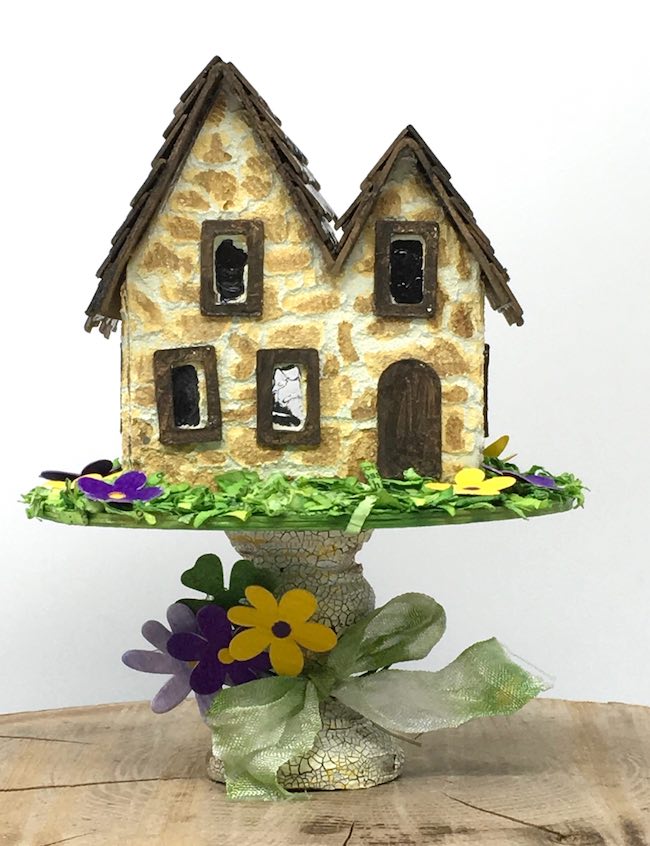
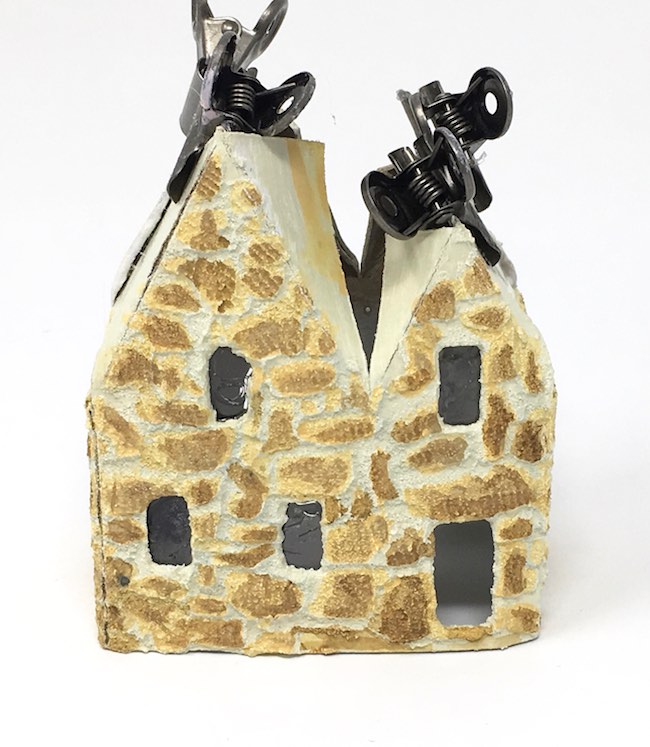
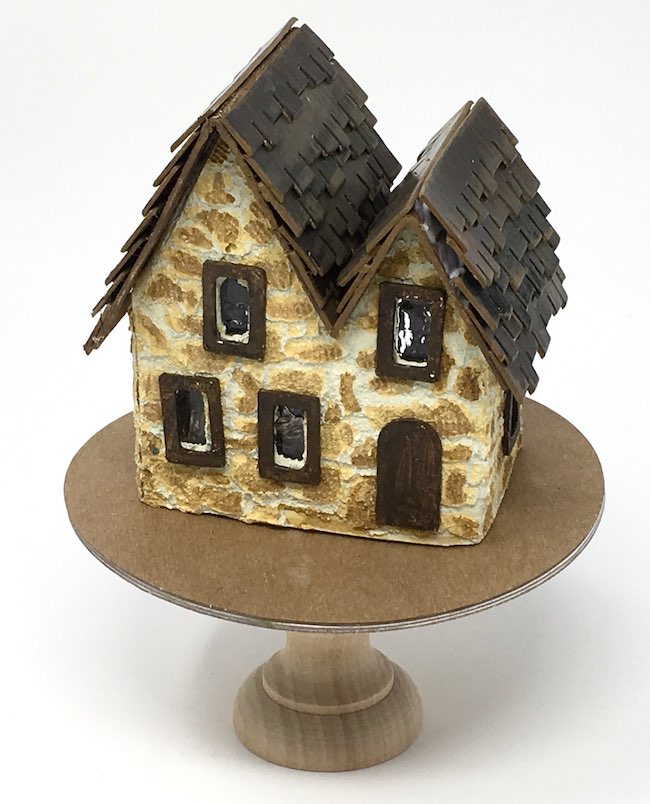
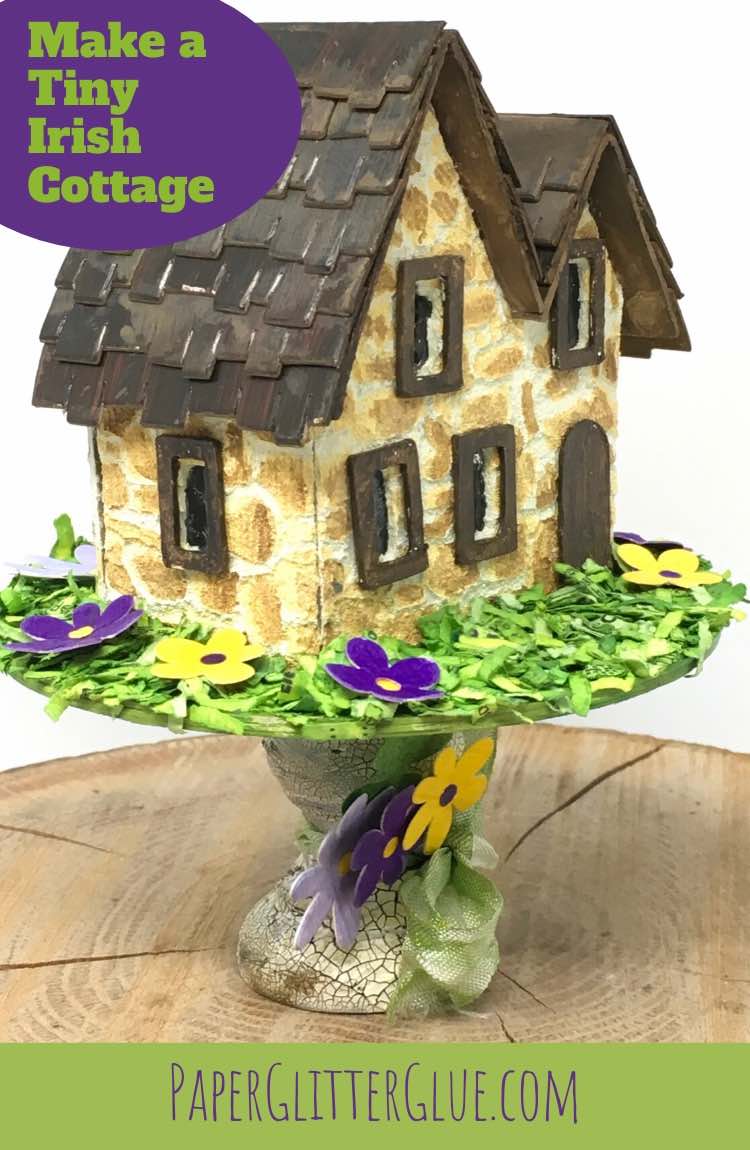
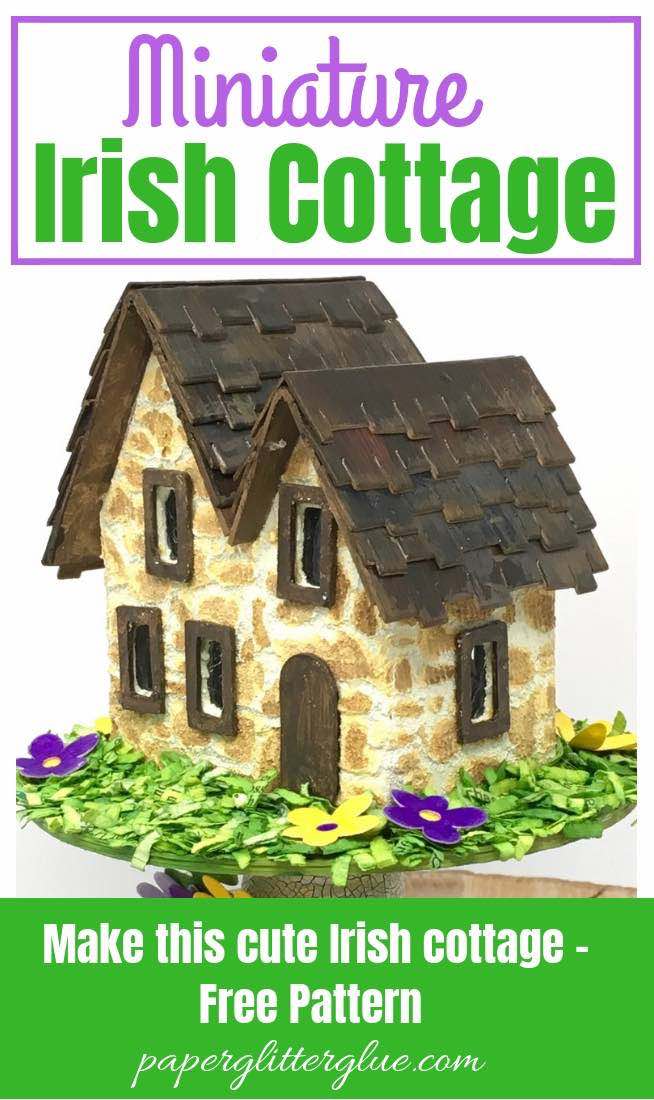
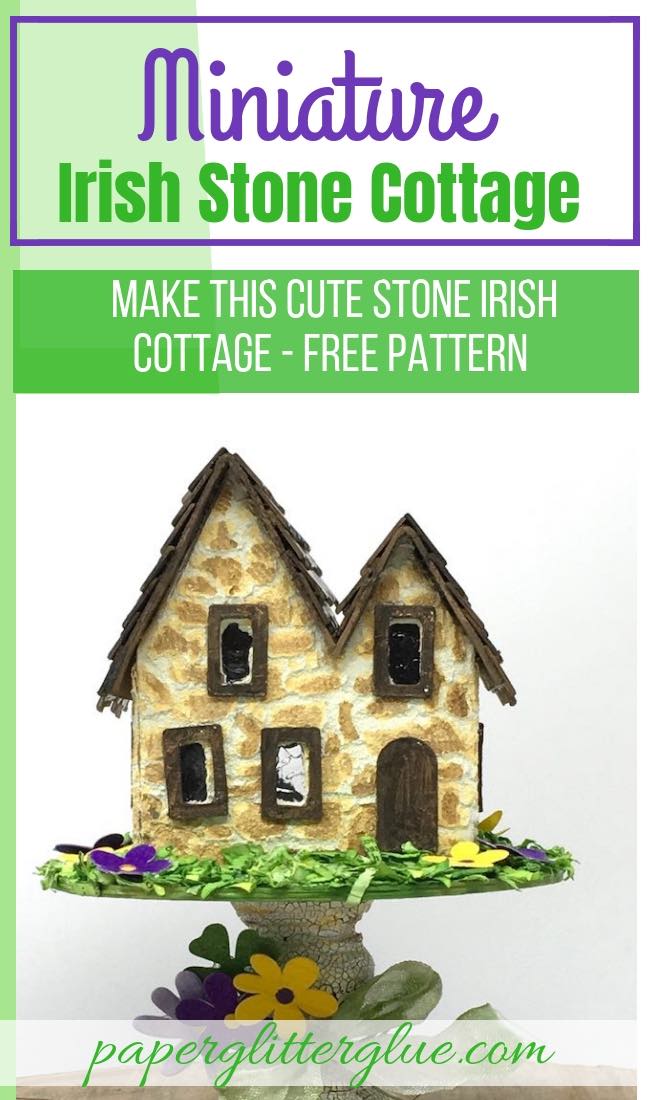
Make this adorable Miniature Irish Stone Cottage that you can use as a holiday centerpiece, a Spring decoration, or as a starter home for a delightful paper house village.
You can customize this miniature paper house in so many ways - with or without the stone texture. I'll show you all the steps to make your own tiny Irish Cottage with the stone texture.
The basic version of this little Irish house is the same as the Miniature Irish cottage that I set in a paper mache egg. For this particular little house I added a stone surface and placed it in the yard full of grass and flowering blooms. However, you can decorate this house for any other season and it would still fit in perfectly with other seasonal decor.
So let's get started on this tiny paper house which is about 3 inches wide and 3.5 inches tall.
This post contains some affiliate links for your convenience. That means I get a commission for purchases you make through the links in this post, but there is no additional cost to you. Click here to read my full disclosure policy.
Materials to make the Miniature Irish Stone House
This is a detailed list of all the materials I used to make this Irish Stone Putz house. In the instructions, I explain where you can use substitutions.
- Free Pattern for the Miniature Irish Cottage from the Paper Glitter Glue library - Design No. 47
- Cardboard
- Glue
- Craft knife or automatic cutting machine like the Cricut or Silhouette
- Grit Paste
- Plastic knife
- Stone stencil
- Acetate for windows
- Glossy Accents
- Gesso
- Crackle Texture Paste
- Paintbrushes
- Distress Paints:
- Distress Spray Stain - Mowed Lawn
- Finial
- Crinkle ribbon
- Funky Florals dies
- Village Rooftops
- Four leaf clover punch
Summary of steps to make the Miniature Irish Stone Cottage
Make the little Irish cottage
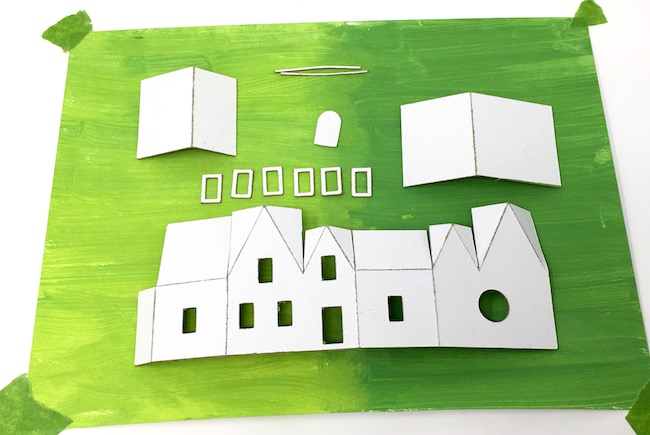
- Download the pattern for the Miniature Irish Cottage - Design No. 47
- Cut out the pattern using your favorite method
- Prime the Irish Stone Cottage, windows, door and roof pieces
- Stencil the stone pattern on your tiny paper house
- Paint the base layer
- Paint layers of color on the stone
- Glue on acetate behind the windows
- Now glue on window frames and the door
- Fold the house along the score lines and glue tab in the back
- Glue the 2 roof sections of the roofline
- Make shingles for the Irish Stone house
- Glue shingles to your little cardboard house
- Touch up if needed
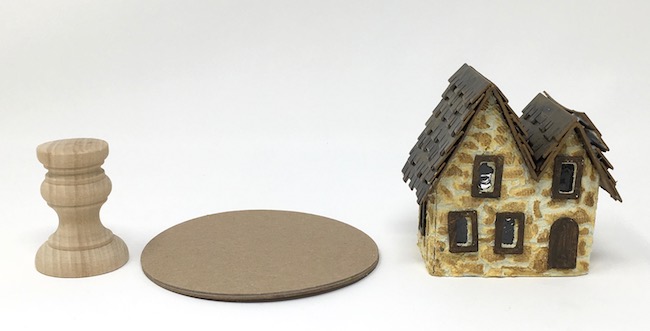
Make the Pedestal base
- Cut out 3 cardboard circles large enough for the house
- Prime and paint the circular base
- Paint the wood pedestal with dark paint
- Apply crackle texture paste to pedestal
- Distress crackle paste to highlight the cracks on the pedestal
- Center and glue the pedestal to the underside of the cardboard circle
Make Spring decorations
- Make paper grass
- Cut out flowers
- Glue flowers to wire stems
- Make a bouquet of flowers
- Tie crinkle ribbon around the pedestal base
- Tie a bow around the bouquet of flowers
Related Links for making this Miniature Irish Stone Cottage:
- How to cut out a pattern
- How to cut out windows and doors
- Stone Texture Tutorial
- Make Shredded Paper Grass
First Make the Little Irish Stone Cottage
Download the pattern for the Miniature Irish Cottage
This little stone house is made with the same pattern as the Miniature Irish Cottage. It's Design No. 47 in the Paper Glitter Glue library.
I often get questions about how to download patterns from the library. Well, the first thing is that you have to subscribe to my newsletter to get the password. If you haven't already subscribed you can subscribe below. I will never send you any spam.
Next click on the main link to the library - the doorway to the library. In the middle of the page is the link to the password-protected part of the library. Click that link.
Finally type in the password on that page and ta dah! you are in the library. I list the patterns numerically and chronologically so the most recent pattern is first. This is pattern no. 47.
Most of the patterns are in a zip format (compressed) so you have to unzip them to open them.
Cut out the pattern using your favorite method
One thing I try to do when I develop patterns is to make them as simple as possible to cut out. So whether you are cutting out the pattern by hand or using an automatic cutting machine like a Cricut or a Silhouette, the pattern is as straightforward as possible.
If you are cutting the pattern by hand, you can decrease the number of windows to make it easier to cut out. Another thing is that you don't have to cut out the door- just glue a door on top of the house.
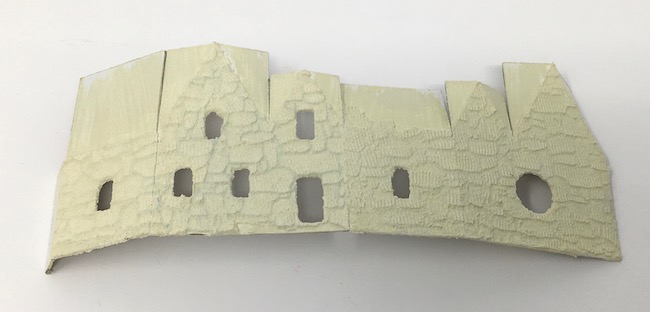
Prime the Irish Stone Cottage, windows, door and roof pieces
I always prime with gesso so my layers of paint or texture paint cover better in the next step.
Also prime the roof pieces as well.
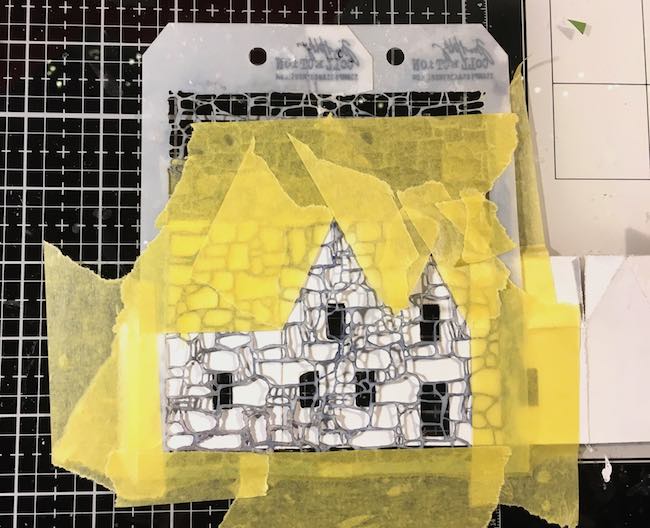
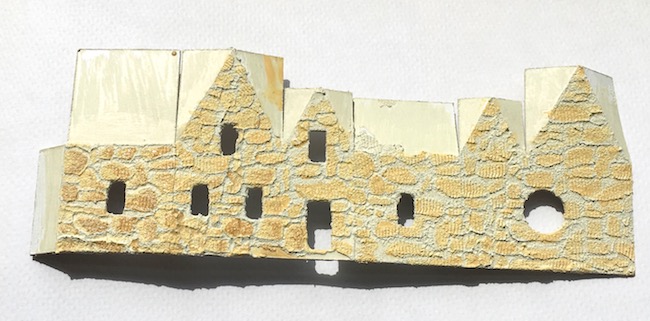
Stencil the stone pattern on your tiny paper house
You know I love to make different textures on my little Putz houses. And one of my favorite textures is the stone texture. For this house, I followed the same process as the stone texture tutorial.
First I tape down the house to my mat. (This is my favorite mat to cut and paint on).
Then I tape the stone stencil to the surface of the house. Since this house is so small, it is easy to get the stencil to cover half of the house.
Next apply the grit paste. I've found that using a plastic disposable serrated knife works very nicely for making a stone-like surface.
Let dry. Grit paste doesn't take very long to dry - less than an hour. I didn't time it though.
Depending on the size of your project you may need to stencil again. For this house, I had to apply the stencil twice.
Paint the base layer
Now that the grit paste is dry, paint the base layer - the mortar between the stones. Since this house is a cheerful Spring-themed house, I want the color to be brighter so I used Antique Linen distress paint.
Also paint the roof pieces so that the underside that shows will be close to the same color as the shingles.
Next paint the layers of color on the stone
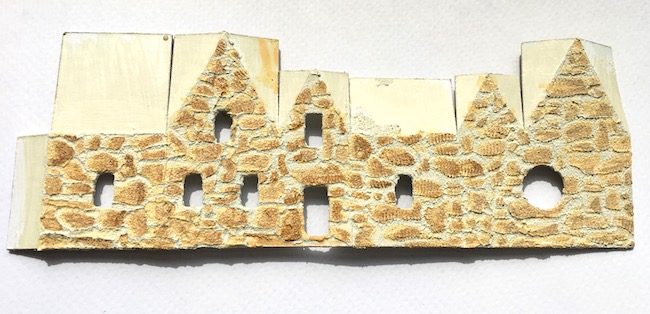
This step is somewhat time-consuming, but fun for me. First I paint a slightly darker shade of color to the Antique Linen - Scattered Straw in this case. Then apply various shades of brown. I generally use a square-tipped brush like this one. I can control the color pretty well with a square-tipped brush.
That's a simple run down of how to make the stone texture on a little Putz house. There's lots more detail in the Stone Texture Tutorial.
Glue on acetate behind the windows
You don't have to do this step, but I like to put actual windows in my little houses. For this I use a piece of leftover packaging and just glue it to the inside surface of the paper house with a glue called Glossy Accents.
Generally, I smear the acetate with Glossy Accents so the window looks like old timey wavy glass. The nice thing about Glossy Accents is that it dries really fast.
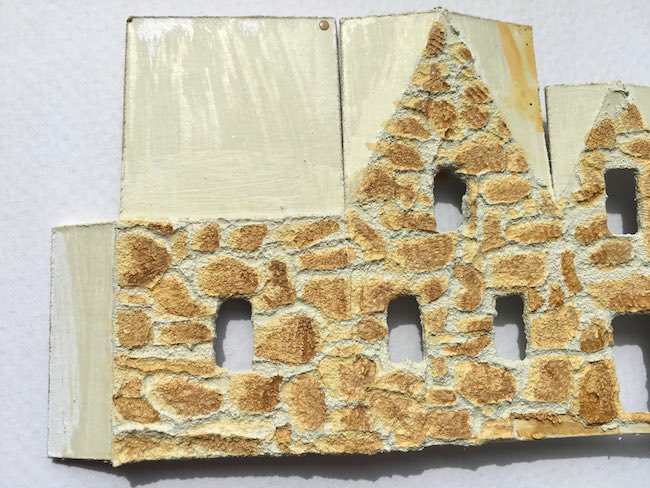
Now glue on the window frames and the door
To help the window frames and door be more prominent, I painted them with my favorite brown color - Ground Espresso. It just makes a nice contrast with the light colored stones.
To get the windows frames and the door to stick to the grit paste, I use Aleene's Fast Grab Tacky glue. I think it makes things stick faster and easier.
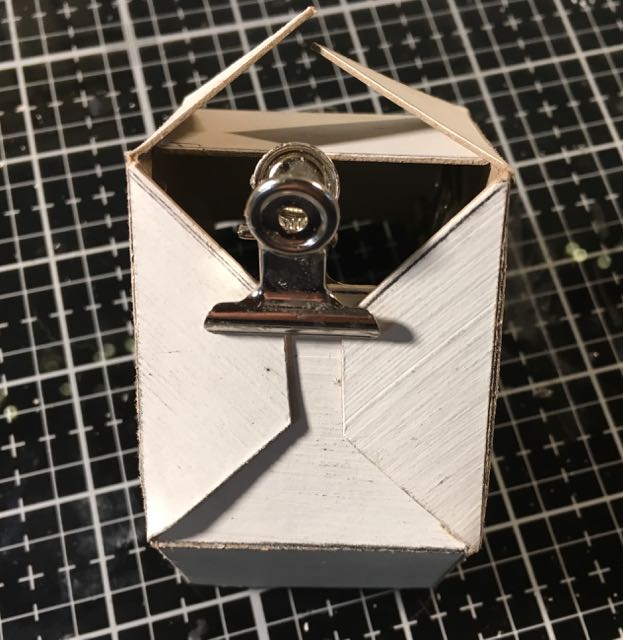
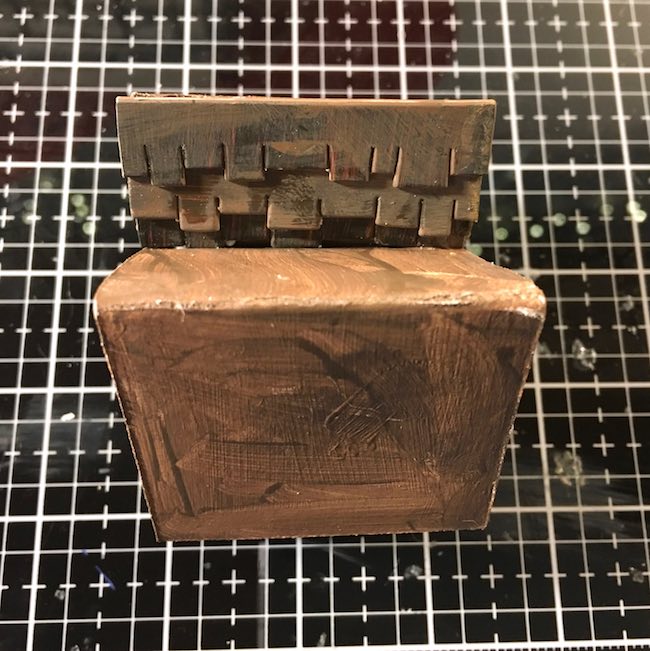
Fold the house along the score lines and glue the tab in the back
Now you get to put the house together. Fold along the score lines and glue the tab in the back. Here you also need to glue down the roof tabs to the outer roof flaps. I trimmed the roof tabs just a little bit so they didn't overlap in the middle. Here's a photo from a previous house that shows what I am talking about
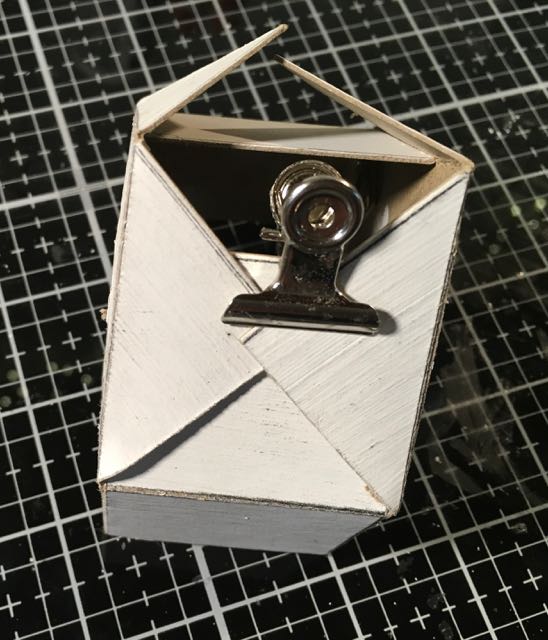
If the house is very narrow sometimes the roof tabs overlap the roof flap.
After trimming the roof tabs they are now flat against the roof
Make sure your house is square (angles at that corners are 90 degrees) before the glue dries.
Next glue the two roof sections to the roof line
See the gap in cardboard pieces on this roof.
Test fit each piece of the roofline. To make sure that roof and the tip of the gable touch, I found I have to trim the inside part of the roof so it fits perfectly. Because thickness of cardboard varies, I made each pattern piece just a little long so you will have to trim each one a bit.
For each of these roof pieces, I think I trimmed about ⅛ inch until I could make sure the roof piece fit nicely on the gable.
First glue one roof section, then the other.
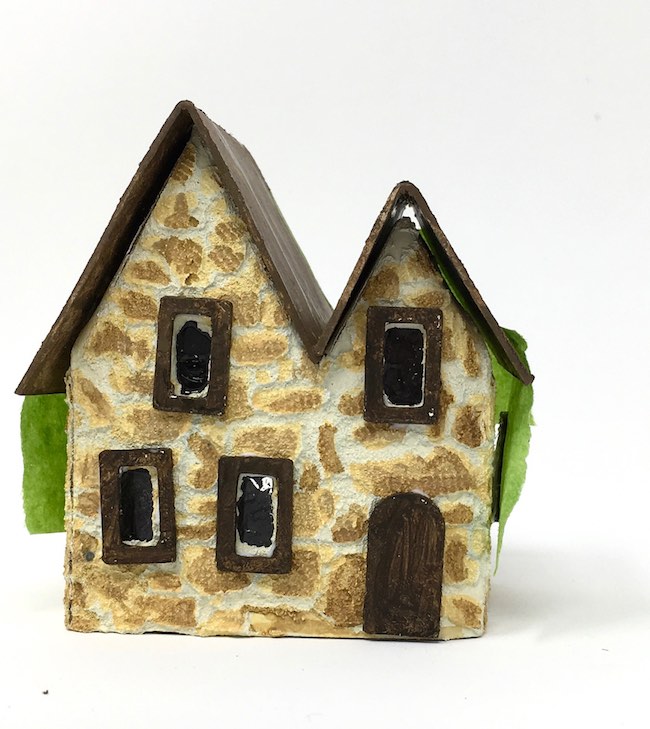
Make shingles for the Irish Stone House
Here you can cut individual shingles or hand cut strips of shingles. But for this Irish Putz house I used the Village Rooftops die from Sizzix to make these shingles.
I glued the inner section in place first just because it is slightly harder to reach.
Touch up if needed
If you see some areas that look like they need to be touched up, now is the time to do it. It's easier before you glue the house down to the base.
Next make the pedestal base
P.S. I did glue down the shingles better than it shows in these photos.
For this Putz house, I decided on a simple pedestal base. Here's how you make it.
Cut out 3 cardboard circles large enough for the house to sit on
I used a four-inch circle as the size for this miniature house. Cut out 3 circles and glue them together. This makes a sturdy base of the little house.
Prime and paint the circular base
Once the glue is dry, prime and paint the base. I chose Mowed Lawn to match the color of the paper grass. Also paint the underside of the base.
Paint the pedestal with dark paint
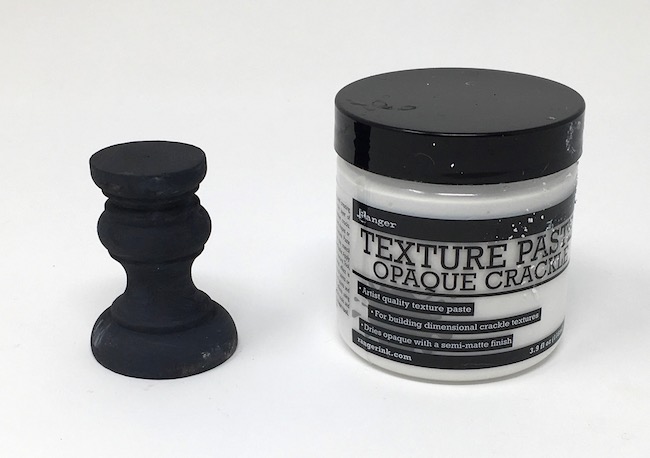
Because I want to coat the pedestal made from a Tim Holtz Vignette Finial with crackle paste, I want the underlayer to be dark so the crackles show up better.
For this I used black gesso (black primer) to paint the finial.
Apply crackle texture paste to the pedestal
Now apply a pretty thick layer of crackle texture paste to the pedestal. I just applied it with my fingers. Allow the crackle paste to dry.
Distress the crackle paste to highlight the cracks on the pedestal
And to make sure the cracks in the pedestal really show up, I use distress crayons and smeared the color along the cracks. That gave the pedestal a little more color and patina.
Center and glue the pedestal to the underside of the cardboard circle
Now just center the pedestal and glue it to the underside of your cardboard circle base. I just kind of eyeball it, but you can be more precise by actually measuring the center point 2 inches from the edge.
Glue the little Putz house on the base
Now glue the little Irish Putz house to the base using a thick, strong glue like Aleene's Fast Grab Tacky glue. Let dry before you add the Springy or St. Patrick's Day decorations.
So that completes the base for our miniature Irish stone house.
And finally make the Spring seasonal decorations
Make the paper grass
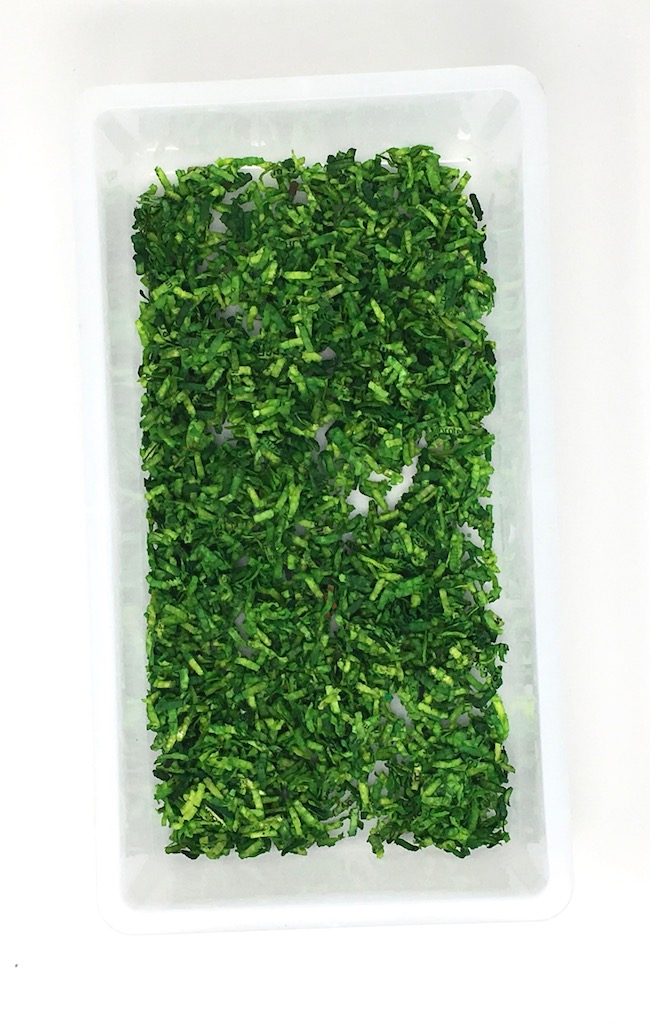
I just love the paper grass because it is so easy and add such a great landscaping detail for a Putz house. It's so easy to make. Basically gather some shredded paper, put it in a plastic bag, spray with a spray stain. As you know, I love the Tim Holtz green called Mowed Lawn. Well, it is available in a spray stain so that is what I used.
Here you can find a more detailed tutorial on making shredded paper grass this way.
Apply a thick layer of glue to the green base around the house and then dump the paper grass on top. Then pat the grass down and let dry. When it is dry, you just shake it a bit and dust off the pieces of grass that haven't adhered.
Cut out flowers
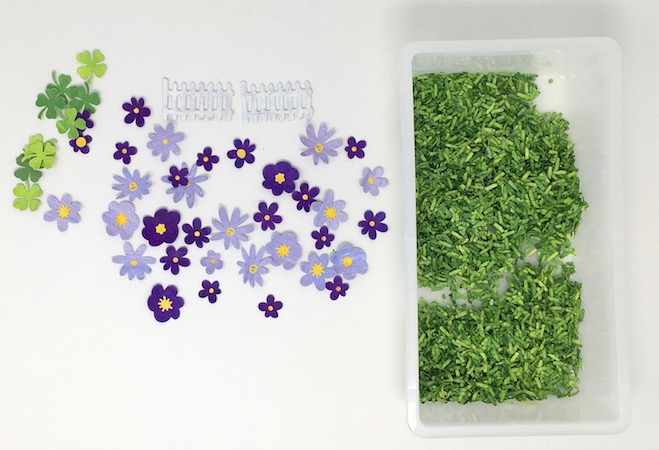
There are lots of options for making flowers. I just used some Sizzix dies like the ones in the Funky Floral series. First I painted cardstock on both sides and then cut out the flowers. I used Mustard Seed or Fossilized Amber for the yellow and Wilted Violet and Shaded Lilac for the purple flowers.
Each flower was curved slightly using an embossing tool (or you could use a ballpoint pin that no longer has ink).
Now add however many flowers you want to the lawn of shredded paper grass.
Glue flowers to wire stems and make a bouquet
Because I wanted to decorate the crackled paste pedestal with flowers, I glue several to short pieces of wire using a quick-drying glue, Glossy Accents. Next wire the stems together with a wire around the middle. Then kind of fan the flowers outward.
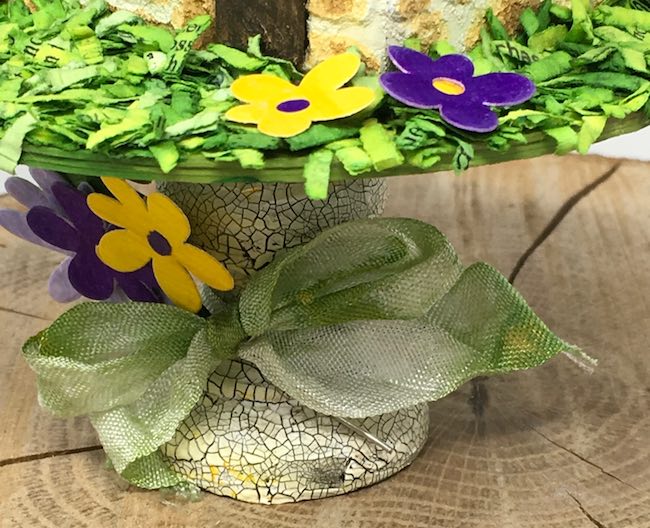
Tie a crinkle ribbon around the pedestal base
Now just tie a piece of ribbon around the base. I used some leftover crinkle ribbon that came in one of my orders from the Funkie Junkie Boutique.
Then tie a bow around the bouquet of flowers
After the ribbon is secure around the base, just tie the bouquet in the center and then tie a bow in the ribbon. Really this is the hardest part - tying a little bow.
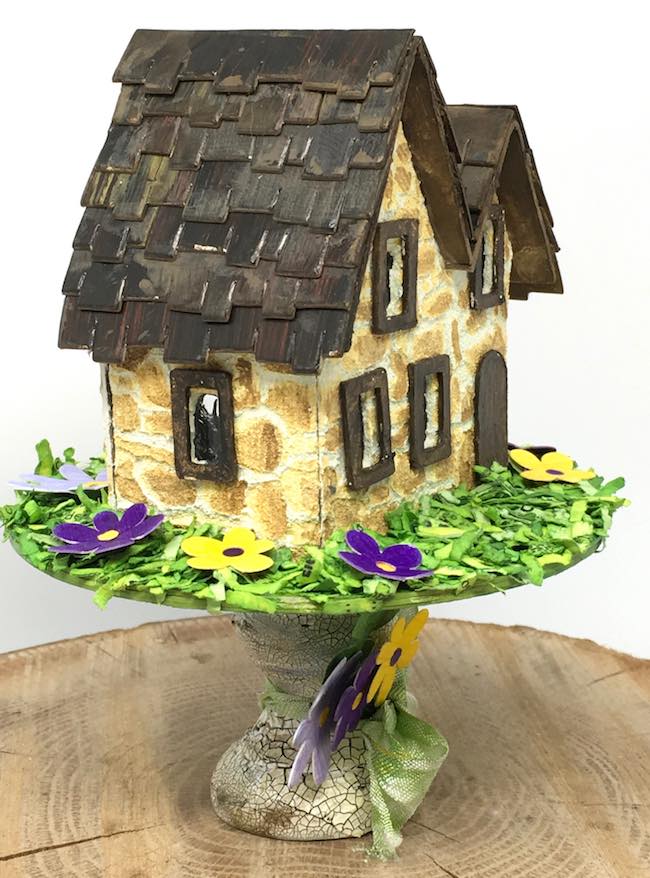
Another little Putz house completed that you can use as a table decoration, on top of a cake, as the start of the little paper village or whatever else you can imagine. This is number 8 of the 14 Days to Spring Crafts. More to come.
Be sure to pin this to your favorite Pinterest Board so you can remember where you found the tutorial for the Miniature Irish Stone Cottage.
Be sure to pin this to your favorite Pinterest Board so you can remember where you found the tutorial for the Miniature Irish Stone Cottage.
If you have any questions, email me at [email protected].
Thank you so much for stopping by.
Leave a Reply