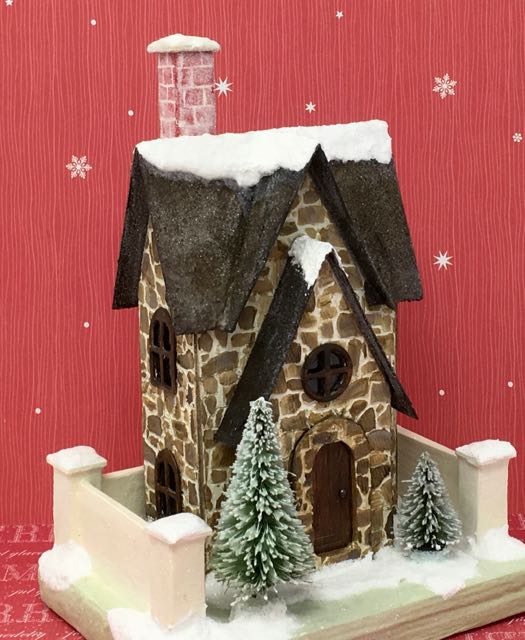
Christmas Farmhouse in Stone - the start of a Christmas Village
The Christmas Farmhouse - another paper house for your Christmas Village
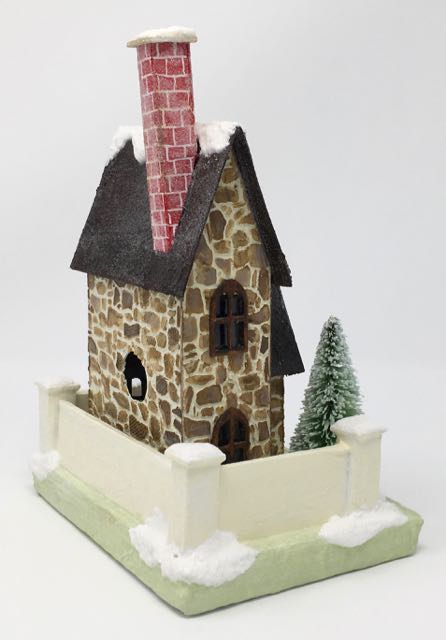
Here is the paper pattern I promised you for making the Christmas Farmhouse - another cute little paper house to add to your Christmas Village. It's got lots of great details for a little Putz Christmas house - a gable in front part of the roof and a small gable foyer. This house pattern would make a great church as well. You can choose what kind of surface you want - stone texture like the one I've made here or paint and glitter your house or use colorful paper over the cardboard structure.
The free PDF and SVG files are available in the July 2018 section of the Paper Glitter Glue library.
Links to information in this tutorial:
- The Christmas Farmhouse in Stone - Christmas Glitter House
- Stone Texture for your little house
- How to Cut Out Windows for Your Putz House
- How to Add Light to your little house – how to make the base for your house
This post contains some affiliate links for your convenience. Click here to read my full disclosure policy.
Materials:
- Cardboard - Christmas Farmhouse PDFpaper pattern here
- Aleene’s Fast Grab Glue or similar glue
- Gesso
- Paint colors of your choice
- Craft Sand for texture if painting the house
- Texture paste for the stenciled stone surface if you want to make a stone surface
- Clear packaging for windows if desired
- Glossy Accents
- Window Dies
- Snow-Tex
- Decorative elements such as a bottle brush tree and glitter
- Please note - the SVG pattern for the Christmas Farmhouse is only available in the book, Create 12 Simply Super Miniature Houses in my shop.
Steps for Making Your Little Christmas Putz House
Briefly, these are the steps in making this cardboard house:
- Copy the pattern for the Christmas Farmhouse onto cardboard, score the fold lines, cut out
- Cut out the window openings
- Prime and paint the house
- Follow instructions here to make the stenciled stone surface if desired
- Cut trim for windows, door and roof shakes or shingles if you are using shakes on your house
- Adhere windows and trim before you glue the house together
- Cut out roof, chimney and prime and paint
- Glue house together along tab in the back
- Glue house addition (the front gable foyer) to the house
- Next glue the roofs to house
- Adhere the chimney to roof, then the wooden shake or shingles if desired
- Make base, prime and paint
- Glue house to base and add embellishments
Easy when you take it one step at a time.
Download the pattern to make your Christmas Farmhouse from my resource library. It's Design No. 6 in the July 2018 section of the library.
I've just added the SVG version if you have a cutting machine like a Cricut Maker.
You can get the password for my resource library with the pattern for the Christmas Farmhouse and other free patterns and tutorials by filling out the newsletter subscription form located at the bottom of this post.
Detailed Information to Construct Your Own Christmas Farmhouse Paper House
-
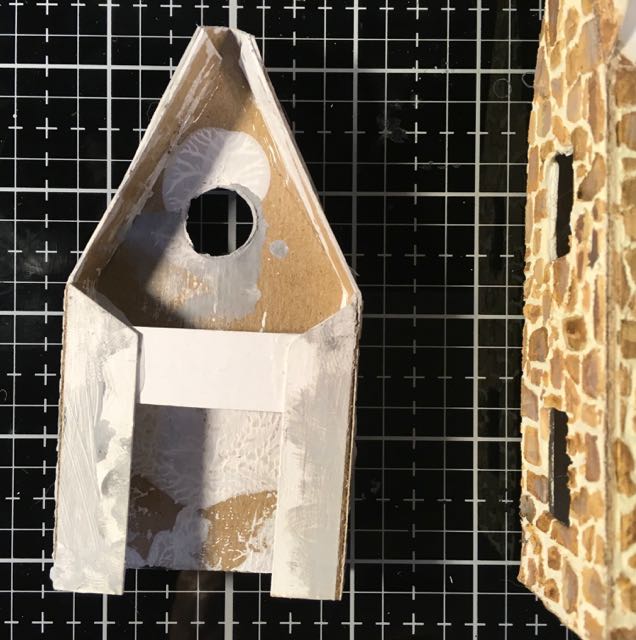
Copy the pattern onto your cardboard, score and cut the pattern
The pattern itself is pretty easy – it is a basic gable house with a cut out in the roof for an extra gable in the front of the house. I generally make my patterns so they fit on an 8.5 x 11 piece of paper and cardboard which makes a nice-sized small house. You may shrink or enlarge your pattern to whatever size you want depending on your sources of paper and size of cardboard.
Once you have the pattern copied, the score along the fold lines BEFORE you cut it out. It is so much easier to score before you cut because you have a bigger area to hold on to. I don't always remember to do this, but I always mean to.
-
Cut out window openings
I did not draw the windows on the house pattern so you can decide exactly where you want the windows placed. I only added 5 windows to this Christmas house. A round window in the front gable foyer piece and 2 on the each side.
-
Prime and paint the house and stencil the stone, if desired
I always prime my houses with gesso (gesso is a white paint primer which prepares your cardboard to hold onto paint better).
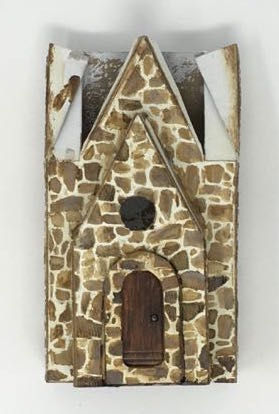
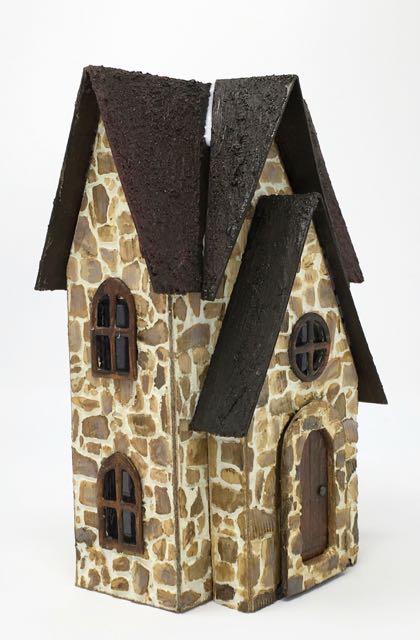
You can follow the tutorial linked above to make the stone surface on the foundation of the little house. Here's a photo of the stenciled Christmas Farmhouse. I masked off the areas where I didn't want the stone such as the location of the little foyer piece on the front and the doorway.
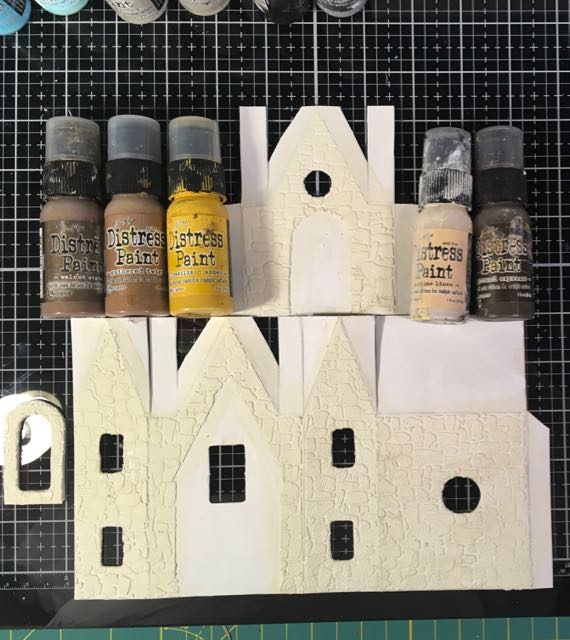
The paper house pattern has been stenciled with Stampers Anonymous Mini Layering Stencil #28. I love this stencil. These are the colors I used to mimic the look of stone on the house. I omitted yellow Fossilized Amber. The rectangle in the middle of the front section is to allow a little light to foyer.
After stenciling the stone texture, paint the entire house the background color - the color you want for the mortar between the stones and for the plastered part of the house between the wood timber trim. I used Antique Linen Distress paint.
Paint the stone with layers of color to mimic the look of stone.
-
Cut out windows, door, and wood trim
If you've read something of my Putz house-making adventures, you know I use window dies for almost all of my windows and window frames. I just don't like cutting out windows, but I know a lot of putz makers who happily cut them out, boy it is not for me. The window dies for the Christmas Farmhouse are from Tim Holtz Village dwelling series.
-
Adhere windows and/or trim before you glue the house together
If you want your windows to look like they have glass in the panes, cut small sections of clear acetate packaging to function as windows. You can color the window glass with alcohol inks to give them a nice shade. I adhere the windows on the inside of the house with a thick transparent glue from Ranger Ink called Glossy Accents. I put a thick layer on the entire window so the windows look like wavy glass.
It is easier to adhere windows to the house before you glue the house together. It's not absolutely necessary, but they stick on better if you do. Also I try to paint the inside edge of windows the same color as the window frame when I remember.
-
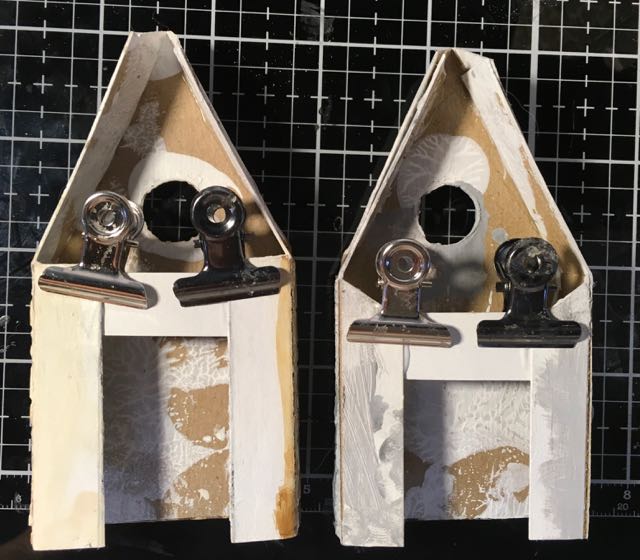
Glue house together along tab in the back
The little tab on the right side of the pattern is the glue tab. Apply a thick layer of glue and let it get just a little tacky and then adhere the back and side together.
Binder clips are a great help in holding the glued sides together. It doesn't work on the top edge though because the roof flaps for this particular pattern are in the way. You can use one of those brands of painter's tape that doesn't pull off your paint if you have already applied it. For this house I just held the top side for a few minutes while the glue was drying.
Speaking of roof flaps - what is the purpose of those things anyway? They function as the under roof and give support to the house so it holds its shape better. After this step you can do test fitting of the roof.
Christmas Farmhouse in progress showing how to glue the angled roof flaps onto the supporting roof flaps. It helps keep the house square and provides much better support for the roof.
-
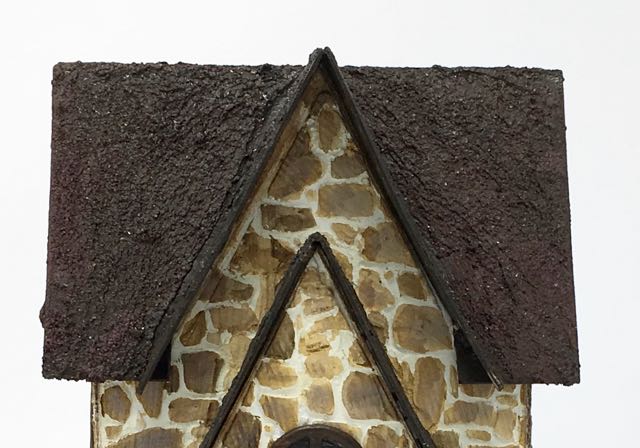
Cut out roof, chimney and prime and paint
The roof pattern is a little large on purpose. Cut it out and see how it fits, then you can trim the edges if you think they overhang too much or if you can't fit the roof because of the gable in the front. It can be a challenge getting that piece to fit. If you happen to cut off too much where the front gable goes, you can cover it up with the old standby - glue and glitter and piles of snow.
Oh, and before you glue it to the house, paint the underside of the overhang. It looks much better painted a matching color rather than raw cardboard.
Making the chimney can be kind of fiddly, too. You may notice that the chimney has 5 sides and that is because one of them is the glue tab. You can cut the glue tab a little smaller to help keep the chimney square.
After painting the chimney, I usually draw the mortar lines on the chimney with a white gel pen. You can draw them on before or after you glue the sides together.
-
Glue the Front Gable Foyer Piece together, adhere to the house
The pattern for the front gable foyer shows the tabs on the sides where you glue it to the house. I added a small piece of cardboard to the back of those tabs just to give a little extra support to this extension on the Christmas Farmhouse. It's not absolutely necessary, but it helps a little bit.
Binder clips hold the support piece of the front gable foyer on the Christmas Farmhouse section while the glue is drying
Small supporting piece of cardboard glued to the back of the front foyer piece. It helps keep the sides of this little extension square.
-
Next glue the roof to the house
Be sure the previous house pieces are dry before you glue on the roof. Score the middle of the roof piece and fold it at the scored line. Test fit the roof again. Make sure if fits before you apply glue. Draw a bead of glue on the gable edges and the base of the roof flaps. You don't want the glue smooshing out too much, especially if you have already painted your house. Just dab it with a paper towel to remove the excess glue.
Center the roof over the house (equal overhangs on each side, front and back). Painter's tape might come in handy here, but normally I hold the roof in place until I am sure it has adhered. Keep watching to make sure you haven't made the roof slide forward or backward too much.
-
Glue on the secondary roofs
Also test fit your other 2 roofs before you start gluing. Trim the length if needed. Both patterns are slightly long to give you a little margin of error. Glue on the roof that covers the little gable foyer first. It's the easier piece to glue on.
The ends of the gable roof are trimmed to match the length of the main roof
Next glue on the large front gable roof at the main roofline.
It's a little trickier because sometimes the roof cardboard bends and flexes a bit so there is often a gap like the one you see below. Snow will fix it, texture paste and glue and glitter will cover up that area if needed.
The front gable roof has a bit of a gap here - but we have a solution - Snow and glitter and texture paste to cover it up.
See the gap on this side as well.
-
Glue the chimney to the roof
There are 2 patterns to choose from - chimney that goes on the back of the house roof like below and a chimney that perches on top of the roofline. Choose whichever on you like the best.
Next step is putting the chimney in place. The angle of the chimney pattern matches the roofline of the house. If there is a gap at the bottom of the chimney after you glue it on, you can cover it up with the shingles or texture paste or snow just like we did with the gable roof. I use lots of glue to adhere the chimney because it takes a little while to get it to hold on a slant. You make the chimney shorter if you want. Just cut off some from the top.
Again, because cardboard bends sometimes so when you look at the chimney from the side is not straight up and down. It bothers me, but not too much. Mostly I try to make sure the chimney is straight when you look at it from the front.
The farmhouse chimney angles a little bit which you can see from this viewpoint.
-
Decorate the roof
I used a mixture of texture paste and paint to make this roof surface before I glued the roof on. But add shingles at this time.
-
Make base, prime and paint
I make my bases out of corrugated cardboard. Previously, I glued them together with Mod Podge, but now I use a hot glue gun to glue the layers of cardboard together. It's much faster and easier. It's the only place I use hot glue. Then I cover the cardboard with paper and paint.
Since this is a Christmas house, the base is painted with Snow-tex on top then glittered.
-
Glue the house to the base and decorate
Apply a thick bead of glue to the base of your little house, center it over the base and glue it down. I apply a little pressure at first, but I don't have to hold it long.
When I first started making houses, this was the funnest part - decorating the house. Now I enjoy the whole process, but it is still exciting to see the whole project come together. Use whatever embellishments you have on hand to decorate your little house. And have fun in the process.
Want to remember where you found this fun little Christmas Farmhouse? Well, pin one of these photos to your favorite board.
Christmas Farmhouse in Stone paper house tutorial paper pattern
Pin this to remember the Christmas Farmhouse in Stone paper pattern
Christmas Farmhouse in Stone paper house tutorial paper pattern - pin to your favorite crafty, Christmas board
P.S. Sometimes it is challenging to describe how to make something with words. If I haven't made it clear to you how to make this little paper house, please let me know. You can leave a comment here or email me at [email protected]. I will be glad to help.
Leave a Reply