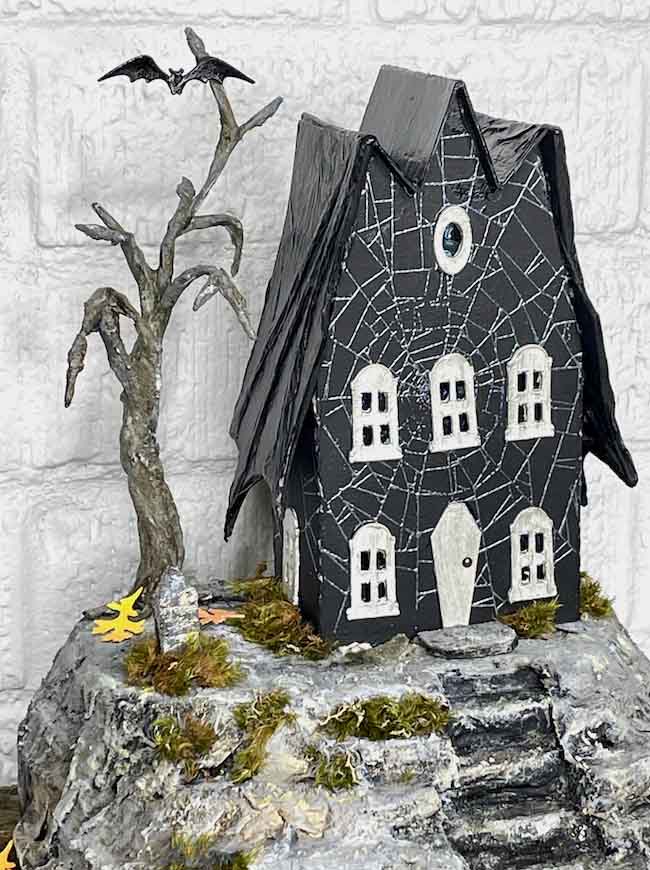
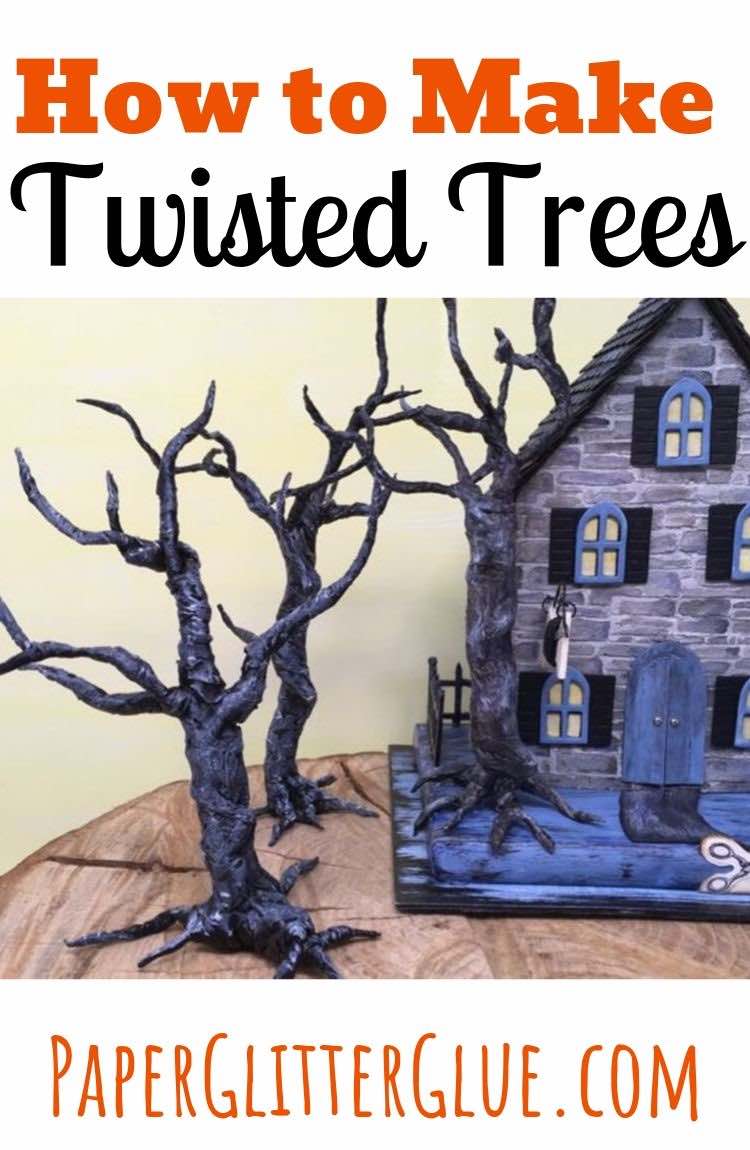
DIY Instructions on how to make miniature twisted trees for your paper crafts out of wire and paper
This method of making spooky little twisted trees was inspired by 2 types of trees I found on Pinterest - the paper bag tree and some beautiful wire trees. The problem with the paper bag trees is that you can't really sculpt the limbs and the problem with the wire trees is that you have to cut a LOT of wire. I figured why not use the wire as the base for the tree and the limbs, then wrap the wire in paper to give texture and conserve the wire. So the twisted tree was born.
This post includes:
- a video of how to make the twisted tree
- examples of trees I've made with wire and twisted paper
- and written instructions on how to make the tree.
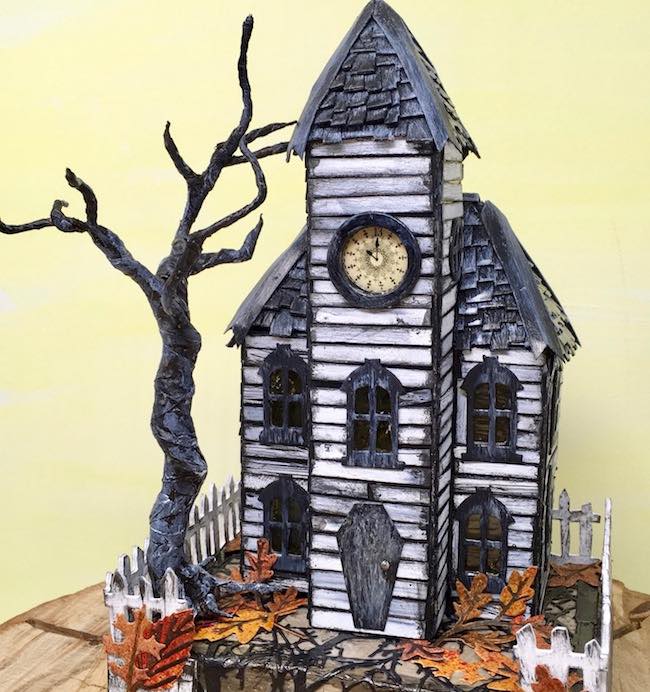
Here's an example of a twisted paper tree on the Haunted Schoolhouse base
I've made a short video of the process (about 11 minutes) that you might find helpful. Just click on it video to see how to make the Twisted Tree.
I've written the instructions on how to make the tree below. Just scroll below.
If you want a printed copy of instructions to make the paper mache wire tree, I've written a PDF of this tutorial so subscribe to my newsletter, get the password to my free resource library and download a copy to keep the instructions without having to look them up on the internet.
Yes, you do have to sign up for the newsletter, but you can unsubscribe at any time. And I will never send you any spam.
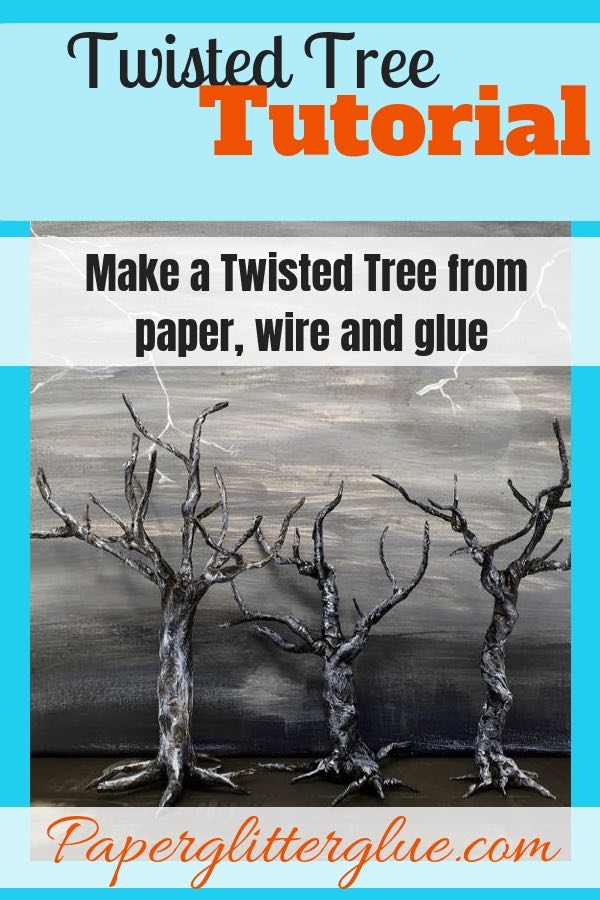
Examples of Twisted Trees

Three spooky twisted trees on a dark and stormy night
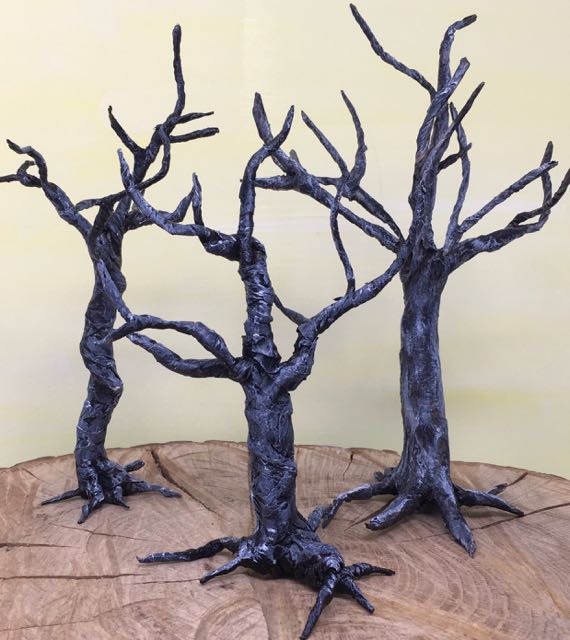
A trio of twisted trees for your halloween projects made of wire and paper

Twisted tree on Hilda's Haberdashery with a tree in progress
This paper Halloween house is abandoned, but guarded by twisted trees on each corner
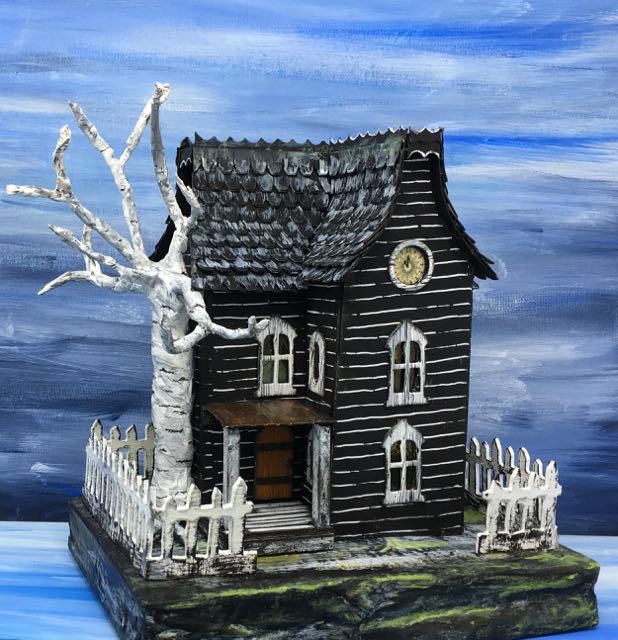
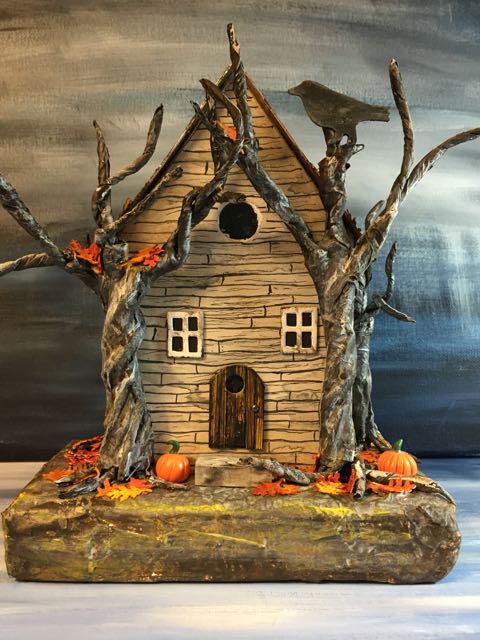
This Halloween house is called Davenport Hall decorated with a skeletal birch twisted tree
And here is a Springtime blooming version of twisted tree - the Cherry Blossom Flowering Tree.

Here's how you make the Halloween spooky twisted tree. And if you want to make the Cherry Blossom tree here are the instructions for the Cherry Blossom Flowering Tree.
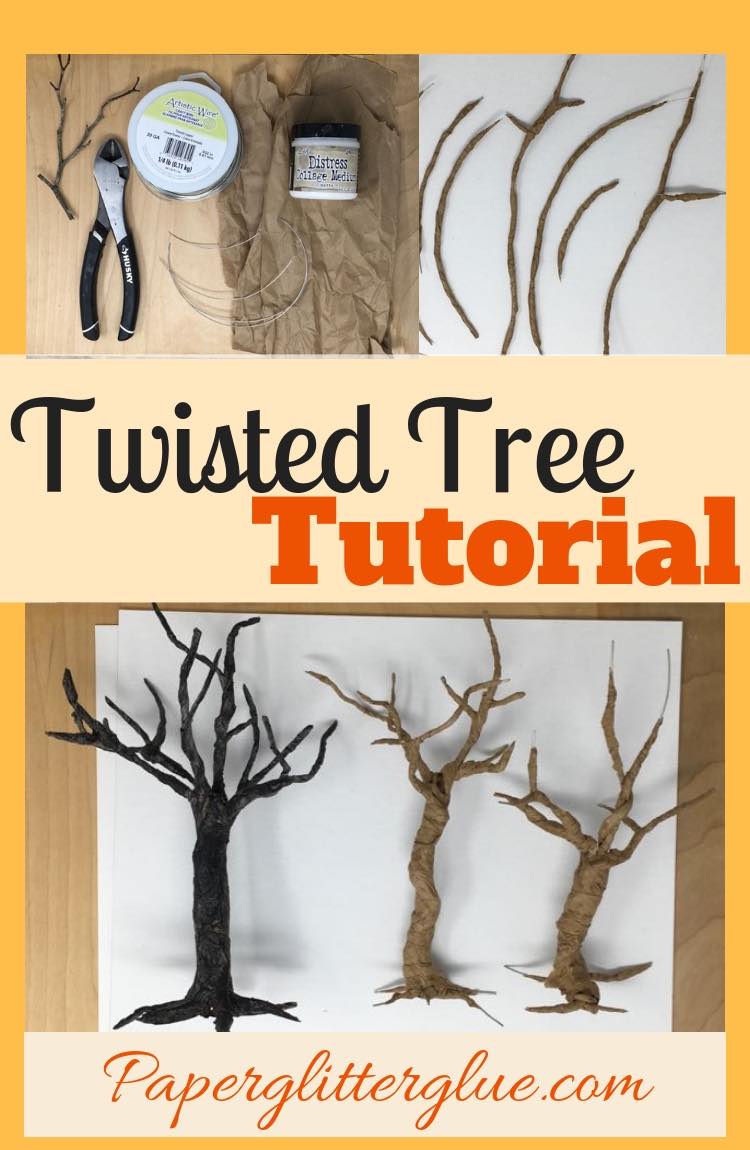
First, a few (very few) supplies to make a twisted tree
- Wire - any kind, from paddles of floral wire to jewelry making wire. I used 20g jewelry wire for the trees here
- Wire Cutters
- Paper - newspaper, brown packing paper
- Glue - Ranger Collage Medium is my favorite, but any PVA glue will work
- Paint - Black soot and Picket fence distress paints were used here
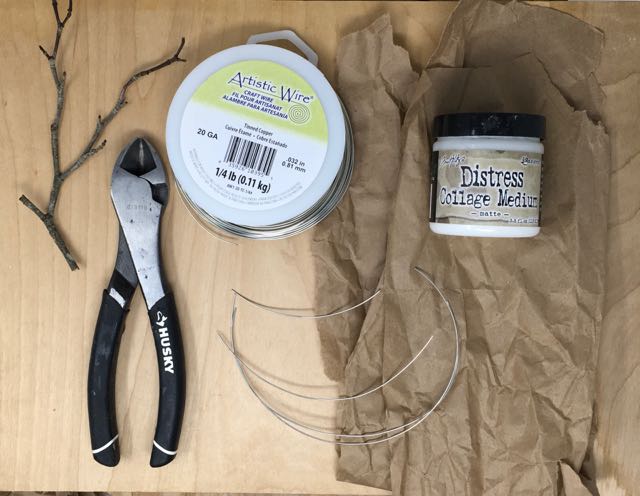
Supplies to make the spooky little Twisted Trees to decorate your Halloween crafts
Cut the wire to size
For my projects, the trees are about 7 inches tall with the trunk section about 3-4 inches tall. If you add the root system, the largest wire I cut is about 9-10 inches long.
In addition, I cut some smaller pieces to make smaller branches for the trees - about 2-6 inches long.
Each tree takes about 3-5 pieces of wire of each size.
Tear strips of paper
My favorite paper (which I have in abundance) is brown packing paper. It's not too thick, it wrinkles nicely and is flexible. Newspaper would work great as well. Even scrap paper works.
Tear the paper into strips. One cool thing about paper is that it actually has grain - that means it tears easier in one direction than the other. Tear your paper in two different directions. See which way makes strips and then continue to tear in that direction. It is much easier.
Don't worry about the length of the strips. Just make some long and some short ones. You will vary the sizes as you wrap the wire.
Get your glue ready
I am fond of the Ranger Collage Medium because it is so easy to dip my finger in it and coat the paper. It also dries fast and holds really well. But if you are using another brand of glue, pour some in a bowl or dish you can reach it easily. You don't want to have to reach for a bottle of glue and squeeze it each time because your hands are going to be seriously messy. You just want to dip your finger into the glue to spread it around. Your hands are still going to be seriously messy, but the glue bottle won't be.
Make the twisted strands for the basic structure of your miniature twisted tree
First start with the longest pieces of wire. Apply some glue or collage medium on one end of your paper strip and twist it around the the wire. Continue twisting until you get to the top of the wire. Tear or cut the excess paper off if needed. Try to taper the paper so that the ends are much narrower than the middle.
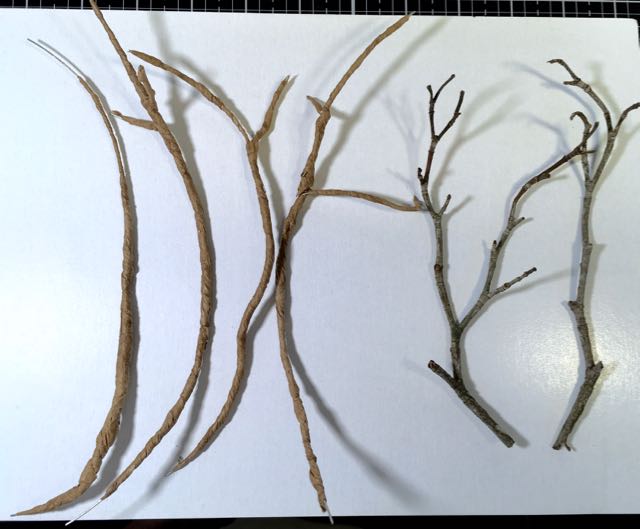
Brown packing paper wrapped around wire for the foundation of the twisted tree. Dogwood trees next to the wire strands for inspiration. Note how the paper is tapered at each end of the wire.
More paper-covered wire, some with branches already added
You can add branches at this point if you want. I do it some of the time, but not on all of the wire.
Wind strands together to make the basic tree structure
Now wind two-three strands together to form the basic structure of the tree. Leave enough room at the bottom to make roots. The photo below shows 3 strands woven together with an extra branch or two.
Leave room at the bottom for some of the paper-covered wire to form the root structure.
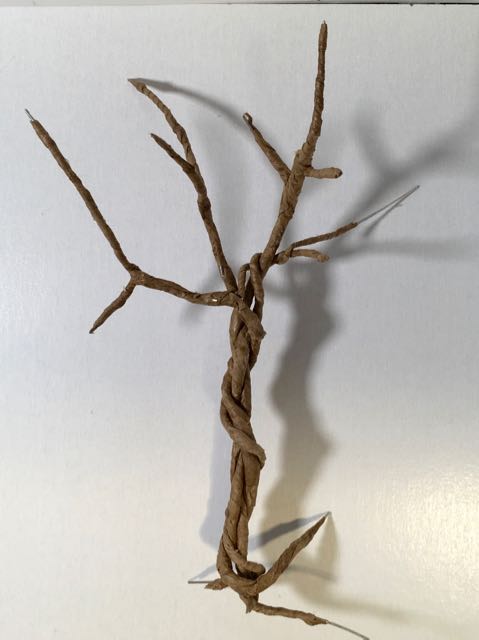
Twist strands of paper-covered wire together to form the basic twisted tree structure
Here's another tree in progress below:
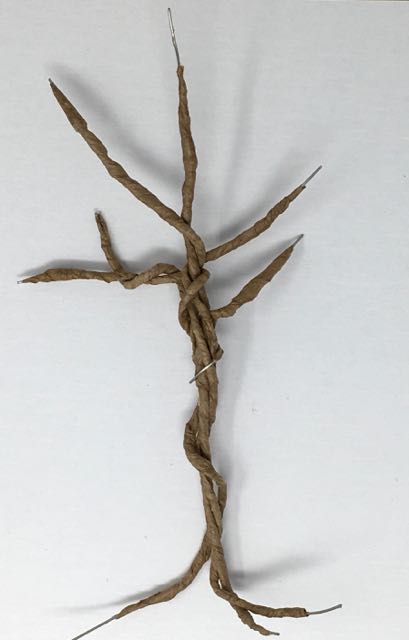
Another twisted tree made with the same twisted wire technique
Add extra wire covered paper to fatten up the tree trunk
Add extra wires the length of the trunk to make the trunk of the tree more substantial. Or you could just add extra layers of paper. Either way works well. But for the root system to be sturdy enough to support the twisted tree I usually add more twisted wire here.
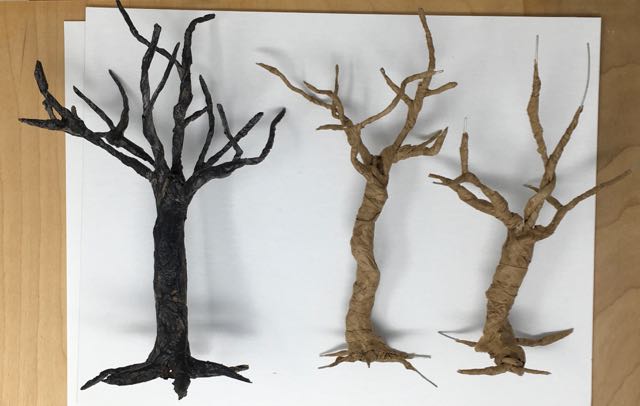
The two twisted trees in progress have an extra layer of paper twisted around the trunk to merge all the wire together. The tree on the far right is the one made during the video.
Cover any exposed wire with more paper. I try to make the paper look wrinkly and crumpled like tree bark if I can.
Cut the excess wire from the limbs and the roots with wire cutters
Now cut off the excess wire with wire cutters. Try to cut the wire so it is blunt rather than angled so it won't make a sharp point.
Paint the spooky little tree with the colors of your choice
After the glue is dry the tree is ready for paint. Depending on my setting for the little tree, I either paint it white or black. If I want a seriously dark and gloomy tree, I will paint the under layer black. For a lighter setting, I paint it white. You can use shades of browns and greys for a more realistic tree, but for the haunted Halloween spooky factor - black is my choice.

Two twisted trees just painted with Black Soot Distress paint as the first layer of paint
The finished miniature twisted trees with white highlighting from Picket Fence distress paint are shown in the top of this post.
Place your twisted tree in your Halloween setting
Finally, one of nice feature of this tree is that you can arrange the limbs and the roots the way you want. Often to make them fit on the base with one of my houses, I have to bring all the branches to the front and move the roots to the front as well. You'll find that the roots can be wrapped around an edge for a more interesting and kind of creepy look. In the House guardians above, the tree on the right is creeping up the front stair and edging over the base.
On the Harlequin Halloween House, the tree also extends over the base of the house.
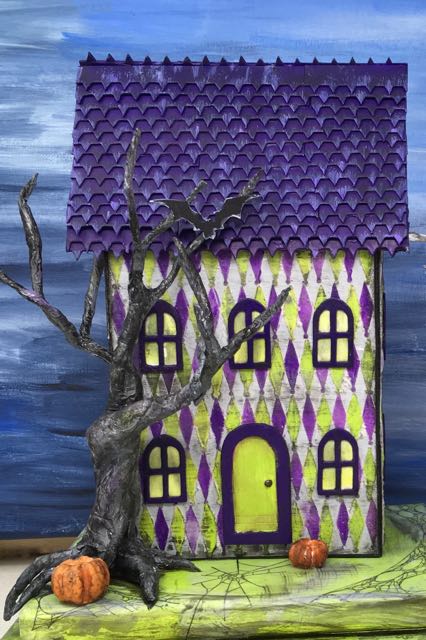
Harlequin Halloween House (a used bookstore) has a twisted tree in the front yard with roots that extend over the base
You don't even have to add the tree to the base of a Halloween putz house. You can just use it as extra decor around a Halloween vignette where one of the twisted trees is in the background setting.
What do you think about the twisted trees? I like them because they are both inexpensive and easy to make. But mostly I like them because add cool detail and dimension to my Halloween houses. Do let me know if you make one or several.
Want to make leaves to go with your twisted tree? Here is my best advice on making beautiful fall paper leaves for the base of your miniature paper tree.

Subscribe to the newsletter for my up-to-date crafting information. Also follow me on Pinterest.
Be sure to pin this to your favorite spooky Pinterest board
Kathleen
I am almost done making my first tree. It was fun but it took me forever to wrap the wire. I am pretty happy with it although I still have to work more on the trunk and roots. Then it will be ready for my graveyard next to my haunted dollhouse.
Thank you for the tutorial it was really easy to follow!
Lucy
The roots are always one of the hardest things for me.
It sounds like a great project you are working on.
Lucy
Terri
Hi! I love your twisted trees! Would Kraft paper on a roll work? It’s a bit thicker than packing paper so I wasn’t sure. Thank you!
Lucy
I think it will work, but I would crumple it up before you use it. I may be a little bit more challenging to wrap around the small parts.
Dale Walkey
I really appreciate you sharing your creative talent with us. Thank you so much!
Lucy
Thank you for the kind words. It mean a lot to me.
Lucy
Cricket Mitchell
Your site is amazing, I don't know why it took me so long to really look at everything....it's lovely.
Lucy
Thank you, Criket. I appreciate your kind comment.
Martha
I enjoyed your video about making the trees. I was hoping to make an Easter tree. I've used small branches from my woods before but they become a little brittle and the grandkids needs something a little sturdier. I'd like it to be about 20" high. Do you have any advice since you've made so many small Halloween trees? Thanks
Lucy
That is funny that you asked because I am going to make a larger tree around Halloween so ornaments can hang on it. My plan is to use a dowel in a wooden base. Then make the branches out of thicker wire covered with paper. I won't have it done until October though. Email me [email protected] and I will give you some more ideas on how this works.
Martha
Thank you! I was wondering how I'd get a base to hold my branches. A dowel should work for that. I'm just starting to collect some materials, wire and such, but I will continue to check your site and I'll email you for ideas. I've basically been a quilter for a number of years and I'm making a felted wool Christmas tree. My brother-in-law was going to cut my wood bases for me but he's had surgery and I'm waiting for him to mend. I'm so glad we have lots of projects to work on while we deal with this pandemic! You might want to look at sarafinafiberart.com and check out their wooly pine tree. Your type tree would be different for sure but it might offer something for you. I'll be in touch!
Lucy
I love the wooly pine tree. That is a great way to make a little tree. Thank you for the link. (I fixed it in the comments.)
Angela Cronic
Ive been out of the crafting mode for months and months. I can't seem to get back into it....when I got the thought though today I ended up right here looking at your stuff!
Lucy
Thank you, Angela. I hope these projects inspire you so you can make something really cool.
Susan Graves
Thank you so much. What a fascinationg tutorial. I can't wait to try them.
Lucy
Thank you so much.
Kirsty
Love these and truly love the idea of conserving wire—it adds up cost wise. Thanks, Lucy!
Lucy
Thank you so much. The wire trees are very beautiful, but you use a lot of wire. And since I was using them for spooky houses, I didn't need the twisted trees to be beautiful. I think you could cover them with paper clay, but I like using what I have on hand - a few paddles of wire for Christmas wreaths and brown packing paper.
So thank you for your perspective.
Janie Stahly
Do you make 4 foot to 6 foot spooky halloween trees?
Lucy
I haven't made a huge paper mache tree that way. I did kind of make a feather tree though that is about 3 feet tall.
Connie
Thanks for a great tutorial! This looks like a fun project and I can't wait to try to make one.
Lucy
I hope you will try a twisted tree. You can't mess them up because they are supposed to be twisted and wonky. Have fun. Thank you for taking the time to comment. First it lets me know that someone likes my crafting tutorials. And second it makes me happy. Thank you.
Noma Noorda
I love your twisted trees. I have made a Halloween village and a Christmas one with the little glitter houses. I drew my patterns, lots of work but I love them. These trees will be perfect ! Thank you so much!!
Noma Noorda
Lucy
You know I wrote the twisted tree tutorial (almost wrote twisted twee because it is a tongue twister) kind of as an afterthought. Several people asked me how to make them so I wrote up the tutorial. I hope you will make some trees for your villages. And I am so happy to hear that you like to make glitter houses. I just think they are so fun. Thank you for stopping by my blog and leaving a comment. That means a lot to me.
Lucy
Margy Abbott
Hi Lucy, thank you for posting your video of how to make a twisted tree. I am keen to make more of my own embellishments, I am making fairy gardens. I look forward to seeing more on your website.
Jennifer
I've been checking out your website for a while this year. You are very talented. What an awesome tutorial you have shared. You are very kind and generous. Thank you for sharing your secrets 🙂
Lucy
Thank you, Jennifer. I am so glad you like these projects. I have some really cool ideas for the next few projects that I think you will like. Halloween and Christmas are prime time for what I make so I have lots to do in the next few weeks. Thank you again for stopping by.
Marjorie
Thanks for the video. I was was just wondering when I saw the habadashery house about how you constructed the tree! So perfect timing...and great instructions 😁
Lucy
I am so happy that you like the twisted trees. I hope you will make some because they are kind of addictive and perfect for Halloween decorations, especially the little houses.
Brenda DeLawyer
Awesome tutorial Lucy! Thank you so much for making it. I will be making a few trees this week.
Ann Barnes
These are so cool! I’ve always admired these spooktacular additions to your houses! Thanks for the tutorial, I may need to try a few to use in some Halloween creations!
Tammy
these twisted trees are neat, 🤔 ideas on how to upscale the sizes and make them weather proof, outdoor durable ?
Lucy
Tammy,
I've tried to think of ways to make my paper crafts waterproof, but I think if you use a paper-based material, it is extremely difficult to make it weatherproof. You could coat it with multiple layers of glue or Mod Podge or even polyurethane sealer, but I still think water would eventually deteriorate the paper.
I do think you could make an armature structure and cover it with polymer clay and that would be weatherproof. It's a good question and something to think about.