
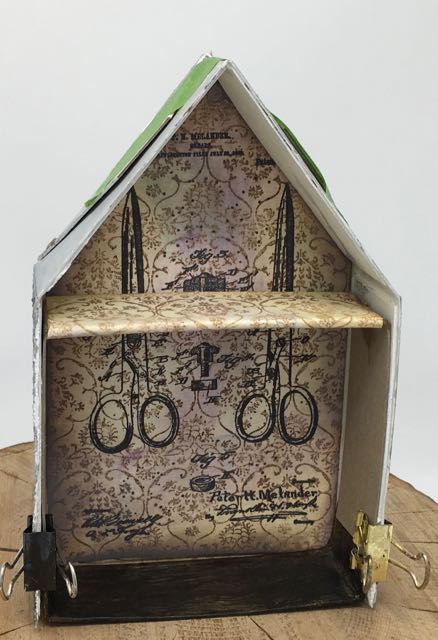
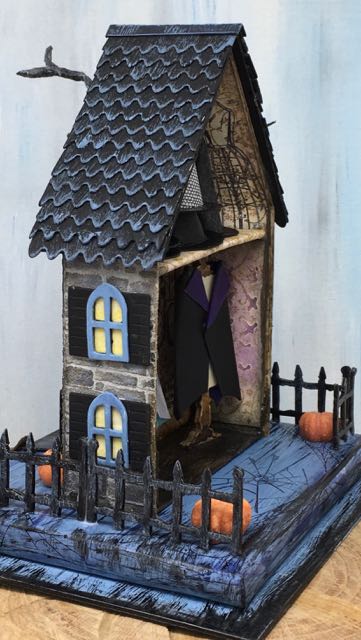
Make sure that the witches' hats fit on the top shelf of the little Halloween shop
As a continuation of the Halloween project I made as a guest designer for the Frilly and Funky "Haberdashery" challenge, I'm going to write more about the actually construction of Hilda's Haberdashery - a miniature Halloween shop that sells the Finest Capes and Hats this side of the Moon.

I talked about making the decorative Halloween elements that make up Hilda's miniature Haberdashery in the previous post. This post is about making the actual structure for the little cardboard Halloween shop. When you look at the pattern for Hilda's shop you will see that it is a very simple pattern. I planned it that way to showcase the capes and hats more effectively. That's why there is no border around the back edge of the house like on the Apothecary Halloween House and the Halloween Used Bookstore.
The structure is different as well. Because I wanted the witches' hats on the top shelf it made sense for the peak of the house to be in the middle on a gable front house (instead of on the sides). That let me add different hat sizes to the top shelf.
Related Links:
- Frilly and Funkie Haberdasher Challenge
- Miniature Halloween Haberdashery
- Apothecary Halloween House
- Miniature Used Bookstore (Harlequin House)
- Miniature Broom Tutorial
- Stone Texture Tutorial
This post contains some affiliate links for your convenience. That means if you make a purchase after clicking an affiliate link, I will earn a small commission but it won’t cost you a penny more. Click here to read my full disclosure policy.
Materials:
- Cardboard - Design No. 8 - free Miniature Haberdashery Shop PDF pattern here
- Aleene’s Fast Grab Glue or similar glue
- Gesso
- Texture paste or Grit paste
- Paint colors of your choice
- Siding for the house
- Decorative Halloween decorative elements such as creepy trees, miniature brooms, tiny pumpkins, in addition to the sewing items for the Haberdashery shop
Steps for Making Your Miniature Halloween Shop
Briefly, these are the steps in making this little cardboard Halloween shop:
- Copy and cut out the pattern - Design No. 8
- Decorate the outside of the house
- Make reinforcement cardboard pieces to provide good support for the house
- Decorate the inside of the house
- Make shelf and base for the miniature Halloween shop
- Glue the house together
- Glue the roof on and install the shelf and base or floor of the shop
- Add the shingles or roofing of choice
- Make and paint the base
- Glue the house to the base
- Add the final decorative elements to the your Halloween shop
Overall this is a very easy house to build since it is a simple structure. What makes this house interesting is the decor.
Download the pattern to make your Miniature Hilda's Haberdashery shop from my resource library.
You can get the password for my resource library that has the pattern for Hilda's Haberdashery Miniature Halloween shop and other freebies by filling out the newsletter subscription form located at the bottom of this post. You will also receive my newsletter every two weeks or so.
Detailed Information to Construct Your Own Two-Sided Apothecary Halloween House
-
Copy the pattern onto your cardboard, score and cut the pattern
The pattern itself is very simple – it is a basic gable house with the back open. I generally make my patterns so they fit on an 8.5 x 11 piece of paper and cardboard. This house is taller than usual to make room for the decorative elements in the back. You may shrink or enlarge your pattern to whatever size you want depending on your sources of paper and size of cardboard.
Once you have the pattern copied, the score along the fold lines BEFORE you cut it out. It is so much easier to score before you cut because you have a bigger area to hold on to.
Prime the outside of the house with gesso.
-
Decorate the outside of your Halloween House
Prepare to stencil the stone surface on Hilda's Haberdashery by taping the stencil to the front of the house. I altered this Stampers Anonymous stencil (mini layering stencil #28) by gluing 2 stencils together because I use it so much for my little houses. I trimmed off the borders of one side on each stencil and glued overlapping material together with E6000 glue. It works nicely.

Prepare to stencil the stone surface on Hilda's Haberdashery. It's hard to see but the base color is a light grey color.
Though you don't have to alter your own stencil - just use a thin layer of texture paste or grit paste and let it dry before you stencil other areas. No matter how you use the stencil, let each side dry before moving on. The Ranger texture and grit pastes dry pretty quickly.
I used Ranger Grit paste here because I love the way the gritty texture mimics the stone surface.
-
Paint the Decorative Stone Texture on the Little Haberdashery Shop
Once everything is stenciled and dry, you get to paint now. You'll find a detailed tutorial on making the stone texture here. You can even find a copy of the tutorial in my resource library. I think the painting part is fun, not tedious. And it is easier than it looks. First, paint the color of the mortar between the stones. Generally, I paint it lighter than the stones themselves. To add variation to the background color of mortar, I mixed gesso with Hickory Smoke distress paint where some areas are lighter and some areas are darker.
There's a lot of variation just with the very first layer of color on the stones. Then add successive colors to suggest all the gradations of color in stone. 2-4 more colors works nicely. If you mess up, just dab it with a paper towel to absorb the paint.
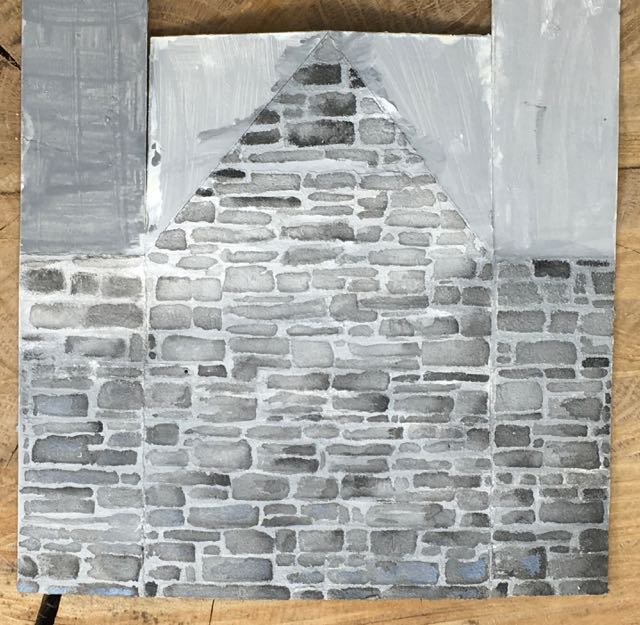
This stone layer was painted with Hickory smoke and a little black soot. I had just started using a little blue at the bottom before I took the photo.

More blue color added to the stones on the surface of the little shop. This blue is either Stormy Sky or Faded Jeans, not sure which.
More colors added - Chipped Sapphire and a brown shade to warm up the color of the stone. It gives a little more depth to stone.
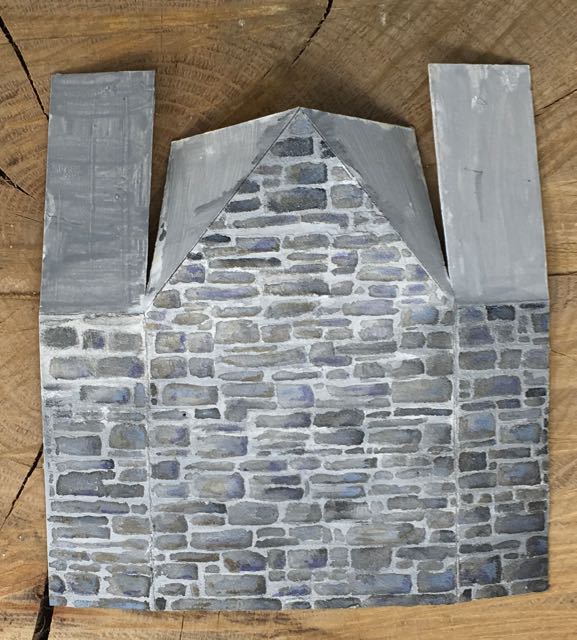
Front of the miniature shop before the addition of the windows and doors

Figuring out placement of the windows and the door of Hilda's Haberdashery Miniature Shop
-
Windows and the Door for the Miniature Haberdashery
For windows I combined the Village Belltower windows painted with Faded Jeans distress paint with the black painted shutters from the Village Bungalow Sizzix dies. I traced the door from the Village Bungalow to make my own door with a frame around it. Tiny silver brads function as door knobs.
Now be sure to leave space for the hanging sign when you plan placement of the windows and doors.
Please note it is easier to glue on windows and doors at this stage than when the house is all glued together.
-
Reinforce the Sides of the house with extra cardboard
Because of all the paint and paste on the front of the house, I reinforced the back side of the house with extra cardboard. It makes a very sturdy little house structure.

You can see the extra layers of cardboard glued on the sides and roof to provide extra support on the little Haberdashery shop
-
Decorate the inside of the house
Since the Frilly and Funkie challenge is to include sewing elements, I decorated the inside of the shop with the Stampers Anonymous sewing stamps from a set called Inventor 3. The background is the Ornate part of the Ornate and Lace set of stamps also by Stampers Anonymous. I talked about that in the previous post of Hilda's Haberdashery.
-
Make a shelf and a floor for your Miniature Halloween Shop
Make the top shelf and wooden floor for your little Halloween shop by covering cardboard with stamped or embossed papers.

Top shelf for the witches' hats stamped with the same wallpaper design as the walls
-
Glue the house together
Now you can glue the house together since you have all the elements done. You get an idea of how to glue the roof flaps in the photo below. The side roof flaps go under the angled flaps attached to the front gable.
Glue the roof flaps from the front of the house to the top of the side roof pieces
Then glue on the floor of the little shop and the top shelf. The naked cardboard on the sides was covered with more stamped wallpaper.
-
Glue on the roof
Glue on the roof on top of the house. I think of it as an over-roof. It gives extra support and a nice surface for shingles. I always paint it before I glue it on because we can't have raw cardboard showing. For this little house I painted the entire piece black.
-
Add Shingles
Despite the fact that shingles always take me a long time, I can't avoid them because they add so much to the house. I used one of the Village Rooftop dies again. First I painted them black and then distressed them with Faded Jeans. It's a combination I really like.
This view shows the staggered shingles that have been highlighted with Faded Jeans distress paint
-
Make and decorate the base
Sometimes I have no idea what to do for a base of one of my little cardboard houses. But I knew what to do for this one. First, I had already chosen the color - Faded Jeans, of course. Then I knew I wanted it seriously distressed with black. One of the reasons I love the dabber tops on the Distress Paint line is because it makes such lovely striations, really great streaky effects - better than I can get with a paint brush. I also added some Chipped Sapphire as well.
And I added a second thick layer of cardboard under the base to protect the Hilda's Haberdashery sign in the front and to protect the whole little house really.

This view shows the cardboard base for the little shop
If you use two pieces for the base, glue those two together before you glue the house structure to the top.
-
Glue the house to the base
Finally, glue the little house (the miniature shop) to the base. Let it dry completely before you add other elements because it will shift on you and you will look at it and think, "I know I centered that before I glued it on." These little houses will mess with you sometimes.
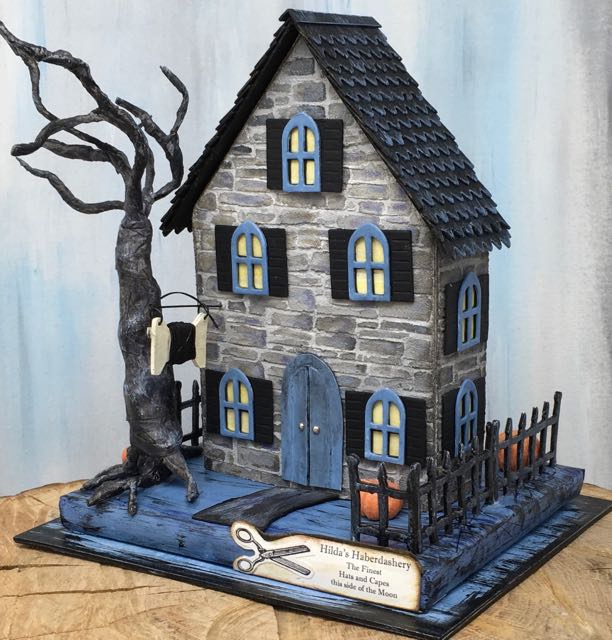
Completed Haberdashery shop for the Frilly and Funkie Haberdasher challenge
Add the final decorative elements to your fun little Halloween shop
Almost done. I added a twisted tree I made to the little Haberdashery. Hilda's sign says "The Finest capes and hats this side of the moon." Two extra last minute details really add to the house, I think. One is the walkway from the door and the other is stamping spider webs from the Stampers Anonymous "Tangled Webs" stamp. Those spooky little webs stamp so nicely and look so cool on any Halloween project. Later I'll probably add some more pumpkins as well.
Anything else needed to be added?
What do you think? Let me know if you have any questions about making this Halloween project. Also if you have any ideas for future projects, I would love to hear from you.

Hilda's Haberdashery - a miniature paper Halloween house with a shop in the back selling capes and witches hats
Susan Dotson
LOVE, LOVE, LOVE this house. I did sign up for your emails but, and maybe I am not looking in the right place, I couldn't find the pass word to get the pattern for the project. Thanks ever so much.
Lucy
Susan, You are supposed to be directed to a landing page with the password so you get it immediately. And you should get an email as well. I will email right away.
Beulah Bee
You were so very clever to pair Halloween with Haberdashery! Your knack for the details is what makes your creations so wonderful. Best brick ever! And that tree--AMAZING! Thank goodness for fast-drying glue as I can appreciate the patience you must have holding all the tiny bits together until dry. Nice to see your work on F&F so that more of us can view and enjoy your work.
wendy baysa
Oh Lucy, you inspire me to pull out my die every time I see one of your gorgeous dwellings, the stories that accompany them, your tips with instructions and your eye for detail & scale are amazing! I then remember, I am a once a year dweller, lol! Keep doing what you are doing cuz I love them all and enjoy them so much, it's like living through you 😉 xo xo
Lisa Hoel
I love your houses Lucy! This is another fabulous example. =)
Sara Emily Barker
Ok, Lucy, I won't say this is my favorite house of yours, because I love them all! Not only do I adore the complete project, I literally sit on the edge of my seat, reading how it all comes together. It's almost like being right there in the craft room, watching and learning from you. THANK YOU so much for sharing these details! I really laughed out loud when you said these little houses will mess with you. I bet! And speaking of messing with you, when I first saw the photo of your stencil, I wondered why your stencil was so much larger than mine! You think of everything! I'm loving those spider webs on the base, your stonework and that cute little shop sign--how perfect! Well, I love it ALL! Thank you so much for all your hard work on this project and for being our special Guest Designer at Frilly and Funkie! Sending hugs!