Paper Halloween House for your Halloween Decor
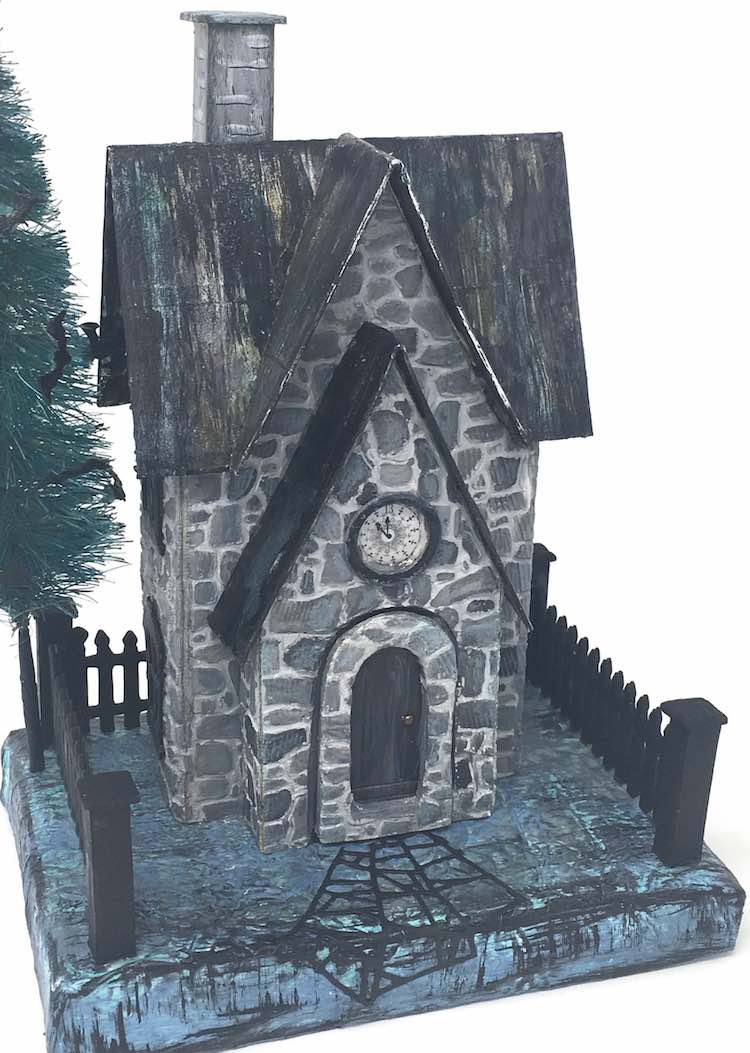
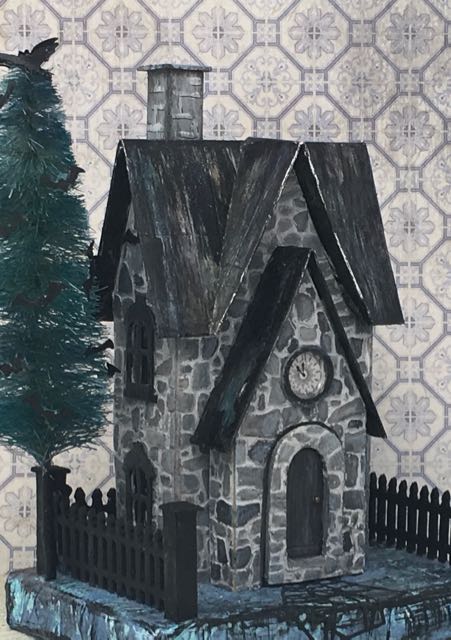
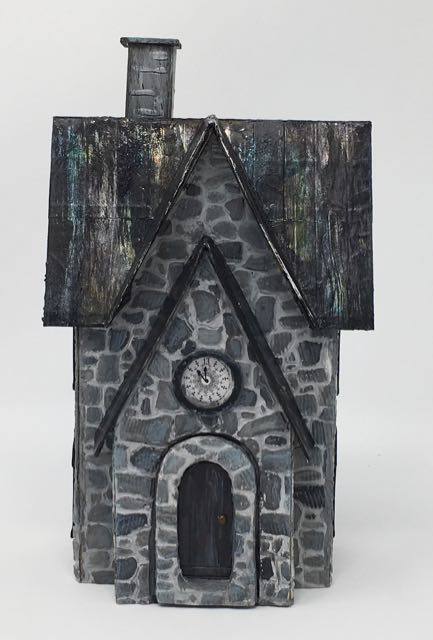
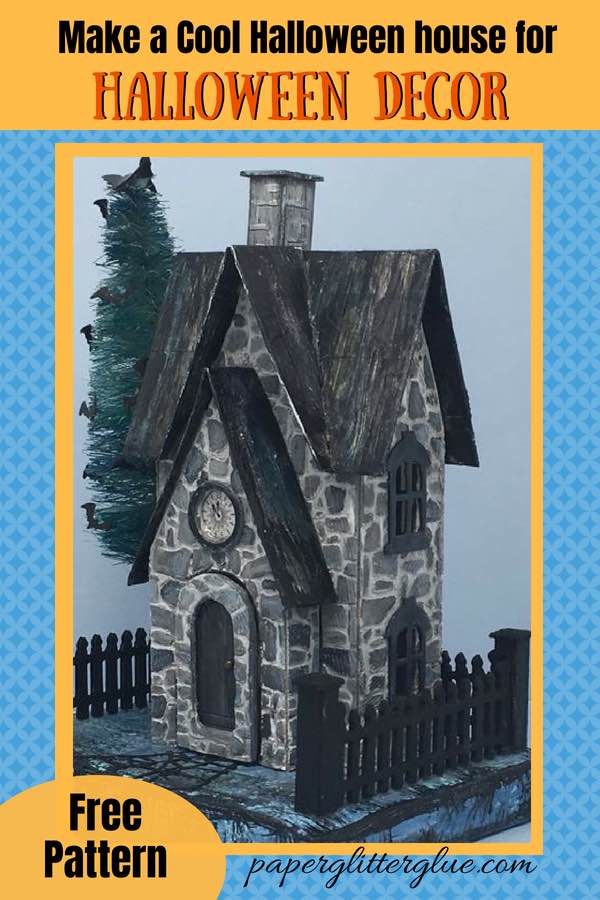
Another cool Halloween decoration for you - the Greystone Clock House with a bat tree made with the Christmas Farmhouse pattern. The color scheme is different from the Christmas Farmhouse, of course - with darker, more spooky colors. It has a 13-hour Halloween clock that I found online. I love this clock because it's so perfect for Halloween houses.
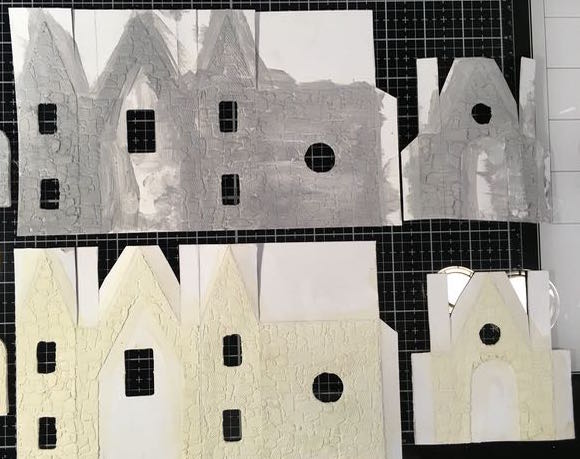
Please note - this PDF pattern is available as the Christmas Farmhouse in the Paper Glitter Glue library. The SVG pattern is available in my shop as a digital book called Create 12 Simply Super Miniature Houses.
Rusted Roof for the Greystone Clock House
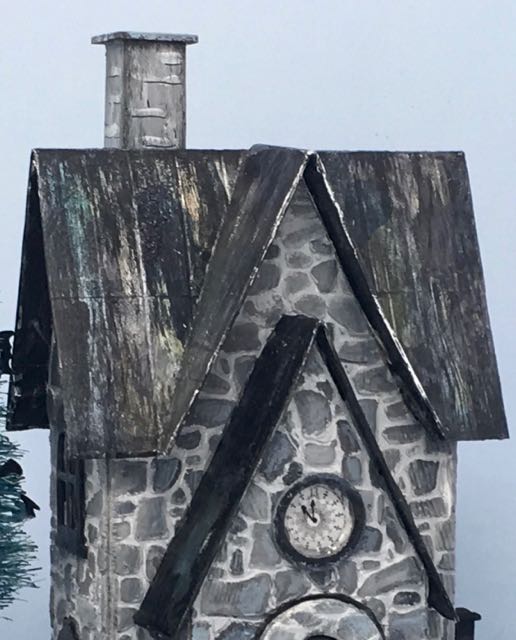
One other major difference from the bright and cheery, snow-covered Christmas Farmhouse is the metal roof which is dark and eerie, mostly black and grey with a few blue highlights. I made the roof just like I've outlined in the Rusted Roof Tutorial here.

Greystone Clock House with bat tree on the side
How to make the Spooky Greystone Halloween Clock House -Basic Steps
- Download the Christmas Farmhouse pattern
- Copy to cardboard, cut out
- Stencil stone surface
- Paint the stones
- Die cuts - windows, door
- Assemble the house
- Make the rusted tin roof
- Attach the roof pieces
- Make cardboard base
- Glue to the base
- Make fencing
- Attach decor items
Links related to making the Greystone Clock House
- Make the Christmas Farmhouse - Free Pattern to make this miniature house
- Stone Texture - How to Add to Your Papercrafts
- Make a Rusted Roof for Your Paper Houses
- How to Add Light to Your Little Houses
I'm not going into complete details on all of these steps because you can read them in the Christmas Farmhouse post and in the directions included with the download. But I will go over a few steps in the construction of this particular paper house.
If you have a specific question, you can always leave a comment or email me at [email protected] and I am always glad to help.
Colors for the Greystone Halloween House
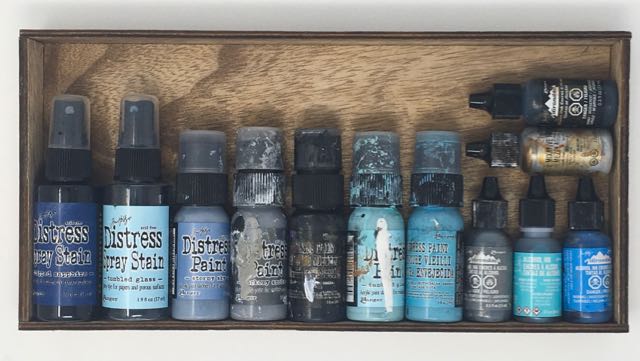
Colors used in making Greystone Halloween Clock House
This post contains some affiliate links for your convenience. Click here to read my full disclosure policy.
Here is a list of the Tim Holtz Ranger paint and stain products used
For the Bottle Brush Tree:
For the Stone Siding:
- Hickory Smoke Distress Paint
- Pumice Stone Distress Paint (not pictured)
- Black Soot Distress Paint
- Stormy Sky Distress Paint
- Tumbled Glass Distress Paint
For the Rusted Roof
- Black alcohol ink
- Grey alcohol ink
- Silver Mixative
- Two shades of blue
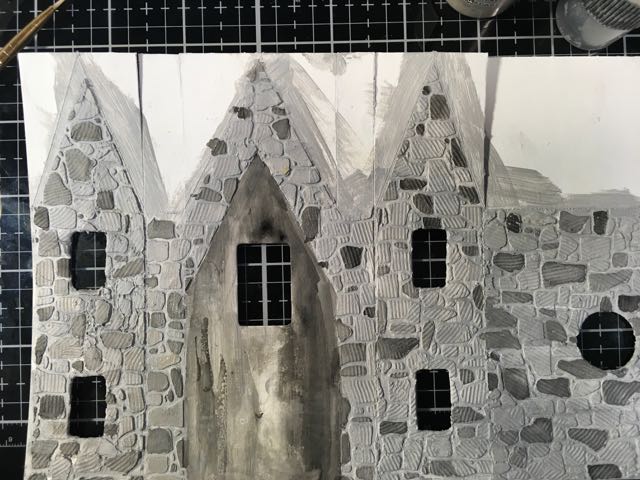
Stone Texture on the Greystone Halloween Clock House
I think the main appeal of this Halloween house is the stone siding. So I'll show a few steps in the making of the stone siding on this house.
Mask off areas to protect areas not to be stenciled
First off, stencil each side by masking off where you DON'T want the texture paste to go.
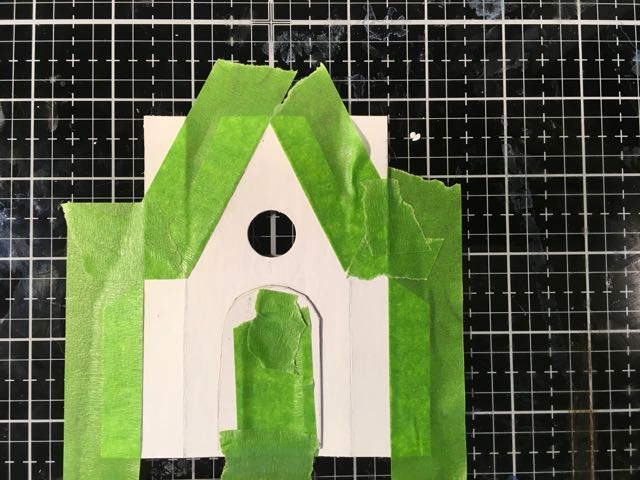
See how I taped down a piece of cardboard to cover up the area where the door will go.
Apply a thin layer of texture paste
When you apply the texture paste, apply a thin layer - thin enough to see the stencil through the texture paste. I applied it with the serrated edge of small plastic knife to give more texture. I was out of Ranger's Grit paste when I stenciled this house. However, grit paste makes a wonderful texture without using the serrations on the plastic knife.
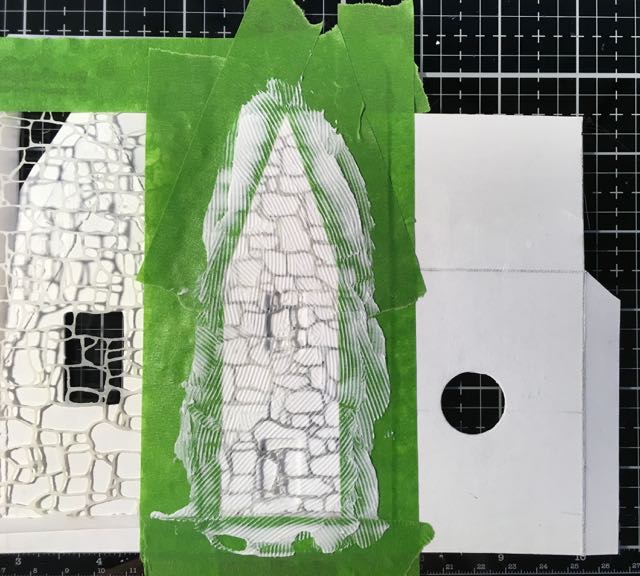
Apply a thin layer of texture paste to each side to make the stone texture. Notice that you can see the stencil through the texture paste.
Paint the base layer of your little house
Paint the base layer for the mortar between the stones. See the two variations below - one is for this Halloween house and the lighter color is for the Christmas Farmhouse.
After stenciling with texture paste, paint the Greystone Halloween House with Hickory Smoke as the base color. The Christmas Farmhouse's base color is Antique Linen.
Paint with various shades of paint to give dimension - dark colors first
Start painting the stones by using the darker color first - Black Soot in this case. When I loaded my brush with black paint I cleaned off excess paint in the center unstenciled section to make sure I wasn't applying too much paint. Sometimes I diluted the paint to give more variety in colors of the stones.
Painting the stenciled stones on the Greystone Halloween house
Using the various shades of blue and grey paint brings the stone texture great dimension.
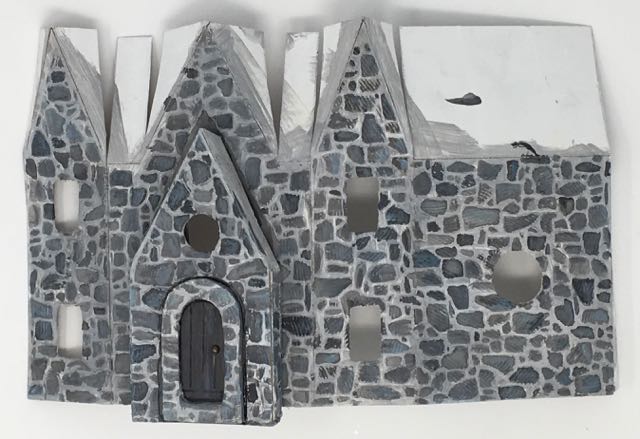
Completed painting the stone texture on the Greystone Halloween House
Windows and Doors for the Greystone Clock House
For this house there are only 4 windows. Once again I used my very favorite window die from the Tim Holtz Village Dwelling series, the Village Manor. I know I say it every time, but I love these windows for my Halloween houses. The door is from the Village Fixer Upper die set. To give more dimension to my door, I saved the cut out for the door and used it to make an archway around the door. I glued 3 layers together for more depth.
Now the 13-hour clock is one I found online, but I don't remember where I found it. It is a perfect addition to this house. The clock is outlined with a distressed black circle to set it apart a little better.
As usual, I made my window "glass" from saved acetate packaging. It is so much easier to glue on the windows to the inside of your house before the assembly of the house. But I don't often to remember to do that.
Two dark windows on each side on the Greystone Clock House. The spooky door is inset within a stone archway.
Rusted Roof for the Greystone Clock House
You can find the rusted roof tutorial here.
Materials for the rusted roof:
- Metal duct tape
- Alcohol inks
- Texture paste
- Roof cardboard pieces
But the difference here is the set of colors I used - blues and greys and black. Often I add texture paste to the metal duct tape for additional grunge on the roof.
View of the metal roof on the Halloween house
Glue on the Roof pieces
Truthfully, it is challenging to glue on the roof. I haven't found a magic solution to this step without occasional frustration, especially if you have already painted your house or your roof. Painter's tape works if you haven't already painted these pieces, but if the house is pre-painted, painter's tape can pull up the painting or the textured siding at times. So I become the tape. I hold the roof in place for a little while until I am sure it holds.
Make the Base
Greystone Clock House before attachment to the cardboard base
Fortunately, because the Greystone Clock House is a simple house, the base is simple as well - merely 4 layers of cardboard with a section cut out to fit the LED light and that's it. I like crinkled up paper to cover the cardboard for the texture.
You can find more on making a base with a space for an LED light here.
I do like the distressed streaks and painting of the base. That worked out well.
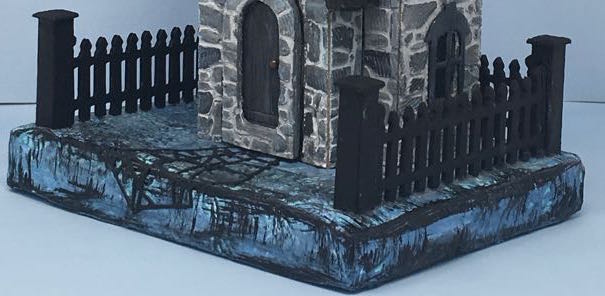
Close-up of the fencing and the distressed base on the Greystone Clock House
Fencing
For the fencing I used the Village Bungalow die. Each piece was cut out of cardboard and glued to another piece for strength, then painted black. The fence posts are lightweight pieces of cardboard scored at ⅜ inch intervals to make skinny fence posts that work well visually with the fence.
Decorative Elements
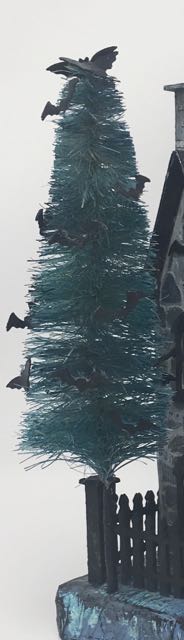
Close-up of the bottle brush tree.
Really, the only decorative element on the house at this time is the bottle brush tree which I made and dyed with Chipped Sapphire and Tumbled Glass. But I'm not exactly happy with the tree because I couldn't get the blue shade I envisioned. In addition, bats won't stay on the branches very well. The tree is just barely installed in a hole on the side of the base. I will probably replace it when I get the coloring right. And then I may make some polymer clay bats because I think they will work better than the paper bats.
Before the Habitat Fundraiser (I make most of my houses to be sold for my local Habitat for Humanity fundraiser), I always add more Halloween elements like fall leaves and pumpkins.
Want to remember where you found this pattern - pin to your best Halloween crafting Pinterest board
Denise Consiglio-Lahti
Good morning. I’m just reading your posts for the first time. Love your work! Do you have a tutorial on making bottle brush trees? I would be so grateful if you would share that. Denise
Lucy
Denise, I do have one, but I do it a little differently now. One thing I use much more sisal now and I get 20 gauge wire that I find in the jewelry section. Here’s the link -https://paperglitterglue.com/bottle-brush-tree-tutorial/
I will update this tutorial soon. I will let you when I do that.
Sara Emily Barker
EXCELLENT! Lucy, it's taken me a while to get back over to get a real good look at this, but it was WELL worth the wait for me! Oooh, how I love that stone work--so realistic! And the blue tones on the roof give it the perfect creepy glow. My favorite bit is the stonework archway door surround. These details are what make your houses so wonderful. That and your excellent craftsmanship! Thank you for so generously sharing your templates and all of your process; that's special and rare! Sending hugs!
Lucy
Sara Emily, I don't always get around to replying to comments even though I intend to. You always make me feel good - partly because you read the entire blog post, but also because of your lovely comments. You know the stone archway surround is actually very easy, but I do think that little bit of extra dimension really helps the doorway stand out.
So even though this is a month late and you probably won't read it - thank you.
Lucy