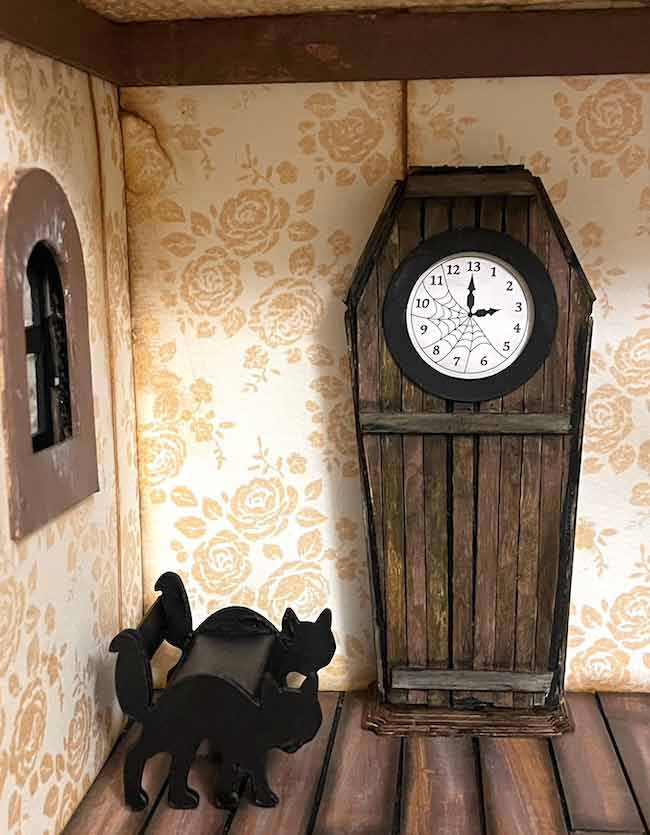
Here's a tutorial to make a Miniature Haunted Clock in the shape of a coffin. And the bonus is that it really works!! Yes, you can really tell time with this tiny coffin-shaped clock. When I saw miniature clock inserts online, it occurred to me that I could make a real, tiny clock that actually works.
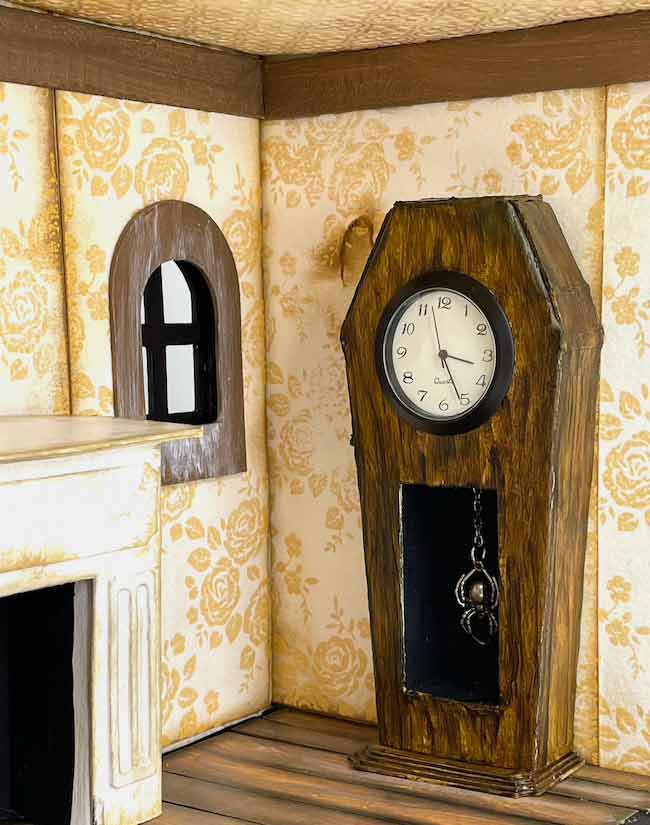
Oh, the other major inspiration for this clock is I'm making a small haunted Dollhouse. And doesn't every haunted dollhouse need a miniature clock?

Read on to see how to make this seriously cute coffin-shaped miniature haunted clock.
This post contains some affiliate links for your convenience. Click here to read my full disclosure policy.
Table of Contents
What do you need to make a Miniature Haunted Clock?
Here are the materials for this tiny coffin clock:
- Cardboard - 30 pt medium weight chipboard
- Clock Insert - 1 7/16 inch insert (for hole 1 ⅜ inch)
- Glue
- Paint to mimic wood grain
- Pendulum or hanging charms (this is an example, but there are many to choose from on Amazon)
- Optional - Coffee stirrers ( I chose this brand because they are very thin and easy to cut)
- A way to cut out your clock - I use my Cricut Maker or my Cricut Explore Air
- Free Pattern - Design No. 120 - from the Paper Glitter Glue Library
How to make the Miniature Haunted Clock
- Download the free pattern - Design No. 120
- Cut out the clock from cardboard
- Paint the clock to mimic wood
- Optional - use coffee stirrers on the surface of the clock
- Glue the clock together
- Adhere the base to the clock
- Install the clock insert
For more specific details on how to make the miniature coffin clock, see below.
Here's a video that shows you the construction details for making the Coffin-shaped Miniature Clock.
1. Download the free pattern for the Miniature Haunted Clock - Design No. 120 - from the Paper Glitter Glue Library
First, get the free pattern from the Paper Glitter Glue library. And how do you do that? Well, just subscribe to my newsletter where I keep you up-to-date on my newest crafts and give you the password to the library.
Next, enter the password on the password page which will take you directly to the library. All of the projects are listed in chronological order with the most recent project first. So get the Miniature Clock project within the July 2021 section of the library. It's Design No. 120.
All of my patterns are available in two formats - a printable format PDF if you cut your projects by hand and as an SVG pattern for use with cutting machines like a Cricut or a Silhouette.
Within the Miniature Haunted Clock file folder, there are the following files:
- Miniature Haunted Clock pattern with no cutout on the front as an SVG cut file and a PDF printable pattern template
- Miniature Haunted Clock pattern with a front cutout as an SVG cut file and a PDF printable pattern template
- Printable 13 hour clock included in the PDF file if you don't want to purchase a clock insert to make a clock that really works
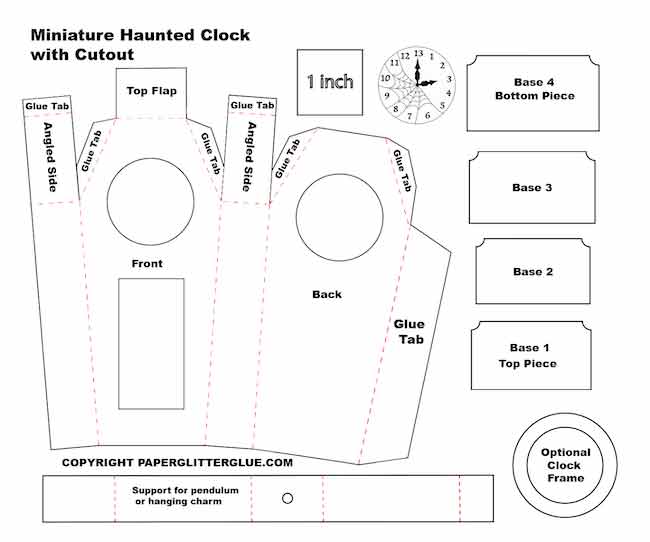
For example, here are how the Miniature Haunted Clock patterns look in the printable format.

And here is the clock with the cutout section for a pendulum or a hanging charm.
2. Cut out the Mini Coffin Clock in cardboard
Next, cut out the pattern. If you make your projects by hand, this is a relatively simple pattern to cut out. The circle for the clock is sized to fit the clock insert exactly.

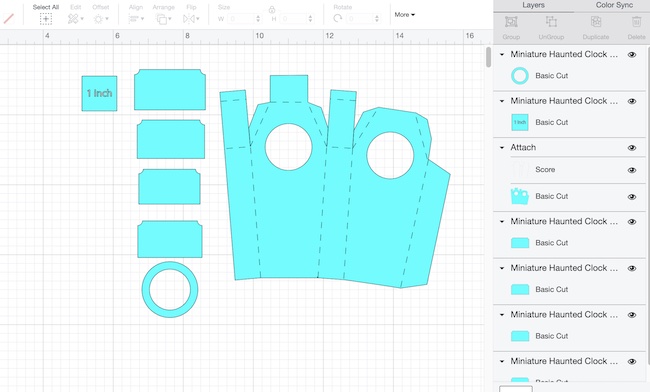
If you use a cutting machine like a Cricut, here is how the pattern looks in Cricut's Design Space. For Cricut users, the score lines are already attached and marked as score lines.
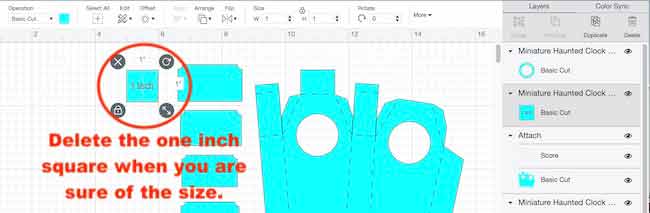
First, ungroup the pattern pieces in the cut file if the file is sized properly. The body of finished clock is 5 inches high. But you can make it larger or smaller, if desired. If you are going to resize it, do that before you ungroup. The one inch block helps you size the file properly.
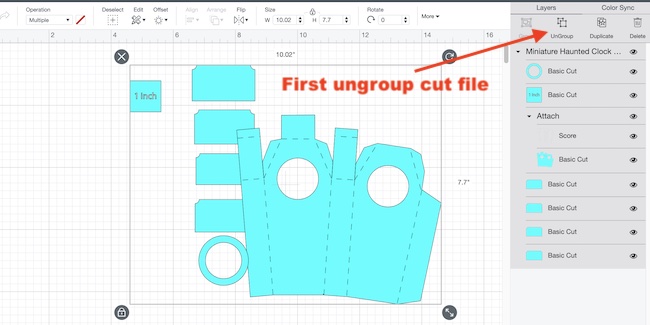
And here is the cut file after ungrouping and arranging it within Design Space.
Delete the one inch square block before you cut out the clock.
As I noted in the supply section, I use a cardboard that is fairly sturdy (30 pt medium weight cardboard), but still folds easily. What makes the clock so easy to make is that it is one basic piece, you don't have to glue many different pieces together for the clock structure.

Unfortunately, I don't think card stock is strong enough to support the weight of the clock insert. For this project, you do need cardboard.
3. Paint the miniature clock to mimic wood
If you have followed me for awhile, you know that I love to paint projects mimic wood. Fortunately, it is easily achieved with layers of color.

But if you like, you can paint the house after assembly. For this project it doesn't really matter.
First, decide if you want to apply texture paste to add more texture. In this example, I did use texture paste that I smeared in linear pattern to mimic wood grain, but it didn't make a dramatic difference. Then prime the cardboard cut out with gesso primer. I almost always use gesso because it provides "tooth", a subtle texture to allow paint to adhere better.

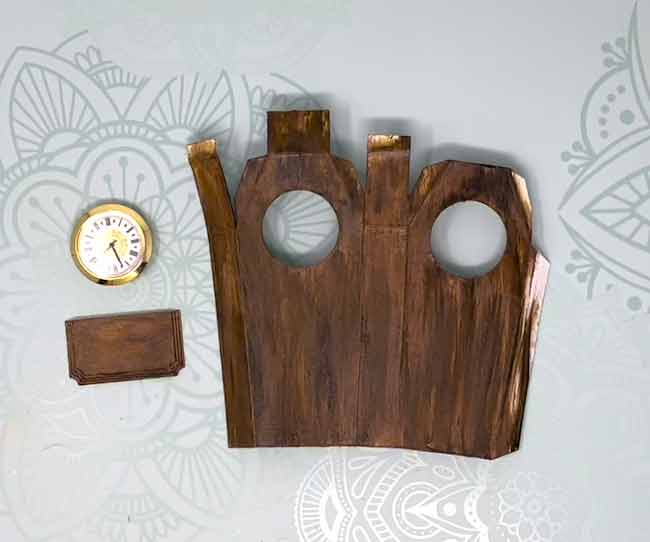
Next start your painting with your lightest color. I use a either a light brown or a golden yellow. For each successive layer, go darker and darker, finishing with a deep rich brown. Sometimes after I finish it doesn't look the way I want it to look. If that happens, I just add different color paint to mimic wood grain.

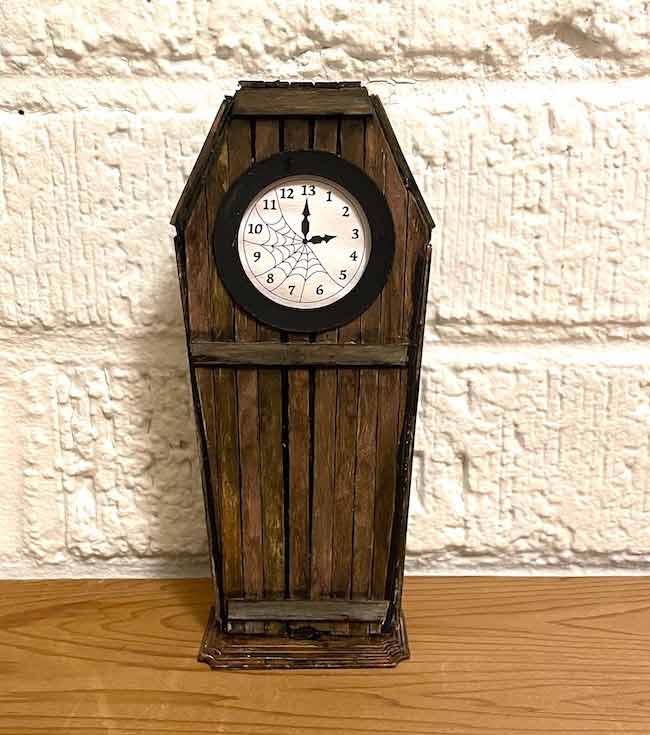
And here is how it looks with when you layer the paint. I just love this look.
4. Optional - Use coffee stirrers on the surface on the clock
At first, I didn't think using coffee stirrers was worth the effort. But as I completed the miniature clock with them as the wood surface, I realized I liked how they looked on the clock.
How to cut the coffee stirrers?
But I have to admit that there are some challenges. First, how do you cut them? In my one experiment with cutting the stirrers with my Cricut Maker, it did work. While the Cricut Maker with a knife blade cut the thin wood sticks, I could tell it didn't like cutting them because the machine stuck in places.
On Amazon, I purchased some really thin coffee stirrers because I know they are easier to cut. Usually they are the cheaper ones as well.
If you choose to cut the coffee stirrers this way, use the stickiest strong mat, tape all the sticks together so they won't move on the cutting mat. But you can cut the pieces with regular scissors - your paper scissors, not the good scissors.

Then the second challenge is to glue them on. The little pieces of the wood are hard to piece together. Just think of it as a puzzle and glue them in place, but you do have to be patient.
And the final problem is how well this surface works with the clock insert. I suspect the insert would fit even with the thickness of the wood on top of the cardboard, but I decided to use the printed 13-hour clock to solve that problem.
If you choose the paper clock instead of the clock insert, glue it on the back side of the clock and then glue the ring on the top surface to frame the clock better. It also covers up any irregularities in cutting the coffee stirrers.
5. Glue the haunted clock together
To assemble the clock, apply glue the side tab. Glue the main structure together. Let that dry before you glue down the angled top sides of the clock.

Once the main structure is firmly adhered, glue the angled sides on the top together. To do this, glue the outer flaps ON TOP of the support flaps. When you do this, be sure to push down on the sides so they firmly adhere to the flaps and not leave a gap. Once again, painter's tape comes in handy here.

After the angled side pieces are done, then glue the top flap down on top of the top support tabs on the angled side pieces.
Optional - Make a clock with a pendulum or a hanging charm
If you want to have a pendulum or hang a charm below the clock, follow these instructions.
First, use the specific pattern with the cutout section on the front.
Next, cut out the long strip in the pattern to make a rectangular spacer that supports the pendulum or charm. Then glue the strip together to form a rectangle.
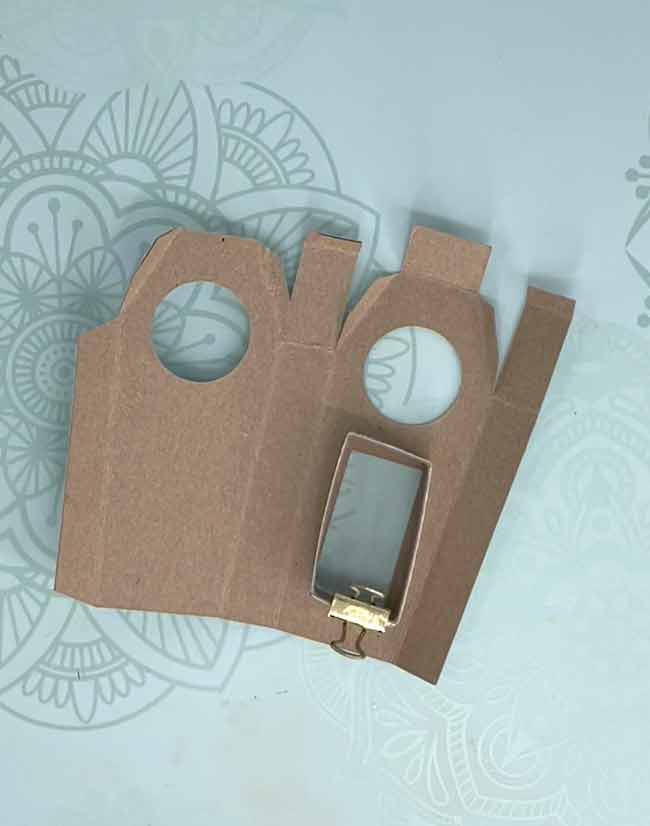
To make it easier to glue in place, the rectangle piece is slightly larger than the cut out. That way you don't have to place it precisely.
Glue the strip just outside the cut out portion inside the cutout on the clock.

Paint the inside back of the clock and the inside of the rectangle strip your desired color. For these clocks, I painted the inside either black or dark brown.
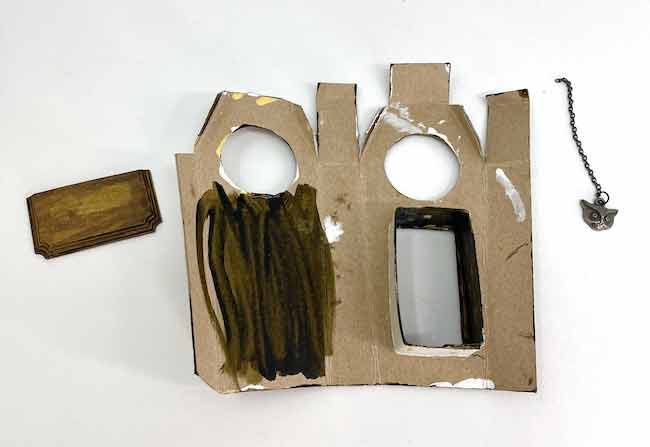
And finally, hang the pendulum or charm from a chain. Insert it in the hole on the support strip and use a large jump ring or hot glue the chain in place.

Here is a finished clock with the spider charm hanging down.
6. Next, glue the base to the miniature clock
The base is very important to make the clock stable. Since the front of the clock is heavy, you have to counteract that with a base that protrudes in the front. So you see that it prevents it from tipping forward.
To make the base, glue successive layers of cardboard base together. Apply glue to the smallest piece and move to the largest. Also make sure to line up the back of these pieces so they are aligned flat.
After you complete the base, glue it to the bottom of the clock. Again, be sure to line up the back of the clock with the back of the base when you glue them together. That ensures that the base sticks out in the front to help the clock stand up straight.
7. Install the clock Insert
Before you install the clock insert in the circle cut out, you have to remember a few important things. First, remove the little white tab under the setting crown (the round knob you turn to set the time) that stops the clock from working. And be sure to set the clock to the correct time. Every time I started to install the clock, I forgot to do that.

And the other thing I kept forgetting to do was line up 12 o'clock at the top of the clock.
To reiterate, before you install the clock insert:
- Pull the white tab out from under the setting crown (the little round knob)
- Set the clock to the correct time
- And find the 12 o'clock position so you install it correctly.
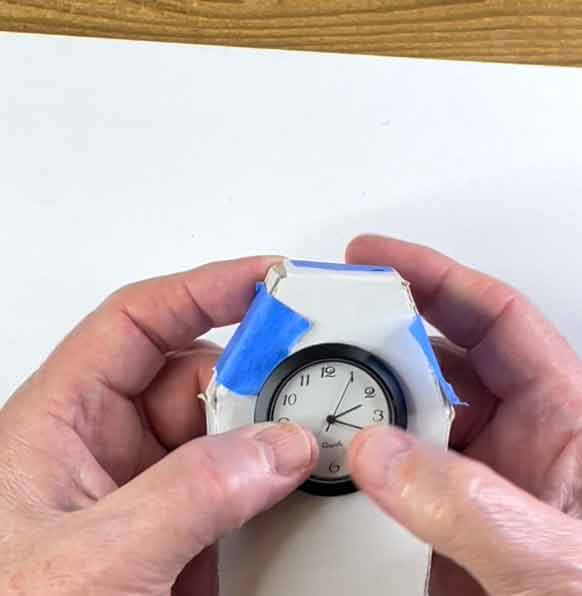
Then to complete the installation, gently (well, pretty gently) push the insert into place. Support the cardboard from behind with your fingers so you don't tear the cardboard. Fortunately I've taken the clock insert in and out several times and I've never torn the cardboard clock.
And that's it for this (relatively) quick Halloween craft. That's how you make a miniature haunted clock in the shape of a coffin. I hope you like it so you can add it to your seasonal Halloween decor. Or if you have a haunted dollhouse, it is a perfect addition.
If you like the coffin-shaped clock, you will like the Coffin House in the 13 Days of Halloween challenge and the great variation of the Coffin House in the 13 Handcrafted Halloween Houses Book.
If you have any questions, please feel free to ask. You can leave a comment or email me at [email protected].
I hope you have a lovely day.
Lucy

Laura Norman
Thank you for this! I make Halloween and creep/cute crafts year round and have been planning a larger haunted house as soon as I can find space for it. This is definitely going in there!
Lucy
When I thought of the coffin-shaped clock, I thought it would relatively easy to make and would be different and perfect for haunted house or even on a mantle as an interesting Halloween decor item.
I am so glad you like it. Thank you.
Lucy
Karen Poole
This is a very cool project! I can’t wait for the other Halloween projects!
Lucy
My goal (though it may be unrealistic) is to have 31 projects for the Halloween season - a 31 Days of Halloween series. I will get them to you as soon as I can.
I am so glad you like it.
Thank you so much.
Maria Mendoza
Lucy:
Thanks for share your ideas. I like de coffin clock and I’m in love to the cat bench. Best regards from Colombia
Lucy
Maria,
I am so happy you like the coffin clock and the cat bench. I'll work on those tutorials as soon as I can.
Thank you so much.
Lucy
Stephanie
This is the cutest thing, I never thought about making this, but I will now. Thank you for the idea, you are so creative and talented and helpful. You bring me and my daughter closer by building these things together. Such fun. ☺
Lucy
I really like the idea of making crafts with family members. That is so cool.
Thank you.
Sandra
Hope we get to see your little haunted doll house. It sounds eerily divine. Thanks for all your wonderful tutorials and sharing your creativity.
Lucy
Yes, I am going to do a whole series of tutorials on how to make the dollhouse - from how to make wallpaper to the shingles, fence, stone patio, and the spooky tree. I will do them over the few weeks.
Shirl Lundstrom
Wow, that is an amazing little Halloween clock!!! I am loving that little cat bench too.......just saying! Thank you!