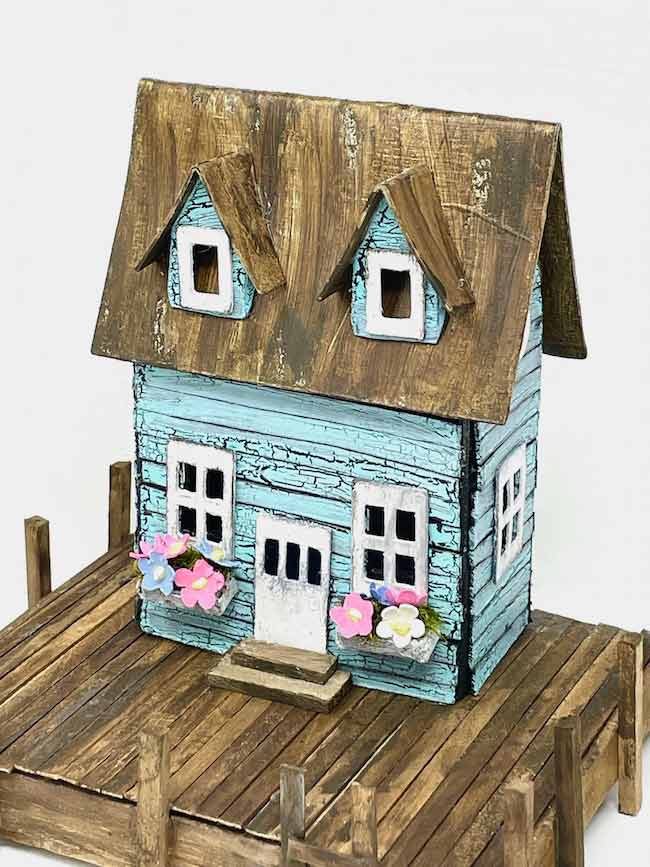
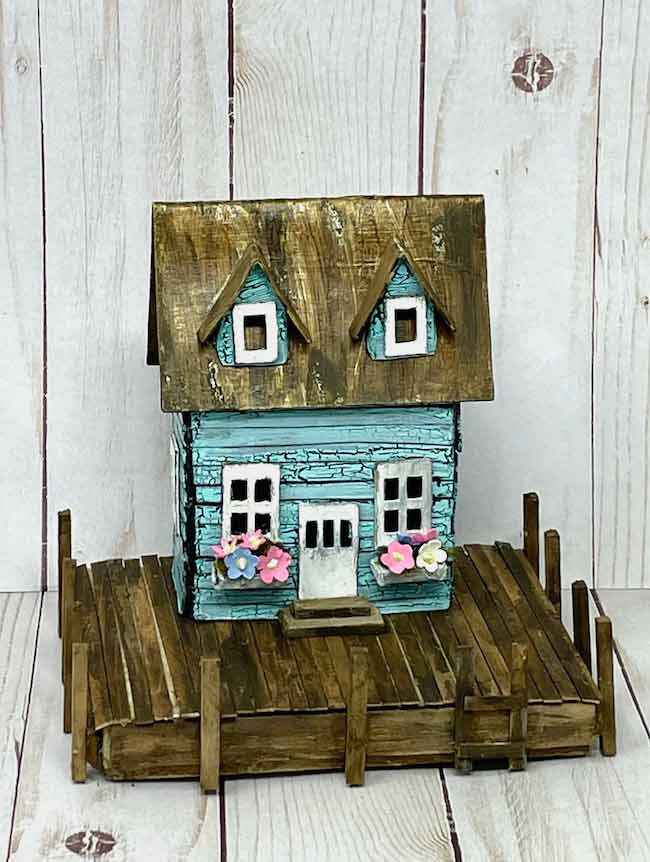
Here's how to the make the Sea Shack Miniature House, a distressed tiny house on the beach or even on a pier. You can make it with flower boxes if you like or you can make with distressed crackle paint or make it with beautiful, bright tropical colors. You get to choose how you want to make this adorable little cardboard house.
So what do you need to make the Sea Shack? Here's the materials list. This post contains some affiliate links for your convenience. Click here to read my full disclosure policy.
Table of Contents
Materials to Make the Sea Shack Miniature Paper House
- Cardboard
- Glue - Aleene's Tacky Glue works well
- Gesso Primer - I used both black and white gesso
- Paint colors for house, trim, roof, and dock or pier:
Tumbled Glass Distress Paint
Picket Fence Distress Paint
Ground Espresso Distress Paint - Colored card stock for flowers
- Free pattern for the Sea Shack - Design No. 116 - in the Paper Glitter Glue library May 2021
- A way to cut out the pattern - I used my Cricut Maker to cut the pieces
Materials for the Sea Shack Pier
- Corrugated Cardboard
- Hot glue
- Brown packing paper
- Paint
- Wood Coffee stirrers
- Balsa wood sticks
Instructions for Making the Sea Shack Miniature House
- Cut out the pattern - Design No. 116
- Prime the house pieces
- Make crackle paint siding, if desired
- Make dormers and flower boxes
- Paint house pieces
- Glue siding and trim to house
- Glue dormers to roof
- Assemble the house
- Make the base - dock or pier
- Glue the house to the dock and decorate
Related Links to Help You Make the Sea Shack:
And here is a video showing the important steps in making the Sea Shack.
For more details on making the Sea Shack, read below.
First, cut out the pattern for the Sea Shack
The free pattern for the Sea Shack is located in the Paper Glitter Glue library in the May 2021 section. It's Design No. 116 in the library. Just subscribe to my Paper Glitter Glue newsletter with the form below and you will get the password to the library right away.
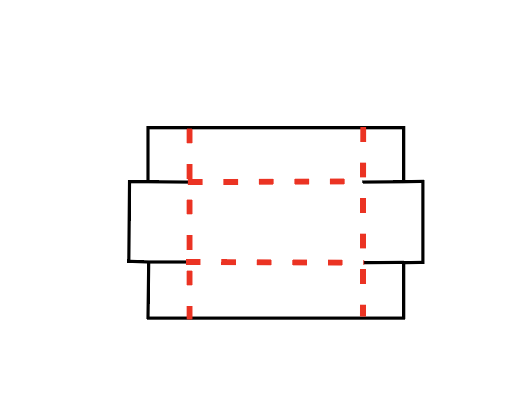
The Sea Shack pattern is available as printable PDF files and SVG files for an automatic cutting machine like a Cricut. Below shows the main piece of the Sea Shack. Note that there is a one inch square in the bottom right corner. That is to help you scale it if you print the PDF.
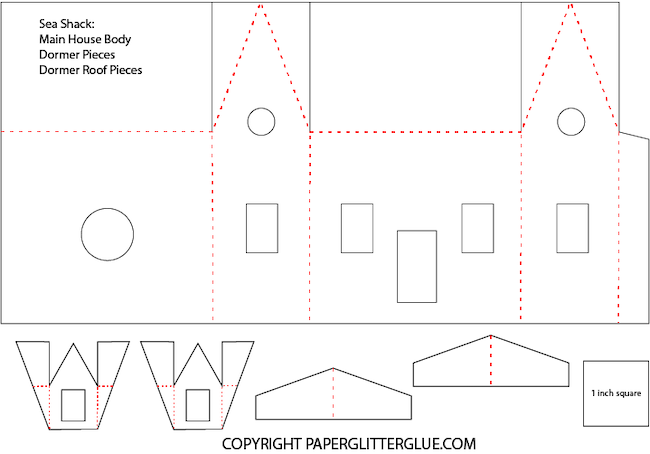
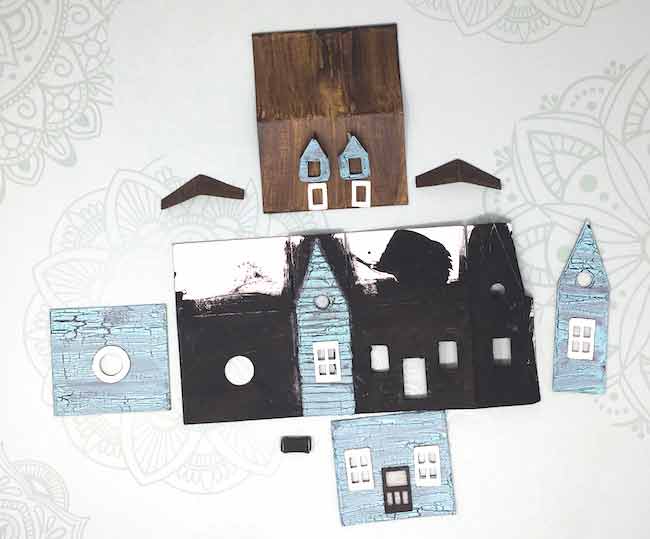
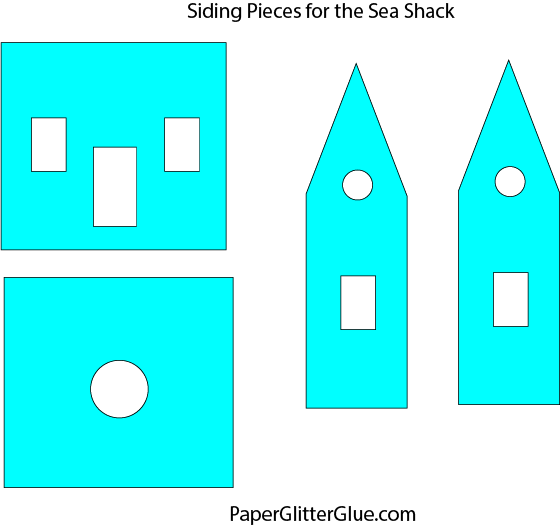
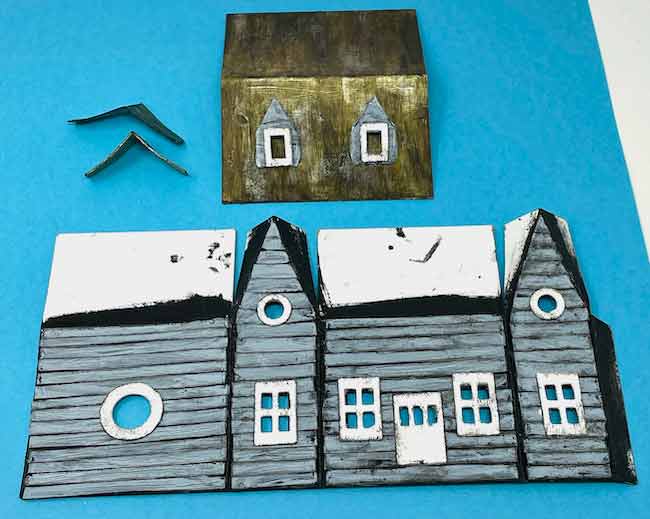
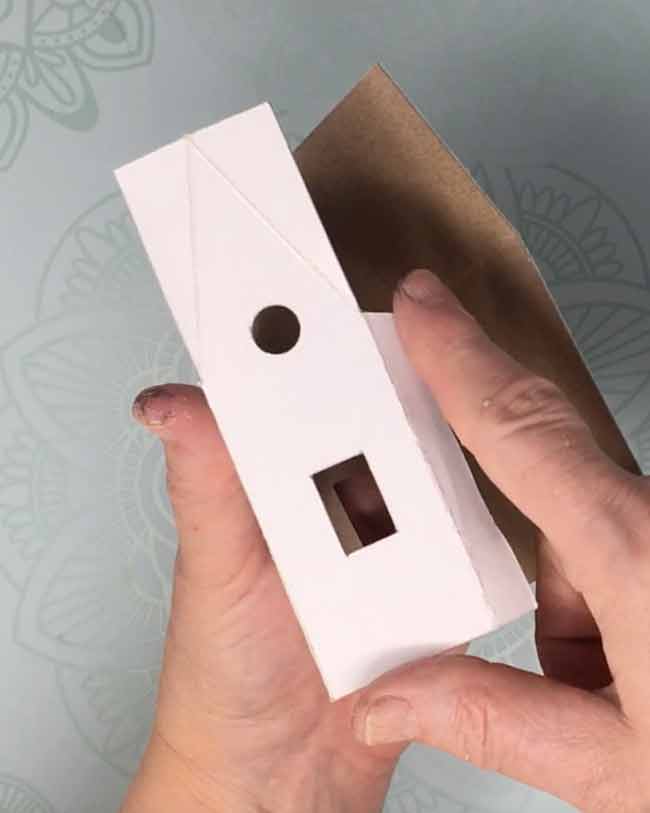
In the photo below, you can see all the pieces for the Sea Shack:
- Roof and dormer pieces at the top
- Crackle siding pieces
- Main structure of the house
- Windows
- Door
- Flower box
- Not shown - tiny flowers for the window box
For every one of my little houses, I try to simplify the pattern so if you are cutting by hand it is as easy as possible.
In addition, this little house is structurally simple enough that you can make it out of a heavy 140 lb. card stock. But my choice is using cardboard. My cardboard of choice is 30 pt medium weight chipboard (that's the way Amazon describes it). It cuts easily and scores nicely as well.
Next, Prime the House Pieces
If you make the house out of cardboard, you need to prime the pieces before you paint the final color or even before you add the siding. Obviously if you are using card stock, use the colors you want for your house.
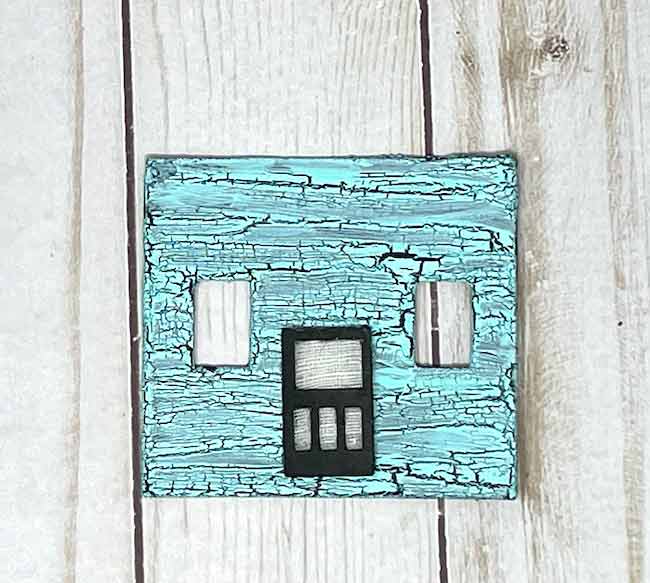
Since this house is designed for strips of crackled siding, I prime the house and dormers with black gesso to form the shadows between the strips of siding.
And for all the other pieces I used white gesso primer because I planned to paint them lighter colors.
Optional step: Make the crackled siding
One of my very favorite distress techniques is crackled siding. You can read about the simple, fun technique to make crackled siding in this post.
There's even a video showing how to make this crackled siding.
In addition, the pattern includes some pieces to make it easier to cut out the siding. Each piece is a section of the house only slightly smaller so it fits easily on the basic house structure.
After the pieces of cardboard are all "crackled", cut them in strips to adhere one by one to the house. Also, I like to edge each piece of siding with black paint or ink to make sure it has a good shadow and makes each piece distinct.
But you can use other distress techniques if you like. Here's my blog post on distress finishing techniques.
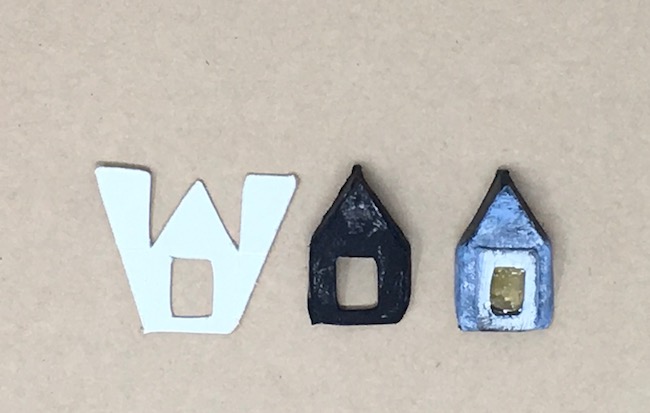
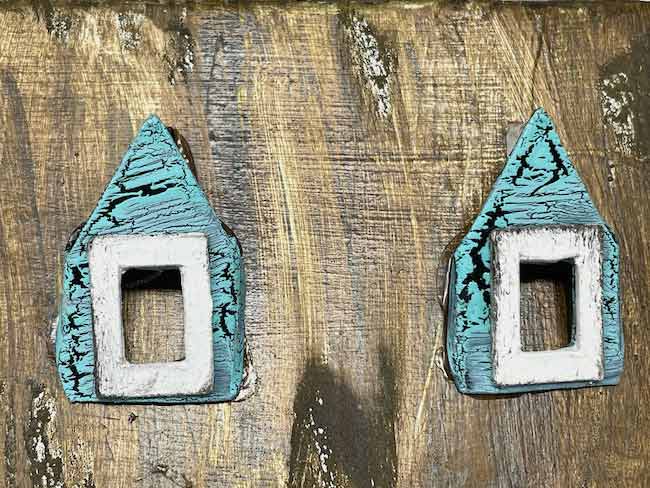
Make the Dormer Pieces and Flower Boxes
These two little pieces can be somewhat challenging to glue together. And that is because these pieces are tiny. That's the challenge.
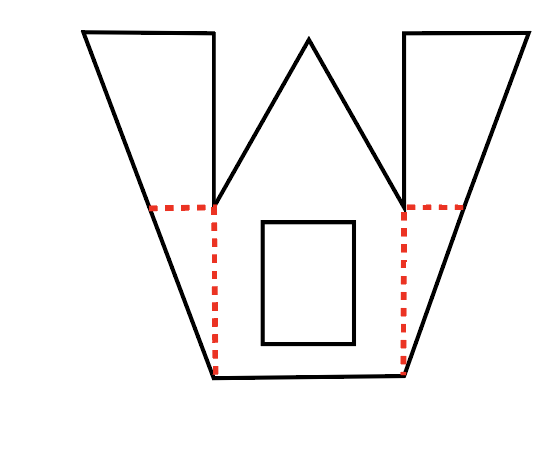
For the dormer, fold along the score lines and glue the roof flaps behind the front of the dormer.
To make the window box, fold along the teeny, tiny score lines. and glue the tiny little side flaps behind the end flap.
Paint the flower box whatever color you like. Then fill the box with some moss and glue tiny flowers to the moss. I've including a set of tiny flowers in the pattern if you would like to use them. Otherwise, you can use a small punch to make flowers or use dried flowers like Baby's breath.
Paint the Additional House Pieces
Next, paint the additional house pieces like the roof, dormer roof pieces, and the windows.
And you can even mimic a rusted roof with paint or use this rusted roof tutorial. For this house, I painted it with ground espresso brown distress paint. I like this brand of paint because it is goes on with a variegated look.
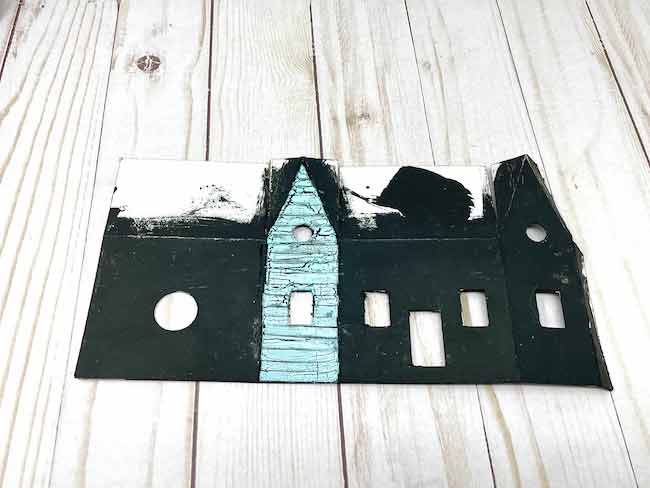
Now Glue the Siding and Trim to the House
You'll find that it is much easier to glue the siding to the house before you assemble the house. And once the siding is in place, glue the windows and door to the house next.
I had fun making a screen door by gluing some gauze to the door openings to the screen door option.
You can see below how I made one example of the Sea Shack with the siding glued on before assembly of the house.
Next, Glue Dormers to the Roof
And one other thing I discovered is that you can glue the dormers on the roof before you glue the roof in place. Really, dormers are much easier when the roof is flat. You can even glue the dormer roof pieces on before the roof is in place on the house.
Assemble the House
Now, you get to bring your little house structure together. Fold along the score lines and glue the side glue tab to the house.
Once that is dry, glue the roof tabs to the roof flaps.

And after the body of the house is dry, glue the roof to the little house by applying glue along the edges of the roof on the house. Also use painter's tape to hold the roof in place while the glue dries.
Make the base for the Sea Shack
To make a base that looks like a dock or a pier, first I make the standard base with 4 layers of corrugated cardboard hot glued together. Cover it with paper, paint it with a dark colored paint.
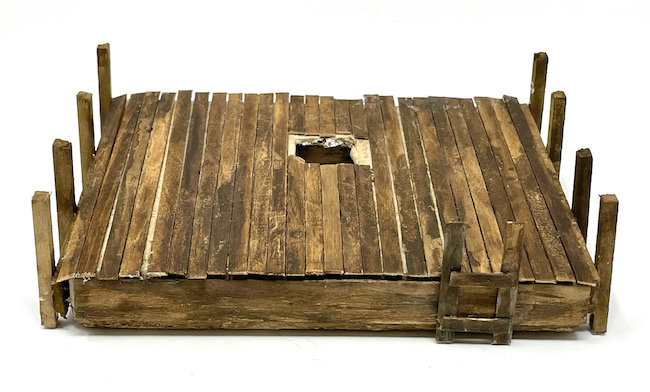
Use coffee stirrers for the deck wood. There are two advantages to coffee stirrers. First, they absorb the paint perfectly so it looks like real deck wood. And second, you can cut them so easily with scissors. But don't use the good scissors. Just get a cheap pair from the dollar store.
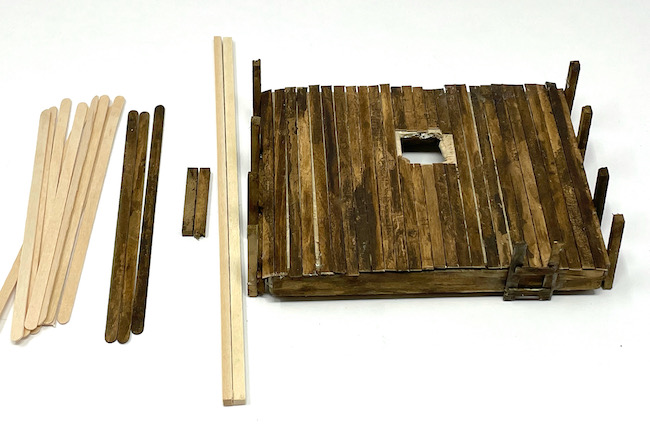
Before you glue the coffee stirrers to the base, outline the base with some balsa wood which is just as easy to use as coffee stirrers because they take paint just as well and can be cut with scissors.
Finally, Glue the House to the Base and Decorate
Once the house and the base are completed, glue the house to the base. I do that by applying a thick bead of glue all along the bottom of the house and adhere it firmly to the base.
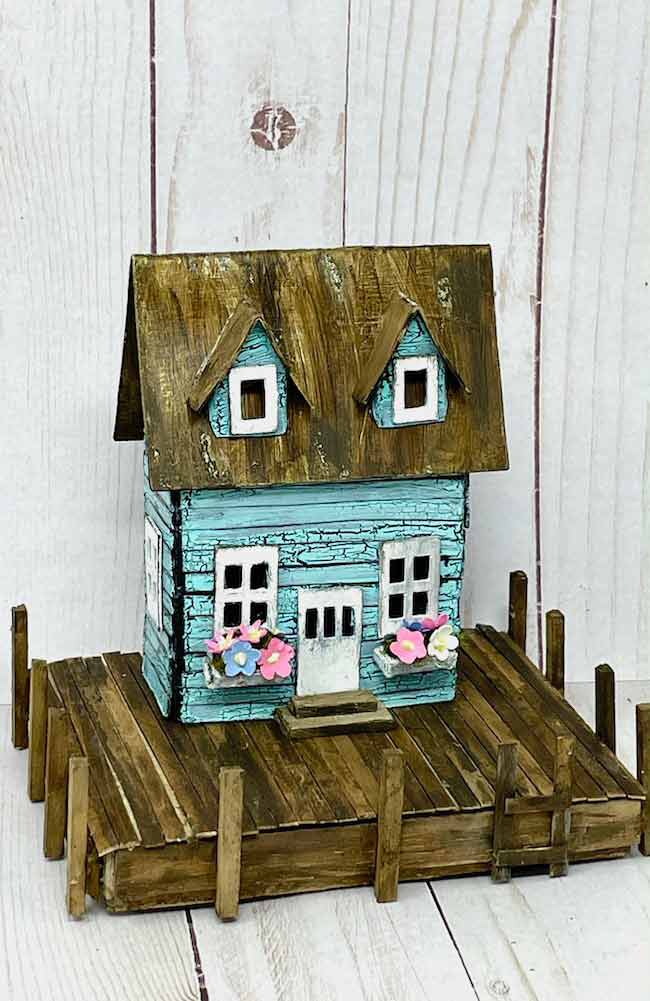
And there you have it!! The Sea Shack is done. Adorn it with little sea shells, life preservers, or whatever else you can think of to decorate the Sea Shack.
Carol made an incredible version of the Sea Shack that she called the Boardwalk Bungalows.
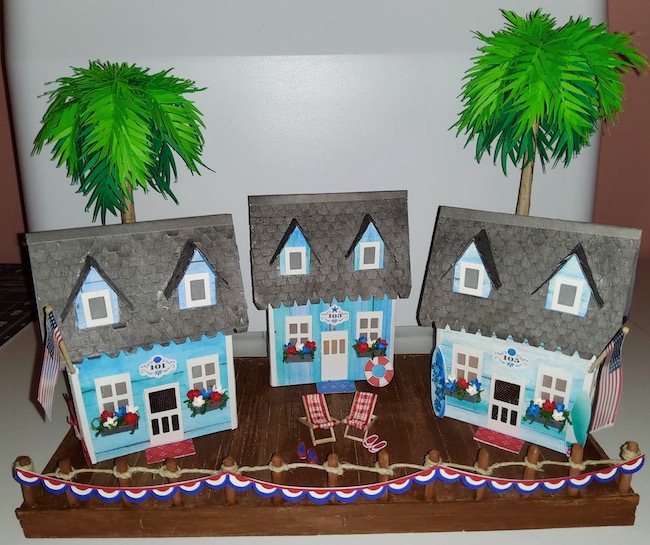
She used so many different elements in addition to the Sea Shack pattern to make this project. She wrote, "I would like to just give credit to Printable Cuttable Creatables for the banners, tropical flowers on the surfboards, shells on the door plaques and leaves on the trees. The bicycle is a design from Miss Mandee that I made as small as I could. The planter boxes are from the Silhouette store by Amanda McGee."
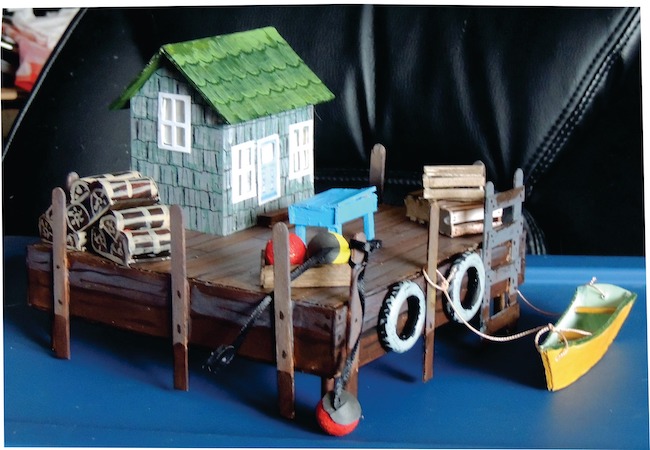
And here is the inspiration for this house - Jo Anne's Miniature Wharf House. She added so many great details - a tiny boat and lobster traps. Really - lobster traps!! So amazing. She posted it on the Paper Houses and Paper Crafts hosted by Paperglitterglue Facebook group. You are welcome to join.
If you have any questions, email me at [email protected]. I am happy to help. Take care.
Lucy
Deborah Mcginniss
This Isabel so cool, you do such creativas work!
Lucy
Thank you so much. I have really have fun doing this.
Lucy