How to make this Putz House Mansion using cardboard and paint and glue
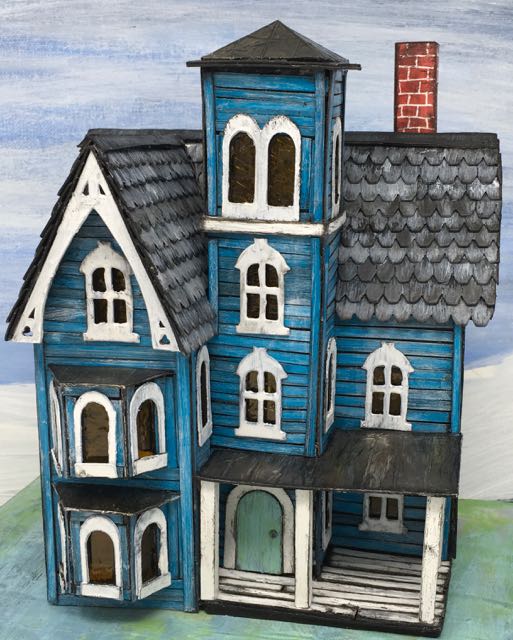
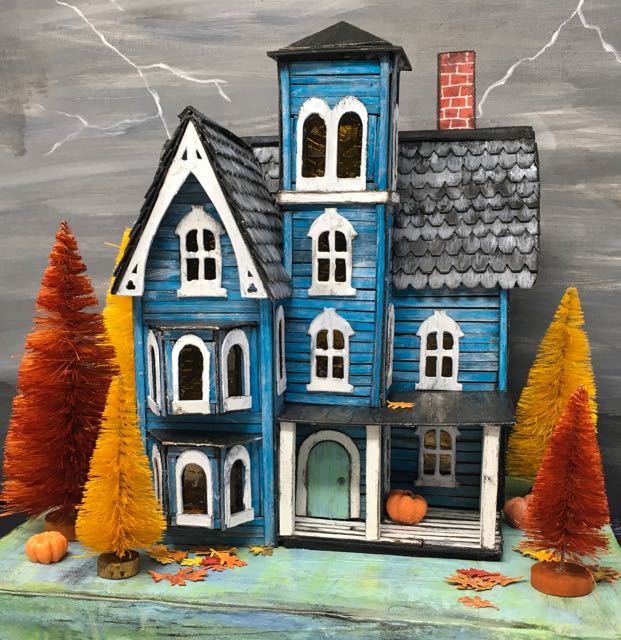
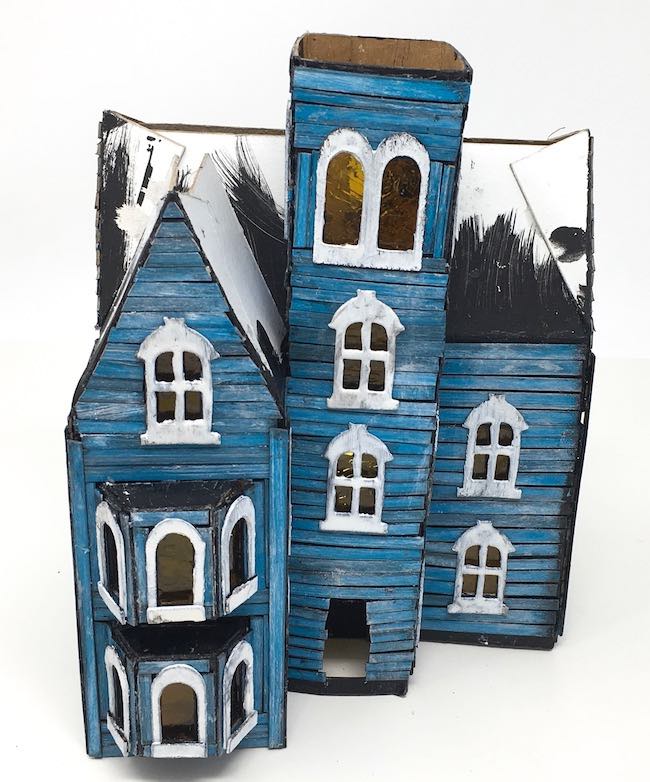
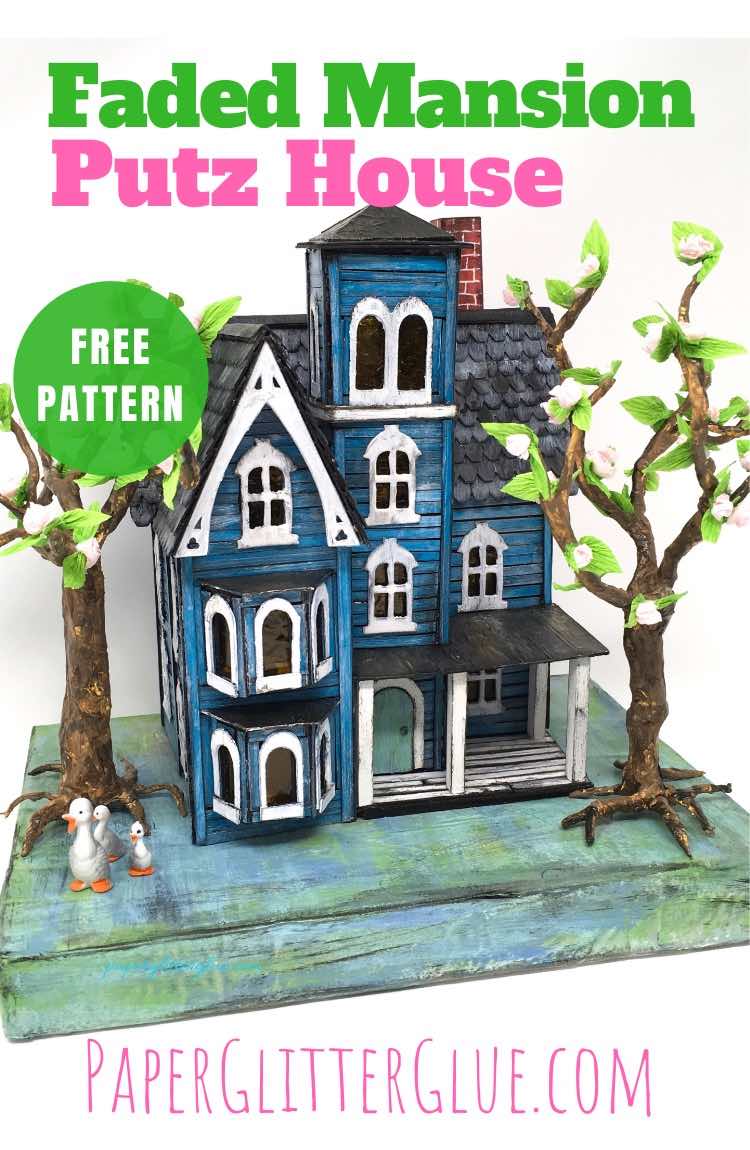
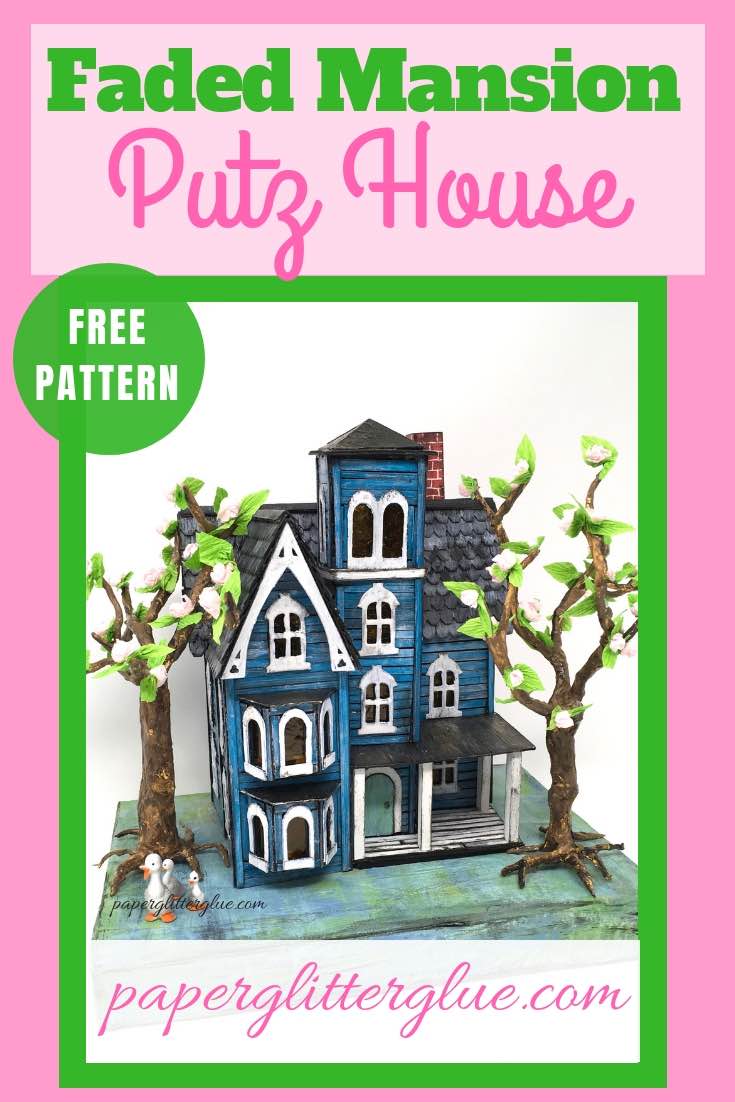
The house above is my most recent version of the Faded Mansion. It's called the Blue Moon Manor. You can get the free pattern from the Paper Glitter Glue library as Design No. 42. Just subscribe to my newsletter to get the password to the library and then download the pattern.
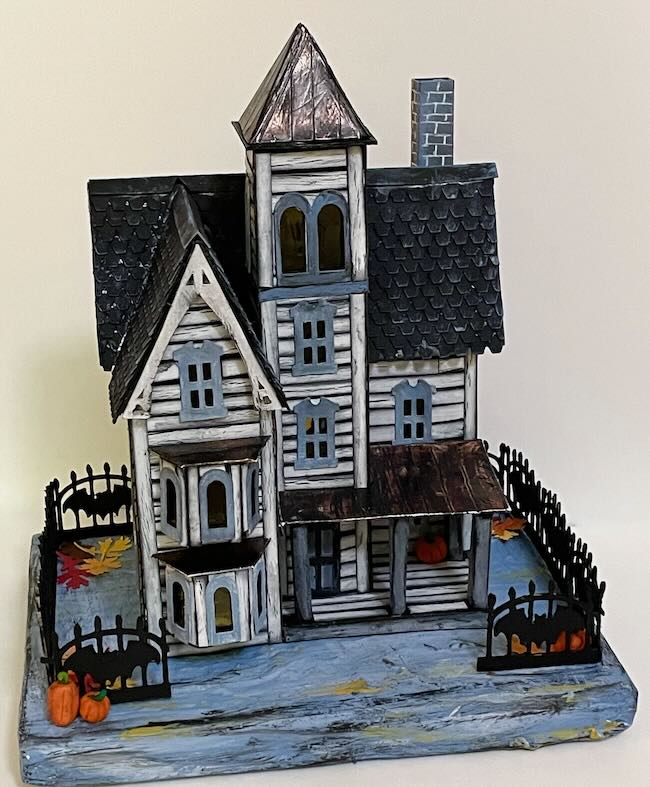
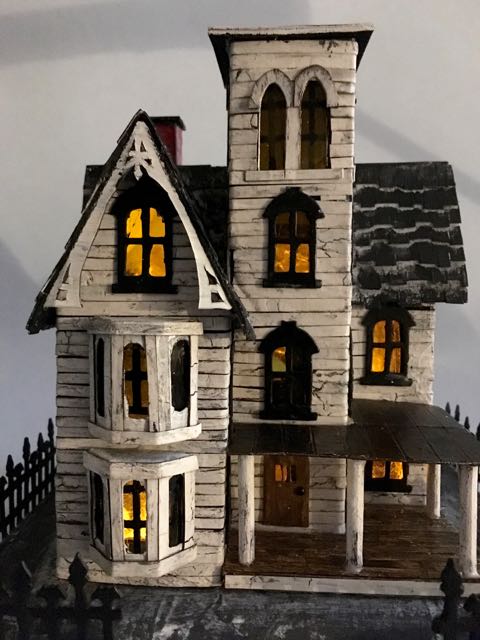
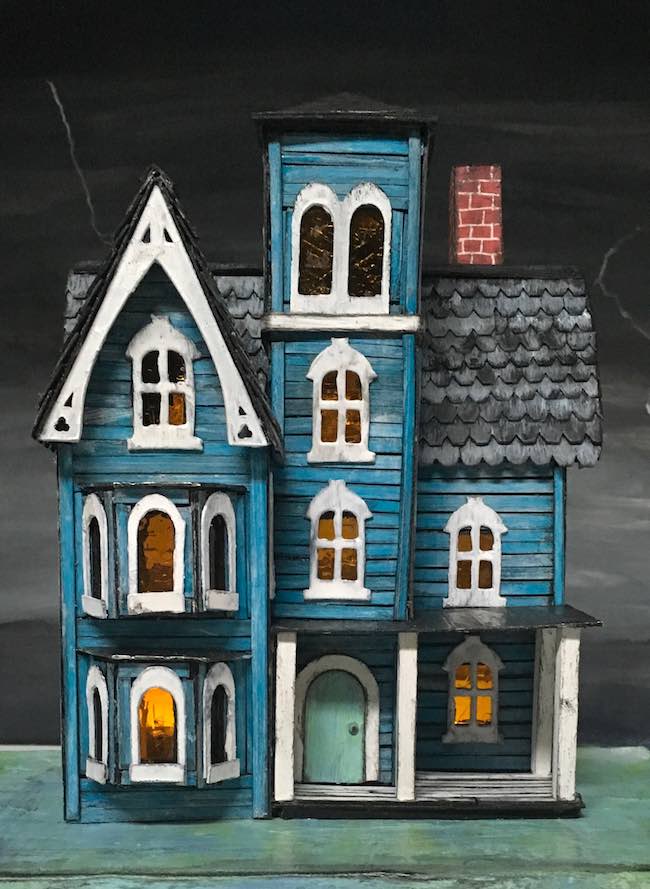
Now you can make this aged Victorian mansion Putz house based on a real house in Pennsylvania. The Abandoned Italianate Mansion is the first version of this little cardboard house made two years ago. Since then I've gotten lots of requests to make a pattern for this house. Finally, I have the pattern done which you can download for free from my Paper Glitter Glue library. This version is called the Faded Mansion because the house is past its prime and has acquired a faded, vintage patina.
You may recall that the Abandoned Italianate Mansion is based on a house in Coudersport, Pennsylvania called Old Hickory Inn or the F.W. Knox Villa. Happily, it is currently being renovated into a Bed and Breakfast.
Truthfully, this is house has a lot of steps but I've broken it down into doable steps. Adding siding and roof shingles makes it a little more complex, but mostly those details are a bit tedious rather than really difficult.
This post contains some affiliate links for your convenience. That means if you make a purchase after clicking an affiliate link, I will earn a small commission but it won't cost you a penny more. Click here to read my full disclosure policy.
So what is needed to make your Faded Mansion Putz House? Subscribe with the form below.
Materials for the Putz House Mansion:
- Downloaded Pattern - Design No. 42 - from Paper Glitter Glue library
- Cardboard
- Gesso primer
- Glue - here is my favorite glue for holding the house together
- Paint
- Distress Paints:
- Mermaid Lagoon
- Black Soot
- Picket Fence
- Fired Brick
- Mowed Lawn
- Tumbled Glass
- Iced Spruce
- Collage Medium - Crazing
- Glossy Accents Glue
- Alcohol Inks
- Acetate for windows
- Window dies - Village Manor
- Binder Clips
- Painter's Tape
- Embellishments of your choice
- Distress Paints:
Outline of Instructions to make the Faded Mansion Putz House:
- Download your pattern from the paperglitterglue.com library - Design No. 42.
- Cut out your pattern OR upload the SVG pattern to your automatic cutting machine design software.
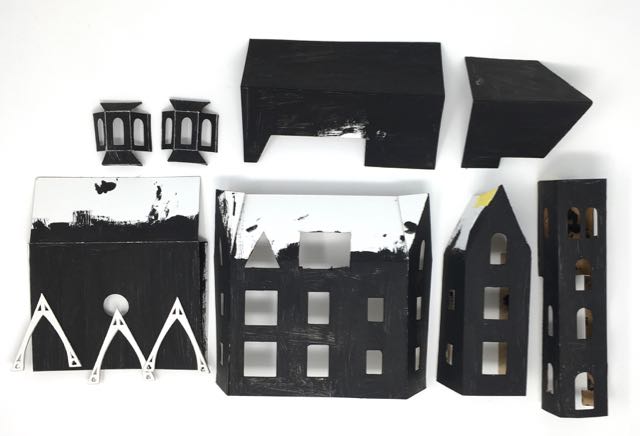
- Cut out the pattern for the Faded Mansion. Prime the cardboard pieces.
- Glue window material inside the house.
- Mark where the front tower and front extension will touch before you glue the siding on. Glue siding to the hard to reach areas.
- Fold at the scored lines to make the house shape. Glue roof tabs and roof flaps together for the house and the front extension.
- Apply glue to the glue tabs and glue the house together. Let dry.
- Glue the front extension in place.
- Glue the square tower piece together in the back.
- Once the front extension is securely in place, glue the front tower in place
- Test fit the roof pieces. Mark where the angled front extension roof will fit so you can add shingles to the roof before gluing it on.
- Paint and distress roof shingles. Glue on shingles on the roof pieces.
- Glue on the main roof. When secure, glue the angled roof to the front extension.
- Glue on the square roof to the tower and the steeple piece if desired.
- Glue bay window sides together. Add windows and doors to the house. Glue on the porch roof.
- Make the cardboard base for the house.
- Make the porch floor, apply wood flooring to the porch floor. Then glue the porch floor to the house and the base.
- Cut wood columns to support the porch roof. Glue in place.
- Decorate your Faded Mansion as desired.
How to Make Your Miniature Putz House Mansion
-
Download your pattern from the paperglitterglue.com library
There are two versions of this pattern in the paperglitterglue library. One is a zip file PDF version with 10 pages of printable patterns that you can use if you hand cut your cardboard. All the pattern pieces are labeled. There is also an outline of instructions on how to make the house.
The other version is a zip file of SVG cut files for those of you who use an automatic cutting machine like a Cricut Explore or Cricut Maker. It is also a 10 page file with instructions as well. But none of the parts can be labeled on an SVG file. So you may want to print the PDF file for reference.
-
Next cut out your pattern OR Upload the pattern to your automatic cutting machine design software
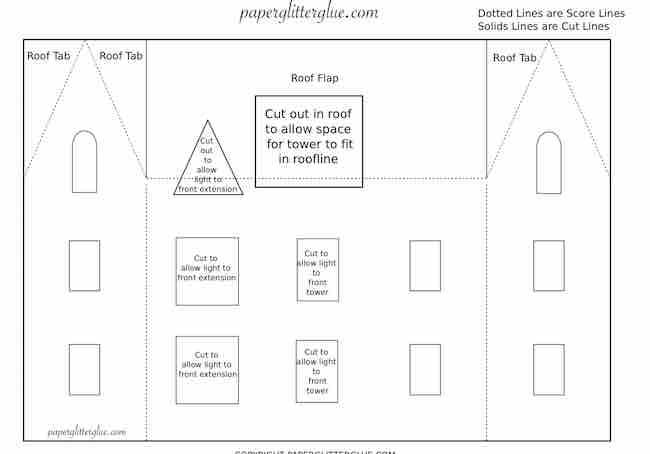
If you use an automatic cutting machine be sure to specify which lines are for scoring. On my patterns, the red lines are for scoring, they are also dotted lines on the SVG file, but I think that goes away when you upload it to your software. After you mark which lines are for scoring, make sure you attach those lines to the design. So always remember to change the red lines to score lines and attach to the pattern before you cut the pieces out on the SVG files.
-
Cut out the pattern for the Faded Mansion. Prime the cardboard pieces
When I make a miniature house with siding, I always prime the house structure with black gesso so any cardboard that shows through the gaps will be black and look like shadows. Here are a few examples of other little Putz houses I've made with cardboard siding:
Now is a good time to glue the window inside the little house before all the pieces are glued together. You can see the windows on the video below where I show how to glue the house together.
Here's an 11 minute video that explains the construction process for this miniature house:
Mark where the front tower and front extension will touch before you glue the siding on
To make the aged, distressed siding, I painted cardboard black followed by crazing collage medium to give a little texture, but not serious crackling, and then coated it with the main color - Mermaid Lagoon distress paint. I also dry brushed some white paint on the surface to tone down the color a bit. After I had the color I wanted, I cut the cardboard into ⅛ inch strips. Then I edged each strip in Black Soot Distress Paint.
You can add siding before you glue the entire house together. But what I did was added siding to the areas that would be very difficult to reach when the house was glued together. The most challenging piece is the front tower because of how it intersects the rooflines and the front extension.
Fold at the scored lines to make the house shape
Most often the houses I make fit on one 8.5 x 11 inch piece of cardboard, but because of all the details I included on this house, I made it bigger. So the main body of the house - the front and the two sides - are 9.5 inches wide. The back is a separate piece that inserts into the sides of the house. You can see that in the video.
Apply glue to the glue tabs and glue the house together
I like a really thick, strong glue called Aleene's Fast Grab (now I recommend Aleene's Quick Dry Tacky Glue since it is easier to use) for this purpose.
Glue roof tabs and roof flaps together for the house and the front extension
After you glue the house together, glue the roof tabs to the roof flaps. The purpose of the roof flaps is to help maintain the structure of the house, really to help keep the corners square.
Glue the front extension in place
When the main house structure is glued together, glue the front extension in place before you glue the tower to the house.
Glue the square tower piece together in the back
Glue the tab in the top back of the tower piece so make a square. This part inserts into the cut out on the roof.
Once the front extension is securely in place, glue the front tower in place
Now you can glue the front tower in place. Fit it securely in the roof cut out section. Sometime you have to trim it to fit because the thickness of cardboard varies. You may notice that my tower is just a little crooked. It leans a little to the right. Unfortunately, I didn't notice it until the glue was set.
Test fit the roof pieces. Mark where the angled front extension roof will fit so you can add shingles to the roof before you glue the roof on.
Put the main roof in place then test where the front roof extension will touch the main roof. Draw a line around that area. When you apply shingles, leave the triangle empty so the front roof extension will fit nicely in that space.
Oh, that funny rectangular piece of cardboard on the roof between the tower and the front extension is to prevent a gap from showing there.
Here's a brief video that shows progress on the house before the roof pieces are attached. Shingles have already been added though.
Paint and distress roof shingles. Glue on shingles on the roof pieces.
Next you paint the roof shingles. Of course, you have other options on your roof rather than shingles. I just like the way they look, but I must admit that it is time-consuming to both cut them out, paint them and glue them to the roof. Fortunately, you can apply the shingles before you glue the roof down. That makes it SO much easier.
To make the shingles look like slate I painted them with 3 layers of paint - first black, then a grey blue paint called Iced Spruce Distress Paint, followed by dry brushed Picket Fence Distress Paint.
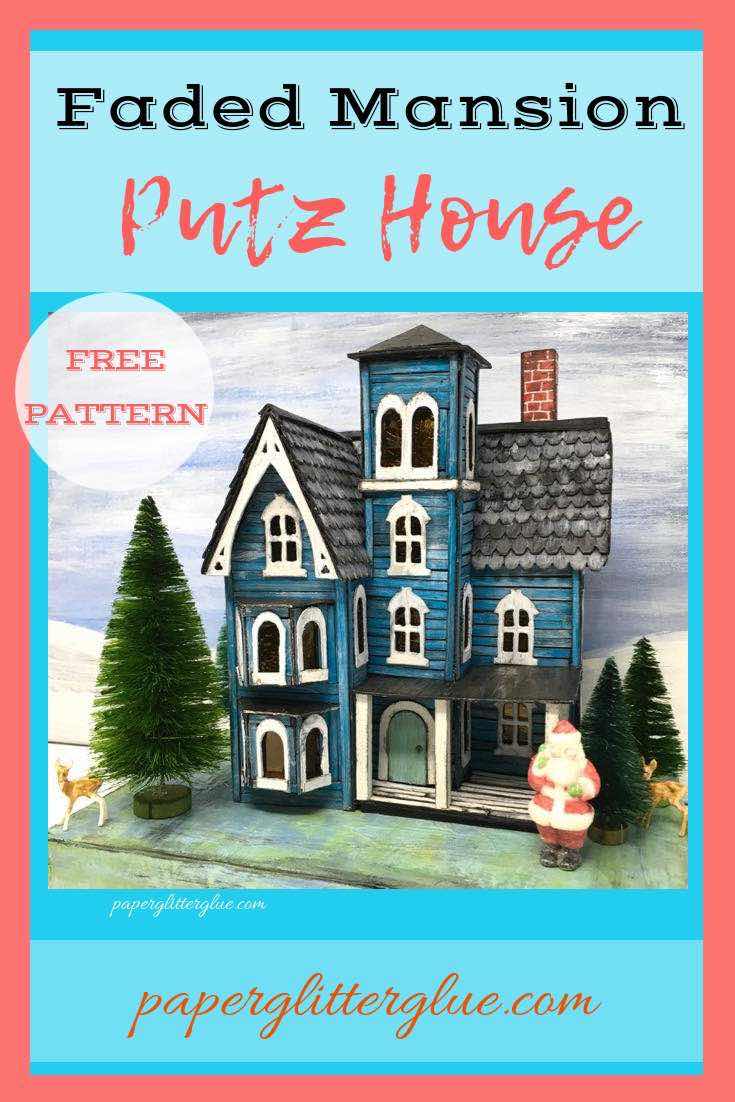
For a simpler roof, just paint the roof whatever color you desire. If you are turning this into a Christmas house, snow is a great option to cover and gaps that might be present between the tower and the roof.
And then a metal roof is always fun too. Here are some examples of metal roofs on some of my houses:
Sea Worn Beach House with tutorial to make a rusted roof
To simply things a bit, I did make the porch roof, the tower steeple and the bay windows roofs out of metallic tape. I distressed them without making them too rusted. Remember this house is supposed to be past its prime, but not abandoned.
Glue on the main roof. When secure, glue on the angled roof to the front extension.
Once the roof shingles are on, glue the main roof in place. When that is secure, glue the front extension roof on. It doesn't always happen, but the two pieces fit together nicely with no real gaps in the shingles.
Glue on the square roof to the tower and the steeple piece if desired
The pattern includes a 2 x 2 inch square piece for the tower roof. If you want, you can add the shallow steeple on top. The real house that this house is based on has something on top of the roof, but I haven't seen good photos to see what it looks like so this is my interpretation. Here's a link to the Facebook page for the renovation of the F.W. Knox house.
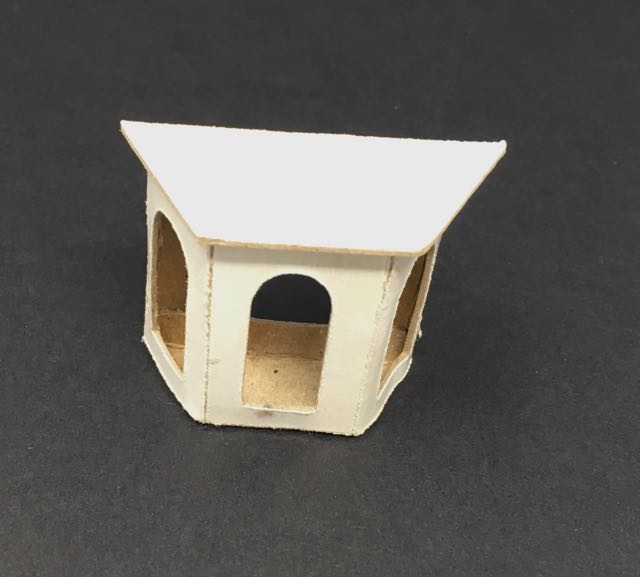
Glue bay window sides together
To be honest, the bay windows are flat out a pain to glue together. I modified the pattern after my first attempt so it would be a little bit easier. And it is, but it is still a pain because the folded pieces are so small. Be sure you have good score lines before you try to assemble the bay windows. Prime your cardboard, then glue the window material behind each window before you glue them to the little house.

Add windows and doors to the house
Distress the doors and windows before you glue them to the house. I made them just like I did the rest of the house - prime the cardboard with black paint, a little Crazing Collage Medium, the main color and edging with Black Soot Distress Paint.
In the pattern you may notice that I omitted a pattern for the shingles, the bigger windows and the door. That is because I used my favorite dies to make these parts.
Here are the Sizzix dies that I used:
- Bigz XL Die Village Manor Windows
- Thinlits Die set Village Fixer-Upper Door
- Bigz Die Village Rooftops
For the window frame on the bay windows, I cut a few extra copies of the arched windows that are in the patterns and cut them down to fit these slightly shorter windows.
Add the gingerbread trim to the gable ends of the Faded Mansion Putz House
One cool detail on the Coudersport PA house is the gingerbread trim at the end of each gable of the house. On my first rendition of this house, I hand cut the trim. For this house I was able to design the trim as an SVG file and my Cricut Explore Air 2 cut it out for me. That was a very nice thing. I actually cut out 6 pieces and glued two together to make the trim stronger.
There is a bit of trick to glue the trim in place. It needs a little backing to make it easier to adhere to each gable eave. My solution is to add a thin piece of cardboard to the gable end that is inset enough to support the trim. The photo isn't great, but you get the idea.
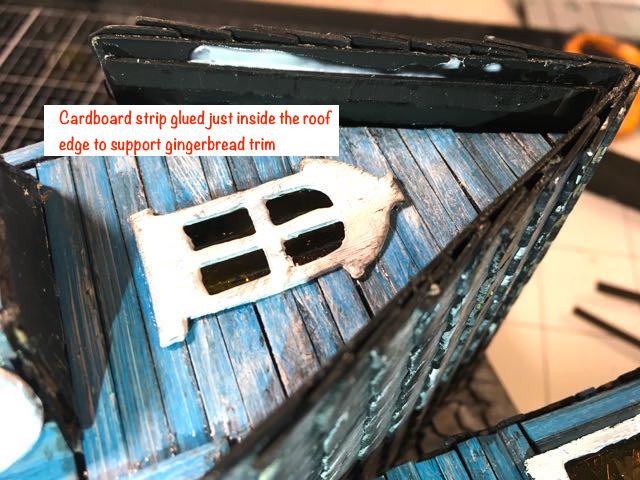

I also had to hold the ends of the roof inward for a little while to help the trim stay in place while the glue holding the gingerbread trim dried.
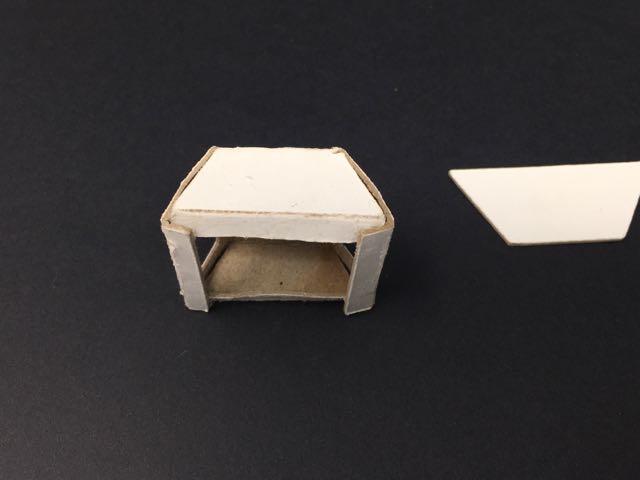
Glue on the porch roof
First score the cardboard piece for the porch roof and test fit where you would like it glue it to the house. Mine is about 2.25 inches high measuring from the base of the house. That way the roof fit nicely around all the windows. I did trim the side flap to fit over the lower level tower arched window.
Next cover the roof with metallic tape. Score the tape to look like a metal roof, then use alcohol inks to age the metallic tape. I just found a new alcohol ink that makes a great roof - it's the Ranger Gunmetal Mixative ink. I mixed it with some yellow ink and then streaked Black Soot Distress Paint on top.
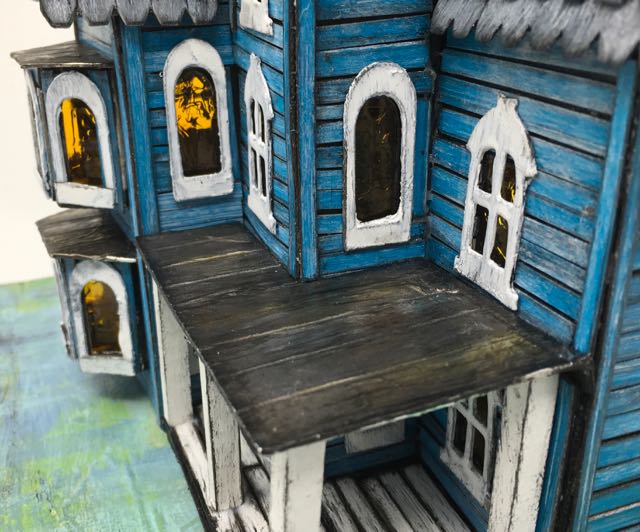
Now glue the roof in place. I do this part of the porch first because it is easier to adhere before the house is glued to the base.
Make the base for the Faded Mansion
Now that the house is basically done, you need to make the base for the house. Since this post is so long I published the instructions on making a cardboard base for this house in a separate post on the blog. That way I can go into more detail on making a good cardboard base for your Putz house mansion.
Glue the house to the base
Once the paint is dry, you can glue the house to the base.
Make the porch floor, apply wood flooring to the porch floor. Then glue the porch floor to the house and the base.
Trace around the house and cut out corrugated cardboard for the porch floor. Then I edge it with some black cardboard and glue those 2 layers together. After it is in place, then I add the distressed wood floor.
Cut wood columns to support the porch roof. Glue in place.
Usually I cut the wood columns to support the porch roof after I have both the roof and floor already glued in place. If I do it this way, I seem to measure a the columns little bit better when I do it this way. You could construct the porch as a free-standing porch and then glue the entire porch to the house in one step. That is another option.
Decorate your Faded Mansion as desired
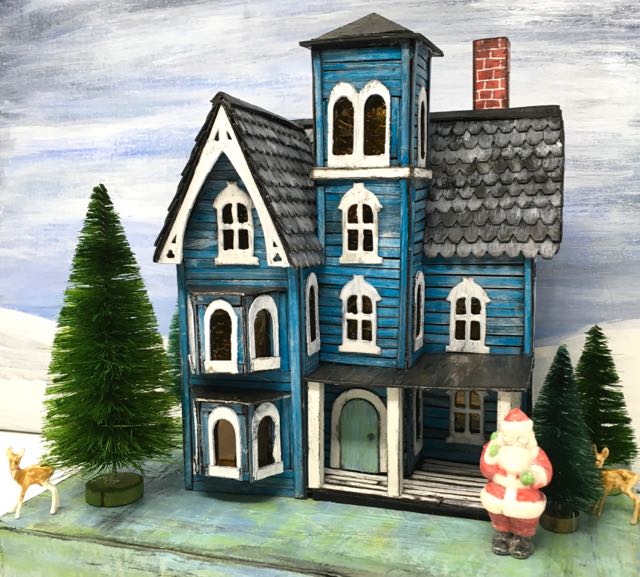
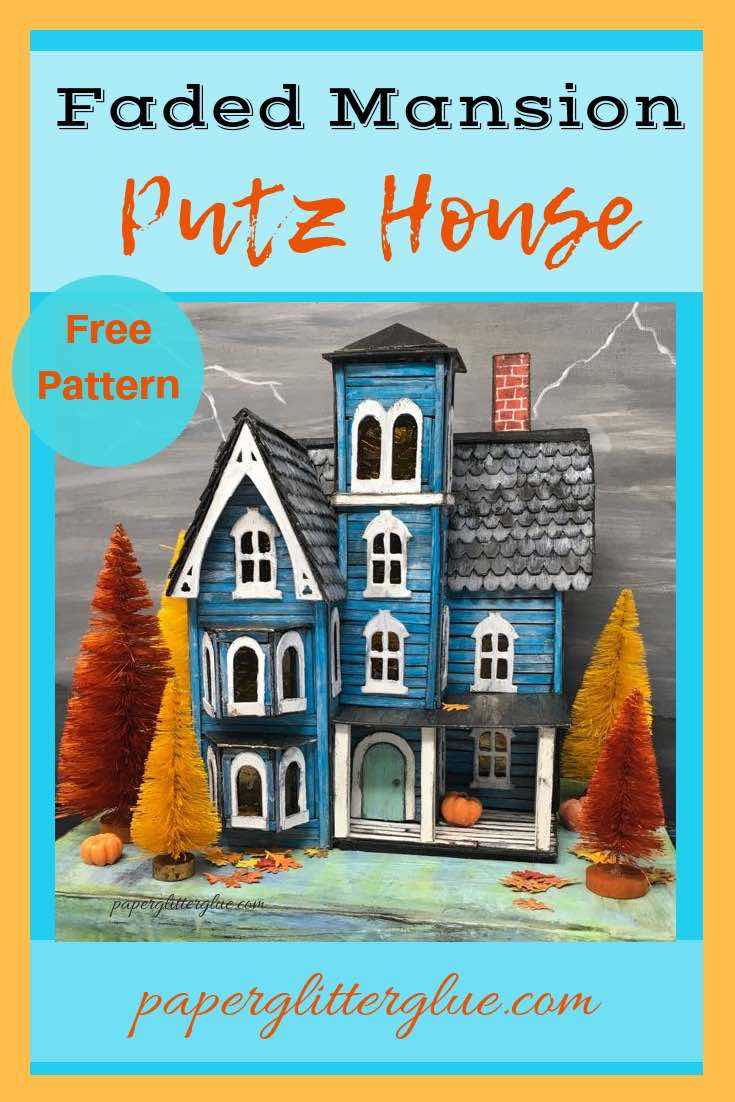
Mostly I left the house unadorned because I want to dress it up for different seasons by using different colors of bottle brush trees and other seasonal adornments.
Sometimes I enter my projects in online craft challenges when the project fits. Well, this week's Simon Says Stamp Monday Challenge is "Alcohol, Drinks or Inks". While there are no drinks in my little house, I did use a number of alcohol inks - mostly Ranger's Fixative Gunmetal Alcohol ink on the roof pieces. I also used alcohol inks on acetate for the windows. So I will be entering the Faded Mansion cardboard house in this week's challenge.
Tami
I go through Coudersport on my way home to Ridgway, PA. It is fun that this is based on the house there. I even think I know which one it is. I'll have to look more closely next time I go home.
Lucy
The house is behind a bowling alley, I think. They are doing an incredible job saving the house because it is certainly worth saving. The house was known as the FW Knox villa for awhile.
Diana
Do you have a svg pattern for the porch floor?
Lucy
Diana,
Yes. But at first, I didn't make a pattern initially because sometimes the angle is kind of funny depending on how the middle tower fits. Often it is a little crooked. Also at the time, I didn't know how to cut corrugated cardboard on my Cricut.
So I just trace around the the base of the house and cut an L-shaped piece out of corrugated cardboard and then cover it with crackled paper.
But I just looked at this pattern and there is a porch floor on the section bay windows, porch, tower, and steeple. I am making a new pattern that has all the pieces on it to make everything easier to find.
Beth
Can't wait to do this one, my grandpa's family is from Coudersport, PA.
Sara Emily Barker
I've already had the pleasure of watching you assemble the house in your video, and just read through your post on how you've added the details. I have to say your windows are so amazing (as is everything, but they just caught my eye this time). I love the gingerbread detail, porch flooring and metal rooftops. Amazing work, my friend! Continuing to pray for your brother. Hugs.
Lucy
Thank you for watching the video, Sara. Since this house is a little more complicated, I thought a video might be helpful. I like the wavy glass windows especially since it's all recycled material that I would throw away otherwise. Still working on developing video skills. I haven't figured out how to edit YET, but I will.
Jennifer
What a great house. There is a mansion local (The King family mansion) that I wish someone would save... sigh. Glad to hear that your brother is doing better, but sounds like he has a long way to go yet. Prayers for him and your family. Ready for spring crafts as well. I've been lost for a while, but feeling better after finally being diagnosed with Lyme disease. Hoping to finally start crafting again. Spring is my favorite season. Everything seems to be new again, the air smells fresh, the creeks are icy cold, but clear. Tomorrow it is going to feel like 10 to 30 below zero with the chill factor with a danger of frostbite in 20-30 minutes... yep, I'm ready for spring. Love your blog. You truly inspire!
Lucy
Lyme disease is a serious pain, mostly because it is tricky to diagnose unless you are lucky and know you were exposed to deer ticks, live in the Lyme area, and have the classic rash. Then it can be tricky to treat as well. I had a patient from Connecticut who had bilateral Bell's palsy and we were able diagnose her with Lyme disease only because she was from an endemic area and had an extremely unusual symptom for a child. I am working on the Spring crafts right now. Thank you for stopping by and your kind words. Lucy
Gretchen
SO glad you're back!
Lucy
Thank you so much, Gretchen!
Kelly Schirmer
This is amazing! What tiny treasures you have create, incredible designs!!!!
Lucy
Thank you, Kelly.
Lorraine A
Oh my goodness how fabulous is this!! I love these houses!! Absolutely GORGEOUS!!! they must have taken ages to make but so well worth it! WOW!! 🙂
thanks for joining us on the Simon Says Stamp Monday Challenge
Luv
Lols x x x
Lucy
Thank you, Lols. I am so glad you like it. My projects generally take a lot of time so I don't get to join the Simon Says Stamp Monday challenges very often. I hope to do better soon. Lucy