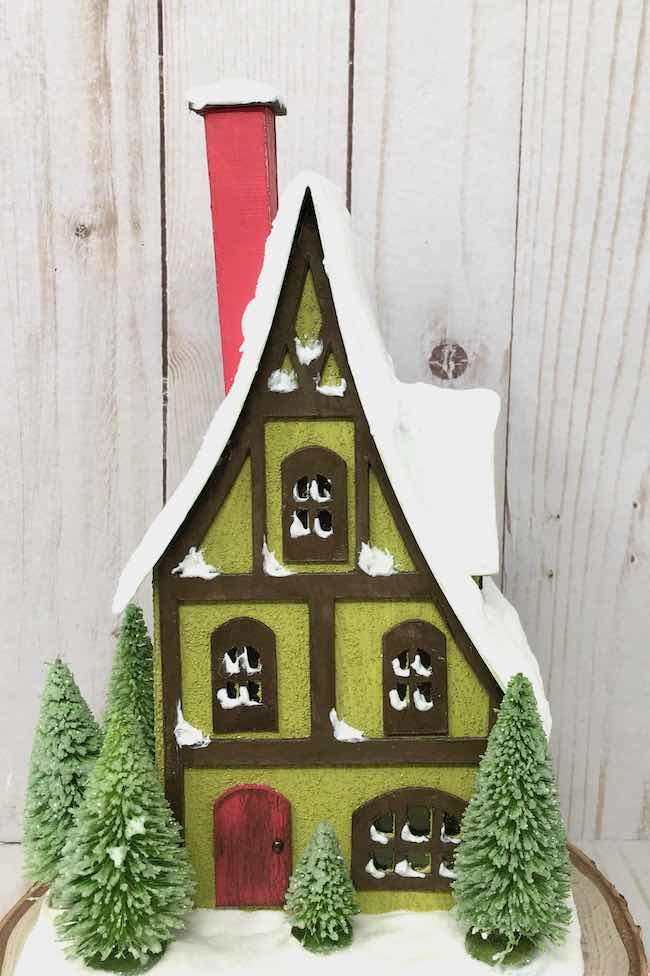
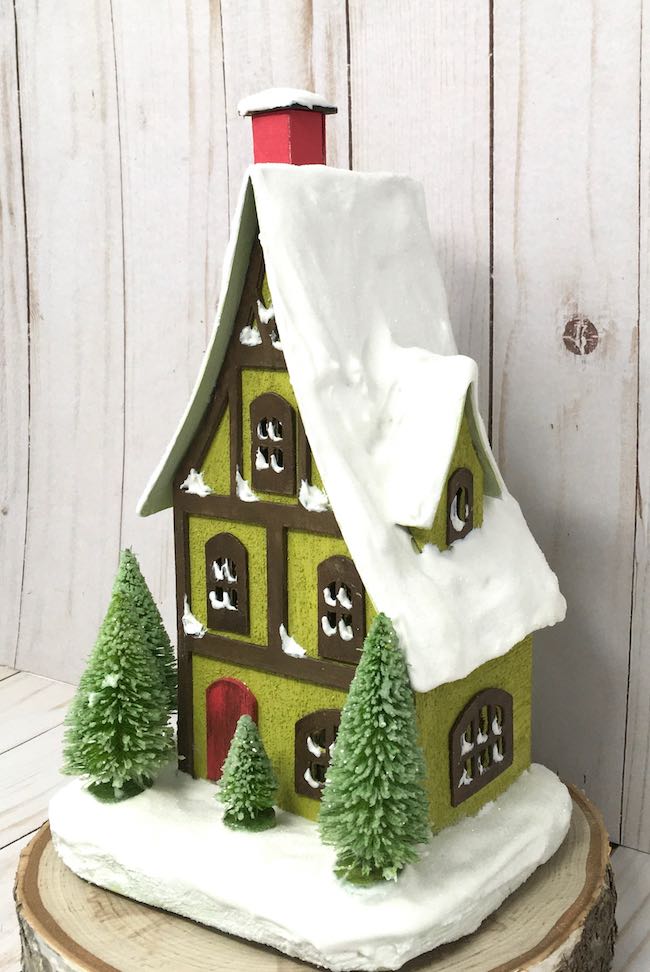
The Storybook Holiday Cottage is done. I've been working on some variation of this little cardboard house since July. Finally, I came up with a version I really like. This is the 10th in the 12 Day Craft-Along Holiday series.
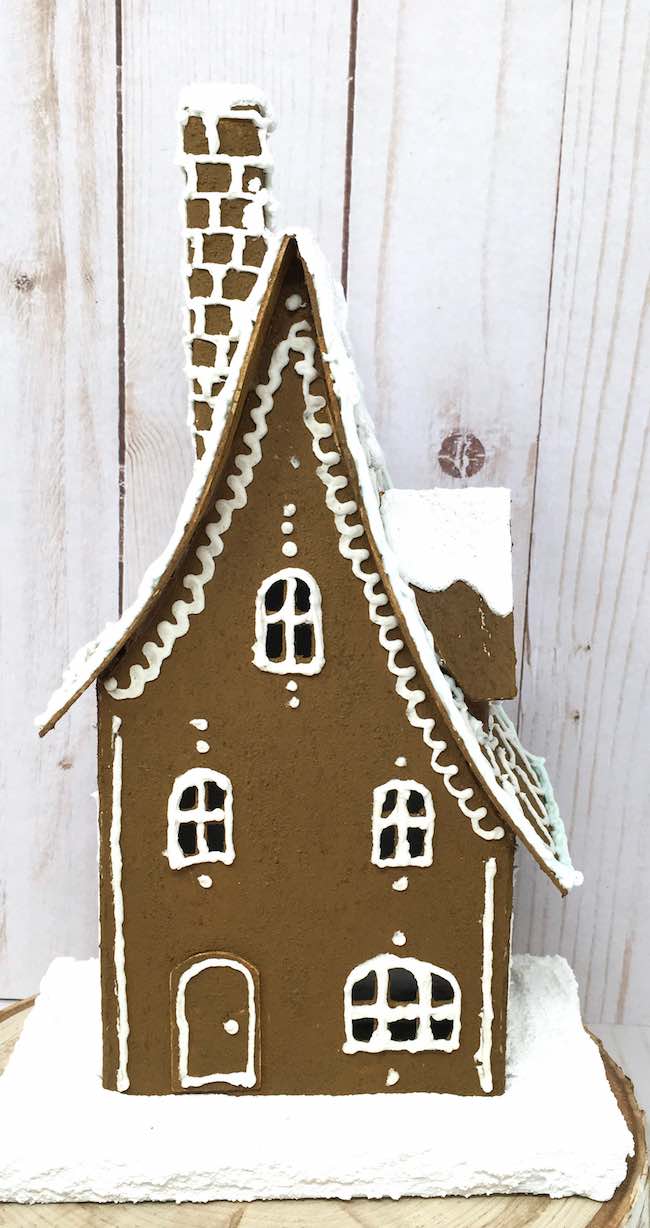
Here is the July version of the Storybook Cottage as a Gingerbread house
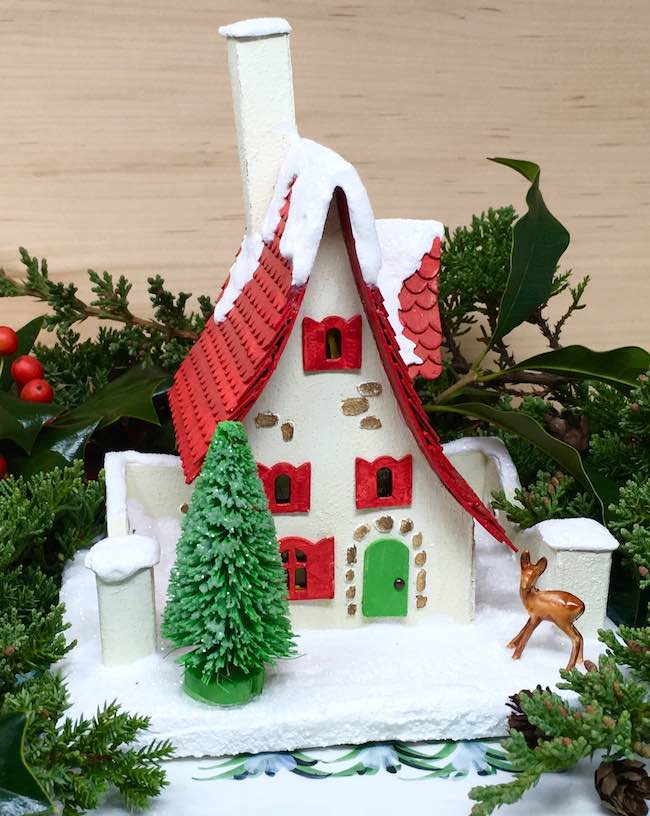
Red Roof Holiday Cottage has the same shape roofline
Well, the Storybook cottage actually has a longer history than July. It's actually a larger variation of the Red-Roof Holiday Cottage with a few tweaks. Often I hear people ask for larger paper house designs so they can make one single showcase house. So that is also part of the impetus behind making this cardboard cottage. The Storybook cottage is about 8 inches high, 2.5 inches deep and about 4 inches across the front.
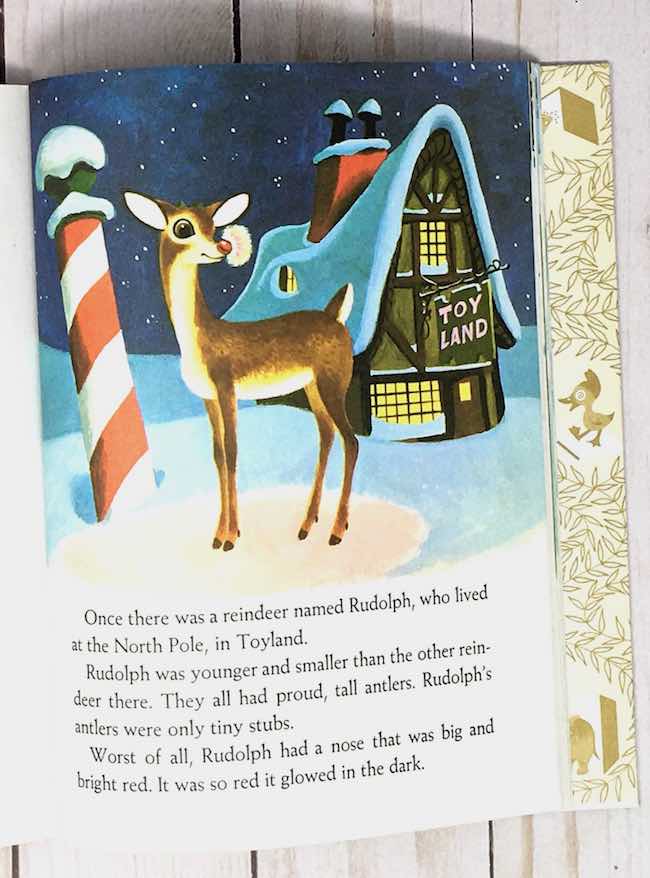
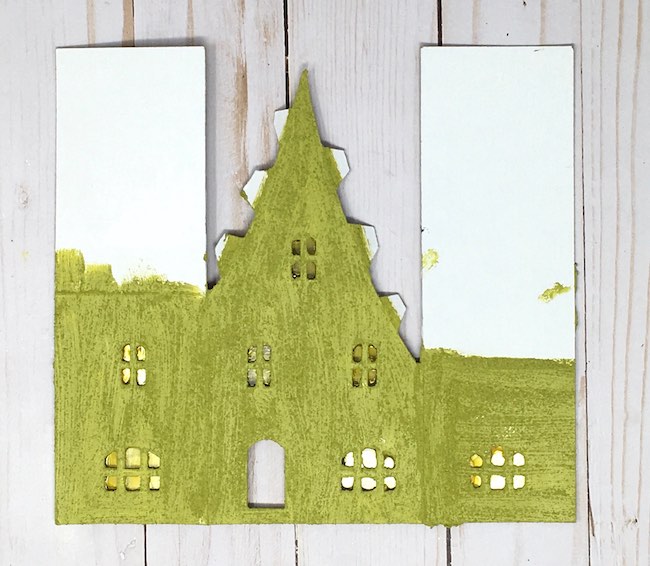
Now I need to explain a little bit about the color of the house. When I saw this drawing from the classic Little Golden Book, "Rudolph the Red-Nose Reindeer" illustrated by Richard Scarry, I said, this is the color I will use. But what is problem? I didn't have a green color exactly like that. I figured I had one close enough, but it's slightly too yellow-green instead of dark green, but it still looks pretty cute.
And if you want to paint it with gingerbread paint for a different look, check out this video on making gingerbread paint.
Here's how to make the Storybook Holiday Cottage.
This post contains some affiliate links for your convenience. Click here to read my full disclosure policy.
Materials for the Storybook Holiday Cottage
- Cardboard
- Corrugated cardboard for base
- Glue - you need a pretty strong glue for this structure - I used Aleene's Fast Grab and Quick Dry Tacky Glues
- Gesso
- Paint
- Fine craft sand
- Mod Podge
- Ranger Clear Rock Candy Dry Glitter
- Window backing - recycled acetate packaging for me, translucent Vellum paper is also good choice
- Glossy Accents Glue
- Yellow Alcohol Ink
- Snow to cover the roof - options:
- Snow-Tex
- Aleene's True Snow
- Aleene's Glitter Snow
- or make your own with Light Molding Paste (directions below)
- Decorations for the Storybook house such as bottlebrush trees, Christmas figures
- Pattern to make the Storybook Holiday Cottage from the PaperGlitterGlue library (Design No. 107 - it's free!)
Steps to make Your Own Storybook Holiday Cottage
- Get the free pattern for the Storybook Holiday Cottage - Design No. 107
- Cut out the cardboard pieces for the cottage
- Prime and paint the cardboard
- Adhere the windows, door, and trim to the cottage
- Glue the back piece in place to construct the cottage
- Next, glue the roof in place
- Add chimney and dormer, then dormer roof
- Apply snow to roof - lots of snow
- Make a base for the cottage
- Glue the cottage to the base
- Decorate your delightful Holiday cottage
- Extra - make the Gingerbread version of the Storybook Cottage
First, get the free pattern for the Storybook Holiday Cottage
So here is how to get the free pattern for the Storybook Holiday Cottage. Simply go to the Paper Glitter Glue library and type in the password to get the pattern. All my designs and patterns are listed chronologically. So locate the Storybook Holiday Cottage pattern - Design No. 107 - in the December 2020 section of the library.
And how do you get the password to the library? Just subscribe to the Paper Glitter Glue newsletter with the form below and you get the password immediately. I also will send it to you with every email. Well, almost every email, sometimes I forget.
The free pattern is available in 2 formats - SVG for cutting machines, and as printable PDF files whichever one is most convenient for you.
Updated Storybook Holiday Cottage now includes a Halloween Version
Note: I updated the pattern to include a Halloween version with different windows to make the pattern more "Halloweeny". I've even done a YouTube live that shows you how to make it.
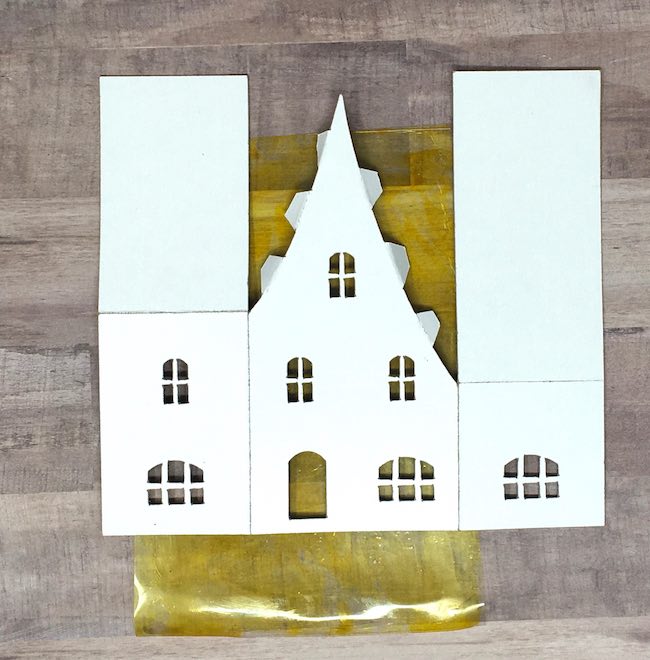
Cut out the pattern pieces for the Holiday Cottage
If you use the SVG file and Cricut Design Space, all the score lines are already designated and attached for you.
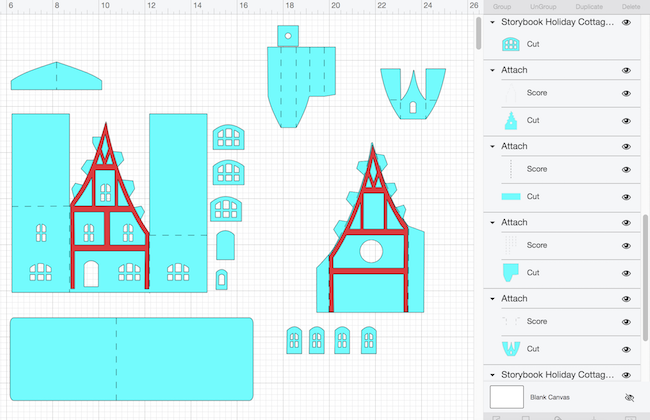
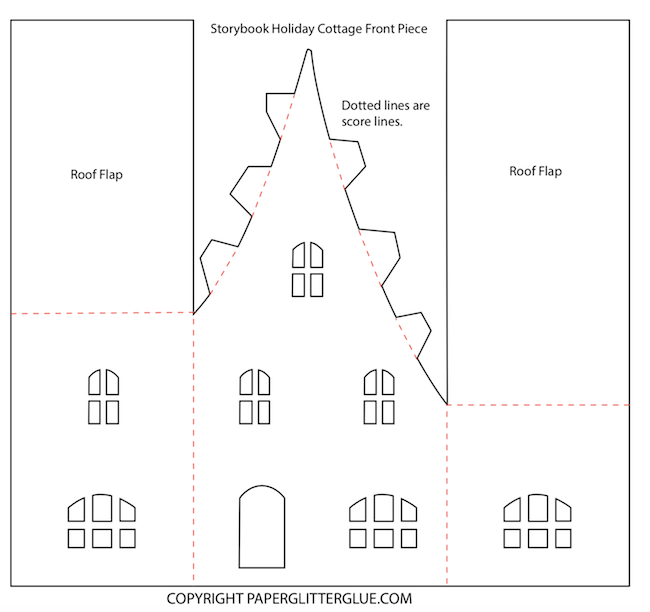
If you have a different cutting machine, the score lines show up as regular lines - not dashed lines. All of those lines need to be converted to score lines. Here's the front of the house as shown on the PDF in files.
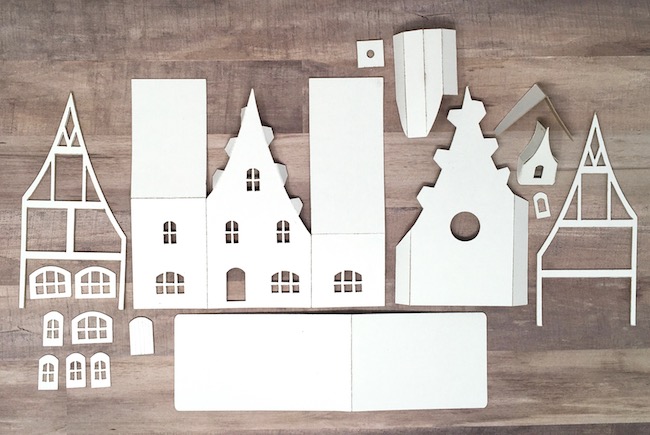
And here are all the pieces cut out for the little cardboard cottage.
Prime and paint the cardboard
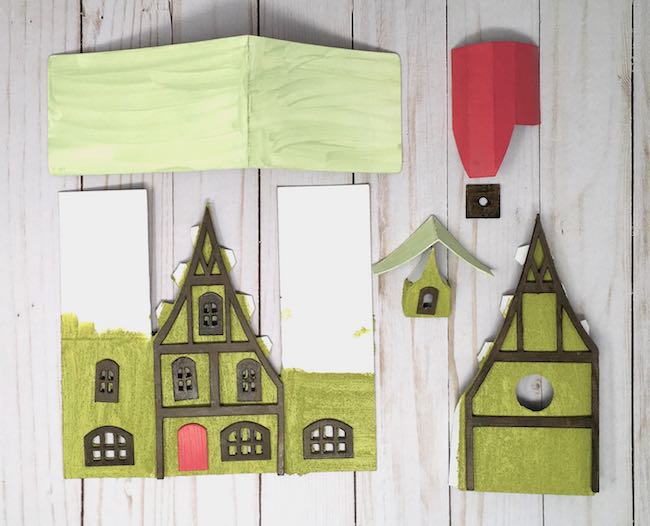
After you have cut out the pattern, it's time for PAINT. I happen to love this step - despite my handicap in choosing colors.
First, prime the cardboard with gesso. The recycled cardboard that my friends save for me has a white slick coating on one side. Paint does not adhere well to that. The same is true of poster board. So gesso primer makes the paint adhere better and the color to show up as more vibrant.
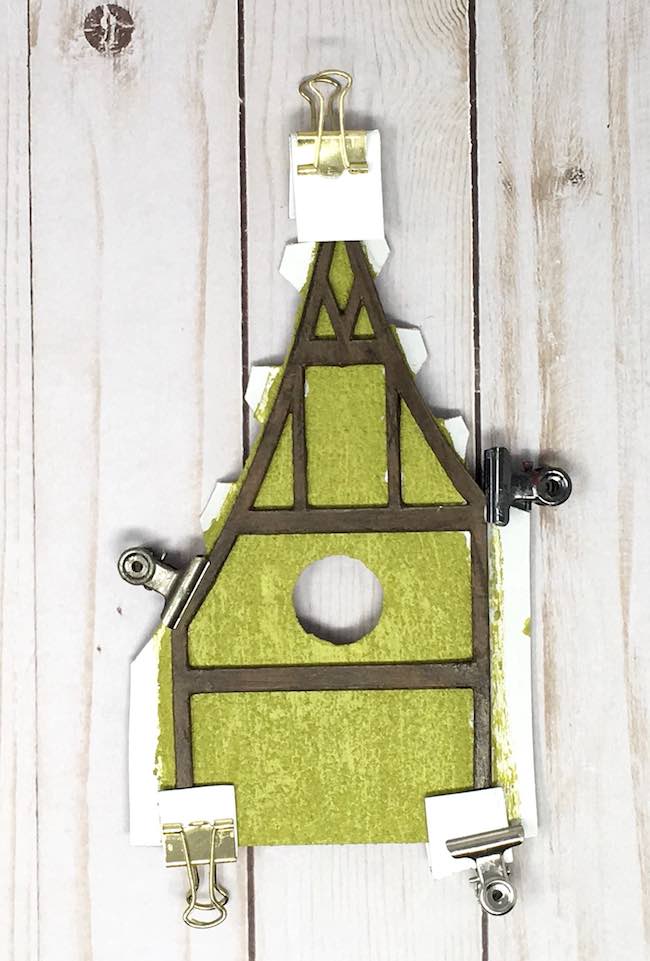
Since I like texture, I mixed fine craft sand with the paint. I love the way it looks, but for this house it does cause a problem. When you adhere the trim to the sanded paint, it does not stick as well so you have to be pretty generous with the glue to make sure the trim adheres well.
Once the painting is completed, I like to add windows to the inside of the cottage. For this I use recycled acetate packaging, but you could use paper or Vellum. Vellum works well. I like to color the acetate with alcohol ink and often I smear it with glossy accents glue to make it translucent rather than transparent.
In addition, I like to use the glossy accents to adhere the window pieces to the inside of the windows because it holds well and dries really fast.
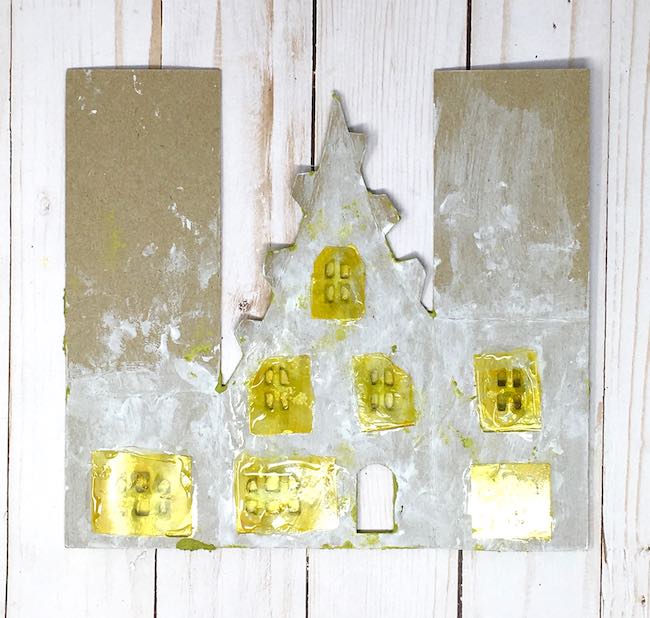
Here's how the windows look from the front at this stage.
Adhere the windows, door, and trim to the cottage
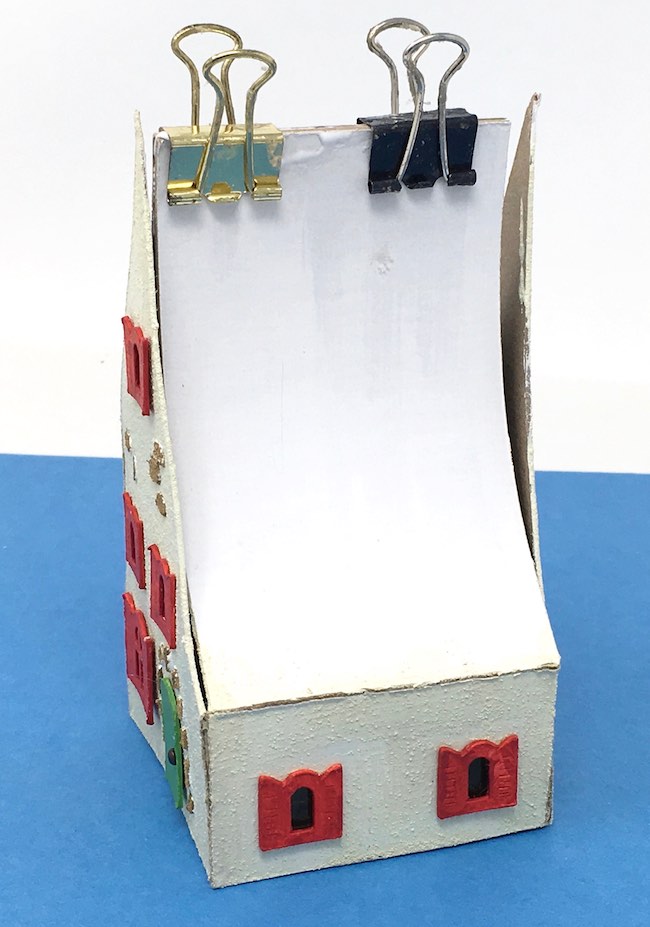
As I mentioned above, the sand in the paint makes it harder for the trim to stick in place. To solve that problem, I used one of my really sticky glues - Fast Grab or Quick Dry and binder clips to hold the trim while the glue dried. I made some cardboard spacers to go between the binder and the trim where I didn't want the binder clip to make a deep indentation on the trim.
Glue the back piece in place to construct the cottage
I don't have any photos of this step, but the back piece has two glue tabs - one on each side - these tabs go inside the two sides of the larger front piece of the cottage. I call this an INSET house meaning that the back piece is inset between the two sides of the house. When I make a smaller house, there is only one glue tab on the back side, it's easier but much more limiting in the size of the house.
Apply a thick bead of glue to the glue tabs and insert them into the main house piece. Use binder clips at the bottom and painter's tape if needed to hold it in place. Let dry.
Next, glue the roof in place
Now for the next challenge, the roof placement. There are three steps to this process - first glue the roof flaps together, then adhere the front and rear gables to the roof flaps. The first two steps make a much more stable house for gluing the roof on.
Glue the roof flaps together
When I design a little cardboard house with a curved roof, I use roof flaps to help hold the gable in alignment so they don't flop around and move too much forward or backward. Since the roof flaps are in line with the sides of the house, you basically glue the back of the gables to the roof flaps. Here's a photo from the Red Roof Holiday Cottage showing how to do it. Then after gluing the roof flaps together, run a thick bead of glue along the edges of the roof flaps and adhere the front and back gables to the roof flaps. I often use painter's tape to help me with this step or I end up holding it together for a few minutes.
Once the house gables are firmly adhered to the roof flaps, it's time for roof placement. When you have a deeply curved roof like this, you need to curve the roof before you glue it on. Do that by holding the roof in both hands and applying gentle pressure with your thumbs on each side to make the cardboard curve. You don't want to make a fold line. You just want to ease the cardboard into a curved shape.
Above you can see the curved roof shape on the photo with all the painted pieces for this house.
Adhere the roof to the house
Apply a thick bead of glue to the edge of the front and read gables, then center to roof over the house and apply it to the house. Painter's tape to the rescue here as well.
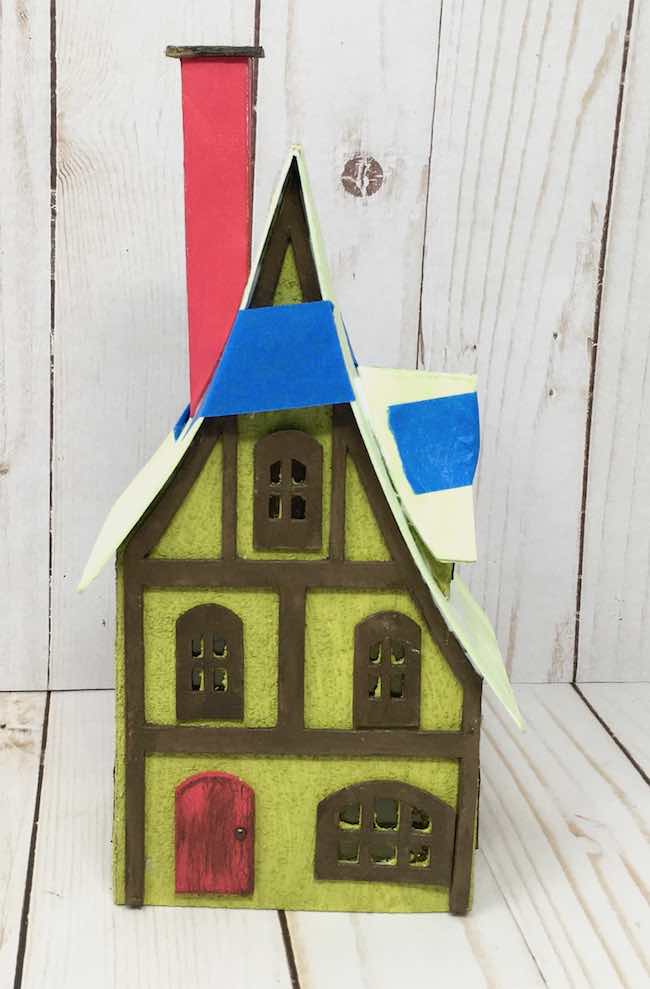
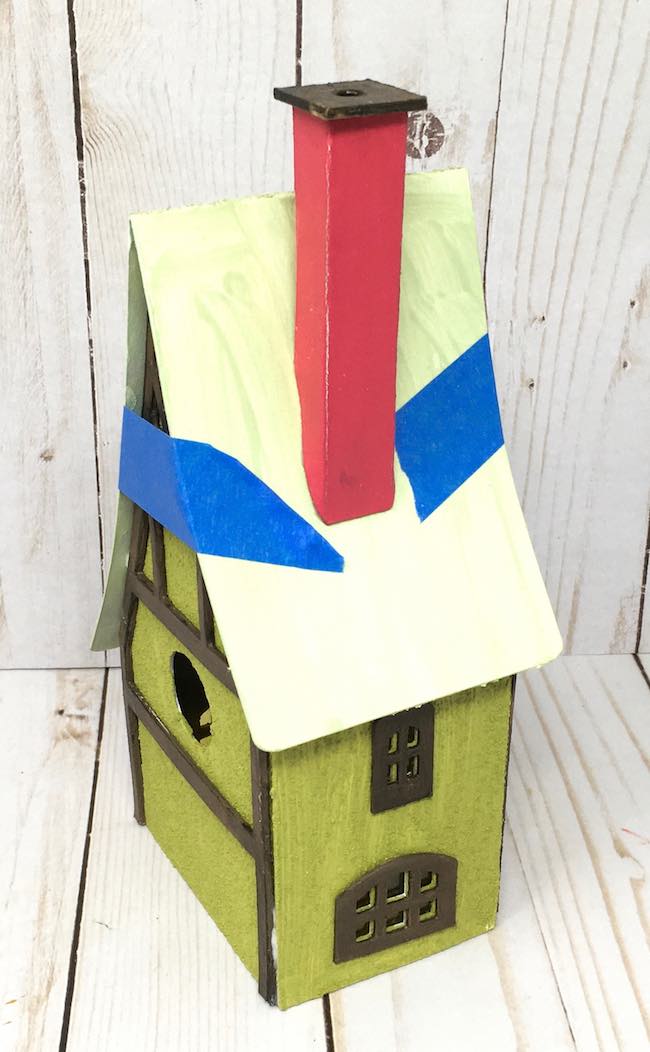
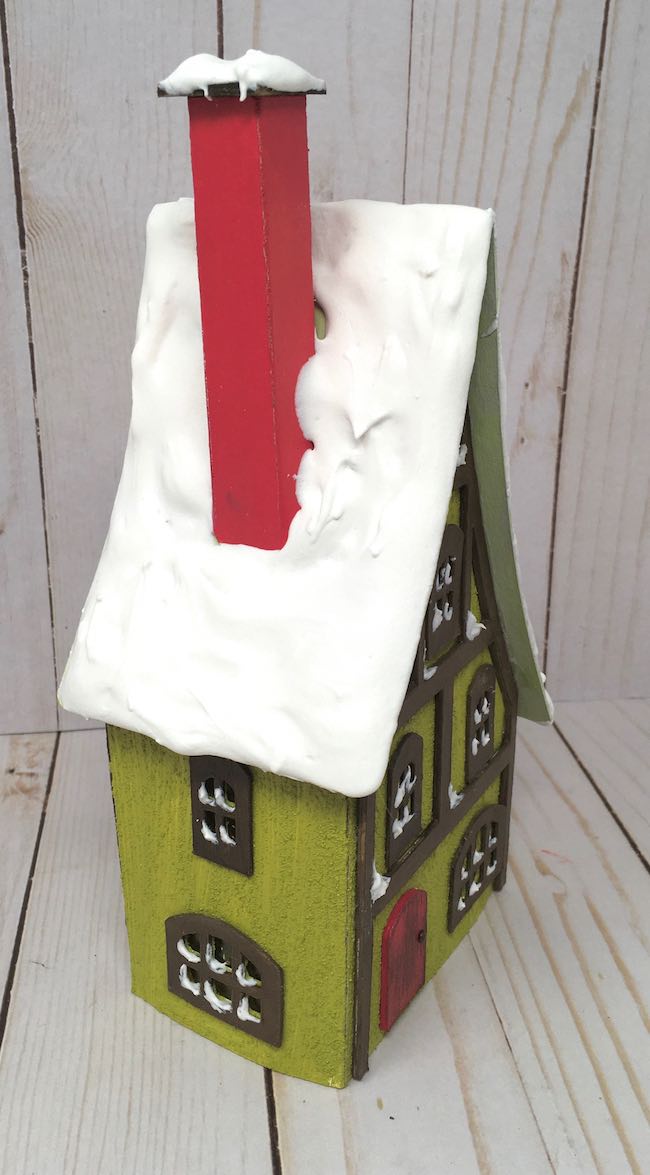
Add chimney and dormer, then dormer roof
Once you are confident that the roof won't shift around, glue on the chimney and the roof dormer. Both of these fit on the curve of the roof. But since this is an asymmetrical roof top, they fit best at one section of the curve. The chimney fits higher up on the shorter side of the roof and the dormer fits best lower down on the long side of the curve. If you don't place them correctly, the pieces won't be angled properly.
Unfortunately, I haven't found a good way to tape these pieces in place while the glue dries. You pretty much have to hold them for a few minutes to get them to stick on well. Because my finishing plan covers the entire roof with a thick blanket of snow, I don't mind have large glue blobs around the bottom of the chimney or dormer. Normally, that would be an issue.
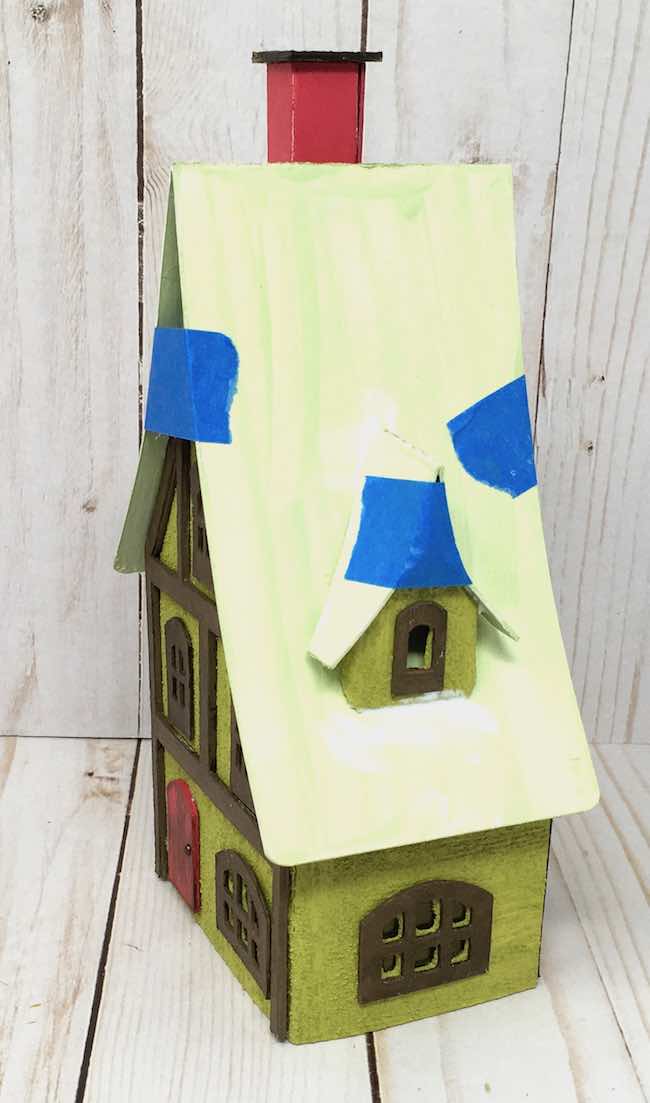
The dormer really needs to be dry before you add the dormer roof. If you don't wait for it to dry, the dormer will slip when you adhere the dormer roof. That happened to me because I was impatient.
Apply snow to roof - lots of snow
Since I was inspired by the Rudolph Toyland illustration, I covered the entire roof with snow. I don't think I've ever done that before. For one thing, I hope it kind of moderates my error in color choice for the house.
In addition, I experimented with making my own snow. It worked pretty well. I still prefer Snow-Tex mixed with gesso, but this works.
Here's my recipe:
- 2 parts Light Molding Paste (also called Modeling Paste for some brands)
- 1 part Gesso
- 1 part Mod Podge
- 2 parts sand if you want some texture (but it really didn't help much)
Mix together well and spread on the roof. Apply it with a plastic knife, but to get the snow near the chimney and the dormer, use a paintbrush with short stiff bristles to push the snow to the edge of the chimney and dormer. Otherwise, you tend to get lots of snow smears where you don't want them.
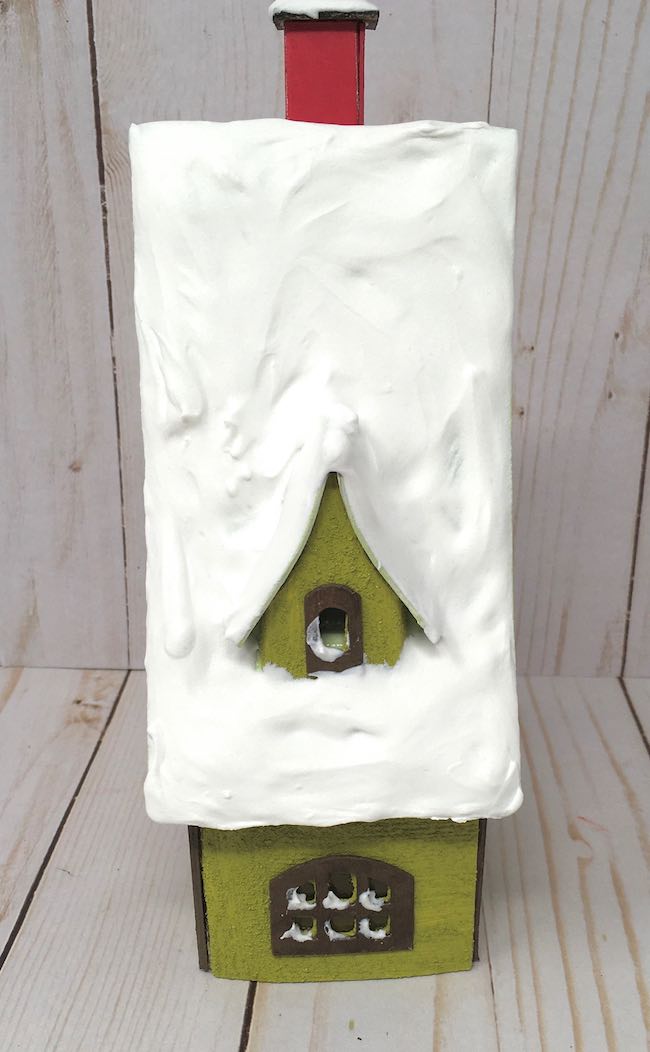
What do you think? The snow really looks more like frosting to me.
Make a base for the cottage
Make a base for your cottage using whatever method you like. I tend to stick to my tried and true method - 3-4 layers of corrugated cardboard hot glued together, covered with crumpled brown packing paper, then painted. Generally, I cut out a section in the bottom so I can add lights from the bottom. Although the pattern has a hole in the back if you want to add lights to your cottage that way.
Again for this house, I covered the entire base with snow (after the house was glued on) so I didn't worry too much about the paint color.
Glue the cottage to the base
Adhere the cottage to the base with a thick bead of glue all along the bottom of the house. Stick the house to the base, let dry.
Decorate your delightful Holiday cottage
Now ask yourself, what do you want to do here to elevate your little cardboard house and express your creativity? For my cottage, I think the snow is too flat, there is no sparkle so I glittered the house and the snow at the base. Trees? Yes, I love bottlebrush trees so I added several to the base. And really that was it. What do you think?
Need a little touch up around the dormer window.
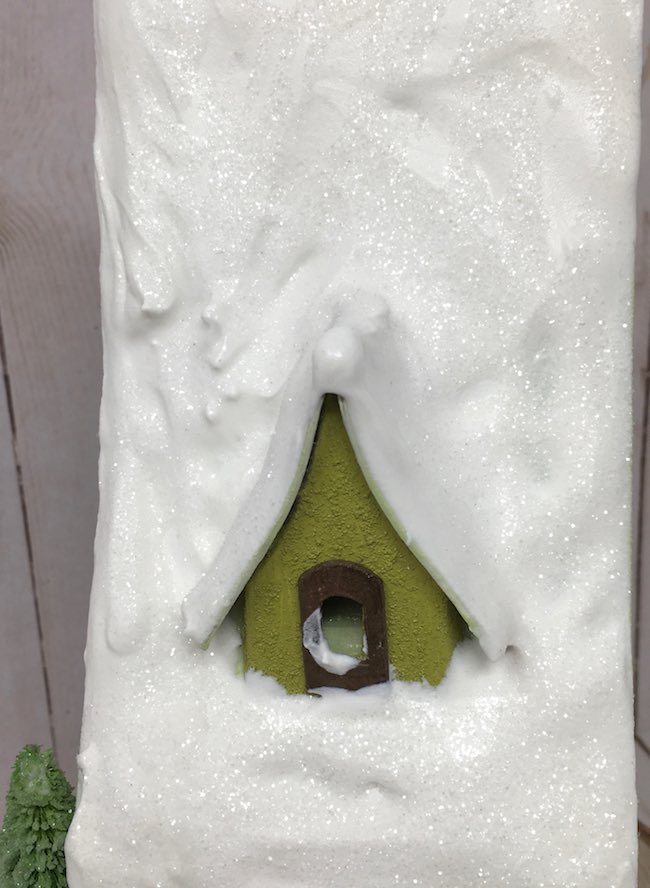
How about more glitter closer to the chimney?
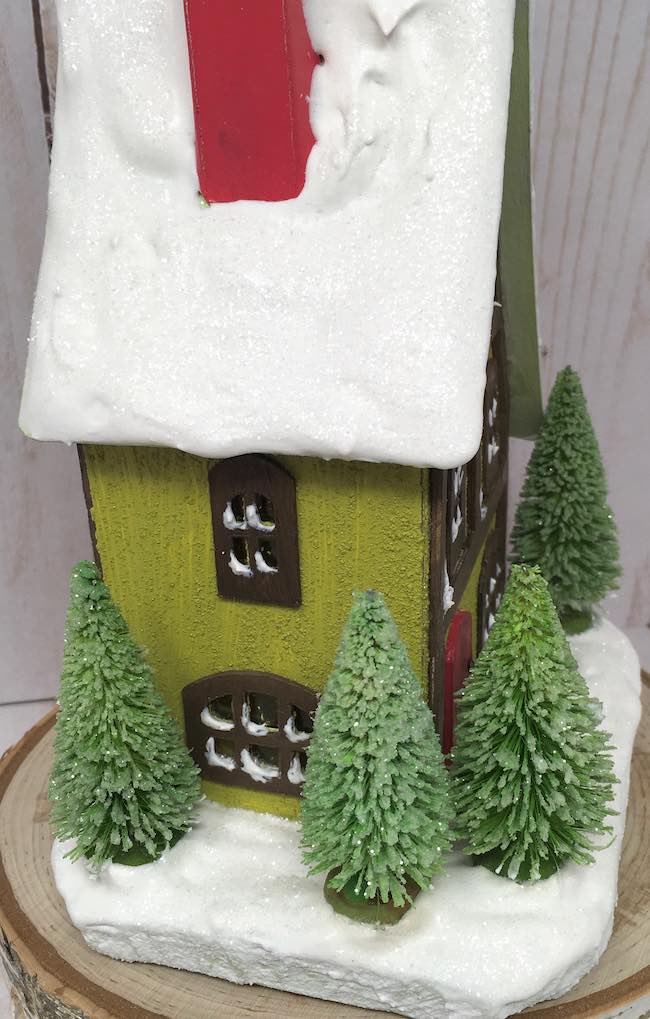
The finished Storybook Holiday Cottage - whew! Like I said, finally it is done.
I hope you enjoy making the Storybook Holiday Cottage. If you have any questions, or problems, just email me at [email protected].
Here are all the 12 Day Craft-Along Projects
- DIY Easy Autumn Paper Leaf Wreath
- Easy Tiny Paper Church - Quick Holiday Craft
- Tiny Paper Cottage
- Tiny Paper Barn - Quick and Easy Holiday Craft
- Make a Tiny Paper Swiss Chalet for Your Holiday Decor
- Make the Cutest Tiny House Holiday Garland
- Little Cottage Pop-Up Card - Make One for the Holidays
- Make a Paper Holly and Ivy Wreath
- DIY Christmas Fairy House - Paper Fairy House with Poinsettia Roof
- A Storybook Holiday Cottage for Christmas
- Easy Snowman and Scotty Dog Gift Tags
- Little House Gift Tags - From My House to Yours
Thank you for stopping by.
Lucy
P.S. Extra - if you would like to make the Gingerbread version it is pretty easy. Make the house just like you make this one. Paint it with Gingerbread Paint just like the Holiday MakerFest Gingerbread house. Then mix modeling paste with gesso, place in an icing bag and pipe the details on just like you would with a real gingerbread house.
And remember to pin this to your favorite Pinterest board so you can remember where you found it.
vickie
Thank you so much for sharing everything you do. Youre so talented. I cant begin to tell you how truly grateful I am for your kindness. Now off to cut cardboard....
Lucy
That is the nicest thing you could say to me - especially the part "Now off to cut cardboard ...".
Thank you so much.
Lucy
penny fowler
What a precious house! But then again, all your designs are really great. How you got this much imagination is beyond me. Thank you for taking your time and efforts to come up with all these projects.
Maggie Klaassens
I love this house! You did a great job replicating from Rudloph. I can't wait to make it.
Lucy
Thank you so much, Maggie. This house has lots of potential. You can make it look different depending on color and finish techniques. It would be a great stone house, too.
Lucy