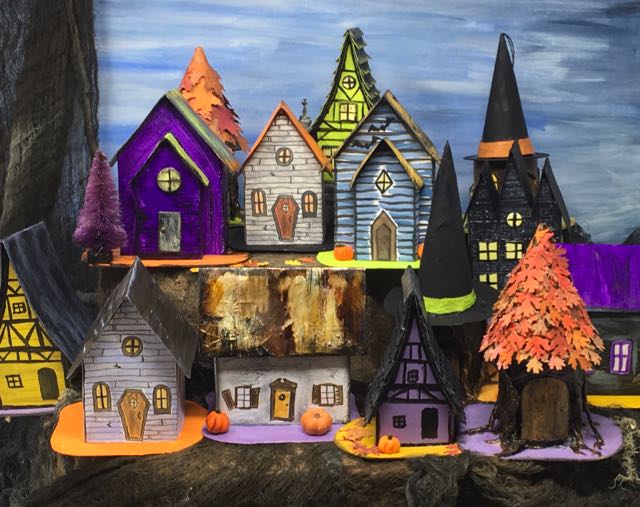
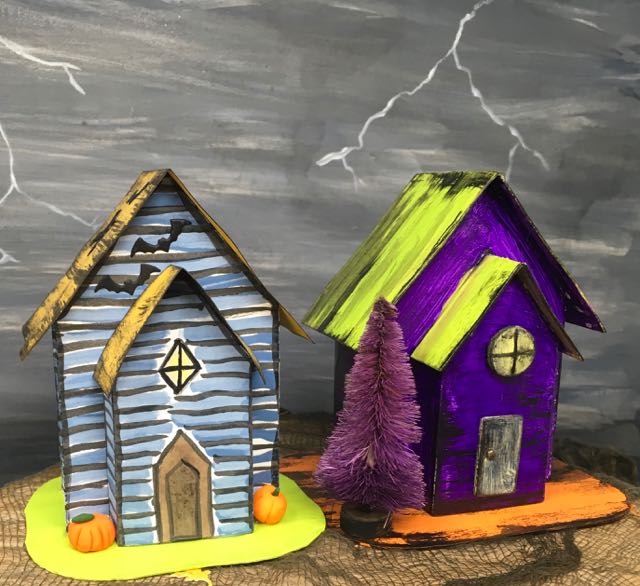
The growing Halloween village with two versions of Halloween house No. 5 front row in the top tier of paper houses. It kind of looks like a class photo, doesn't it? I would be one of the ones tucked directly behind everyone else.
The Halloween Village of little paper houses continues to grow with the addition of Halloween Paper House No. 5 with its front portico. Fortunately, the neighbors like having more people move in for sharing recipes, tools and brooms, making potions, child-rearing advice, Halloween decor, stuff like that.

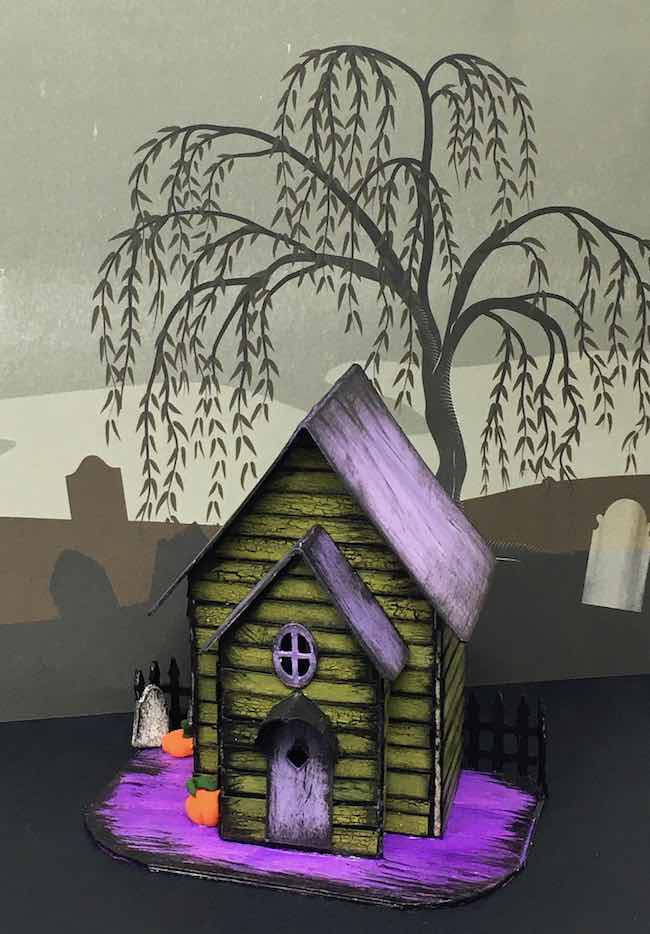
Halloween paper house no. 5 with a small front portico
So we have arrived at Halloween House No. 5 - another relatively simple paper house, but with a front addition. The little portico in the front just provides an extra dimension to the house. I think I said on another post that the little houses will gradually get a little more complex as we go along.
Update! I now have a detailed book, 13 Handcrafted Halloween Houses, with all of the patterns in this series including:
- variations on a number of the houses - some with side chimney options, dormers, roof top chimney
- lots of window and door patterns
- roof shingles patterns
- 2 styles of fences.
The patterns are in two formats - printable PDF patterns and SVG cut file patterns if you have an automatic cutting machine like a Cricut. Below is the version in the 13 Handcrafted Halloween Houses digital book. Below is the updated version of Halloween House No. 5 - Cassandra's Front Portico House.
What do you need to make the houses?
First, Access the Paper Glitter Glue Library
You can find all my free patterns in my Paper Glitter Glue Library. I list the patterns chronologically. So you will find the newest 13 Days of Halloween paper house pattern first at the top of the library.
To get access to the library, simply subscribe to my newsletter with the form at the bottom of the post and you will be sent the password immediately so you can download the pattern. Then click on the library link, click to enter the password protected area, type in the password and the poof! the list of free patterns and tutorials will appear.
Materials to make Halloween House No. 5
- Halloween House No. 5 Pattern PDF - Design No. 18 - (also a separate SVG pattern included)
- Carbon tracing paper (if tracing to the cardboard) or use an automatic cutting machine like a Cricut or Silhouette or ScanNCut
- Cardboard
- Cutting Mat
- Metal-edged ruler
- Craft knife and scissors
- Aleene's Tacky Glue or other PVA glue
- Acrylic Paints - I use the Tim Holtz Distress Paint line because I love this range of colors so much and they work so well with Halloween stuff. I also use either white or black gesso to prime my houses before I paint them.
- Colored pens, pencils to add details if you want
- Paintbrushes in different size (small pointy ones work best for details)
- Halloween Embellishments
Brief Outline of Directions
- Download pattern - Design No. 18
- Copy pattern to cardboard if hand cutting your pattern
- Score, then cut out pattern, front portico and cardboard base
- Paint the house and the cardboard base
- Fold and glue house together, then glue the portico on
- Glue the roof to the portico first, then the roof to the house.
- Glue to base
- Decorate with Halloween embellishments
Additional Links:
- 13 Days of Halloween Paper House patterns:
- Halloween Paper House No. 1
- Halloween Paper House No. 2
- Halloween Paper House No. 3
- Halloween Paper House No. 4
- Halloween Paper House No. 5
- Halloween Paper House No. 6
- Halloween Paper House No. 7
- Halloween Paper House No. 8
- Halloween Paper House No. 9
- Halloween Paper House No. 10
- Halloween Paper House No. 11
- Halloween Paper House No. 12
- Twisted Tree Tutorial
First Download Halloween Paper House No. 5
After accessing the Paper Glitter Glue library, download and print out the pattern. I have included it in two main formats - a PDF file and a zip file including the SVG pattern.
The PDF Zip file includes:
- Printable PDF house pattern
- Directions
The SVG Zip file contains:
- SVG pattern for this house
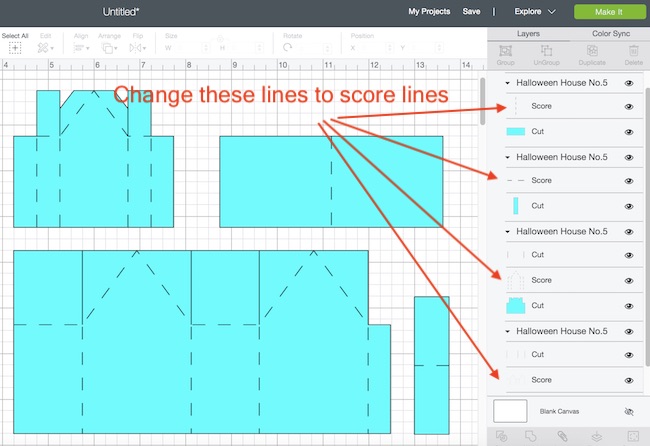
Below are the cut lines and the score lines for the Halloween Paper House No. 5 in Cricut Design Space. You don't have to do anything for cut lines.
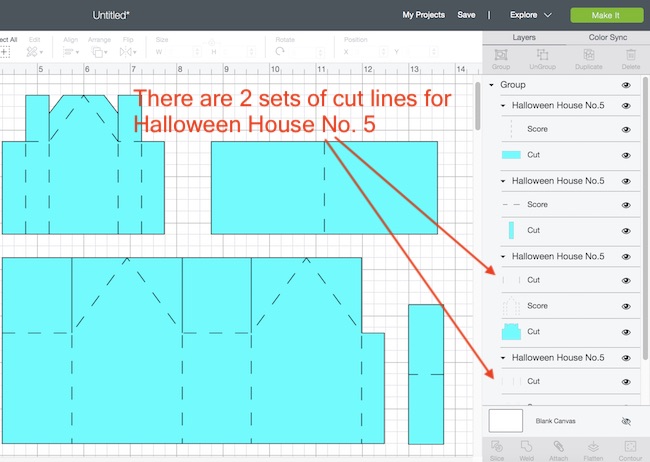
Be sure to remember to change these sets of lines to score lines.
Copy Halloween House No. 5 pattern if you aren't using an automatic cutting machine

Trace your pattern onto your cardboard. This pattern you see is for Halloween House no. 4.
Even though Halloween house no. 5 is simple, it needs to be made out of cardboard. Generally, I use a thin cardboard about the the thickness of poster board because that is what I have and it makes a very sturdy house.
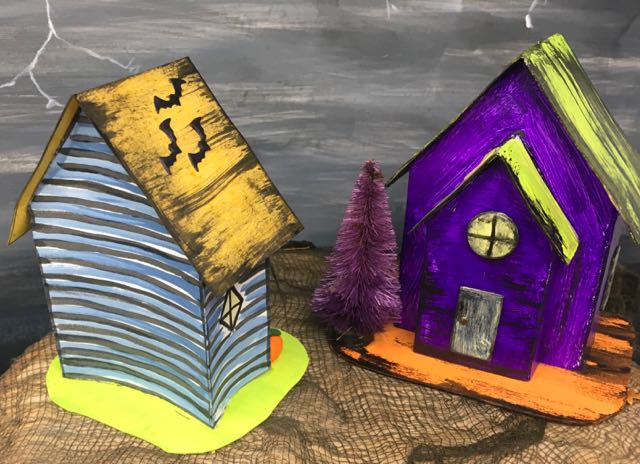
This is why I don't think you should use cardstock for this house. The walls are too bendy. The purple house is made out of cardboard, the blue clapboard painted house is made of cardstock.
I used tracing paper to transfer my pattern to the cardboard. But you can trace the pattern with a pen or a dull pencil to leave lines on your cardboard which you can cut out and score. Or if you have a Cricut you can cut it out without even going through this step. I look forward to the day when I am able to do that.
Score, then cut out Halloween Paper House pattern and the cardboard base
Score the fold lines. On my patterns, I draw the score lines as dotted lines and the cut lines as solid lines. Remember to score before you cut because it is easier that way.
For the bases of these house, I cut out an irregular shaped piece of cardboard that is just a little larger than the house itself.
Paint your miniature paper house and the cardboard base
Now you have your first really fun step - painting your house.
But when you are using cardboard, paint your cardboard with gesso so the paint layer will stick well. Poster board and the cardboard often have a slick coating that needs gesso for the paint to adhere. Then choose your paint color. I chose a different colors for the 2 houses I made with this pattern.
Paint with the base with gesso, then your desired color. For my miniature Halloween houses, I used contrasting colors for the house and the base.

Halloween paper house pattern No. 5. Oh, this is the back of the purple house that's why you don't see the portico.
Fold and glue your paper house together
And this is another fun step because this is where the house comes together. Fold along the score lines and glue the house together. The roof flaps and roof tabs help the house maintain its rectangular shape. Don't worry if the roof flaps don't meet perfectly in the middle because you're going to add another, larger roof piece to the house.
After the house structure is firmly glued together then you can center the portico and glue it on with the glue tabs folded in the back. Here the only trick is to glue the sides so that they don't bend inward or outward too much. Sometimes it's a little hard to keep the angles square.
Glue the Roof on Halloween House No. 5
Glue the roof on the portico first because it's easier to hold it in place if the main roof isn't on yet.
Paint your roof whatever color you like. I've been using the Tim Holtz Distress Paints which work so well together. If you are going to add shingles, paint the under layer so you won't see raw cardboard on the edges or if you miss a spot with the shingles. You can add shingles now or after it is adhered to the body of the house. Normally, I glue shingles on after the roof is already glued onto the house because sometimes there is an angle you have to compensate for.
Glue the roof on after the house shape is dry. Sometimes it is hard to get the roof to stick so you have to hold it or tape it in place for a little while as the glue dries.
Glue your miniature Halloween house to base
Now add a thick bead of glue to the bottom of the house and adhere to your cardboard base. Leave it alone while the glue dries. Almost always, I mess with it at this stage and then have trouble getting the glue to stick (which requires more glue, then more time, etc, etc.)
Finally Decorate with Halloween embellishments
The Halloween house pattern no. 5 is pretty easy to make.
Finally, the funnest step - decorating. I use all sorts of embellishments on my little houses. For Halloween House No. 5, I kept them kind of simple just the like previous houses, but you can go bat crazy if you want. I did include several bats on the roof of the one of the houses.
Thank you for visiting me on the 5th day of the 13 days of Halloween. See you tomorrow.
Lucy
P.S. Remember, you can get this pattern and all of the 13 Halloween house patterns in one book - 13 Handcrafted Halloween House digital book.


Elizabeth
When you say cardboard, can cereal box cardboard be used?
Lucy
Yes, cereal box cardboard works. I use a cardboard from work that is similar to poster board so it is a little thicker, but cereal box cardboard works well too. On my private Paper Houses Paper Crafts Facebook Group, I've seen a number of adorable houses made with just cardstock. I use cardboard because I sell all my houses at a local fundraiser for Habitat for Humanity so I want them to be very sturdy and last for years. But at first I did make the houses out of cardstock.
I didn't recommend cardstock for this house because the walls got all crooked. I think that was because I painted the cardstock and that made it a little wrinkly.