Halloween Paper House No. 10 is a two story haunted house with a front clock tower in the center. This Halloween pattern is similar to the Haunted Schoolhouse, but easier for you to make. This little house builds on two techniques. First there is a front addition like the portico on Halloween Paper House No. 5 only this time it extends above the roofline. Second there is a gable to glue to the roof just like Halloween Paper House No. 9, the last house we made. Halloween house no. 11 is a variation on this same house, but the tower is moved to the side and I added a porch.
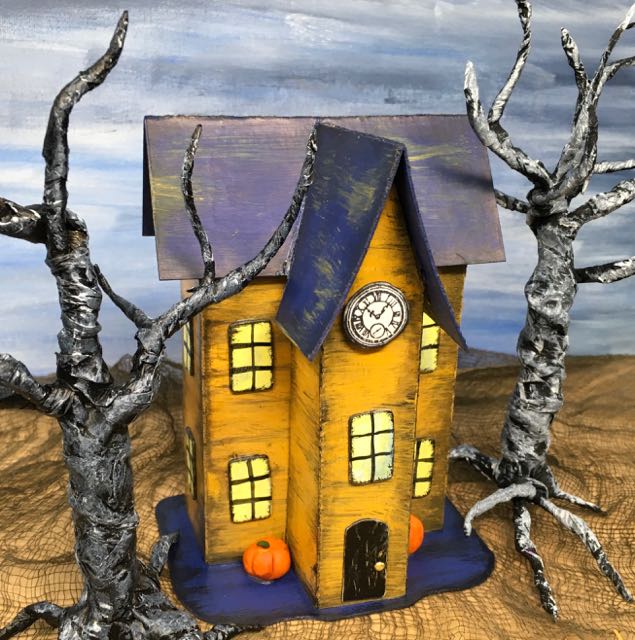
Front view of the Haunted Halloween Clock Tower
Here are a few photos of the Haunted Clock Tower Halloween Paper House No. 10. You can download the pattern from the Paper Glitter Glue library.

Two Halloween House variations for you to try.

Back view of the Haunted Clock Tower house. I need to add some more windows I think.
HOW TO MAKE HALLOWEEN Paper HOUSE No. 10?
DOWNLOAD THE FREE PATTERN for the Halloween House No. 10 AT THE PAPER GLITTER GLUE LIBRARY
You can find all my free patterns in my Paper Glitter Glue Library. I always list the patterns chronologically. That means you will find the newest 13 Days of Halloween paper house pattern first at the top of the library. I mostly list these houses by their number. Today’s house is Halloween Paper House No. 10. The pattern works for both Halloween House No. 10 and 11.
To get access to my library, simply subscribe to my newsletter with the form below and you will be sent the password immediately so you can download the pattern for this little house. Then just click on the library link, click to enter the password protected area, type in the password and then the list of free patterns and tutorials will be available.
MATERIALS
- Halloween House No. 10 Pattern PDF Zip file or use the SVG Zip file for automatic cutting machines - Design No. 23
- Carbon paper (if you are tracing to the cardboard)
- Cardboard (this house needs to be made of cardboard because of the front gable)
- Cutting Mat or an automatic cutting machine like a Cricut Explore Air or Cricut Maker, a Silhouette Cameo, or Brother's ScanNCut
- Metal-edged ruler
- Craft knife and/or scissors
- Aleene’s Tacky Glue or other white PVA glue
- Paint – I use Tim Holtz Distress Paints because these paints work so well for Halloween projects
- Clock Stamp
- Colored pens, pencils if desired
- Paintbrushes – you need small brushes for details
- Various Halloween Embellishments - I made the pumpkins out of orange polymer clay
BRIEF OUTLINE OF DIRECTIONS
- Download and print your pattern - Design No. 23
- Copy the pattern to cardboard
- Score, cut out the pattern and cut out a small cardboard base
- Paint your little house with the base color
- Add the clock, windows and doors
- Fold and glue house together
- Glue the main roof on, then glue front tower in place
- Now glue the gable roof on
- Paint cardboard base
- Glue to base
- Decorate your little house
ADDITIONAL LINKS:
-
- 13 Days of Halloween Paper House patterns:
- Halloween Paper House No. 1
- Halloween Paper House No. 2
- Halloween Paper House No. 3
- Halloween Paper House No. 4
- Halloween Paper House No. 5
- Halloween Paper House No. 6
- Halloween Paper House No. 7
- Halloween Paper House No. 8
- Halloween Paper House No. 9
- Halloween Paper House No. 10
- Halloween Paper House No. 11
- Halloween Paper House No. 12
- Halloween Paper House No. 13
- 13 Days of Halloween Paper House patterns:
MAKE THE Haunted Halloween Front Clock Tower House – HALLOWEEN PAPER HOUSE NO. 10
-
FIRST DOWNLOAD AND PRINT THE PATTERN FOR YOUR LITTLE HOUSE
First download and print the PDF pattern for Halloween Paper House No. 10 – the Front Clock Tower House
-
COPY THE PATTERN TO CARDBOARD
Use your favorite method copy the pattern to your cardboard.
-
SCORE YOUR PATTERN, THEN CUT IT OUT. ALSO CUT OUT A SMALL CARDBOARD BASE
For the bases on these little houses, cut out a small piece cardboard a little bit larger than the house. This cardboard doesn’t need to be anything fancy. In fact, I like irregular shapes for this little Halloween neighborhood.
-
PAINT YOUR HOUSE WITH THE BASE COLOR OF YOUR CHOICE
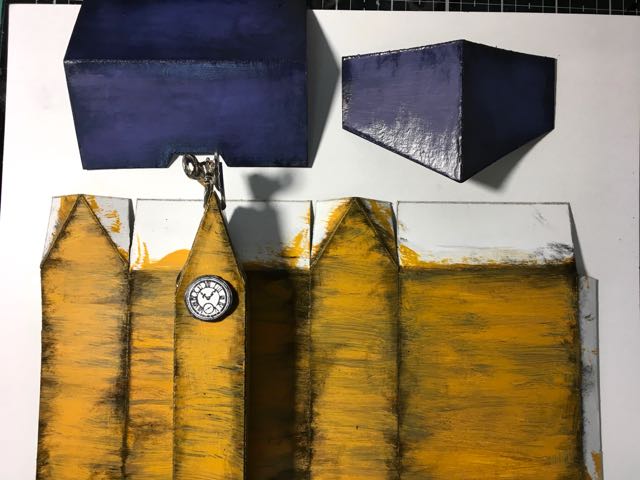
Front Clock Tower Halloween House painted with Wild Honey distress paint and Chipped Sapphire for the roof
-
ADD WINDOWS AND DOORS WHEREVER YOU THINK THEY WILL FIT THE BEST
Before you add the windows and doors, remember the glue tab always goes in the back.

Glue on the windows and doors to the miniature Halloween house. This little house probably needs more windows on the back.
I am still using the easy way to add windows and doors to these little houses. So cut out squares and rectangles for your windows and doors. Then paint them a brighter color than the houses so that they show up against the walls of your house – mostly I used Squeezed Lemonade or Fossilized Amber distress paints. Also I cut them out of cardboard rather than paper to give more dimension to the windows and doors on the front of the houses.
The clock is a Tim Holtz Stampers Anonymous stamp from a set called Small Things. It fits perfectly on the top of the tower.
By now you know that I glue the windows and doors onto the little house before I fold and glue the house together. It’s just easier to place them accurately at this step.
Another detail that helps with the windows and doors is to distress them with various ink colors – pinks and purples and blues. It varies the light color in the windows. Again, just making them a little spookier.
-
NEXT FOLD ALONG THE SCORED LINES AND GLUE YOUR LITTLE HALLOWEEN HOUSE TOGETHER
Just like we did on the previous houses - fold the house along the scored lines and glue the house together with the glue tab in the back. Let dry before you try to glue the roof on.
Don't glue the tower on yet. I think it helps to have the roof in place so you can be sure the tower and roof cut out match.
-
GLUE THE MAIN ROOF TO THE HOUSE, then Glue the tower on
Center the gable cut out in the middle of the house. Glue the roof to the house. When dry test fit the front tower to make sure it fits in the cut out. Sometimes you have to enlarge it a little bit.
After the main roof is glued on, then glue the tower in middle where it fits on the cut out on the roof. Allow that to dry.
-
Glue the Gable to the roof
Do this step just like you did on Halloween House No. 9. It is a little tricky. I often use painter's tape here because it is so hard to apply pressure in two different places - the sides of the gables and to push the gable roof up against the main roof. Below are two photos showing how I tape it in place. Since the roof is already painted, be sure to peel the paint off slowly so you don't pull up the paint.
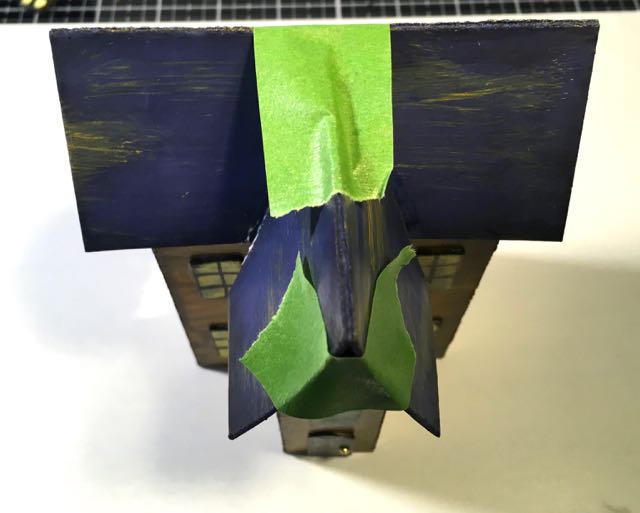
Painter's tape holding the gable roof in place while the glue dries on this little house

Front view showing a piece of painter's tape holding the gable sides together
Now you've done all the hard parts for this little house.
-
PAINT CARDBOARD BASE
For this house, I chose the same color as the roof because I think it works.
-
GLUE TO BASE
Apply a thick bead of glue onto the bottom of your house and glue it to your painted and distressed cardboard base. Let dry.
-
DECORATE YOUR LITTLE HOUSE
Now decorate your house with whatever Halloween elements that you think goes with the house. Pumpkins, yes, I chose pumpkins again. But in the setting with the Twisted Trees and the distressed paint, I think the Halloween Front Clock Tower House is spooky enough.
Next house in the 13 Days of Halloween challenge is the Haunted Boarding House - a variation on this house with the addition of a porch and placement of the tower on the side.
Lucy
P.S. Pin to your favorite crafting Pinterest board.


Debbie
Hi Lucy
I want to make this house and have downloaded it but it seems that it is just the front part, can you tell me what I need to download to get the base to add the clock tower on. What I have downloaded doesn't show any windows either. Thank you love your little houses, so much fun
Lucy
Debbie, I will check right now and see what the problem is.
Lucy
Lucy
Debbie,
No. 10 and 11 share the same basic structure so most of the file is on No. 11. I am going to email it to you.
Lucy