Halloween Paper House No. 3

Miniature tree stump paper houses all in a row. Have fun making these little paper houses for your Halloween decor or your very own Halloween village
In the continuing series, 13 Days of Halloween - a new little house pattern a day for 13 days, the next miniature house has a tree stump base. It is so easy to make with easily found materials - cardstock for the witch's hat or leafy top and a paper towel or toilet paper roll for the base.
What do you need to make the Tree stump house?
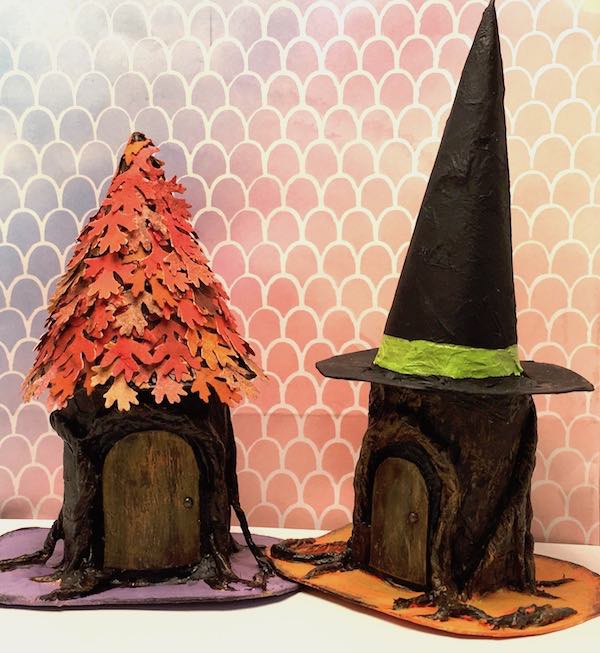
Two versions of the tree stump paper house for the 13 Days of Halloween challenge
You don't really need a pattern for this house
The only thing you need to cut out is a circle or two for the hat or leafy top to the house. I'll give you the circle sizes that I used below. If you want to download the circles as a pattern along with the directions, then you can download them from the library.
Access the Paper Glitter Glue Library if you would like the pattern of circles
You can find all my free patterns in my Paper Glitter Glue Library. I list the patterns chronologically. So you will find the newest 13 Days of Halloween paper house pattern first at the top of the library. This is Halloween Paper House No. 3.
It's design no. 16 in my Paper Glitter Glue library.
To get access to the library, simply subscribe to my newsletter with the form at the bottom of the post and you will be sent the password immediately so you can download the pattern. Then click on the library link, click to enter the password protected area, type in the password and the poof! the list of free patterns and tutorials will appear.
Materials
- Halloween House No. 3 Pattern PDF - Design No. 16 - (also SVG pattern included), but this particular pattern includes circles for the witch's hat and the leafy rooftop as well as instructions.
- Cardstock for the cones
- Cardboard for the base
- Toilet paper roll or paper towel roll
- Craft Mat - this is my favorite
- Metal-edged ruler
- Craft knife and scissors
- Leaf Punches:
- Newspaper or brown packing paper for the roots
- Aleene's Tacky Glue or other white PVA glue
- Ranger Collage Medium to make the tree stump roots with brown paper
- Various colors of paint - My favorites are the Tim Holtz Distress Paints because I love this range of colors so much. I also use gesso to prime my houses before I paint them.
- Distress Spray Stains for great color variation in the leaves. See these examples:
- Paintbrushes in different size (including a few small pointy ones for details)
- Tiny brads for doorknobs - I think these are the right size about 0.3 inches long
- Halloween Embellishments of your choosing
Brief Overview of Directions to make the Tree Stump Paper House
- Download and print Halloween Paper House No. 3 pattern - Design No. 16 - the Tree Stump Paper House pattern (really just the circles to make the rooftops)
- Copy pattern to card stock
- Cut out card stock pattern and cardboard base
- Cut the toilet paper roll to desired height
- Glue the toilet paper roll to the base
- Twist paper to make roots, glue to tree stump
- Paint the tree stump and the door
- Make cone for the top of the house
- Glue cone to the top of the tree stump house
- Decorate with Halloween embellishments
Additional Links for making a Tree Stump house:
- The Making of Black Hat Inn - my first tree stump house
- Easter Houses with Leafy Tops - 4 tree stump houses decorated for Easter
- The Easter Tree Stump House - good blog post shows the tree stump in process
- Easter Tree Stump House finished - shows the tree stump house finished
- DIY Fairy House - the tutorial is at JenniferMaker, but the pattern is in my library
Here are the links to the little houses:
- 13 Days of Halloween Paper House patterns:
- Halloween Paper House No. 1
- Halloween Paper House No. 2
- Halloween Paper House No. 3
- Halloween Paper House No. 4
- Halloween Paper House No. 5
- Halloween Paper House No. 6
- Halloween Paper House No. 7
- Halloween Paper House No. 8
- Halloween Paper House No. 9
- Halloween Paper House No. 10
- Halloween Paper House No. 11
- Halloween Paper House No. 12
- Halloween Paper House No. 13
SVG file:
I've saved the circles as an SVG file if you really would like them. No score lines needed for this house.
PDF Files:
The PDF file is not a zip file, but a 4 page booklet with directions and the PDF pattern of the circles that you can download.
Let's Get Started Making Halloween Paper House No. 3
-
Download and print the Halloween Paper House No. 3 free pattern (Design no. 16) in the library if you want to print out the circle sizes.
If you just want to cut out the circles without the pattern, here are the sizes:
- Witch's hat - ¼ circle 4 inches in diameter
- Witch's hat brim - 2 choices: The large is 1.5 inches in diameter while the small is 1.25 inches in diameter.
- Leafy top circle - ½ circle 3 inches in diameter
-
Copy Tree Stump Rooftop Pattern to card stock (rather than cardboard)

3 more Halloween tree stump paper houses in progress with cones. Card stock works best for the cones. Binder clips hold the cone in place while drying. I went back and glued that little flap sticking out later.
Copy the circles to card stock because the circles fold best when made out of a thinner material like card stock. Poster board might flex some, but it's still easier to roll the card stock into a cone shape rather than cardboard.
-
Cut out card stock circle pattern and cardboard base for the tree stump
Cut out the circle you want for the top of the house - either a witch's hat or the leaf top.
For the leafy top houses, I glued the cone to a circle and then glued it to the tree stump base. But I think the roof would integrate better with the house if I just made the cone and glued it directly to the house.
-
Cut the your paper roll to desired height
Since you want the cone to sit nicely on your tree stump, it helps to make the base before you make the cone top.
I cut my toilet paper rolls from 2 - 2.5 inches tall.
You can make your house tall and skinny or leave it short like the houses in my photos. Again, try to make sure that the top of your paper tube is straight so the witch's hat will sit flat. And if you are making the leafy top, add enough space for the cone overhang - usually about 1.4 inch.
Now is a good time to cut your base and a small door.
-
Glue the toilet paper roll to the base
To make this little house, you have to glue your toilet paper roll to the base before you can make the house because you have to add roots to your tree stump.
-
Twist paper to make roots, glue to tree stump

Test fitting cones and doors on the little tree stump paper houses. The witch's hat is a little crooked, oh well.

Construction of the roots is easy. You use twisted paper. You know I love twisted paper for making trees. Well, this is just a variation on the twisted trees. Twist strips of paper long enough to make roots and vines covering the paper roll base. Try to taper at each end. Often, I coat them with Ranger Collage Medium so they will hold their shape. Then glue to your paper roll. Here I find a thick glue like Aleene's Fast Grab or Quick Dry will work better. It's thicker and the twisted paper roots adhere better.
If you are using a thinner glue like Elmer's Glue-All, here's a trick. Apply the glue to the tree stump and let it sit. When the glue gets tacky, it also loses its sheen. It's just not as shiny and will hold better when it gets to that point.
Drape the roots around the paper tube the way you imagine tree roots would grow. If you are going to outline the doorway with a twisted strip of paper to make an archway, then pencil in the shape and size of the door so you have room to fit the door in. Then glue the roots or vines around that area and test fit your door to fit.
-
Paint the tree stump base and the door

Yellow undercoat for the tree stump house. Paint the base before you paint the roots on
Now is a good time to paint the tree stump so it's drying while you make the rooftop. To mimic tree bark, I paint 2-3 paint layers in different shades. I always start with a lighter shade of acrylic paint, usually Fossilized Amber distress paint. Then a lighter brown followed by my favorite dark brown, Ground Espresso distress paint. It's a perfect tree bark brown. On my Halloween houses, I outline crevasses in the bark with black paint as a shadow. Have fun with this step. It's one of my favorite steps in making this little house.
Yes, the roots are a little tricky. Get a tiny brush and paint the roots. If you mess up and paint the base it's ok. It really doesn't matter that much. Paint some black paint on the underside of the roots for shading.
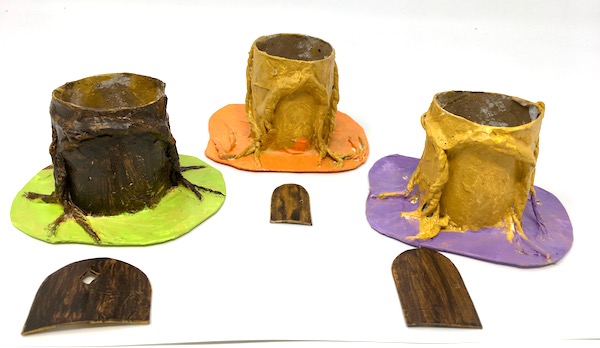
Painting in progress for the tree stump paper houses. It is much easier to paint the roots before you glue the conical rooftop on
Paint the door the same colors as the tree bark, but make it just a little bit lighter so it will show up against the tree bark. For the doorknob I poke a small hole and insert a tiny brad. Glue the door on when the paint is dry.
-
Make the cone for the top of your tree stump house
Finally, you get to the cone-shaped roof top for your miniature paper house. Choose the size of the cone for your house. You can go taller or shorter if you wish. For the really tall witch's hat, the diameter of the cone is 4 inches. And you only use about ¼ of a circle so you don't have to cut out an entire circle.
Roll the circle into a cone shape. I find it can be just a little tricky. Sometimes it is hard to maintain a nice sharp point on the cone, but that's ok. It won't show on the leafy rooftops. You can cover the tip of the witch's hat with the some tissue paper to make the tip look better. That's what I did.
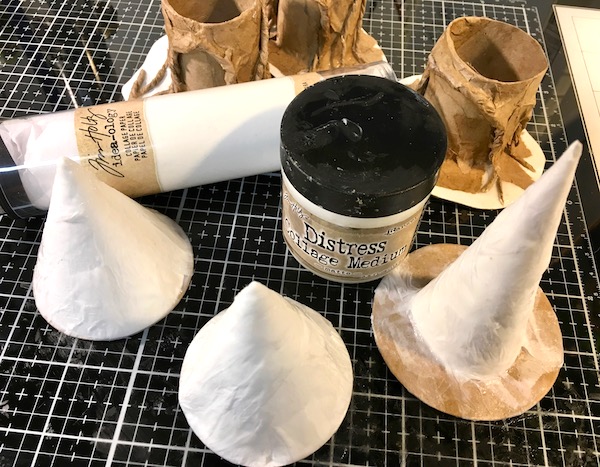
Tissue paper covers the cones to give texture and extra glue surface of the cone to the base
For the leafy rooftops, the diameter of the cone is 3 inches. And I glued the cone to a circular base that is 2.5 inches in diameter. When I make a tree stump with a leafy rooftop again, I will skip the bottom circle and just balance the cone on the tree stump base and glue it straight to the base.
I made two witch's hat versions - one with a 2.5 inch brim and one with a 3 inch brim. Just play around with it and decide which one you want.
Now that you have top to your tree stump house and paint it with the color of your choice. We'll decorate the leafy top after it's glued to the tree stump because the leaf tip hang over the edge a bit.

Paint the cones for the leafy rooftops with yellow undercoat. I painted them brown after this to simulate the tree limbs.
Testing cones and doors on the houses during the painting process.
-
Glue cone to the top of the tree stump house
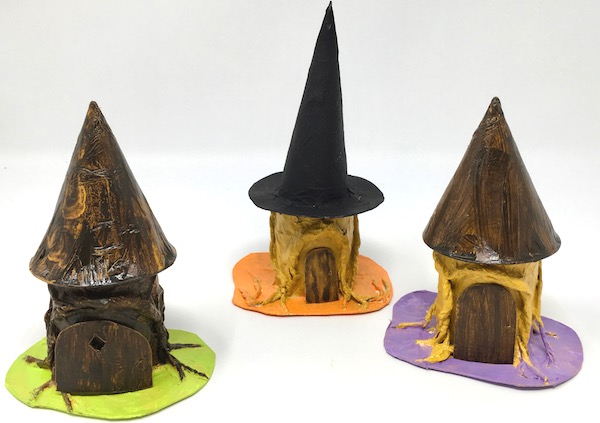
And for the last step in the construction process, glue the hat or the leaf cone to the top of the tree stump. Try to center it and put the seam of the witch's hat cone in the back.
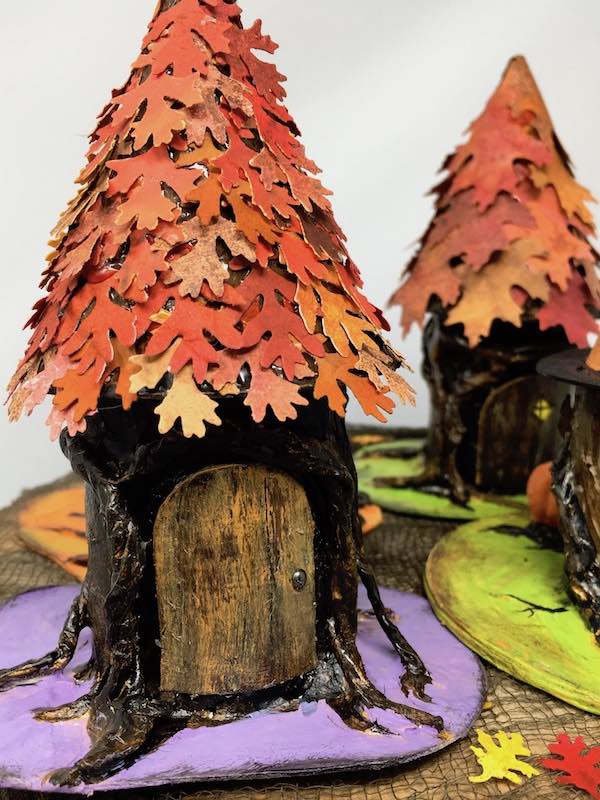
Oak leafy top tree stump house
-
Decorate with Halloween embellishments
There are lots of options for decorating the little tree stump houses. You can use real bark or moss. In my craft room, I have a lots of leaf punches and leaf cutting dies so that's what I used. The little oak leaves are from a Tim Holtz Sizzix punch and the larger oak leaves are from an EK Success punch. Punches are so much faster for something like this because you really need a lot of leaves to cover the cone.

Overlapping oak leaves for the for the Leafy rooftop tree stump paper house
On the witches hat, I cut out an orange band for one and painted a green band on the other one. Ribbon would work as well, but you do have to kind of angle it to fit the conical hat shape.

Once again, we've finished a new paper house - Halloween House No. 3 in the 13 Days of Halloween Challenge. Thank you for following along. I hope you are having fun making these little houses. Tomorrow's house is variation on the German Half-timbered house - just a darker, slightly creepy version.
I hope to see you tomorrow.
Lucy
P.S. You can email me at [email protected] if you have any questions or comments or need help with something or if the directions aren't clear. I would love to hear from you. Also feel free to pin any of these images to Pinterest or share on Facebook.


Pin this to your favorite crafty Pinterest board
Cheri
You are so creative! Amazing. Thank you for sharing.