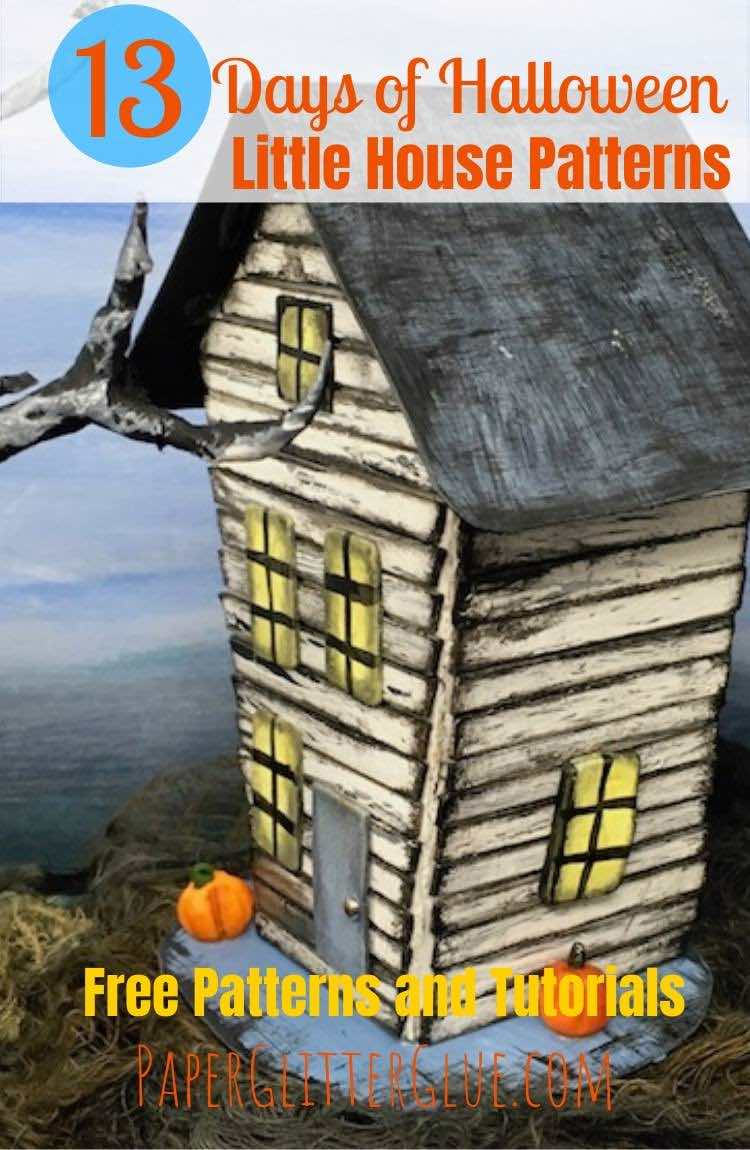
Halloween Paper House No. 6 - the Crooked Little House
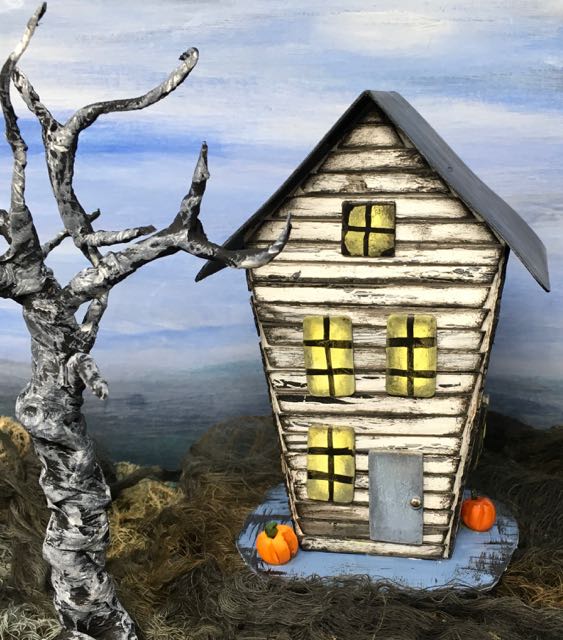
Here is the Halloween Paper House No. 6 - the Crooked Little House. It's another miniature Halloween house to add to your own Halloween village. This little paper house has angled sides and distressed crackle paint siding - perfect for Fall or Halloween decor. You can add lots of Halloween features such as little ghosts, bats, a haunted graveyard tombstones, twisted trees, kitties or whatever your imagination comes up with.
For the 13 Days of Halloween, I have kept the house simple - partly because I am rather busy making and writing about a house a day. This is Halloween house No. 6 in the series.
So let's get started. These instructions are brief because this house is structurally very similar to the previous houses. But when it comes to the crackle paint siding, you'll get some more detailed information. Really it is a very easy house to build, but still a fun addition to your Halloween or Fall village.
WHAT DO YOU NEED TO MAKE THE HOUSES?
ACCESS THE PAPER GLITTER GLUE LIBRARY
As always, you can find all my free patterns in my Paper Glitter Glue Library. I list the patterns chronologically. So you will find the newest 13 Days of Halloween paper house pattern first at the top of the library.
To get access to the library, simply subscribe to my newsletter with the form at the bottom of the post and you will be sent the password immediately so you can download the pattern. Then click on the library link, click to enter the password protected area, type in the password and the poof! the list of free patterns and tutorials will appear.
Please remember that these patterns are for your personal use.
Update 8-22-19. This post has been updated with a SVG pattern (scalable vector graphic)- the kind of pattern that works with automatic cutting machines.
This post contains some affiliate links for your convenience and at no extra cost to you. Click here to read my full disclosure policy.
MATERIALS
- Halloween House No. 6 Pattern PDF - Design No. 19
- Carbon paper (if tracing to the cardboard)
- Cardboard (this house needs to be made of cardboard because of the angled walls)
- Cutting Mat
- Metal-edged ruler
- Craft knife and/or scissors or automatic cutting machine like a Cricut or Silhouette or Brother Scan and Cut
- Aleene’s Tacky Glue or other white PVA glue
- Various colors of paint – I use the Tim Holtz Distress Paint line because I love this range of colors so much and they work so well with Halloween stuff. I also use either white or black gesso to prime my houses before I paint them.
- Crackle Paint or Crackle Medium
- Colored pens, pencils if desired
- Paintbrushes in different size (small pointy ones for details)
- Halloween Embellishments of your choosing - I made polymer clay pumpkins, but here is another pumpkin option
BRIEF OUTLINE OF DIRECTIONS
- Download and print pattern - Design No. 19
- Copy pattern to cardboard
- Score, then cut out pattern, and a small cardboard base
- Prime the house with the base color
- Prime a piece of cardboard for your crackle siding
- Add crackle paint or crackle medium, topcoat of paint if needed
- Cut the crackle-painted cardboard into strips
- Adhere crackle painted strips to your house
- Add windows and doors
- Fold and glue house together
- Glue the roof to the house
- Paint cardboard base
- Glue to base
- Decorate with Halloween embellishments that you love
ADDITIONAL LINKS:
-
- 13 Days of Halloween Paper House patterns:
- Halloween Paper House No. 1
- Halloween Paper House No. 2
- Halloween Paper House No. 3
- Halloween Paper House No. 4
- Halloween Paper House No. 5
- Halloween Paper House No. 6
- Halloween Paper House No. 7
- Halloween Paper House No. 8
- Halloween Paper House No. 9
- Halloween Paper House No. 10
- Halloween Paper House No. 11
- Halloween Paper House No. 12
- Halloween Paper House No. 13
- 13 Days of Halloween Paper House patterns:
- How to Use Crackle Medium for Your Papercrafts
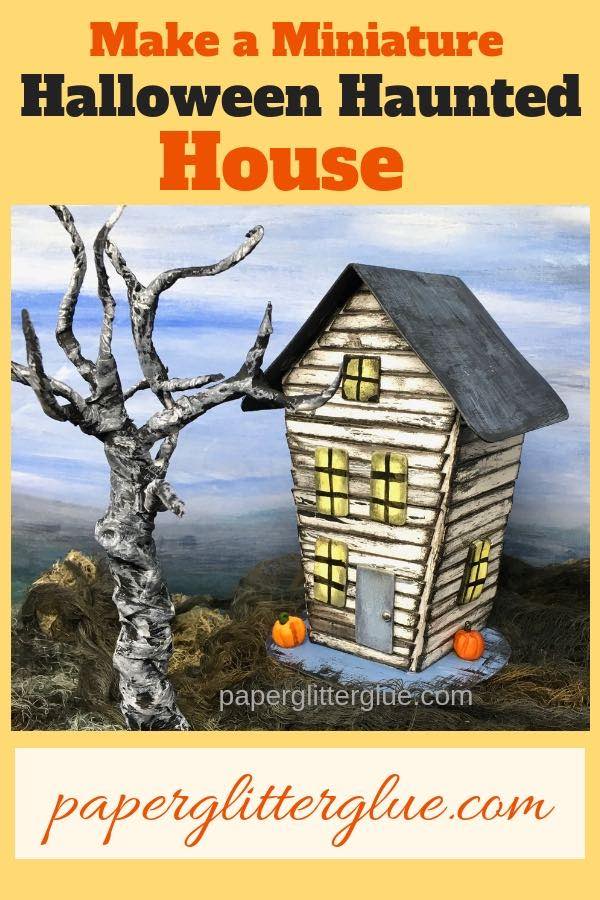
- Twisted Tree Tutorial
How to Make the Crooked Little House - Halloween Paper House No. 6
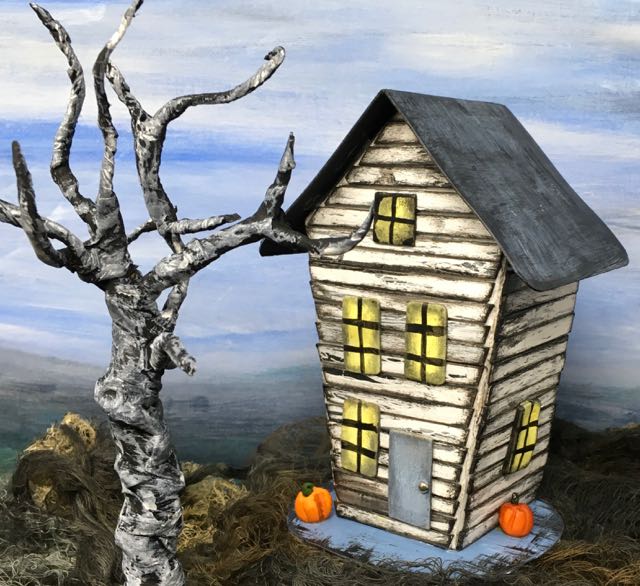
Halloween Paper House No. 6 - the Crooked Little House
-
Download and print pattern
First download and print the PDF pattern.
There is now an SVG pattern for this little house.
-
Now copy pattern to cardboard
Use whatever method works the best for you.
-
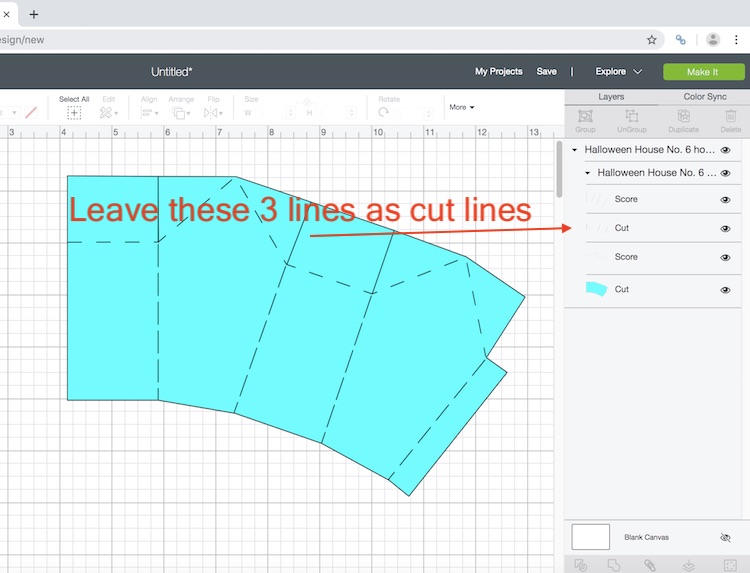
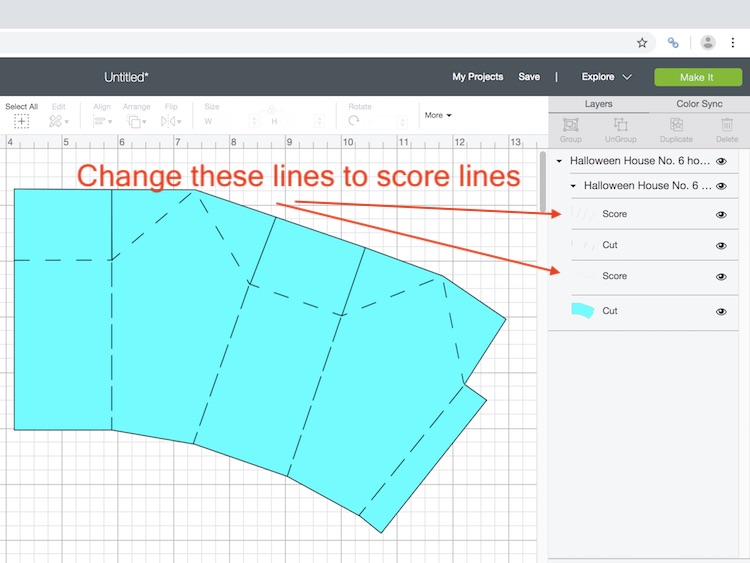
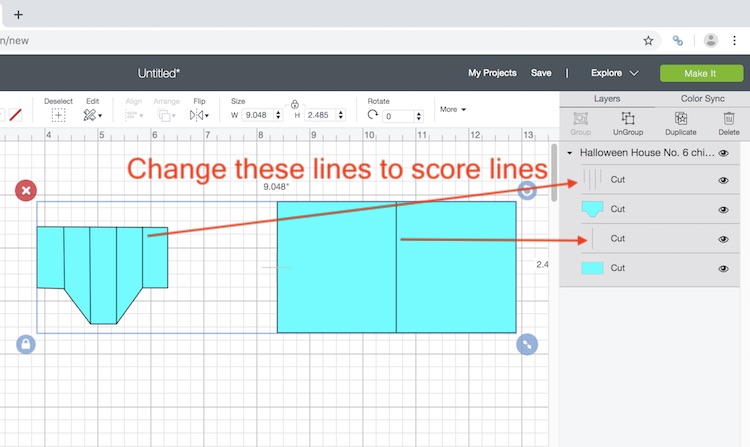
Score, then cut out pattern and a small cardboard base
Here are photos showing how the pattern looks in Cricut's Design Space showing cut lines and score lines.
For these little houses, I have been making small cardboard base that I just cut out randomly. The bases don't need to be anything fancy. In fact, I think small, irregular bases work better for this little neighborhood.
-
Prime the house with the base color
If you are going to make this house with crackle siding, it helps to use a contrasting color under the strips. Normally I make distressed white crackle siding so I usually paint the base coat black. But guess what? I didn't here because I didn't think of using crackle-painted siding until I had already started on the house. It worked fine anyway.
-
Prime a piece of cardboard for your crackle siding
To make the crackle siding, first paint a piece of cardboard with the base coat. For this one, I did paint it black. This is the part that will show up between the crackles. It needs to be a strong contrasting color.
-
Now add crackle paint or crackle medium, topcoat of paint if needed
If you are going to use crackle paint, then just paint that on your cardboard painted with the undercoat. But if you are using crackle medium, you spread that on and then cover it with a top coat of paint. You have to follow the specific directions for each type of paint or medium.
-
Next cut the crackle-painted cardboard into strips
Now cut your crackle-painted cardboard into strips. I use a guillotine cutter to do this. Generally I try to cut the strips less than ¼ inch in width. You'll see that my strips vary in width. It's ok - it's a crookedy Halloween house. That's my mantra most of the time with these houses.

Close-up of the crackle paint siding on the little Crooked house
Here's an important step in my mind. And this is one of the reasons it is so hard to get my hands clean. I edge every single strip with black paint - Black Soot distress paint. It is my favorite. So to hold such little strips I get lots of paint on my fingers. Again that's ok to my way of thinking. That is, unless I have to go to work that night. Then I really have to scrub.
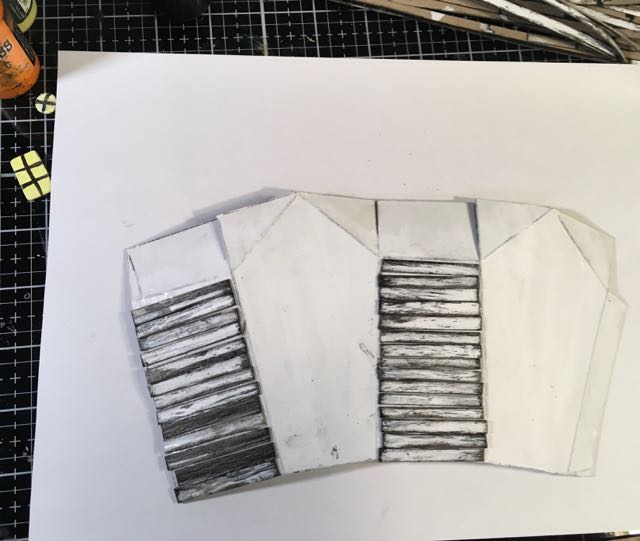
Now apply the strips to each side individually
-
Adhere crackle-painted strips to your house
To apply the crackle-painted siding to your miniature house, cut each piece the width of the house. It's easier on a house with even sides. I didn't think about that detail when I chose this house for the crackle-painting siding technique. Really it's not too difficult, but I do cut each strip individually. I think the irregular pattern adds to the charm of the little house.
But when you glue the strips to each side, be sure to leave just a little space so that when you glue the house together, the house can fold easily at the corners.
Siding applied to each individual side of the house.
-
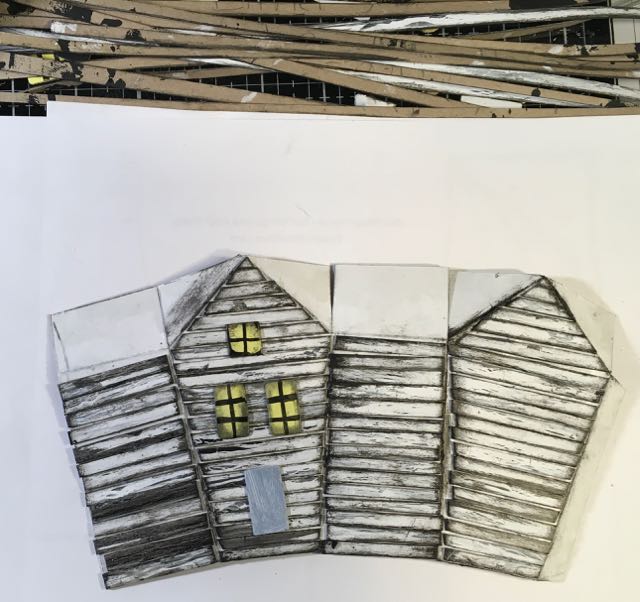
Now add windows and doors to the house
Finally I have settled on way that I like to make windows and doors for the 13 Days of Halloween series. Simply cut out squares and rectangles of cardboard and paint them to match each house. The last 3 houses I've done this way look really good. It's easy and fast and cute. An ideal technique, I think.
Oh, and when you add windows and doors, glue them to the side which does not have the glue tab. Plan on having the glue tab in the back. That way the glued seam won't show up so much.

Windows and doors are finally adhered to the Crooked Little Halloween House
-
Fold and glue house together
This is where you get to see your work come together when you glue the house together. Glue the glue tab in the back. Generally I use a binder clip at the bottom to hold the house together. And most of my house patterns have roof flaps to help stabilize that house and keep it square. It also provides a nice surface for gluing the roof.

The glue is drying and the roof is almost ready to be added on the Crooked little house.
-
Glue the roof to the house
After the house has been glued together, you can glue on the roof. I use large amounts of glue at the edge of the roofline. Usually I have to mop it up after the roof is adhered. Cover a pencil tip or stylus with a piece of paper towel and gently remove the excess glue. This step becomes much more important in the next two houses which have trickier rooflines. Your house is basically done at this point. For this house, I just distressed the black painted roof with a light purply color - Dusty Concord distress paint, I think.
-
Paint cardboard base
Paint your cardboard base a contrasting color. Also I've been distressing the base a little bit. I just love smearing paint around to distress things.
-
Glue to base
For this step you apply a thick bead of glue to the bottom of the house and adhere it to your base. Let it dry.
-
Decorate with Halloween embellishments that you love
Finally you get to decorate your little house. I just added a couple of little polymer clay pumpkins that I made last year. You should be much more imaginative than I am.
And once again, that's the little Halloween Paper House of the Day - Day No. 6. I hope you like the Crooked Little House with its crackle paint siding.
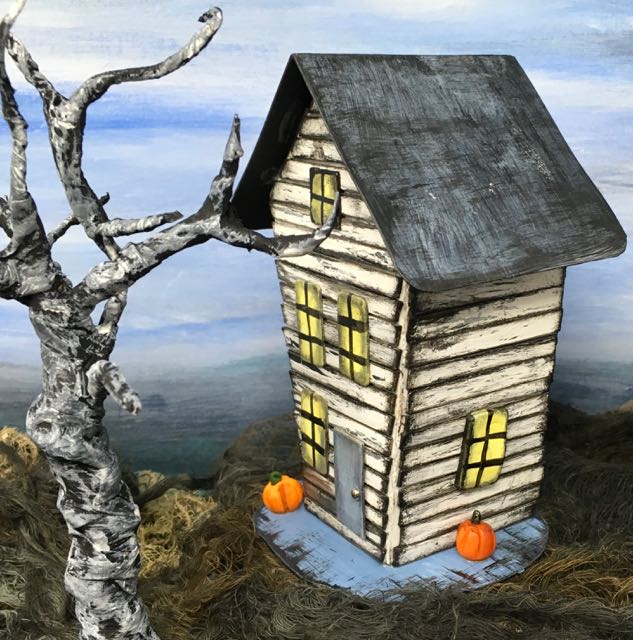
Here is the finished product the Crooked Little House - Halloween Paper House No. 6
Tomorrow, really and truly will be the Triple Gable Gothic House. It has a bit of challenge in the roofline, but I think it is worth it.
See you tomorrow. And thank you again for reading. And I am going to be posting these series of Halloween houses on the Simon Says Stamp Monday Challenge blog because the theme is "Halloween/Spooky" perfect for the little houses. You should see the designs that the design team came up with. They are wonderful.
Lucy

Printable pattern to make this fun little cardboard house for your Halloween village
Maura
Very cool little crooked house! Awesome that you made the pattern for it! Thanks for sharing your awesome make with us at Simon Says Stamp Monday Challenge! Maura