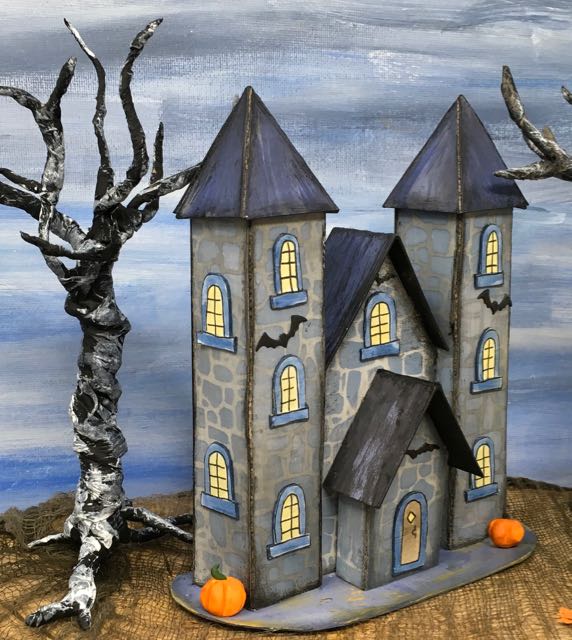
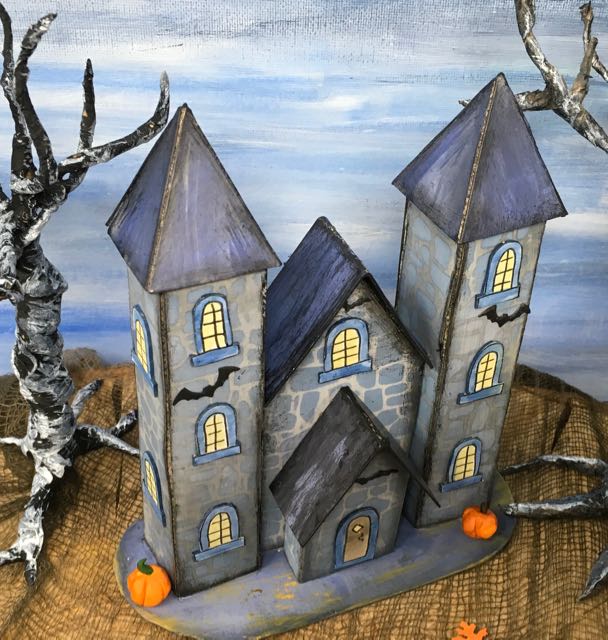
Front angled view of Vlad's Castle the 13th house of the Halloween paper house series
And last but not least, the final little paper house in the 13 Days of Halloween challenge - Halloween Paper House No. 13 also known as Vlad's Castle. The miniature castle completes our Halloween village for this year. It is based on the Smithsonian Castle in Washington, DC which I saw last week. I figured I could turn it into a Halloween castle pretty easily.
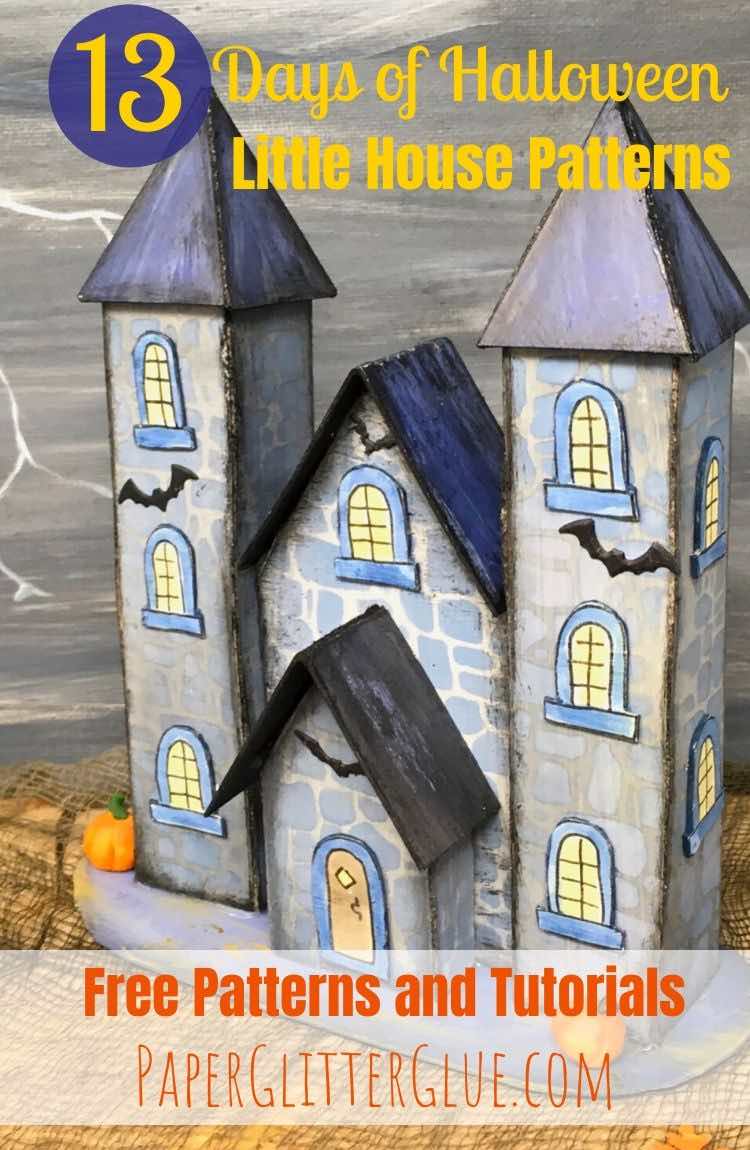
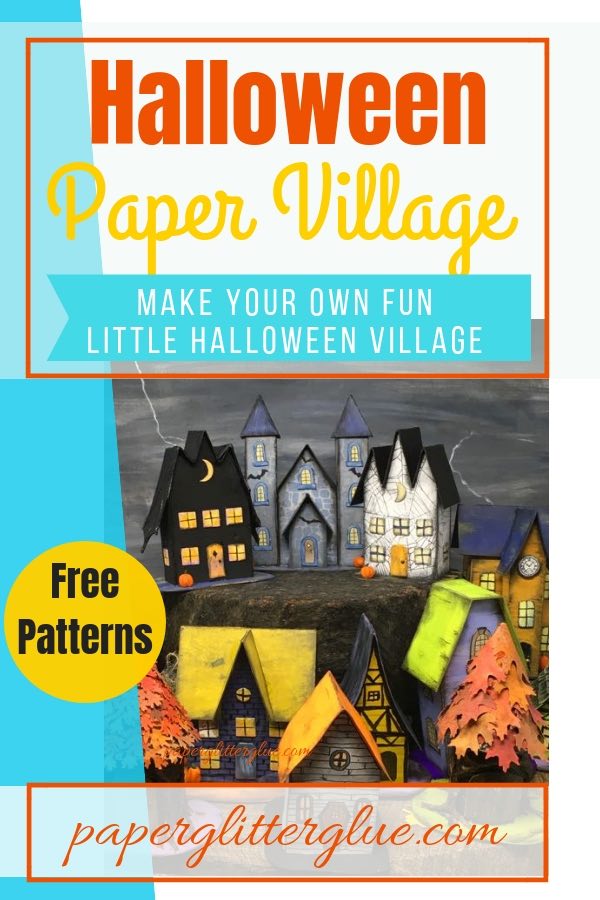
Here is the updated Vlad's Castle in my book - 13 Handcrafted Halloween Houses. I added lots more optional details to the houses like the spooky windows below.

My book, 13 Handcrafted Halloween Houses, has all of these 13 patterns including:
- Variations on a number of the houses - some with side chimney options, dormers, roof top chimney
- Lots of window and door patterns
- Roof shingles patterns
- 2 Fence styles
The patterns are in two formats - printable PDF patterns and SVG cut file patterns if you have an automatic cutting machine like a Cricut.
One challenge in making a castle in paper or cardboard is how to make the towers. If the towers are circular, the castle is far more difficult to build. That is one reason the Smithsonian Castle on the mall in Washington DC appealed to me so much - square towers.
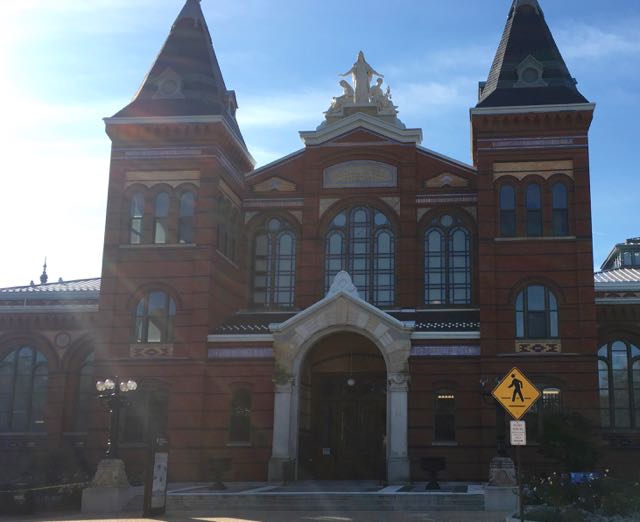
This photo was taken later in the day so you can't see all the wonderful details of the Smithsonian Castle, but it is beautiful. Still you get an idea of the basic structure that I used for Vlad's Castle.
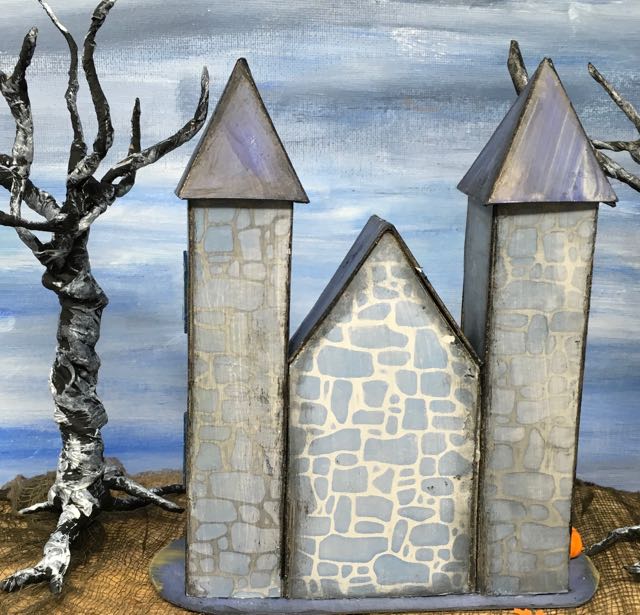
Basic Structure of Vlad's Castle
So Halloween Paper House No. 13 is constructed of 4 main pieces - the body in middle shaped like a front gable house, a portico in front of that and a tower on each side. Each component is pretty easy to make. I made the castle very narrow - only one inch wide because that's the front dimension of each tower. It's a proportion that I think works.
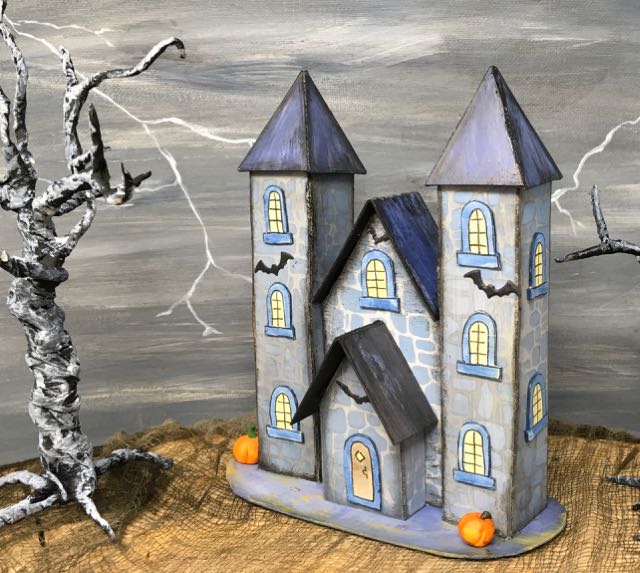
It was a stormy night at Vlad's Castle - the 13th house of the Halloween challenge
Here's how you make Vlad's Castle
Get the pattern from THE PAPER GLITTER GLUE LIBRARY first
You can find all my free patterns in my Paper Glitter Glue Library. I list the patterns chronologically. So you will find this last house of 13 Days of Halloween challenge.
And how to you get the password to the library? Simply subscribe to my newsletter with the form at the bottom of this post. You will be sent the password immediately so you can download the pattern. Next click on the library link, then click to enter the password protected area, type in the password and now the list of free patterns and tutorials will appear.
The pattern for Vlad's Castle is saved as a PDF zip file so it has to be unzipped when you download it. There is also an SVG version for cutting machines like the Cricut Maker. Here are the instructions for unzipping a file when you have a windows- based machine.
This post contains some affiliate links for your convenience. Click here to read my full disclosure policy.
Materials
- Halloween House No. 13 Pattern PDF or the SVG version - Design No. 25
- Carbon paper (or use your preferred transfer method)
- Cardboard - I use cardboard like this
- Cutting Mat or a Tim Holtz Glass Mat
- Or you could use an automatic cutting machine like a Cricut or Silhouette or ScanNCut machine
- Metal-edged ruler
- Craft knife and scissors
- Aleene's Tacky Glue or other white glue. I like this glue the best for constructing my little houses.
- Stone Stencil - Stampers Anonymous Layering Stencil No. 28 - love this stencil
- Various colors of paint from the Tim Holtz Distress Line:
- Colored pens, pencils if desired for details
- Paintbrushes in different size (Use small pointy ones for details)
- Halloween Embellishments - I made the tiny pumpkins out of Sculpey polymer clay
Overview of Directions:
- Download and print pattern - Design No. 25
- Copy pattern to cardboard or use your automatic cutting machine.
- Score and cut out patterns along with your cardboard base
- Paint the house pieces and the cardboard base your desired color
- Paint or color windows and doors
- Fold and glue house together
- Add the windows and doors
- Glue the roofs and steeples on
- Glue to base
- Decorate with Halloween embellishments
Related Links to the 13 Days of Halloween Challenge:
- 13 Days of Halloween Paper House patterns:
- Halloween Paper House No. 1
- Halloween Paper House No. 2
- Halloween Paper House No. 3
- Halloween Paper House No. 4
- Halloween Paper House No. 5
- Halloween Paper House No. 6
- Halloween Paper House No. 7
- Halloween Paper House No. 8
- Halloween Paper House No. 9
- Halloween Paper House No. 10
- Halloween Paper House No. 11
- Halloween Paper House No. 12
- Twisted Tree Tutorial
Now for the Directions in More Detail
-
Download and print pattern
After accessing the Paper Glitter Glue library, download and print out the pattern.
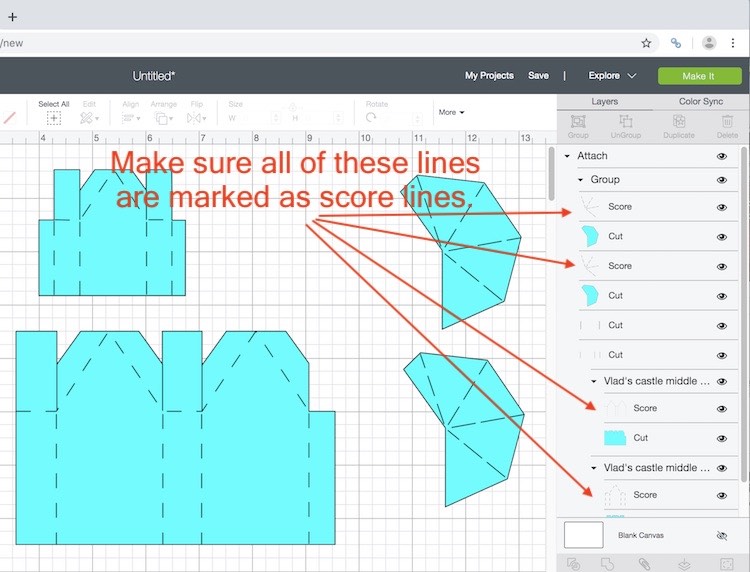
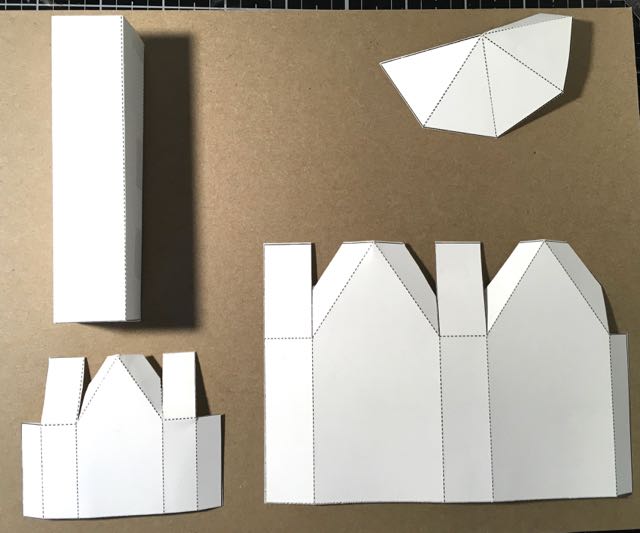
The PDF zip file for Vlad's Castle includes:
- Printable PDF house patterns including the main body of the house, the front portico, two towers, two steeple patterns, and roof patterns
- I also scanned some hand drawn windows and doors as well. Please note that the windows and doors are not neat and straight - they are wonky and whimsical. If you OCD tendencies, when you print up your patterns, just omit that page. It will make you crazy. Also I didn't save them in the right format so they are a little blurry.
- Brief Directions also included.
If you are using an automatic cutting machine, be sure to change the cut lines to score lines. See the photos below:
-
Copy pattern to cardboard
Use your preferred method to copy the pattern to your cardboard. Yes, even in the year 2018, I use tracing paper. I will learn to use my Cricut cutting machine soon, but so far, I cut things out by hand.
Pattern pieces for Vlad's Castle
-
Score and cut out patterns along with your cardboard base
So cut out 4 main pattern pieces for the castle itself:
- The main body of the house
- The front portico
- Two towers
And there are 4 roof pieces as well:
- Main roof for gable house
- Roof for the front portico
- Two steeples for the two towers
Cut out these pieces and score them. Each piece is a pretty simple to cut out.
-
Paint the house pieces and the cardboard base your desired color
Since this is a Halloween castle I figure it has to be grey or a color near grey. I didn't want it to be too boring so I mixed grey with a blue just to give a little more color.
First I painted the pieces with the standard gesso. I just like this as the base for all my painting. Then I added some grey Hickory Smoke to some gesso to make a slightly lighter grey to function as the mortar for my stone stencil Stampers Anonymous Layering Stencil No. 28. At first I planned on stenciling the stones with Hickory Smoke with some black edging, but I decided a little more color might work better for this Halloween village. So I chose Faded Jeans distress oxide ink. It adds a little color, but still close enough to grey.
Next I edged each piece with some Black Soot distress paint and/or Black Soot distress ink. This makes each section of the castle look spookier.
I used the Faded Jeans color on the base as well, edged it with Black Soot distress paint and then added some Fossilized Amber and Wild Honey highlights.
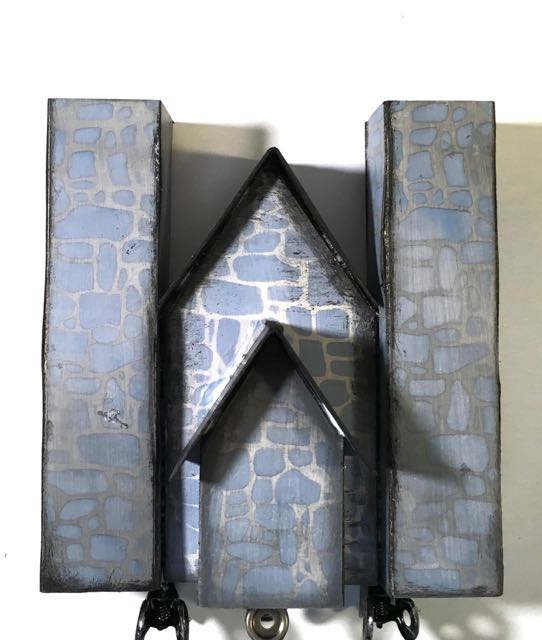
Four main pieces glued together to form the castle
You can also stencil the pieces to mimic stone. This stone stencil tutorial shows you how.
-
Fold and glue house together
After you have painted the house the way you want, glue the house together. Usually I add windows and doors before I glue things together, but because I wasn't sure how all the pieces would fit together, I waited to do that step.
I glued the castle together by gluing the main body of the castle to the two towers. The main body (the little house in the center) is narrower than the towers. It's designed that way to give more dimension to the front of the castle. But that also makes the back of the castle flat which is kind of nice when you are gluing stuff on.
When the towers are glued to the middle piece, then glue the front portico on.
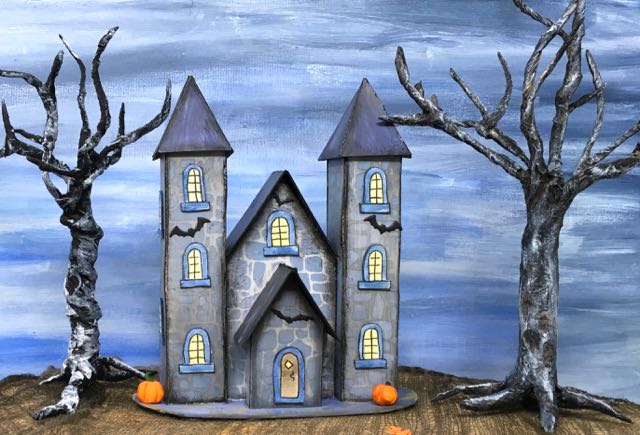
Front view of Halloween Paper House No. 13 next to twisted trees
-
Add the windows and doors
To make these windows, I drew the windows and doors with a fine tip pen on a piece of cardboard primed with gesso. Then I colored them with distress pens. I just like the way they look even though they are uneven. Also I think the fact that they are made of cardboard rather than paper gives them more dimension, but paper works.
And I mentioned earlier, that I scanned the drawing and saved it as PDF if you like whimsical, wonky windows. They're in the PDF zip file if you want to color you own. Otherwise paint or draw or cut out the windows of your choice.
Now you can add the windows and the door. I only added them to the front of the castle because I just got a little lazy after I cut out 11 windows. The back of the castle is bare. Vlad is apparently only concerned of appearances in the front.
Plain back of the castle. Note that the towers and the middle piece are all in the same plane
-
Glue the roof on
After you have glued on the windows and the door. You can glue the roof pieces on. First glue the roof piece on the main body of the castle - the part between the two towers. You might find that you have to trim it a little bit to fit. I did. But on the pattern I would rather it be a tiny bit too long than too short.
I didn't glue this roof on first because I wanted to be sure that the towers fit snugly against the middle of the castle.
Next glue on the portico roof. Then the steeples. The steeples are designed to be slightly larger than the towers so they hang over the towers. Just run a thick bead of glue on the top of the towers to glue the steeples on.
-
Glue the Castle to its base
Now glue your cute little castle to the cardboard you have cut out as the base. I colored this base with Faded Jeans distress paint mixed with a little white gesso and then distressed it with Fossilized Amber and Wild Honey distress paints.
To make sure your house sticks to the base, apply a thick bead of glue to all the seams at the bottom of the house. Since this castle is kind of wide and very narrow, one tower didn't stick very well so I curved the base just a little bit to get the glue to stick.
-
Decorate with Halloween embellishments
Bat's Eye view of Vlad's Castle
On this castle, I embellished it a little better than I did on previous houses - I added bats. Vlad's Castle has to have bats. And of course, there are pumpkins. I just like the little orange pop of color that the polymer pumpkins provide.
So that's the conclusion of the 13 days of Halloween challenge - 13 Spooky Little House Patterns in 13 days. Actually I am over by an hour or so. I just couldn't get the Vlad the Count's castle done in time.
Anyway, thank you for joining me. I hope you found some little houses that you like. And remember, you can always modify these same patterns for Christmas.
Next Project?
My next project is the little house-making party in about 3 weeks. I have some fun crafty ideas related to the party to share with you.
Again thank you for reading. Let me know if you have any suggestions or questions. You can leave a comment in the post or email me at [email protected]. I love to hear from you.
Lucy

Make Vlad's Castle from this free printable pattern for your own Halloween village.
Vlad's Castle the 13th house of the Halloween Paper House series
Make your own adorable Halloween village with these free printable patterns
Sara
What a treat to be able to spend a portion of my 'visiting' time with you this morning, Lucy! I have missed so many of your Halloween houses, but I WILL catch up! These are not to be missed! I love this spooky twin tower castle, and I can see where you were inspired by the SC in DC. You are a genius to make these patterns, and I think you missed your calling as a house/building designer. I really am drawn to the colors on this one, and your painting is superb! Thank you so much for sharing these...I bet they have all flew the coop already to a very happy high bidder. I can't wait to catch up on all the others! Sending hugs!
Lucy
Sara,
Thank you so much for visiting. I didn't start selling the houses early enough this year, usually I start on October 1, but I didn't really get them out until the very end of October. So I have some leftovers. That's ok. I will promote better next year.
And I am going to do a similar thing for Christmas - make 12 houses in 12 days to decorate a wreath. I think that will be fun.
Again, thank you for stopping by.
Lucy