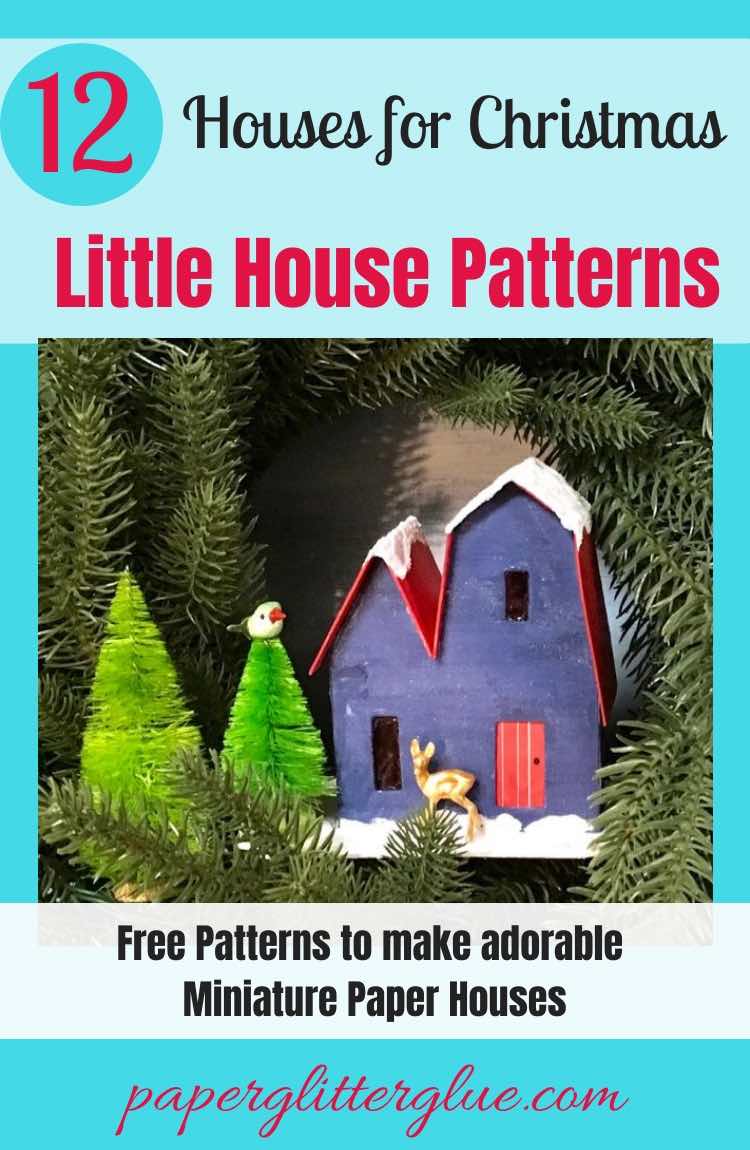
12 Days of Christmas - Christmas Putz Houses for Your Christmas Decor
Here's the start for making the cutest Christmas paper village. I just love this paper house.
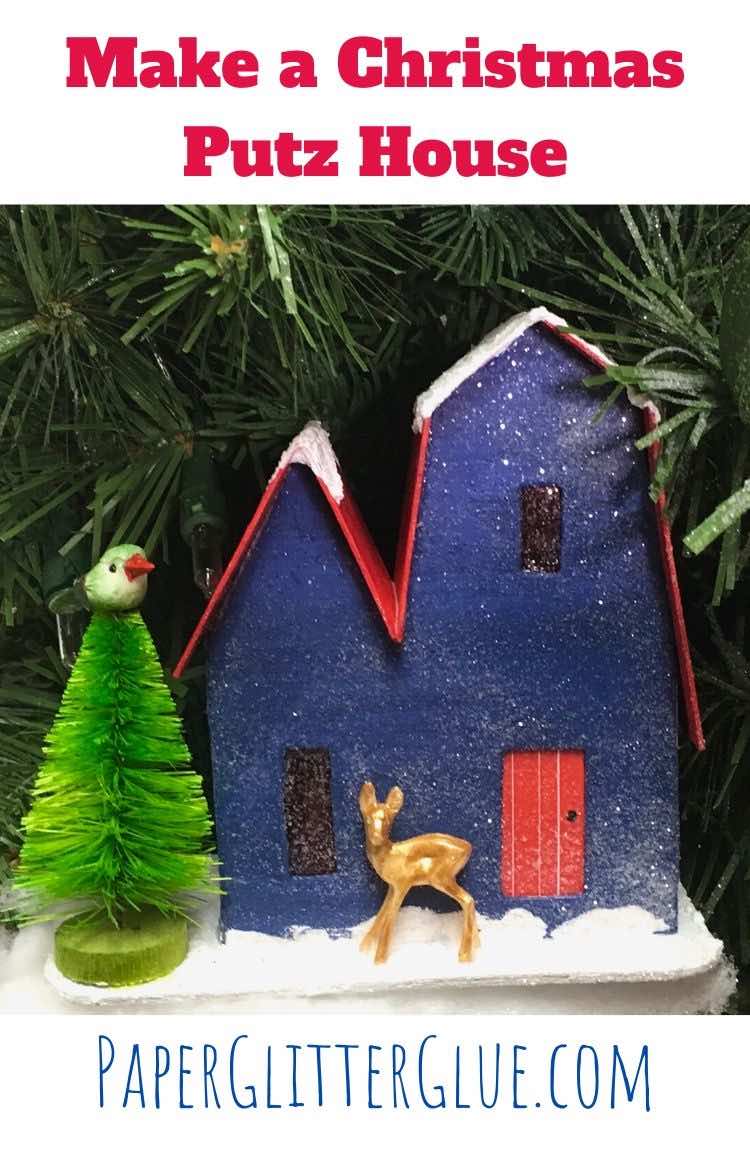
Let's get starting on the Christmas Putz House No. 1. The first house in a series of 12 so you can make your own tiny Christmas village or even a wreath full of delightful little houses. This particular glitter house is based on a 1930s house from a set of 8 little houses which sold for $1.49 in the 1934 Sears Roebuck catalog. I've made patterns from several of the other houses in this set which I will post in the next 12 days.
So let's get starting on the first little Christmas house in our 12 day series of houses.
This post contains some affiliate links for your convenience. Click here to read my full disclosure policy.
Here are the links to all the other little houses in this series you can make:
- 12 Houses for Christmas Challenge
- Christmas Putz House No. 1
- Christmas Putz House No. 2 – Log Cabin Putz House
- Christmas Putz House No. 3 – Twin Gable Front Putz House
- Christmas Putz House No. 4
- Christmas Putz House No. 5 – Little Church with Side Steeple
- Christmas Putz House No. 6 – Frosty Barn
- Christmas Putz House No. 7 – Round Arch House
- Christmas Putz House No. 8 - Happy Holiday House
- Christmas Putz House No. 9 - Swiss Chalet
- Christmas Putz House No. 10 - Snowy Church
- Christmas Putz House No. 11 - Winter Cottage
- Christmas Putz House No. 12 - Split Level House
- Winter Village Wreath - where all the little houses live now
Materials to make the Christmas Putz House No. 1:
- Pattern for Christmas Putz House No. 1 for the 12 Houses for Christmas challenge - Design No. 28 - in the Paper Glitter Glue library
- Tracing paper (if you are copying the pattern to cardboard)
- Cardboard
- Cutting Mat - this is my favorite
- Metal-edged ruler
- Craft knife and scissors
- Aleene’s Fast Grab Glue or similar glue
- Gesso
- Paint colors of your choice
- Paintbrushes
- Sand
- Rock Candy Glitter
- Snow-Tex or Grit Paste for snow
- Christmas embellishments
- Cricut Maker or other cutting machine
Steps to make this adorable miniature cardboard house:
- Download the free pattern - Design No. 28 - and print from the Paper Glitter Glue library
- Copy the pattern for the Christmas Putz House No. 1 onto cardboard, score the fold lines, cut out or use a cutting machine
- Prime and paint the house
- Cut out windows
- Add the door and windows to the inside of the house
- Glue house together along the glue tab
- Glue roof to house
- Cut out cardboard base, prime and paint
- Glue house to base and add embellishments
Detailed Information to Construct Your Own Christmas Putz House No. 1
1. Download the pattern and print it or use SVG cut file
After accessing the Paper Glitter Glue library, download and print out the pattern. To get the password to the library, just subscribe to my newsletter below and you will immediately get the password so you can download the pattern.
The first house in this series is Design No. 28.
The PDF file includes a printable PDF house pattern.
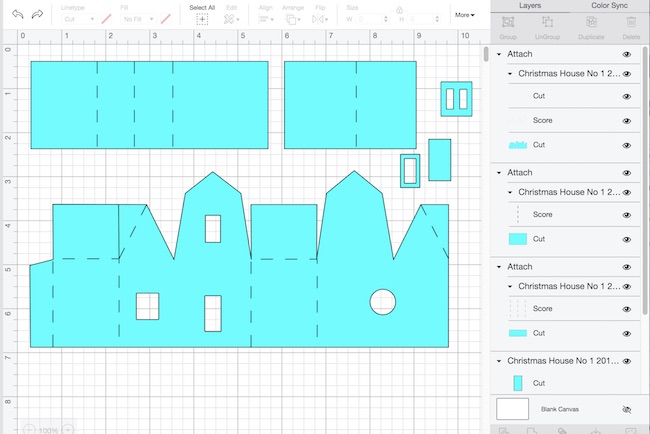
If you have an automatic cutting machine like a Cricut, use the SVG pattern to make the Christmas House No. 1.
Here's how the house pattern looks in Cricut's Design Space. It is important to change the score lines to score. Of all the lines on this pattern, only one line is the cut line. That lines separates the shorter gable on left from the roof flap. All the others lines are score lines. Also be sure to attach those lines to the pattern.
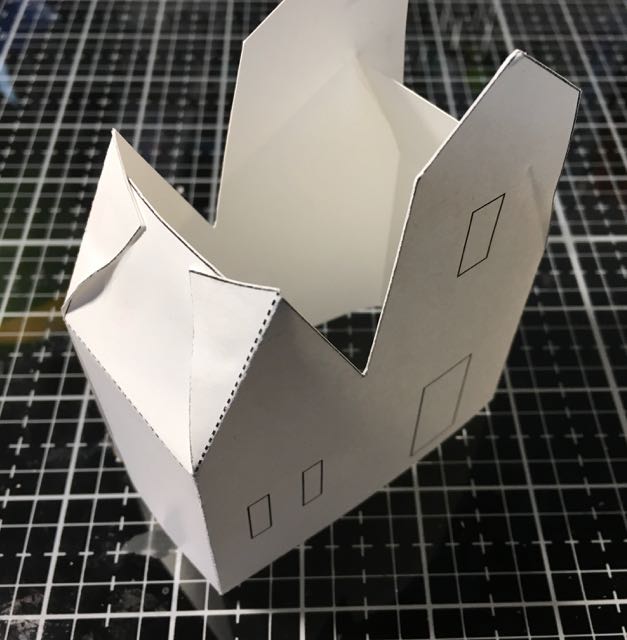
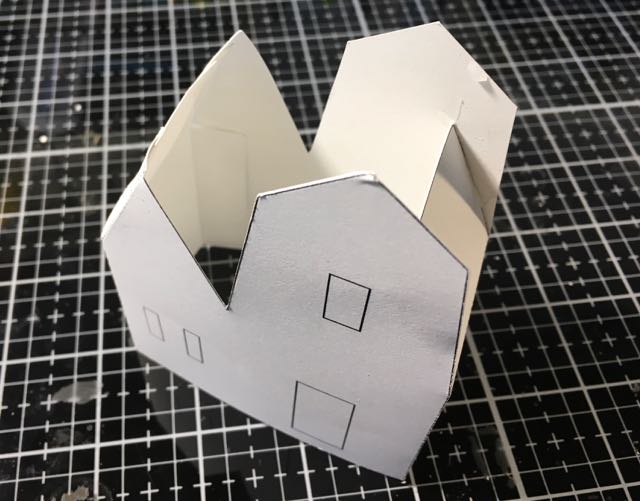
2. Copy the pattern onto your cardboard, score and cut the pattern
The pattern itself is pretty simple – it is a double gable house with one gable shaped kind of like a barn. You may shrink or enlarge your pattern to whatever size you want depending on your sources of paper and size of cardboard.
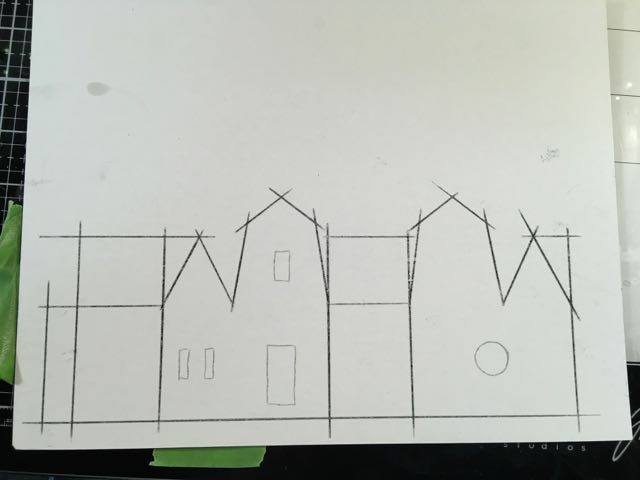
Once you have the pattern copied to your cardboard, the score along the fold lines before you cut it out. It is a little easier score before you cut.
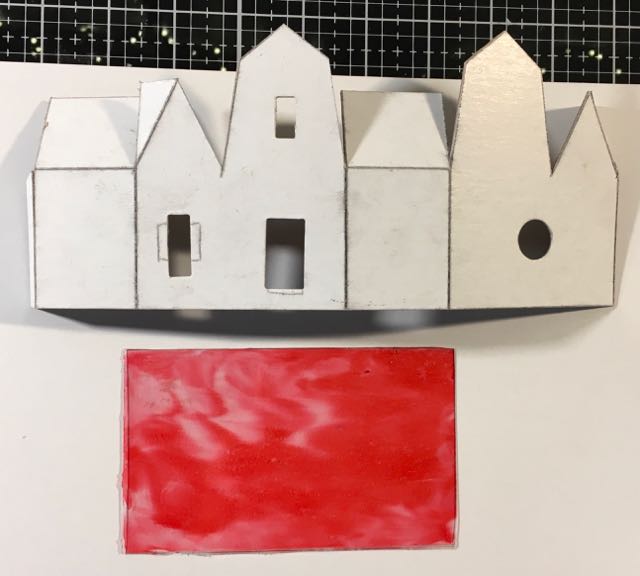
3. Prime and paint the house
Next, I prime my little houses with gesso (gesso is a white paint primer which prepares your cardboard to hold onto paint better).
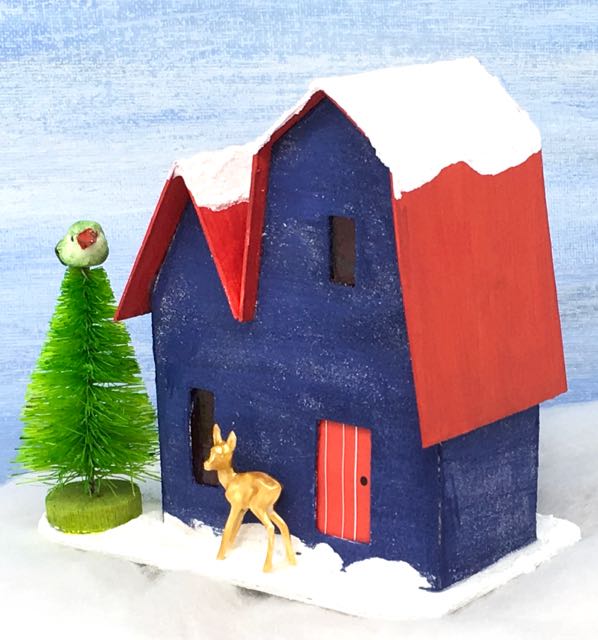
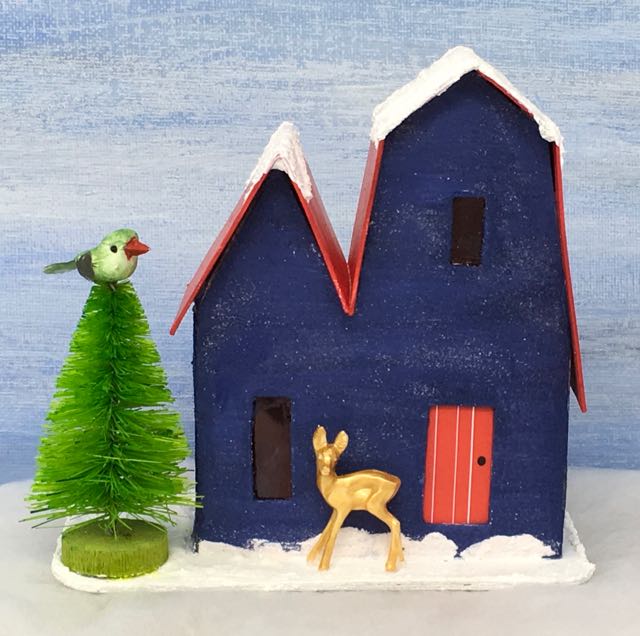
Because the vintage house this pattern is based on was painted a blue-purple color, I used the Chipped Sapphire shade from the Tim Holtz Distress paint line. I also sprinkled a little fine sand from the craft store on the wet paint just to give a little subtle sparkle to the house without being too glittery.
The roof is painted with a wonderful red Distress Paint called Candied Apple. When you paint the roof be sure to paint about ¼ inch around the underside because it will show when the roof is glued on.
4. Cut out Windows
To make these houses easier to make I did not include many windows. Also the vintage versions really didn't have many windows either. I cut them out of the cardboard with these inexpensive dies I've talked about before. You can cut them by hand pretty easily.
For the sake of simplicity I didn't add any windows on the sides either. There is a small circular opening in the back for lighting.
5. Add the door and windows to the inside of the house
Now is the time to add the windows and the door to the inside of the house. I use leftover acetate packaging colored with alcohol inks for the windows.
Reproduction Vintage Putz Windows and Doors
I drew a simple door on my computer and printed it out. But if you want the real vintage look, there are 3 places you can get reproductions of the doors and windows used on the old Putz houses.
- Pete Oehmen has a printing business and has printed reproduction Putz windows and doors for many years. You can find how to contact him and buy the windows and doors on his website - Cardboard Putz Houses.
- And you can print your own windows and doors for free from this link on the Cardboard Christmas Printed Paper Resources page.
6. Glue the house together along the glue tab
Structurally, this is a pretty simple house so just glue it along the glue tab on the side. Then glue the roof flaps and tabs together like you see in the photo below.
The single roof flap on the barn-type gable helps keep the gables from flexing when you glue the roof on.
7. Now Glue roof to house
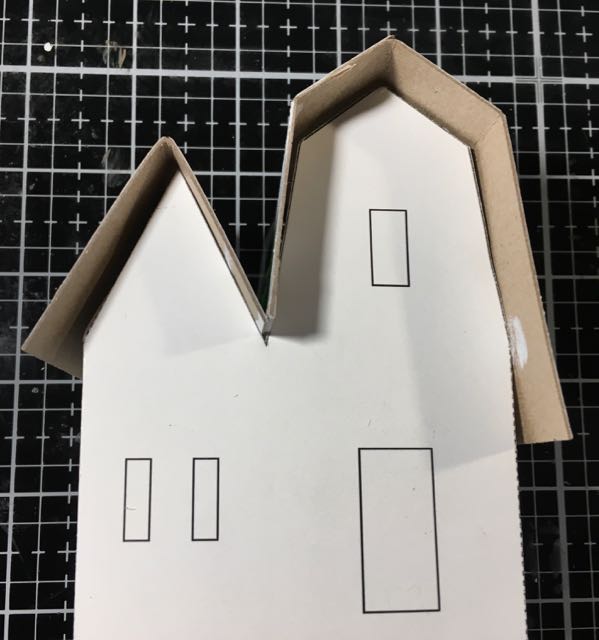
After you have glued the house together, you can now adhere the roof to the house. Gently fold the roof so it mimics the angles of the gables. Sometimes you have to trim the inside leg of the roof to fit in the V where the two gables meet. It's hard to make the pattern perfect because the thickness of materials varies. Sometimes you have thick cardboard and sometimes it's skinnier cardboard. On the photo above, the left gable needs to be trimmed just a tiny bit.
Then run a bead of glue along the gable edges. Hold or tape the roof in place until it is set. I often use a painter's tape to hold house parts together if I can't use a binder clip.
8. Cut out cardboard base, prime and paint
Again, this is a simple house with a simple base so all you need to do is cut a rectangular piece of cardboard a little larger than the house itself. If you want elaborate landscaping or lots of Christmas embellishments, then cut a bigger base. Since I'm keeping these little paper houses pretty simple, I've been making the bases small.
But please remember to cut a hole in the base if you want to make it easier to add light. If you are putting your house on a wreath it helps to have different options for lighting - in the back or underneath the house. I forgot to do that on this house.
For these houses, mostly I am going to paint the bases white and then cover them with snow.
9. Next, glue the house to the base
Just run a bead of glue along the bottom of the house and adhere to the base. These houses are small so they stick pretty easily to your cardboard base.
10. Decorate Your Little Christmas Putz House No. 1
Now you get to use your imagination and decorate the little house however you want. I just added a bottlebrush tree with a little bird on top and a Tim Holtz deer. Also I decorated the roof with Snow-tex sprinkled with just a bit of Rock Candy dry glitter.
Tomorrow's house is a little Log Cabin for day no. 2 in the 12 Houses for Christmas series. I think it is a great addition to any Christmas village. I hope you will stop by tomorrow.
And remember if you have any questions, I will be glad to help. Leave a comment here or email me at [email protected]
Thank you for reading.
Lucy

Clive
This looks like a nice project for the kids to make,I'll have a go first.
Thanks for info.
Lucy
It is a good "starter" home.
If you make it with the kids, I'd love to see it - you could post in the Facebook group. Or tag me if you post it anywhere.
Evelyn
Saw some of these last year and have been looking for them since.
Can't wait to make my little village in time for Christmas.
Lucy
Evelyn, I am so glad you found these little houses. If you have any questions, just let me know.
Lucy
Jennifer Lyson-Soza
Every year I make a putz house for my sister who has a rather large village of the vintage ones. Thank you for being another source of patterns. You can definitely see how I have progressed over the years ( I think it’s been 6 or 7 now). I found some useful tips in your blog that I will use this year. Again thank you for your knowledge, I look forward to retirement when I will have more time to play.
Lucy
That is the nicest compliment I could get. Thank you so much.