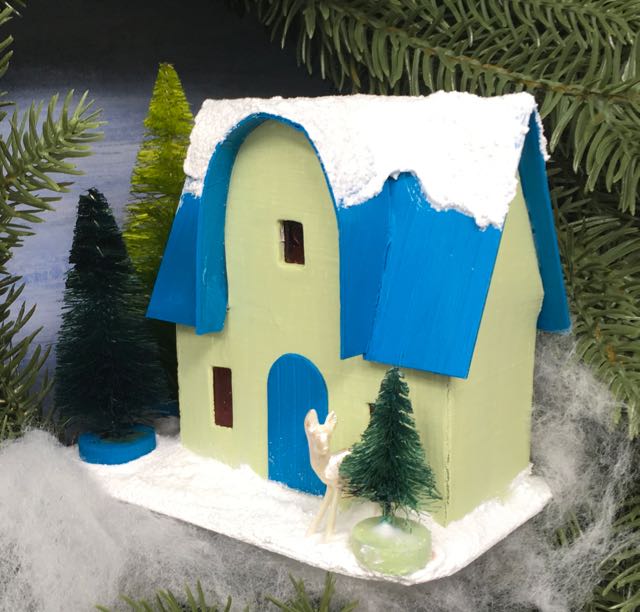
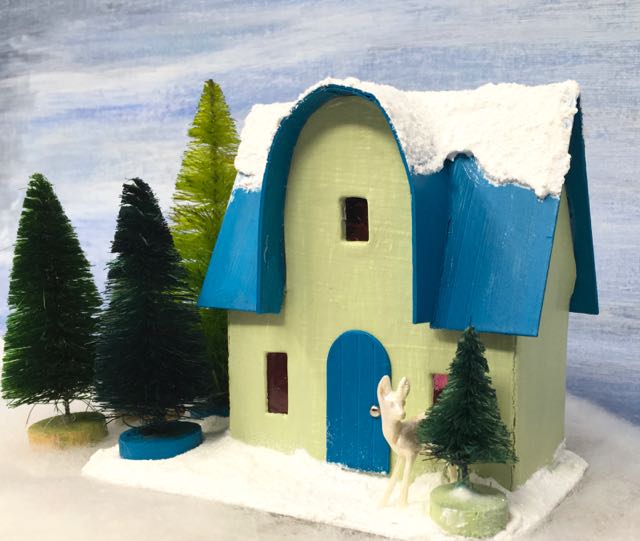
The newest addition to our Christmas village is this cute little Putz house with a rounded front arch. I like almost every little house that I make, but some of them appeal to me more than others. This one - the Round Arch Christmas Putz house (no. 7 in the 12 Houses for Christmas series) - I just love. I've seen similar arches on vintage Putz houses, but I've never made on before. I wasn't sure how easy it would be to glue the roof on a rounded arch. It turns out it wasn't that hard.
Below are the instructions and the link to the free printable pattern in the Paper Glitter Glue library.
Download the Pattern for the Round Arch House - Design No. 34
You can download the pattern from the Paper Glitter Glue library where I keep all my downloadable patterns, printables, and tutorials.
After accessing the Paper Glitter Glue library, download and print out the pattern. To get the password to the library, just subscribe to my newsletter below and you will immediately get the password so you can download the pattern.
There are two files for the Round Arch house - one is the SVG file and one is a printable PDF file.
This post contains some affiliate links for your convenience. Click here to read my full disclosure policy.
What do we need to construct the Round Arch Christmas Putz House?
Materials List:
- Round Arch Christmas Putz House pattern - Design No. 34
- Cardboard of your choice
- Carbon tracing paper
- Stylus to trace the pattern
- Gesso
- Craft knife
- Acrylic Paint such as Ranger's Distress Paints
- Painter's tape - new favorite Frog Tape for Delicate Surfaces
- Binder Clips
- White PVA glue such as Aleene's Fast Grab Glue, Quick Dry or Tacky Glue
- Decorations or embellishments for your little house
Instructions to make the Round Arch Christmas Putz House:
- Copy your Round Arch Christmas House pattern to your cardboard - Design No. 34
- Or cut it out with your cutting machine using the SVG pattern
- Score the fold lines and cut out the little house
- Cut out windows and door where you would like them
- First prime, then paint the house and base
- Add the door and windows
- Glue the house together along the glue tab on the side and roof tabs
- Add the roof to the house
- Glue the Front Arch roof to your Putz house
- Adhere your little house to the base
- Add Christmas embellishments to your house
Additional Links related to making this little house:
Here are the links to all the other little houses in this series you can make:
- 12 Houses for Christmas Challenge
- Christmas Putz House No. 1
- Christmas Putz House No. 2 – Log Cabin Putz House
- Christmas Putz House No. 3 – Twin Gable Front Putz House
- Christmas Putz House No. 4
- Christmas Putz House No. 5 – Little Church with Side Steeple
- Christmas Putz House No. 6 – Frosty Barn
- Christmas Putz House No. 7 – Round Arch House
- Christmas Putz House No. 8 - Happy Holiday House
- Christmas Putz House No. 9 - Swiss Chalet
- Christmas Putz House No. 10 - Snowy Church
- Christmas Putz House No. 11 - Winter Cottage
- Christmas Putz House No. 12 - Split Level House
- Winter Village Wreath - where all the little houses reside now
Copy the pattern to cardboard if cutting out the pattern by hand

My favorite method for transferring the pattern to cardboard is using tracing paper.
For using a cutting machine, be sure to designate score lines and attach them to the piece they belong to
Here's how the file looks when uploaded to Cricut Design Space.
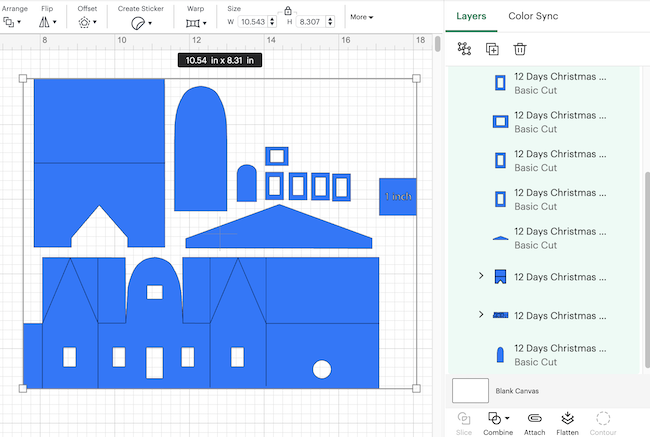
And here is how it looks with the score lines designated and attached. And the arched support piece has the window and door cutouts on it in the updated pattern.

Score the fold lines and cut out your little house
Below is the pattern cut out which is when I noticed that the roof pattern was just plain wrong. It is fixed now.
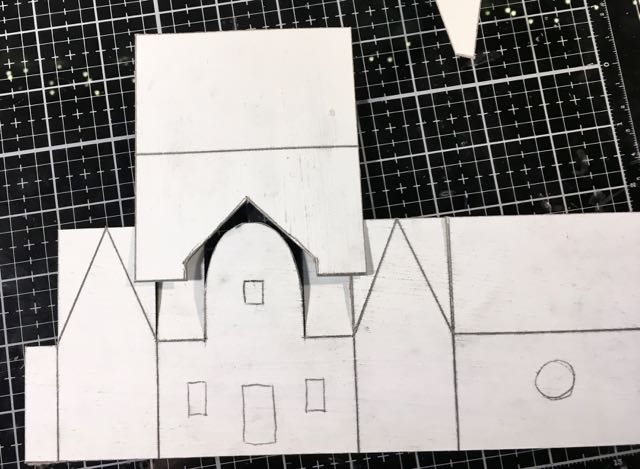

Usually I score the fold lines with the back of my craft knife to make a sharp line for folding. Then I cut out the pattern. Often it is easier to cut out any little pieces first because then you have more cardboard to hold onto while cutting.
Cut out windows and door where you would like them located
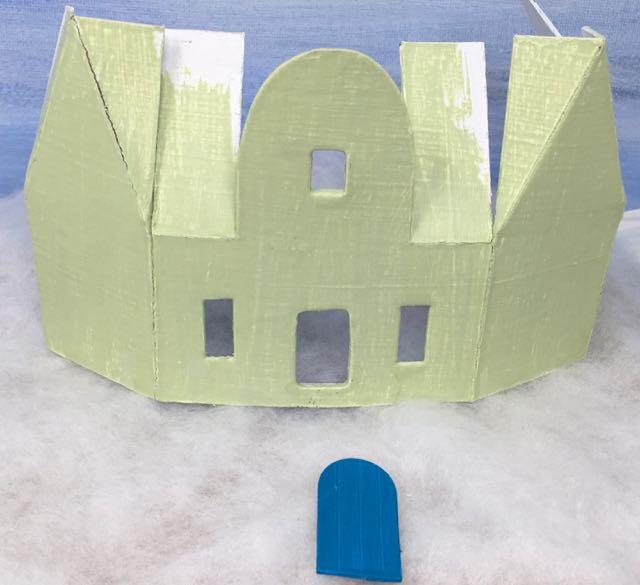
You can use your own ideas about placement of windows and the door. In order to keep these patterns simple, I haven't been adding many windows to the pattern. But you are free to add as many as you want.
If you cut out a door, be sure to leave at the very least ⅛ inch intact at the bottom so your house is structurally more stable.
I used this method for cutting out the doors and windows before I had a cutting machine.
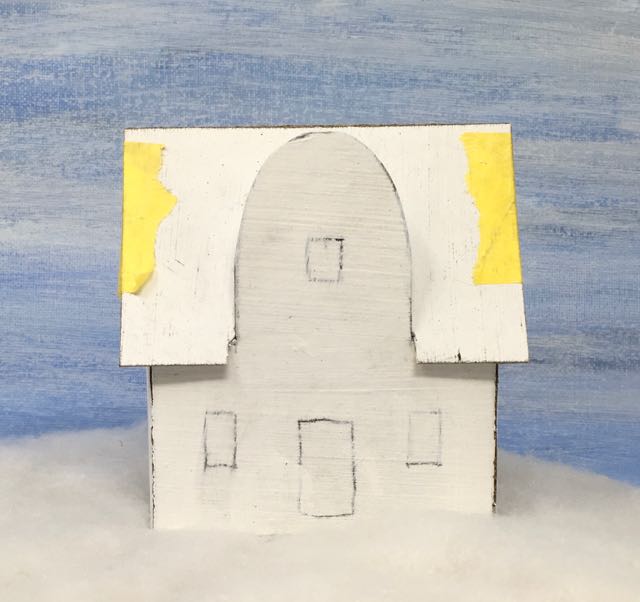
First prime, then paint the house and your base
I prime and paint at this step because it is easier for me. But other people paint after the house already glued together. You can paint the corners better if you wait. What I do is touch up the corners after I have glued the house together, but before I glue the roof on.
To make a cardboard base for your house, glue two sheets of cardboard together and cut out a small base larger enough to fit your putz house and its embellishments. This house is 3 inches wide and the base is about 5 inches wide. For these little houses, almost all the bases are white covered with snow.
Add the door and windows
Here is the main reason I paint first before gluing the house together. I find it easier to glue on windows and the door before I've glued the house all together. I can place them better on the inside surface of the cardboard house when it is flat.
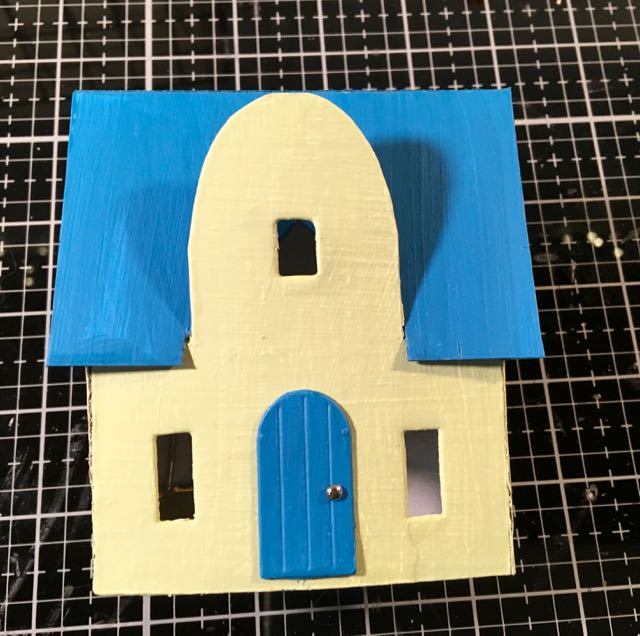
Glue your house together along the glue tab on the side and the roof tabs
To glue the house together I use a number of techniques - generally painter's tape and binder clips to hold the house together. But sometimes there is no other option than holding a piece in place by hand to make sure the house glues together the right way.

Also in the photo above you can see that I glued a support piece on the back of the arch. I did that because it is a tall extension in the front and I don't want it to flex when I glue the arch roof piece on. The pattern includes the optional support piece. If you use that piece, be sure to line up the bottom of the support piece with the bottom of the house. The window and the door should line up easily.
Add the roof to your little house
You may find this is a slightly more challenging step in making any little house. You have to make sure the roof adheres to the body of the house in the correct alignment. Fortunately, PVA glues (the white craft glues) even including my favorite Aleene's Quick Dry Tacky Glue are forgiving. In other words, you have a few minutes to shift the cardboard pieces around to get everything lined up properly.
The photos above show that I had some issues with the roof. First I made the pattern wrong. When I added a ¼ inch overhang to the sides, I forgot that fact when I drew the first pattern. In the second photo you can see that the roof fits nicely. That is the correct one on the published pattern in my library.
BUT after I painted everything, the roof didn't fit quite as well. You can see that the left side of the roof sits higher than the right. I had to make a tiny cut on the cardboard to get it to sit correctly. You may find you have to trim the roof just a bit to fit. That is normal.
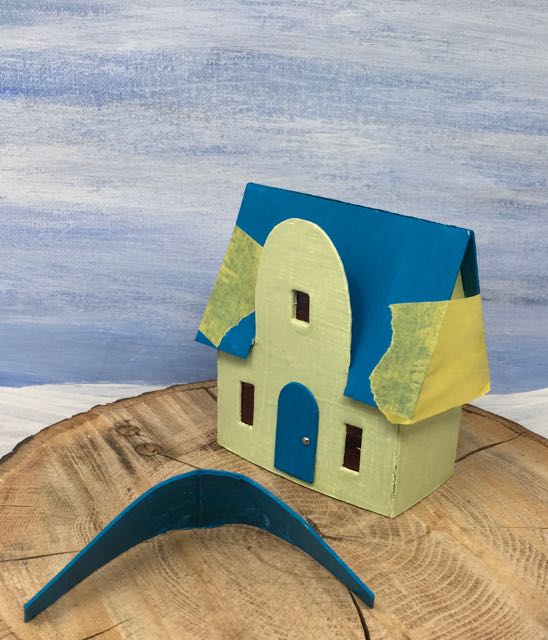
Glue the Front Arch Roof to your Putz House
Now comes the one challenging step to making this house. It's just a matter of having your materials ready and being patient. To get the arch roof correctly aligned, you must first gently curve it with your fingers. You do not have to score this roof, just make the cardboard bend to fit the arch. Test it while you are doing this. Don't fold it, just curve it.
And the better your curved roof matches the arch, the easier it is to get it to stick in place. Also I made the arch a little long. Test fit the roof and trim the ends if
Next tear off several strips of painter's tape. I think you must have painter's tape for this step or you will be holding the roof in place for 15-20 minutes. I also think it helps a lot to have a thicker glue like Aleene's Quick Dry Tacky Glue because it really does hold better. If you have a thinner glue, then apply the glue to both the roof and the edge of arch, wipe down so it won't drip and WAIT. You can tell when the glue gets tacky - ready for gluing - when it loses its sheen. It gets just slightly dull rather than shiny.
Finally place the roof in place. Apply the painter's tape to the top of the arched roof first. You're going to have to work a little to get the lower edges of the arch to adhere. I kind of make a tent with the tape over the lower edges. Check to make sure they are located where you want them to be. If so, let dry. Get a damp paper towel to mop up any glue leakage which is pretty much inevitable.
Whew! Done with that step. Let dry.
Adhere your little house to its base
Now once your completed little house is ready, glue it to the base. I just run a thick bead of glue along the bottom of the house and place it on the base. Push it firmly in place. Don't squash your house, just hold it firmly. After a couple of minutes it will adhere. Then let it dry.
Now add Christmas embellishments to your house
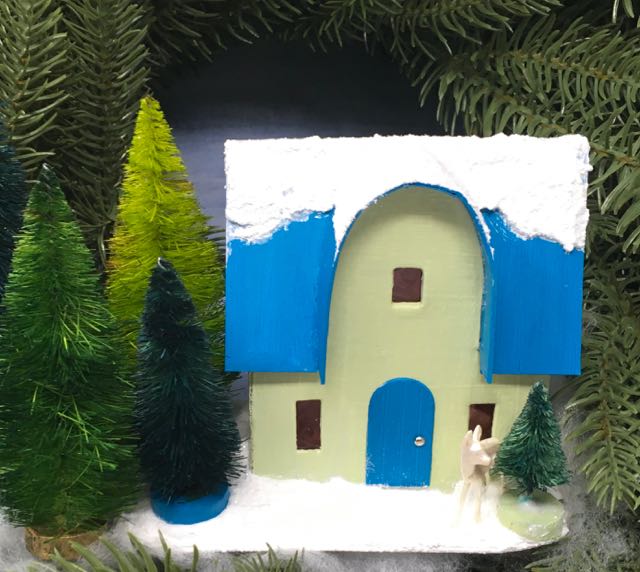
After all the construction and painting and gluing, you get to decorate. This is the most enjoyable step in making your little house. When I am doing a series like this, I don't usually go overboard with the decorations partly because of time constraints. But really the little houses are plenty cute all on their own.
What I've been doing with these houses is adding a thick layer of snow - usually Snow-tex mixed with some white paint on the base and push it up against the house so I don't smear too much on the sides of the house. Then I add a couple of bottle brush trees and usually a little Tim Holtz decorative deer.
What's Next?
And that's it for this little house. That's the Christmas Putz house with the Round Arch in the front. I am so pleased with the colors - Bundled Sage and Mermaid Lagoon, Ranger Distress Paints. They go together so well. I was surprised.
What's next? I'm not sure what house I am going to make tonight. It will be a surprise for me as well.
Thank you.
Let me know if I can help you with anything. Email me at [email protected] or make a comment here. I am always glad to help.
Lucy


Leave a Reply