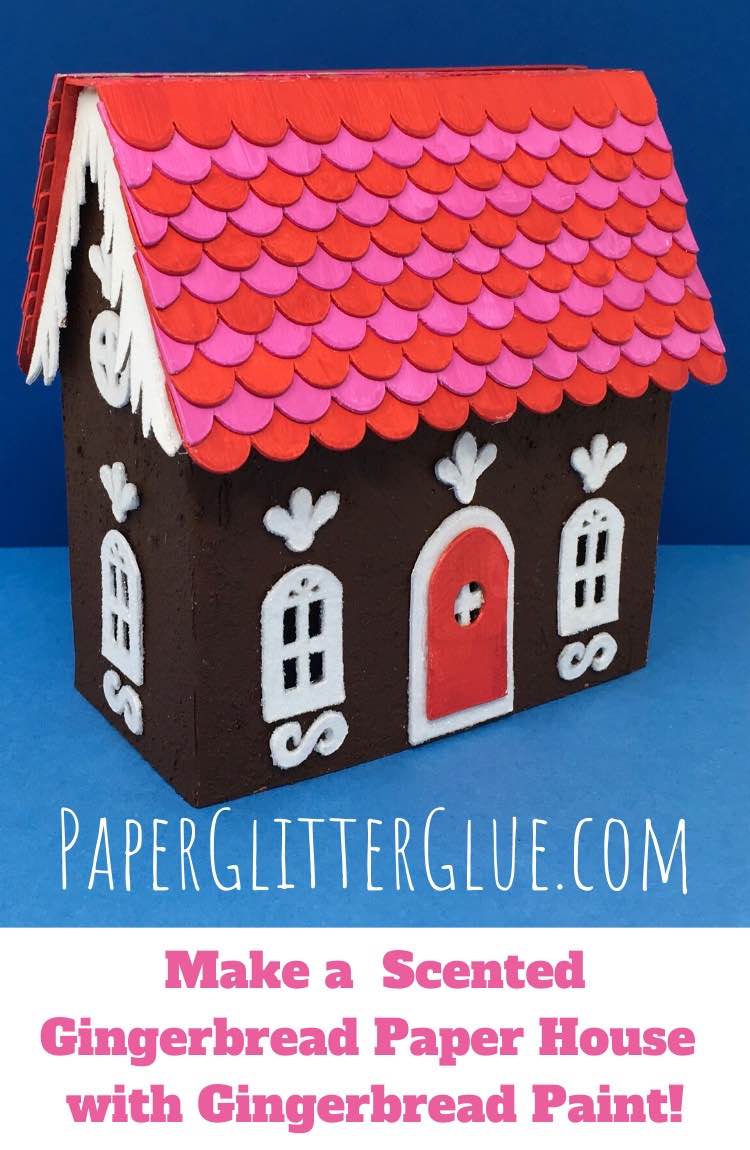
Make a Gingerbread Paper House that smells wonderful with DIY Gingerbread Paint
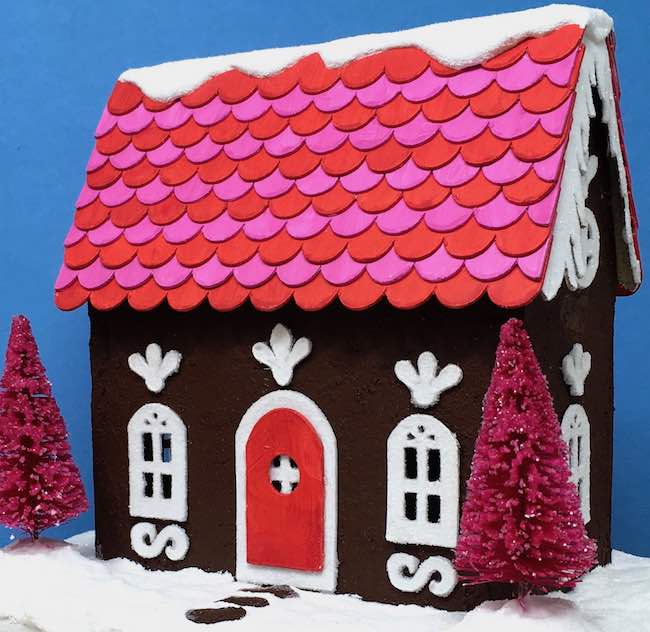
This Gingerbread Paper House has been percolating in my mind for awhile. Last year I experimented with making Gingerbread Paint on my pop-up Gingerbread house invitations to the Little House Making Craft Party. It worked, but not quite as well as I hoped. But this year, I got it. So here's a relatively simple little cardboard house with delicious-smelling Gingerbread Paint that you can make yourself. Let's get started with this fun holiday paper craft.
So this is the another project of the 15 Days of Holiday Craft series. Did you see the Red Roof Holiday Cottage - that's the first Christmas house in the series. Here's the project list:
- Red Roof Holiday Cottage
- Merry ChrisMoose Gift Box – DIY Mini Holiday Piñata
- Mini Paper Christmas House with Barn Shaped Gable (the Green Gable house)
- Gingerbread Paper House – made with Gingerbread Paint
- DIY Gnome Gift Box
- Scotty Dog Gift Box
- DIY Paper Wallet for Holiday Gift-Giving
- Paper Gingerbread Ornaments – Scented Gingerbread Men
- Happy Hollydeer Piñata Candy Box
- How to Make a Paper House Ornament for the Holidays
- Easy Gingerbread House Paper Ornament
- DIY Display Gift Box for the Paper House Ornament
- Pull String Piñata - Miniature Firecracker Piñata
- DIY Bird Ornaments - Cardinal, Goldfinch, and Bluebird (counts as 2 projects)
This post contains some affiliate links for your convenience. Click here to read my full disclosure policy.
So what do you need to make the Gingerbread Paper House?

Materials
- Gingerbread House Pattern (it's free) from the Paper Glitter Glue Library
- Cardboard
- A way to cut out your cardboard (I used my Cricut)
- Gesso
- Gingerbread Paint - make it with the instructions described below
- Burnt Umber Acrylic Paint
- Burnt Sienna Acrylic Paint
- Cinnamon
- Ginger
- Cloves
- Palette knife
- Candied Apple Distress Paint
- Picked Raspberry Distress Paint
- Mod Podge
- PVA glue (my favorite is the Fast Grab glue)
- Ranger Distress Glitter - Clear Rock Candy
- Snow-Tex
- Woodland Tree Lot Bottlebrush trees
And how to make the Gingerbread Paper House? Here is an brief outline of the steps:
- Download the free pattern for the Gingerbread Paper House from the library
- Cut out the Gingerbread Paper House
- Prime the little house and all the components
- Make Gingerbread Paint
- Paint the house with the Gingerbread Paint
- Glitter the door and windows and embellishments
- Glue the house together
- Next glue on the embellishments
- Adhere the roof to the house
- Glue the icicles on the edge of the roof
- Add shingles to the roof
- Make the cardboard base
- Apply snow to the roof
- Glue house to the cardboard base
- Glitter the bottlebrush trees
- Apply snow all around the little Gingerbread paper house and add embellishments
- Touch up the snow
- Paint snow with Mod Podge then apply glitter
- Enjoy your beautiful scented Gingerbread paper house
Now here are the detailed instructions with photos to help you with your holiday house.
First is always download the free pattern
Ok, so here is how you get the pattern to make your Gingerbread house. If you have already subscribed to my newsletter, then just type in the password in the library and you can get the files. The files are listed chronologically so the latest pattern I've made is listed first.
The files are in a zip format. That means they are compressed so they are easier to download. But it also means you have to unzip them or extract them so you have access to the pattern template.
If you have not subscribed to my newsletter, it's easy to do. Just fill out the form below and I will send you the password right away so you can access all of my free patterns. Don't worry, I will never send you spam. I'll send you a newsletter about every 1-2 weeks with crafty updates.
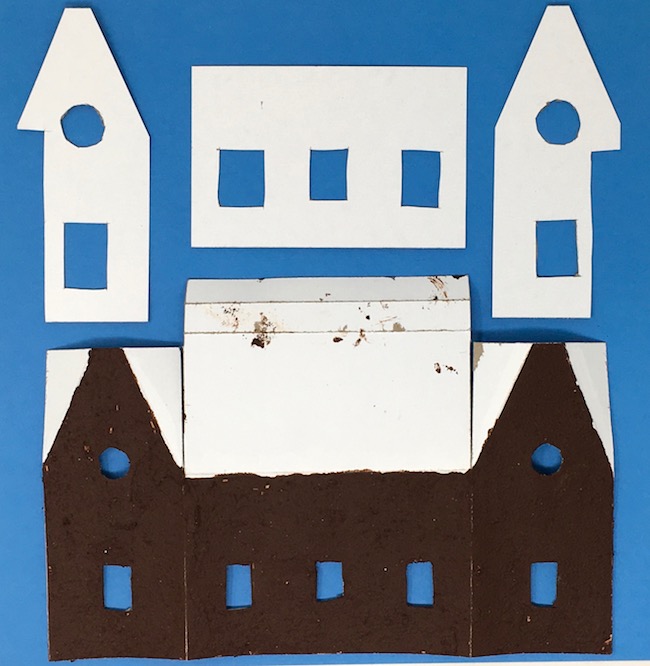
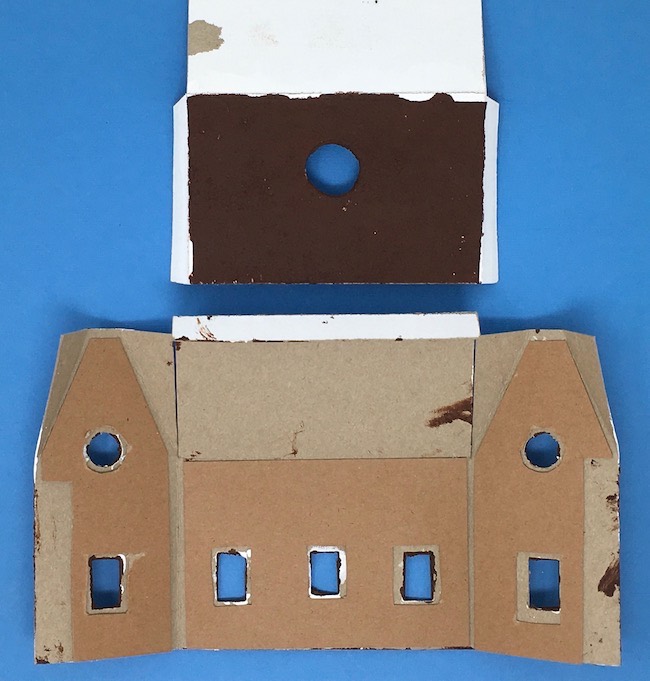
Next cut out the Gingerbread Paper House components
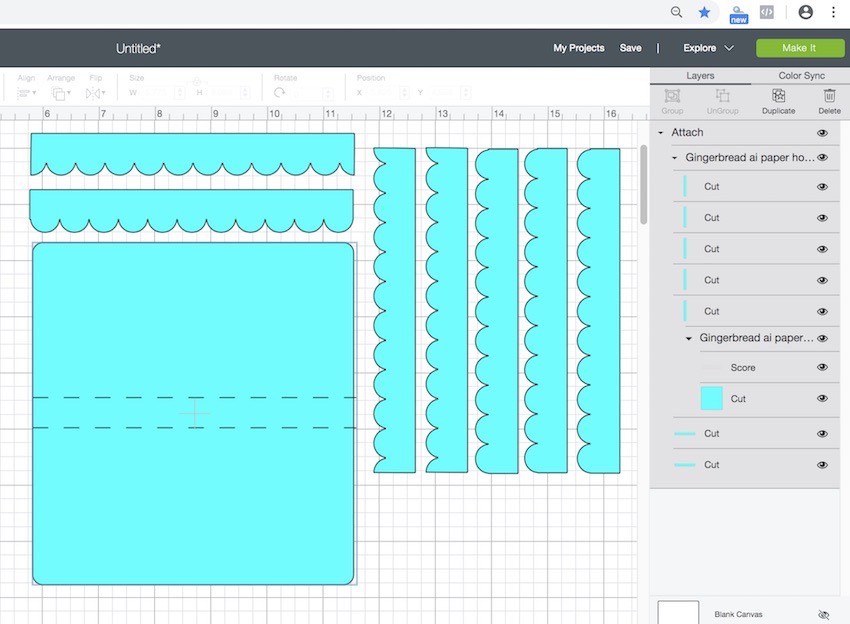
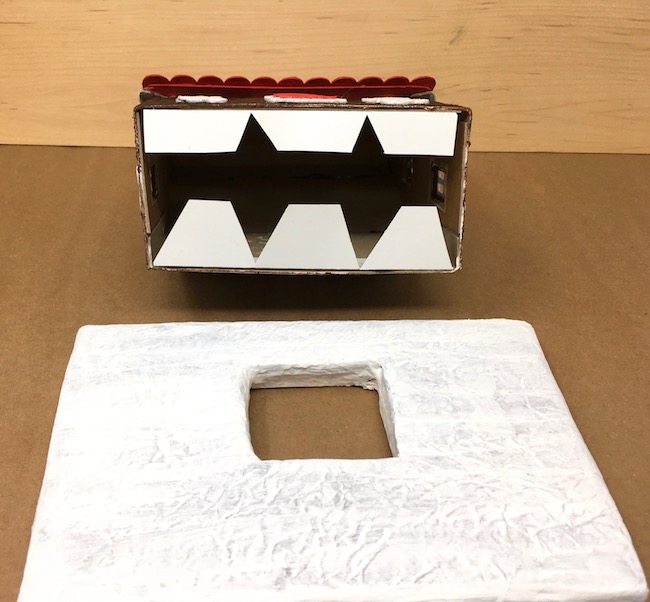
Now it's time to cut out the Gingerbread house. The cardboard I use is 8.5 inches x 11 inches so the pieces are arranged to fit on this size cardboard. This size house requires 3 sheets of cardboard.
If you are using an automatic cutting machine like a Cricut, this is how the pattern looks in Cricut's Design Space.
Always remember to ungroup before you change the lines to score lines.

Here's the main body of the Gingerbread house in Design Space. The score lines are marked. Almost all of the lines are score lines EXCEPT for the 2 vertical lines that separate the gable from the roof flap support in the front. Leave those two lines as cut lines. You can see them fairly easily below because they are the two solid lines. All the score lines have been marked and are dotted lines. Also do remember to attach so your automatic cutting machine will apply the score lines to the cardboard piece.
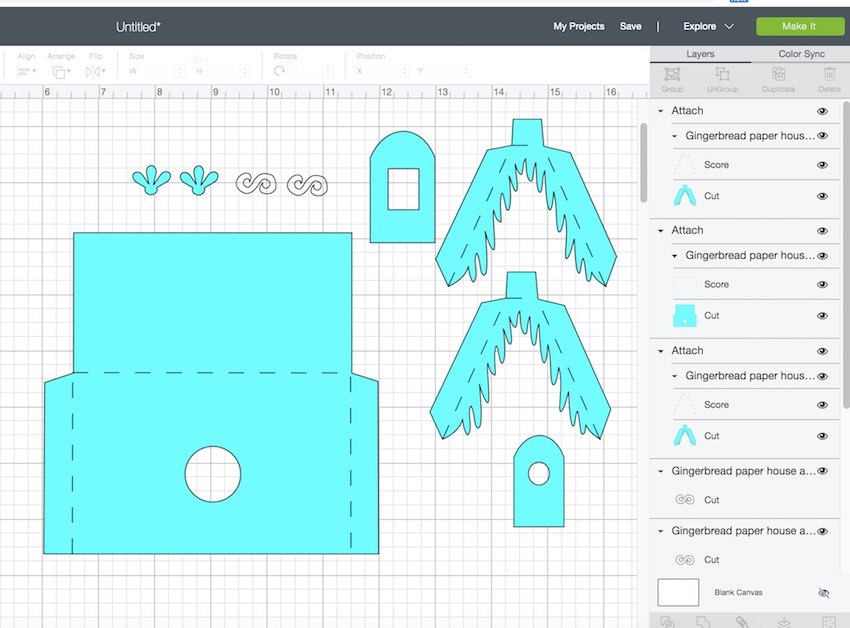
Next is the back of the house. All of the score lines on this section of the pattern are score lines. And I don't know why my little scroll-like embellishments are showing up as white, but they cut just fine.
And finally, here is the roof piece with shingles.
The only lines you have to remember to change are the score lines on the roof. Be sure to change them to score lines and attach to the roof piece.
Tips for Cutting by Hand
If you are cutting by hand, the pattern is pretty easy to cut out. My main piece of advice is to cut the shingles with some paper edger scalloped scissors like this pair. The other thing I would do is simplify the window frames. You could just cut out a rectangular window without any window panes to make it easier. And the icicles on the ends can be cut with scissors or make icicles by dripping some hot glue on paper and then coating it with Mod Podge and glitter.
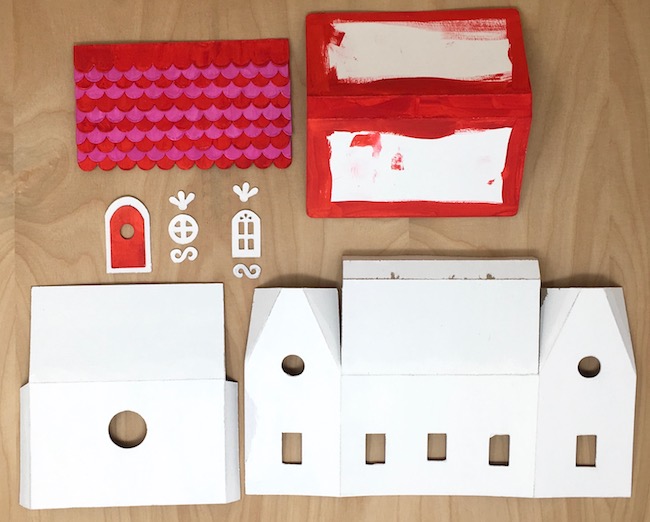
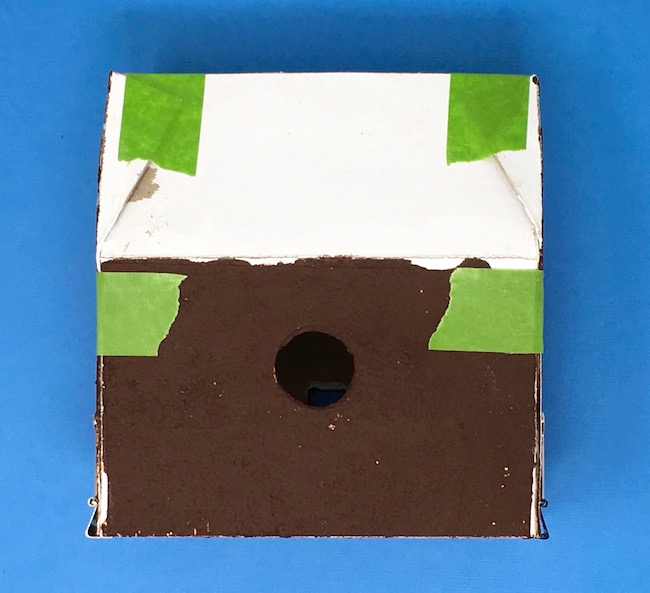
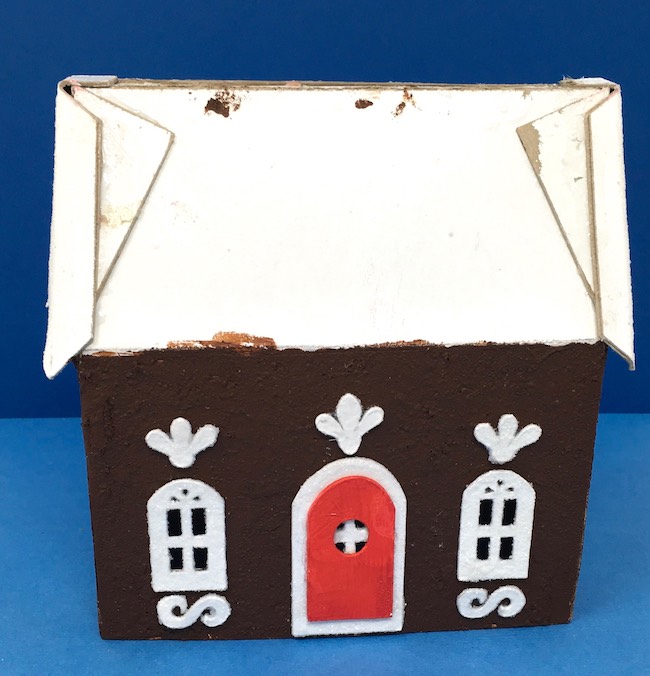
Prime the little house and all the components
Next, prime all the cardboard components. The gesso primer helps paint to adhere better. The cardboard they save for me at work has a white shiny side and needs primer or the paint does stick well.
Make Gingerbread Paint
Oh yes, this is fun and I am so excited to share it with you. I told you that I tried to make Gingerbread Paint last year, but it didn't work great. But I figured it out this year. So here is how to make the Gingerbread Paint:
- Squirt your paint into a small glass bowl. Mix the paints together using a flexible palette knife. I chose Burnt Umber and Burnt Sienna for this house. But I also made a lighter colored batch with some Naples yellow that looked good too.
- Add your strong smelling spices. The ones that worked the best are cinnamon and cloves, but since it's Gingerbread Paint I felt obligated to add ginger. The scent is not nearly as noticeable as the cinnamon and cloves though.
- For the batch that covered this gingerbread house, I roughly added about 2 teaspoons of cinnamon, ½ teaspoon of cloves, and 1 teaspoon of ginger. Just add enough so you like the scent and it's spreadable.
- My batch was very thick so I used a palette knife to spread it on the surface of the house. But the second batch I made spread fairly easily with a stiff paintbrush. It didn't have as much spice in it so the aroma was not as strong.
- Just play around with the proportions until you find something you like. And if you're not happy with a batch you make, cut out some cardboard gingerbread people and paint them for practice.
Here's the brief video that shows you how to make Gingerbread Paint:
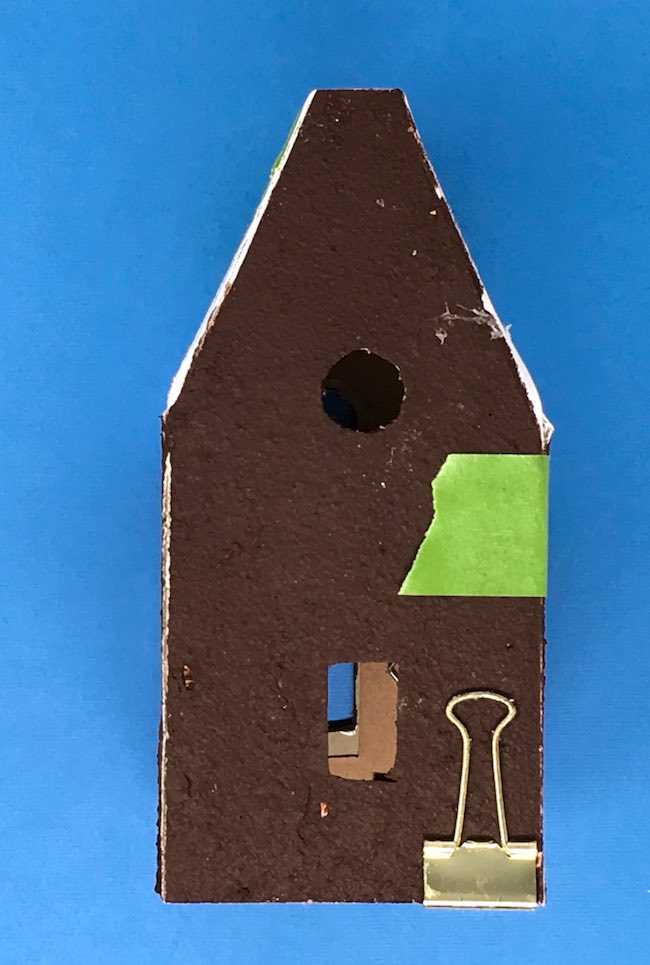
Paint the little cardboard house with Gingerbread Paint
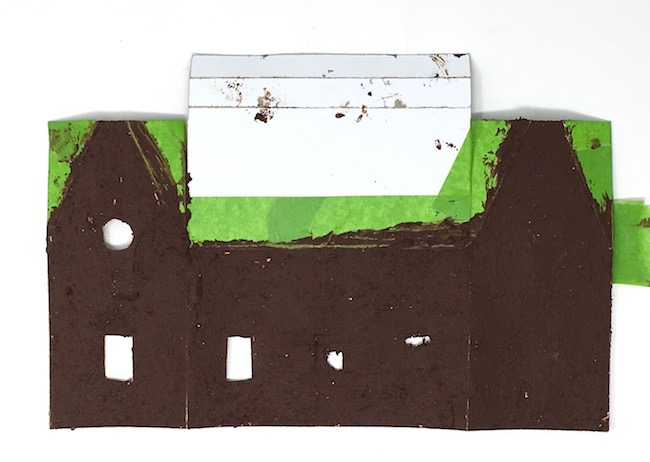
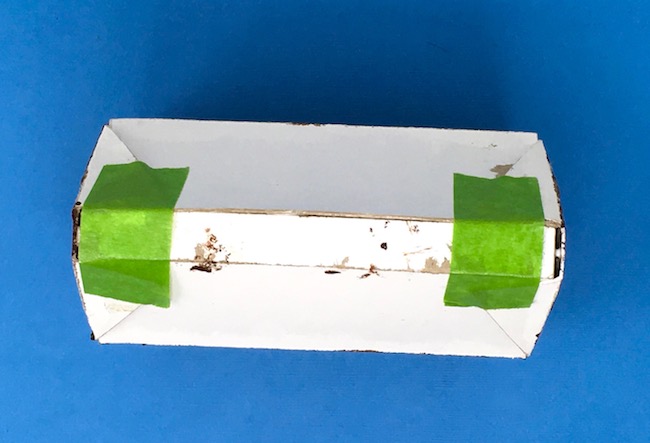
Before you actually put the paint on your little paper house, mask off the areas where you DON'T want the paint to go with painters tape.. What I am talking about is the glue tabs and the roof pieces. I also covered the windows and the hole for the door with masking tape because when you spread a paint this thick it oozes through the holes and makes a big blob on the back of the piece.
You can see where I have masked the roof flap[ and the roof tabs to prevent the gingerbread paint from sticking there. I already removed the tape from the back of the windows and door.
So I experimented on how to do this and finally determined that a palette knife worked best with the very thick Gingerbread Paint that I made. Your paint may be thinner and easier to spread with a paint brush.
Now apply the paint with a flexible palette knife. Try not to scrape the tip along the paint because that makes funky line and actually removes paint. Keep the palette knife relatively flat.
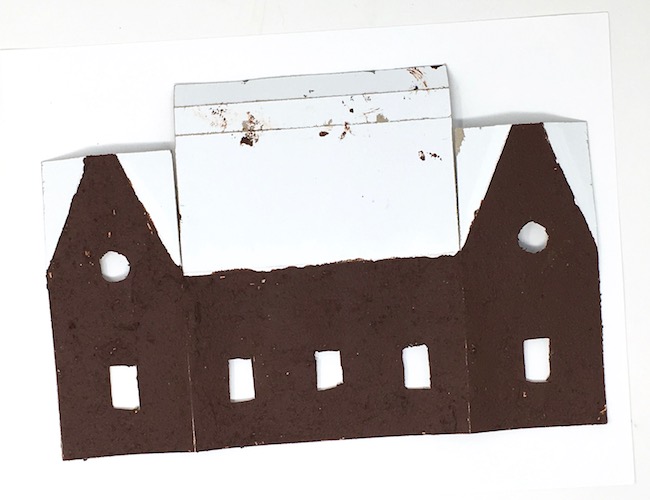
Let the paint dry thoroughly. My paint took awhile because it was so thick. After that cut the excess paint from the window and door spaces.
Later, do some touch-ups on the paint.
Decorate the door and windows and embellishments
While the paint is drying, it's a good time to decorate the windows, the door, and the decorative elements. I just chose to apply Mod Podge then a layer of glitter over the white primer. One of these days I am going to use one of my icing bags and try to apply texture paste as icing, but I haven't played around with that yet.
Glue the house together
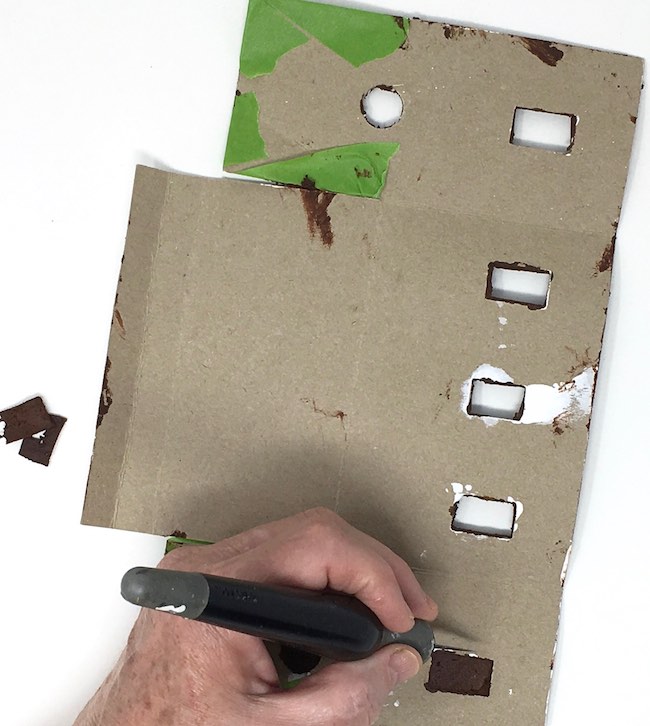
One thing I did on this house was glue support pieces to the back of the gingerbread house because the cardboard got a little wavy from the thick gingerbread paint.
To do that I just cut out an extra set of cardboard for the main body of the house, trimmed the sides down and enlarged the windows holes a little bit. That allows you more space to fold the house and line things up a little easier, but it still gives the house good support.
In addition, this is a good time to touch up the gingerbread paint. When you glue the house together the corners open up and cardboard shows on the edges so you need some touch up paint.
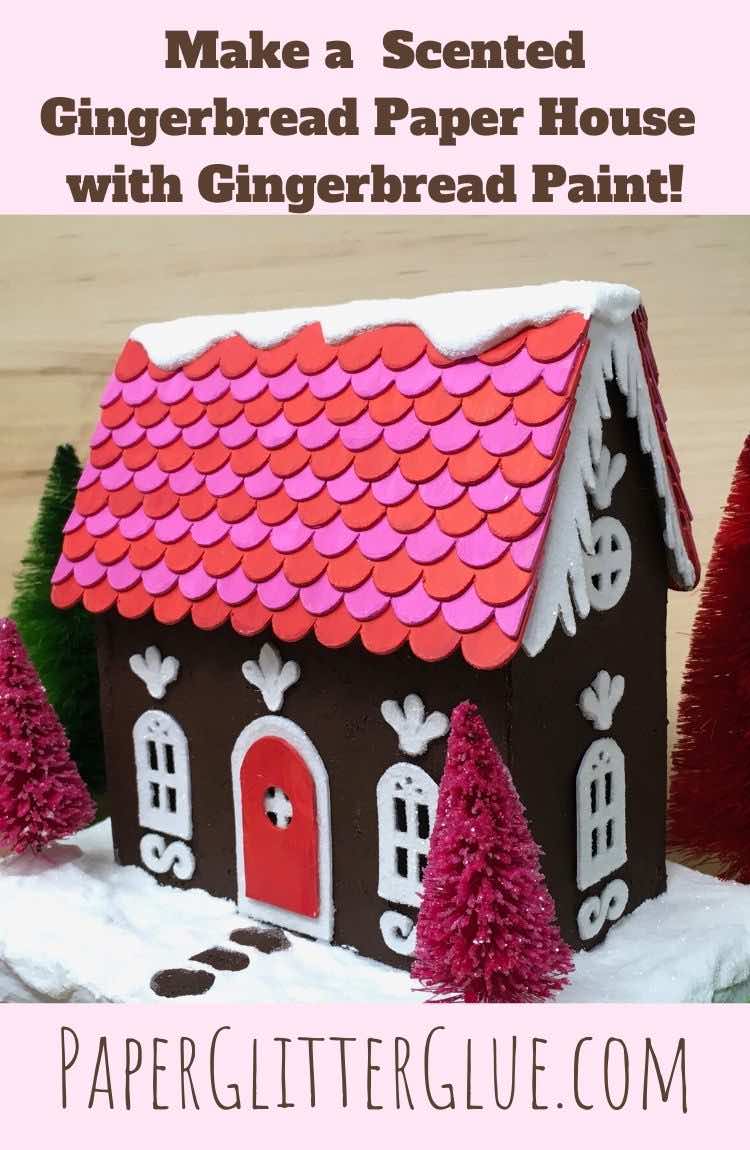
This is a different kind of roofline. It has a flat section on top that you kind of tuck in like an envelope. It makes for a very sturdy house.
Often I glue on the door and window pieces before I glue the house together, but I wanted to make sure this house went together well before I did that.
Next glue on the embellishments
Now glue on the embellishments. These windows are larger than most of the windows I use so there was a good gluing surface. I used my favorite glue - the Fast Grab stuff- because it's a more difficult to glue to a textured paint like this so you need something with a lot of holding power. .
Adhere the roof to the house
In order to get the icicles in the right place, it is important to glue the roof on the house at this stage. The icicles fit on top and on the edge of the roof piece. Truthfully though, I forgot and had to glue them on underneath which was a pain and didn't work very well.
You may wonder why the roof has this little flat section on top. I designed it that way so you could glue some candy pieces or a Santa and sleigh on top. Or just heap up mounds of snow that's what I did.
Glue the icicles on the edge of the roof
Next glue the icicles (already painted and glittered) to the edge of the roof.
Add shingles to the roof
And now you glue the shingles to the roof. There are 2 different shingles designed so that they stagger perfectly (well, as perfectly as I can manage). You don't have to trim them or anything. I chose to paint the ones with the complete semicircle on each end one color and the other set a lighter color. What do you think of that effect?
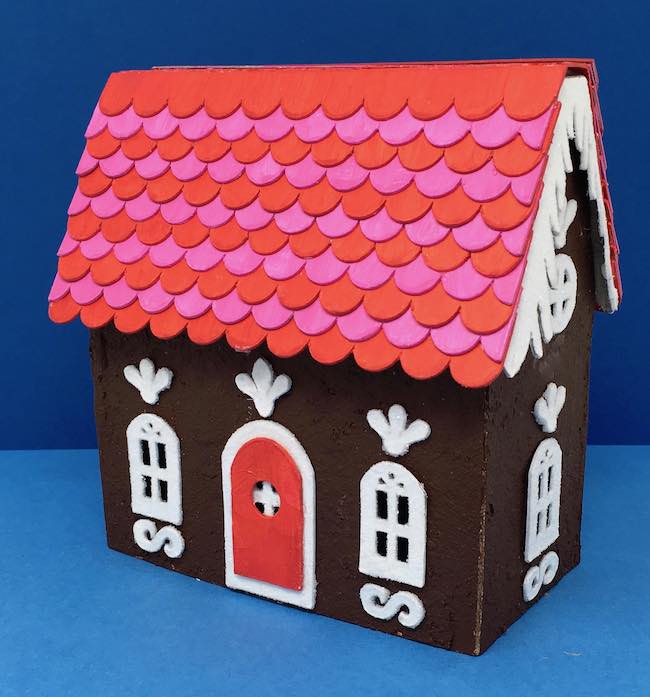
For this roof, I used 22 shingle strips. You might use fewer if you spread the shingles out more, but I like to see how the semicircles intersect so I put them close together.
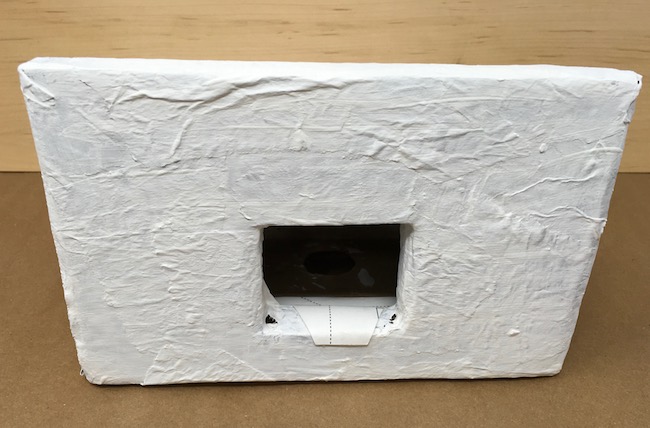
Make the cardboard base
Just like the house structure, the base is very simple. It's just 3 layers of corrugated cardboard hot glued together, covered with brown packing paper and painted with gesso. And there's a hole in the middle for the LED tea light. Here's my more detailed tutorial for the way I make cardboard bases.
Apply snow to the roof
Once all of the shingles are dry, apply snow to the roof. I like the snow to flow a little bit so I mix it with white paint so it is more fluid. And then I kind of gently paint it on the edge and push it a little bit over the edge. Once dry, I paint it with Mod Podge and sprinkle glitter on it.
Glue house to the cardboard base
After the house is sturdy and all the glitter is set, I glue it to the base. Because this house is pretty big and heavy, I added some flanges to make the gluing surface larger. I just cut some card stock, folded it, and glued to the inside of the house. Let that dry. I also trimmed it a bit so some of the card stock would fit in the light hole and adhere to the base even better. Probably the photos explain this better than I can.
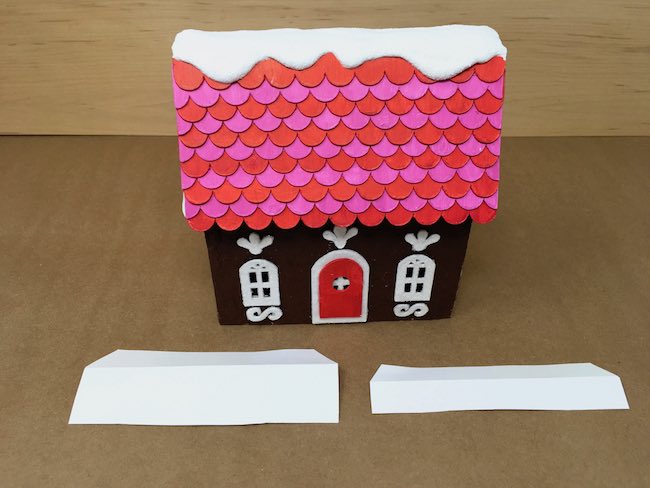
Here are the card stock flaps glued in place.
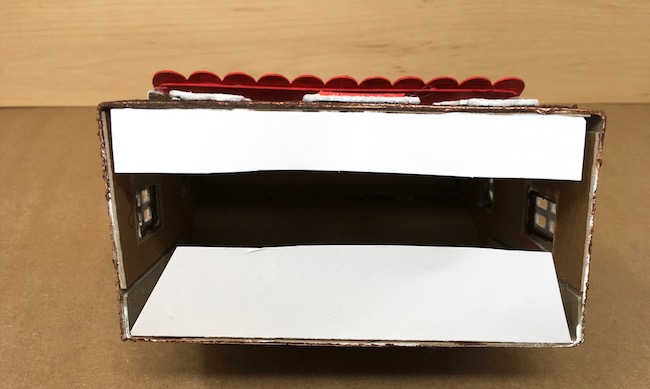
You can see a bit of one of the flaps glued to the base. It basically gives you extra surface area for gluing.
Use a thick, strong glue for this step.
Glitter the bottlebrush trees
I find it easier to glitter the bottlebrush trees if I apply Mod Podge and glitter before I add them to the landscape. These little trees are from Tim Holtz' Woodland tree lot set. And the glitter is his Distress Clear Rock Candy glitter which is not made of plastic so it is not electrostatic like plastic-based glitter. It doesn't attach to everything like that kind of glitter does.
Apply snow all around the little Gingerbread Paper House
When the house is very securely glued to the base, apply snow all around your little Gingerbread house. Apply it just like you did on the roof. Gently push the soft snow towards the house so you don't get snow blobs where you don't want snow blobs. While the snow is still soft, glue on the stepping stones and the sparkly trees. I still put a big blob of glue on the bottom of each piece so I am sure they will stick in the snow.
Then gently push a little snow around the base of the trees. Let dry.
Touch up the snow if needed
Apply more snow if it is a little thin or not to your liking. Let it dry again.
Paint snow with Mod Podge then apply glitter
Now paint the snow with Mod Podge and then apply glitter once again.
Enjoy your beautiful scented Gingerbread paper house

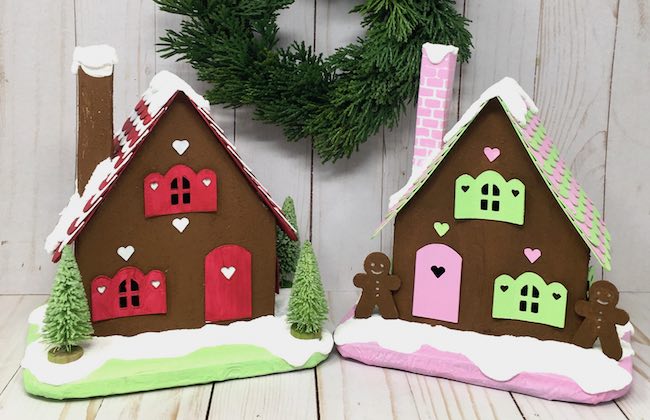
There are a lot of steps to make this Gingerbread Paper House, but so worth it I think. You can make many of the other designs in my library using the gingerbread paint. I'm going to experiment some more with it because it is such a lovely effect.
Here is another Gingerbread house I've made - the Gingerbread Cardboard Cottage. It's fun, too!
Do you have any questions? If so, I am happy to answer them. If you want a detailed response, it helps if you email me at [email protected]. You can also ask in the Paper Glitter Glue private Facebook group where there is a lot of inspiration from a bunch of very kind and creative people. Or you can leave a comment here as well.
Thank you for stopping by and I hope your day is happy and creative. And you are welcome to pin this to your favorite Pinterest board.
Lucy
Mel Duron
Lucy, l would like to enter the contests for Halloween house but , I’m not sure how to go about it . l just got this new iPhone and not real sure about how to navigate this phone yet. l would like to send the picture But not real sure . And to make sure that l have subscribed to your face book so l can send messages straightforward. Thank you if and let me know if l have all my ducks in a roll . And any help if l need it. Thanks again 🍁🍂🎃
Lucy
To enter the 2020 Halloween house contest, you have several options:
1. Email a photo of your entry to me at [email protected] and I will add it to the folder of entries and the Paper Glitter Glue Facebook group if I have your permission.
2. Post your photo in the Paper Glitter Glue Facebook group.
3. Post your photo in Instagram with the tag #2020minihalloweenhousecontest
Does that help?